首页 > 代码库 > VI zabbix
VI zabbix
VI zabbix
超大规模门户网站集群架构: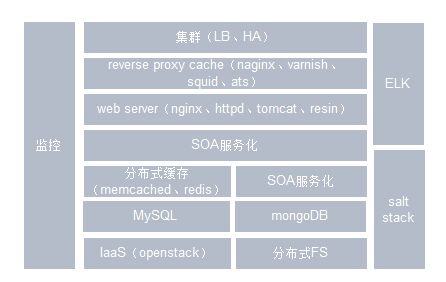
运维30%的时间都在监控,监控要多维度;
监控(单机监控(系统监控)、网络监控、应用监控、分布式监控);
业务监控(业务指标-->流量分析-->舆论监控):
流量分析:
SEO(search engine optimization,指通过站内优化(比如网站结构调整、网站内容建设、网站代码优化等)以及站外优化(比如网站站外推广、网站品牌建设等)使网站满足搜索引擎收录排名需求,在搜索引擎中提高关键词排名,从而吸引精准用户进入网站,获得免费流量,产生直接销售或品牌推广;严谨的定义如下:SEO是指在了解搜索引擎自然排名机制的基础之上,对网站进行内部及外部的调整优化,改进网站在搜索引擎中关键词的自然排名,获得更多的展现量,吸引更多目标客户点击访问网站,从而达到网络营销及品牌建设的目标;搜索引擎检索原则是不断更改的,检索原则的更改会直接导致网站关键字在搜索引擎上排名的变化,所以搜索引擎优化并非一劳永逸);
PR(PR值全称为PageRank,网页的级别技术,用来表现网页等级的一个标准,是Google用于评测一个网页“重要性”的一种方法,取自Google创始人Larry Page,它是Google排名运算法则(排名公式)的一部分,用来标识网页的等级/重要性,级别从0到10级,10级为满分,PR值越高说明该网页越受欢迎(越重要);例如:一个PR值为1的网站表明这个网站不太具有流行度,而PR值为7到10则表明这个网站非常受欢迎,或者说极其重要);
PV(page view即页面浏览量,通常是衡量一个网络新闻频道或网站甚至一条网络新闻的主要指标,网页浏览数是评价网站流量最常用的指标之一,监测网站PV的变化趋势和分析其变化原因是很多站长定期要做的工作,Page Views中的Page一般是指普通的html网页,也包含php、jsp等动态产生的html内容,来自浏览器的一次html内容请求会被看作一个PV,逐渐累计成为PV总数;用户每1次对网站中的每个网页访问均被记录1次,用户对同一页面的多次访问,访问量累计);
IP(独立IP,是指独立用户/独立访客,指访问某个站点或点击某条新闻的不同IP地址的人数,在同一天的00:00-24:00内,独立IP只记录第一次进入网站的具有独立IP的访问者,假如一台电脑关机了,30分钟后重启,再次访问这个站那就再计算一次ip,在同一天内再次访问该网站则不计数,独立IP访问者提供了一定时间内不同观众数量的统计指标,而没有反应出网站的全面活动,比如你是ADSL拨号上网的,你拨一次号都自动分配一个ip,这样你进入了本站,那就算一个ip,当你断线了而没清理cookie,之后又拨了一次号,又自动分配到一个ip,你再进来了本站,那么又统计到一个ip,但是UV(独立访客)没有变,因为2次都是你进入了本站);
UV(unique visitor,是指通过互联网访问、浏览这个网页的自然人,网站独立访客);
注:piwik.org(做统计分析,可定制、可开发、可架构;piwik is the leading open-source analytics platform that gives youmore than just powerful analytics:free open-source software;100% data ownership;user privacy protection;user-centric insights;customisable andextensible)
网络监控:
监控宝(http://www.jiankongbao.com/);
smokeping(rrdtool作者写的,支持分布式,是一款用于网络性能监测的监控软件,通过它可以在自己公司IDC的网络状况,如延时,丢包率,是否BGP多线等,通过rrdtool制图方式,图形化地展示网络的时延情况,进而能够清楚的判断出网络的即时通信情况)
应用监控(httpd、nginx、memcached、redis):
httpd状态监控:
[root@client ~]# rpm -qa httpd
httpd-2.2.15-54.el6.centos.x86_64
[root@client ~]# vim /etc/httpd/conf/httpd.conf
LoadModule status_module modules/mod_status.so
LoadModule info_module modules/mod_info.so
ExtendedStatus On
<Location /server-status>
SetHandler server-status
Order deny,allow
Deny from all
Allow from 10.96.20.89
</Location>
<Location /server-info>
SetHandler server-info
Order deny,allow
Deny from all
Allow from 10.96.20.89
</Location>
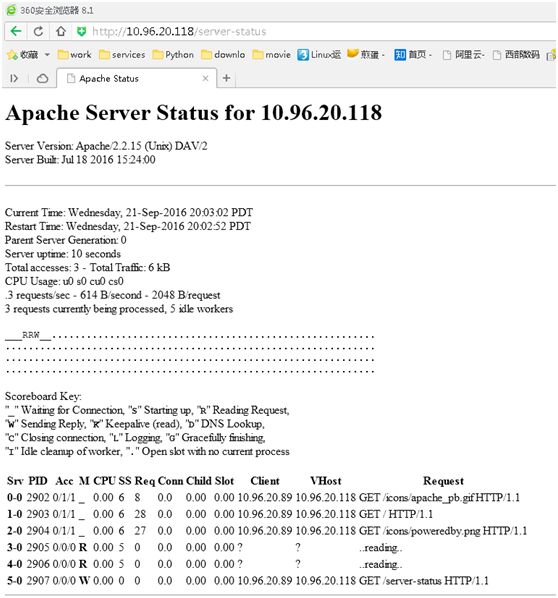
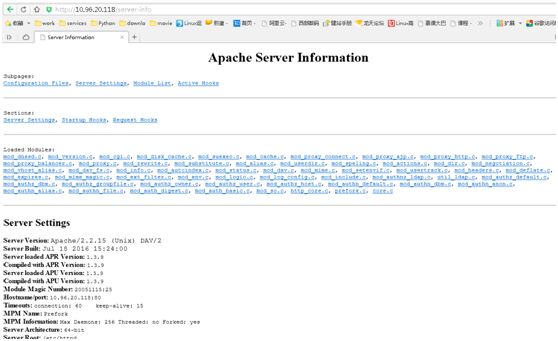
测试:http://10.96.20.118/server-status
nginx状态监控:
[root@server1 ~]# vim /etc/nginx/nginx.conf
http {
……
server {
……
location /nginx-status {
stub_status on;
access_log off;
allow 10.96.20.89;
deny all;
}
}
测试:http://10.96.20.113/nginx-status
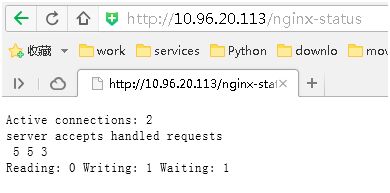
active connections #(当前nginx正处理的活动连接数)
server accepts handled requests #(总共处理了$1个连接;成功创建$2次握手(证明中间没有失败的);总共处理了$3个请求)
reading #(nginx当读取到client的header信息数)
writing #(nginx当前返回给client的header信息数)
waiting #(开启keepalive的情况下,这个值=active-(reading+writing),为nginx已经处理完正在等候下一次请求指令的驻留连接)
注:生产中要开长连接keppalive,否则连接数过多会有很多TIME_WAIT;nginx用作LB,upstream要作keepalive,默认不开启;nginx与backend server要作keepalive;app server(php的pdo)要与MySQL server要作keepalive;php和redis之间要作keepalive;php与memcached之间要作keepalive,还要有压缩功能;
redis状态监控:
#redis-cli info [server|clients|memory|persistence|stats|replication|cpu|cluster|keyspace]
[root@server1 ~]# redis-cli info
# Server
redis_version:3.0.7
redis_git_sha1:00000000
redis_git_dirty:0
redis_build_id:a54b0b3a63c1c32b
redis_mode:standalone
os:Linux 2.6.32-431.el6.x86_64 x86_64
arch_bits:64
multiplexing_api:epoll
gcc_version:4.4.7
process_id:2806
run_id:e9ce8a9e21c8ba87b46fd1d75d8078f26745ca3e
tcp_port:6379
uptime_in_seconds:19
uptime_in_days:0
hz:10
lru_clock:14918416
config_file:/etc/redis.conf
# Clients
connected_clients:1
client_longest_output_list:0
client_biggest_input_buf:0
blocked_clients:0
# Memory
used_memory:879256
used_memory_human:858.65K
used_memory_rss:2441216
used_memory_peak:879256
used_memory_peak_human:858.65K
used_memory_lua:36864
mem_fragmentation_ratio:2.78
mem_allocator:jemalloc-3.6.0
# Persistence
loading:0
rdb_changes_since_last_save:15003
rdb_bgsave_in_progress:0
rdb_last_save_time:1474536189
rdb_last_bgsave_status:ok
rdb_last_bgsave_time_sec:-1
rdb_current_bgsave_time_sec:-1
aof_enabled:1
aof_rewrite_in_progress:0
aof_rewrite_scheduled:0
aof_last_rewrite_time_sec:-1
aof_current_rewrite_time_sec:-1
aof_last_bgrewrite_status:ok
aof_last_write_status:ok
aof_current_size:519180
aof_base_size:519180
aof_pending_rewrite:0
aof_buffer_length:0
aof_rewrite_buffer_length:0
aof_pending_bio_fsync:0
aof_delayed_fsync:0
# Stats
total_connections_received:1
total_commands_processed:0
instantaneous_ops_per_sec:0
total_net_input_bytes:14
total_net_output_bytes:0
instantaneous_input_kbps:0.00
instantaneous_output_kbps:0.00
rejected_connections:0
sync_full:0
sync_partial_ok:0
sync_partial_err:0
expired_keys:0
evicted_keys:0
keyspace_hits:0
keyspace_misses:0
pubsub_channels:0
pubsub_patterns:0
latest_fork_usec:0
migrate_cached_sockets:0
# Replication
role:master
connected_slaves:0
master_repl_offset:0
repl_backlog_active:0
repl_backlog_size:1048576
repl_backlog_first_byte_offset:0
repl_backlog_histlen:0
# CPU
used_cpu_sys:0.03
used_cpu_user:0.00
used_cpu_sys_children:0.00
used_cpu_user_children:0.00
# Cluster
cluster_enabled:0
# Keyspace
db0:keys=4,expires=0,avg_ttl=0
[root@server1 ~]# redis-cli info stats
# Stats
total_connections_received:3
total_commands_processed:1
instantaneous_ops_per_sec:0
total_net_input_bytes:54
total_net_output_bytes:2142
instantaneous_input_kbps:0.00
instantaneous_output_kbps:0.00
rejected_connections:0
sync_full:0
sync_partial_ok:0
sync_partial_err:0
expired_keys:0
evicted_keys:0
keyspace_hits:0
keyspace_misses:0
pubsub_channels:0
pubsub_patterns:0
latest_fork_usec:0
migrate_cached_sockets:0
memcached状态监控:
[root@server1 ~]# memcached -m 64 -n 48 -f 1.1 -vv -u nobody -d
[root@server1 ~]# netstat -tnulp | grep:11211
tcp 0 0 0.0.0.0:11211 0.0.0.0:* LISTEN 9983/memcached
tcp 0 0 :::11211 :::* LISTEN 9983/memcached
udp 0 0 0.0.0.0:11211 0.0.0.0:* 9983/memcached
udp 0 0 :::11211 :::* 9983/memcached
[root@server1 ~]# telnet 10.96.20.113 11211
Trying 10.96.20.113...
<36 new auto-negotiating client connection
Connected to 10.96.20.113.
Escape character is ‘^]‘.
stats
36: Client using the ascii protocol
<36 stats
STAT pid 9983
STAT uptime 212
STAT time 1474537274
STAT version 1.4.25
STAT libevent 2.0.22-stable
STAT pointer_size 64
STAT rusage_user 0.003999
STAT rusage_system 0.003999
STAT curr_connections 10
STAT total_connections 11
STAT connection_structures 11
STAT reserved_fds 20
STAT cmd_get 0
STAT cmd_set 0
STAT cmd_flush 0
STAT cmd_touch 0
STAT get_hits 0
STAT get_misses 0
STAT delete_misses 0
STAT delete_hits 0
STAT incr_misses 0
STAT incr_hits 0
STAT decr_misses 0
STAT decr_hits 0
STAT cas_misses 0
STAT cas_hits 0
STAT cas_badval 0
STAT touch_hits 0
STAT touch_misses 0
STAT auth_cmds 0
STAT auth_errors 0
STAT bytes_read 7
STAT bytes_written 0
STAT limit_maxbytes 67108864
STAT accepting_conns 1
STAT listen_disabled_num 0
STAT time_in_listen_disabled_us 0
STAT threads 4
STAT conn_yields 0
STAT hash_power_level 16
STAT hash_bytes 524288
STAT hash_is_expanding 0
STAT malloc_fails 0
STAT bytes 0
STAT curr_items 0
STAT total_items 0
STAT expired_unfetched 0
STAT evicted_unfetched 0
STAT evictions 0
STAT reclaimed 0
STAT crawler_reclaimed 0
STAT crawler_items_checked 0
STAT lrutail_reflocked 0
END
^]
telnet> quit
Connection closed.
<36 connection closed.
[root@server1 ~]#
单机监控:
IPMI是智能型平台管理接口(Intelligent Platform Management Interface),是管理基于 Intel结构的企业系统中所使用的外围设备采用的一种工业标准,该标准由英特尔、惠普、NEC、美国戴尔电脑和SuperMicro等公司制定,用户可以利用IPMI监视服务器的物理健康特征,如温度、电压、风扇工作状态、电源状态等,而且更为重要的是IPMI是一个开放的免费标准;自1998年,IPMI论坛创建了IPMI标准以来,其已经得到了170 多家供应商的支持,这使得其逐渐成为了一个完整地包括服务器和其他系统(如存储设备、网络和通信设备)的硬件管理规范,目前该标准最新版本为IPMI 2.0,该版本在原有基础上有了不少的改进,包括可以通过串口、Modem以及Lan等远程环境管理服务器系统(包括远程开关机),以及在安全、VLAN 和刀片支持等方面的提高;IPMI针对大量监控、控制和自动回复服务器的作业,提供了智能型的管理方式,此标准适用于不同的服务器拓扑学,以及Windows、Linux、 Solaris、Mac或是混合型的操作系统,此外,由于IPMI可在不同的属性值下运作,即使服务器本身的运作不正常,或是由于任何原因而无法提供服务,IPMI仍可正常运作;
[root@test1 ~]# yum -y install OpenIPMI
根据服务类型确定监控指标;确定性能基准线;
cpu、memory、io(disk io;network io):
cpu:
cpu scheduler;
cs(context switch,cs的数目直接关系到cpu的利用率,如果cpu利用率保持在一定的均衡状态,大量的cs是正常的);
run queues运行队列(每个processor运行队列不超过过1-3个线程,一个双处理器runqueues不要超过6个线程);
cpu utilization(如果一个cpu被充分使用,利用率分类之间均衡的比例应该是:65%-70%user space、30%-35%kernel space、0%-5%idle time);
注:GSLB ,Global Server Load Balance,全局负载均衡,作用:实现在广域网(包括互联网)上不同地域的服务器间的流量调配,保证使用最佳的服务器服务离自己最近的客户,从而确保访问质量;分类(基于DNS实现、基于重定向实现、基于路由协议实现);特点(能通过判断服务器的负载,包括CPU占用、带宽占用等数据,决定服务器的可用性,同时能判断用户(访问者)与服务器间的链路状况,选择链路状况最好的服务器,因此GSLB是对服务器和链路进行综合判断来决定由哪个地点的服务器来提供服务,实现异地服务器群服务质量的保证;使用范围(有有多个站点的系统,最常见的是在CDN系统中作为核心的流量调度系统);
电商架构:
browser(browser对单个域名的内容下载是有限制的,用多域名解决;browser有三种缓存协商方法:最后修改时间If-Modified-Since和Last-Modified、etag、过期时间;优化browser缓存;减少http请求数(合并css、合并js、图片用背景偏移技术、前端用懒加载(yahoo的懒加载12条军规)));
CDN(动态域名解析,智能DNS,反向代理缓存squid|varnish|GSLB);
两LVS间高可用,其后用三个haproxy;
LB(组件分离,如static.example.com、pic.example.com、js.example.com;job用于访问后端动态内容生成静态页面;nginx(openfile、sendfile、keepalive、gzip),nginx+tomcat|php(连接频率;lua+xss+sql注入+ua限制+频率限制));
静态页面主备server间用rsync同步;
共享存储(NFS|GlusterFS|MooseFS);
内部LB(SOA;user、price、运费、购物车、规则);
ELK搜索;
JS(智能推荐,js+hadoop+mapreduce+mahout+MySQL);
mail(触发式邮件、智能营销类邮件);
SMS(触发类、营销类;亿美软通);
分布式缓存(memcached|redis);
MQ(rabbitMQ|ActiveMQ);
DAL+MySQL|MongoDB|hadoop;
[root@test1 ~]# which ethtool
/sbin/ethtool
[root@test1 ~]# ethtool eth0
Settings for eth0:
Supportedports: [ TP ]
Supportedlink modes: 10baseT/Half 10baseT/Full
100baseT/Half100baseT/Full
1000baseT/Full
Supportedpause frame use: No
Supportsauto-negotiation: Yes
Advertisedlink modes: 10baseT/Half 10baseT/Full
100baseT/Half100baseT/Full
1000baseT/Full
Advertisedpause frame use: No
Advertisedauto-negotiation: Yes
Speed:1000Mb/s
Duplex:Full
Port:Twisted Pair
PHYAD:0
Transceiver:internal
Auto-negotiation:on
MDI-X:Unknown
SupportsWake-on: d
Wake-on:d
Currentmessage level: 0x00000007 (7)
drv probe link
Linkdetected: yes
[root@test1 ~]# yum -y install iftop #(display bandwidthusage on an interface by host,查看网络流量,在client与server之间交互的流量)
[root@test1 ~]# which iftop
/usr/sbin/iftop
[root@test1 ~]# iftop -n
tcp状态11种(重点LISTEN、ESTABLISHED、TIME_WAIT、CLOSE_WAIT):
[root@test1 ~]# netstat-ant | awk ‘/^tcp/{STATE[$NF]++}END{for (KEY in STATE) print KEY,STATE[KEY]}‘
ESTABLISHED 5
LISTEN 16
[root@test1 ~]# which ss #(another utility toinvestigate sockets)
/usr/sbin/ss
[root@test1 ~]# ss -ant | awk ‘NR>1{STATE[$1]++}END{for (KEY in STATE) print KEY,STATE[KEY]}‘
ESTAB 5
LISTEN 16
nmon,帮助在一个屏幕上显示所有重要的性能优化信息,并动态地对其进行更新;分析 AIX 和 Linux 性能的免费工具,这个高效的工具可以工作于任何哑屏幕、telnet 会话、甚至拨号线路,另外它并不会消耗大量的 CPU 周期,通常低于百分之二,在更新的计算机上,其CPU使用率将低于百分之一;使用哑屏幕,在屏幕上对数据进行显示,并且每隔两秒钟对其进行更新,然而,您可以很容易地将这个时间间隔更改为更长或更短的时间段,如果您拉伸窗口,并在X Windows、VNC、PuTTY 或类似的窗口中显示这些数据,nmon 工具可以同时输出大量的信息;nmon 工具还可以将相同的数据捕获到一个文本文件,便于以后对报告进行分析和绘制图形,输出文件采用电子表格的格式.csv;
http://nmon.sourceforge.net/pmwiki.php?n=Site.Download
[root@test1 ~]# chmod 755 nmon16e_x86_rhel65
[root@test1 ~]#./nmon16e_x86_rhel65 --help
./nmon16e_x86_rhel65: invalid option -- ‘-‘
Hint for nmon16e_x86_rhel65 version 16e
FullHelp Info : nmon16e_x86_rhel65 -h
On-screenStats: nmon16e_x86_rhel65
DataCollection: nmon16e_x86_rhel65 -f [-s <seconds>] [-c <count>][-t|-T]
CapacityPlan : nmon16e_x86_rhel65 -x
Interactive-Mode:
Readthe Welcome screen & at any time type: "h" for more help
Type"q" to exit nmon
For Data-Collect-Mode
-f Must be the first option on theline (switches off interactive mode)
Saves data to a CSV Spreadsheetformat .nmon file in then local directory
Note: -f sets a defaults -s300-c288 which you can then modify
FurtherData Collection Options:
-s<seconds> time between datasnapshots
-c<count> of snapshots beforeexiting
-t Includes Top Processes stats (-Talso collects command arguments)
-x Capacity Planning=15 min snapshotsfor 1 day. (nmon -ft -s 900 -c 96)
---- End of Hints
[root@test1 ~]# ./nmon16e_x86_rhel65

按m

[root@test1 ~]# yum -y install screen #(screen manager with VT100/ANSI terminal emulation)
具体使用(在编译内核或执行脚本时,在需要很长时间的情况下,用来防止终端意外终止导致内核编译中断或执行的脚本自动停止):
[root@test1 ~]# screen #(会自动跳至一个全新的窗口)
[root@test1 ~]# ./test.sh #(在新生成的窗口中执行脚本或编译内核,然后直接ctrl+a,d退出到上一个窗口里)
[root@test1 ~]# screen-list #(使用-list或-ls,查看当前开了几个窗口;若要恢复某个使用-r)
There is a screen on:
30483pxs-0.test1 (Detached)
1 Socket in /var/run/screen/S-root.
[root@test1 ~]# screen -r 22862 #(恢复22862,刚执行脚本的那个窗口)
[root@test1 ~]# pstree #(查出当前在哪个bash下,若不用哪一个bash直接ctrl+d)
……
├─screen───bash───pstree
├─sshd───sshd───bash───screen
#top
#vmstat 1 10
#mpstat 1 10
[root@test1 ~]# free -m
total used free shared buffers cached
Mem: 474 437 37 0 12 63
-/+ buffers/cache: 361 113
Swap: 1983 344 1639
[root@test1 ~]# sync
[root@test1 ~]# echo 1 > /proc/sys/vm/drop_caches #(to free pagecache)
[root@test1 ~]# echo 2 > /proc/sys/vm/drop_caches #(to free dentries and inodes)
[root@test1 ~]# echo 3 > /proc/sys/vm/drop_caches #(to free pagecache、dentries、inodes)
[root@test1 ~]# free -m
total used free shared buffers cached
Mem: 474 368 105 0 0 11
-/+ buffers/cache: 357 117
Swap: 1983 344 1639
[root@test1 ~]# yum -y install iotop
[root@test1 ~]# iotop
Total DISK READ: 0.00 B/s | Total DISKWRITE: 0.00 B/s
TID PRIO USER DISK READ DISK WRITE SWAPIN IO> COMMAND
2560be/4 root 0.00 B/s 0.00 B/s 0.00 % 0.00 % python2.6~-master-d
1be/4 root 0.00 B/s 0.00 B/s 0.00 % 0.00 % init
2be/4 root 0.00 B/s 0.00 B/s 0.00 % 0.00 % [kthreadd]
3rt/4 root 0.00 B/s 0.00 B/s 0.00 % 0.00 % [migration/0]
4be/4 root 0.00 B/s 0.00 B/s 0.00 % 0.00 % [ksoftirqd/0]
……
zabbix安装:
test1(192.168.23.129,server-sideand agent-side);
test2(192.168.23.130,agent-side);
[root@test1 ~]# uname -rm
2.6.32-431.el6.x86_64 x86_64
[root@test1 ~]# cat /etc/redhat-release
Red Hat Enterprise Linux Server release 6.5(Santiago)
[root@test1 ~]# ls /etc/yum.repos.d #(准备163的yum源)
CentOS6-Base-163.repo epel-testing.repo
epel-release-6-8.noarch.rpm rhel-source.repo.backup_20161102
epel.repo
test1:
[root@test1 ~]# yum -y install zabbix22-server zabbix22-web zabbix22-web-mysql zabbix22-dbfiles-mysql zabbix22-agent mysql-server mysql php php-devel php-mysql
[root@test1 ~]# service mysqld start
[root@test1 ~]# mysql
mysql> CREATE DATABASE zabbix CHARACTER SET utf-8; #(字符集要是utf8)
mysql> SHOW CREATE DATABASE zabbix;
+----------+-----------------------------------------------------------------+
| Database | Create Database |
+----------+-----------------------------------------------------------------+
| zabbix | CREATE DATABASE `zabbix` /*!40100 DEFAULT CHARACTER SET utf8 */ |
+----------+-----------------------------------------------------------------+
1 row in set (0.00 sec)
mysql> GRANT ALL ON zabbix.* TO ‘zabbix‘@‘192.168.23.129‘ IDENTIFIED BY ‘zabbix‘;
Query OK, 0 rows affected (0.00 sec)
[root@test1 ~]# cd /usr/share/zabbix-mysql/; ls #(schema.sql各种表结构;images.sql基本数据;data.sql自带模板;这三个DB脚本导入时有先后顺序,先schema.sql再images.sql最后data.sql)
data.sql images.sql schema.sql upgrades
[root@test1 zabbix-mysql]# mysql -u root -p zabbix < schema.sql #(默认密码为空)
Enter password:
[root@test1 zabbix-mysql]# mysql -u root -p zabbix < images.sql
Enter password:
[root@test1 zabbix-mysql]# mysql -u root -p zabbix < data.sql
Enter password:
[root@test1 zabbix-mysql]# mysql -e ‘USE zabbix;SHOW TABLES;‘
……
[root@test1 zabbix-mysql]# vim /etc/zabbix_server.conf
DBHost=192.168.23.129
DBPassword=zabbix
[root@test1 zabbix-mysql]# vim /etc/zabbix_agentd.conf #(更改/etc/zabbix_agentd.conf,/etc/zabbix_agent.conf是模板文件)
Server=192.168.23.129
[root@test1 zabbix-mysql]# grep ‘^[a-Z]‘ /etc/zabbix_server.conf
LogFile=/var/log/zabbixsrv/zabbix_server.log
LogFileSize=0
PidFile=/var/run/zabbixsrv/zabbix_server.pid
DBName=zabbix
DBUser=zabbix
DBHost=192.168.23.129
DBPassword=zabbix
DBSocket=/var/lib/mysql/mysql.sock
AlertScriptsPath=/var/lib/zabbixsrv/alertscripts
ExternalScripts=/var/lib/zabbixsrv/externalscripts
TmpDir=/var/lib/zabbixsrv/tmp
[root@test1 zabbix-mysql]# grep ‘^[a-Z]‘ /etc/zabbix_agentd.conf
PidFile=/var/run/zabbix/zabbix_agentd.pid
LogFile=/var/log/zabbix/zabbix_agentd.log
LogFileSize=0
Server=192.168.23.129
ServerActive=127.0.0.1
Hostname=Zabbix server
[root@test1 zabbix-mysql]# service zabbix-server start
Starting Zabbix server: [ OK ]
[root@test1 zabbix-mysql]# service zabbix-agentd start
Starting Zabbix agent: [ OK ]
[root@test1 zabbix-mysql]# ps aux | grep zabbix
……
[root@test1 zabbix-mysql]# netstat -tnulp | grep zabbix
tcp 0 0 0.0.0.0:10050 0.0.0.0:* LISTEN 24172/zabbix_agentd
tcp 0 0 0.0.0.0:10051 0.0.0.0:* LISTEN 24202/zabbix_server
tcp 0 0 :::10050 :::* LISTEN 24172/zabbix_agentd
tcp 0 0 :::10051 :::* LISTEN 24202/zabbix_server
[root@test1 zabbix-mysql]# ls /etc/httpd/conf.d #(查看有zabbix.conf)
mod_dnssd.conf php.conf README welcome.conf zabbix.conf
[root@test1 zabbix-mysql]# service httpd start
Starting httpd: httpd: Could not reliablydetermine the server‘s fully qualified domain name, using 192.168.23.129 forServerName
[ OK ]
test2:
[root@test2 ~]# yum -y install zabbix22-agent
[root@test2 ~]# vim /etc/zabbix_agentd.conf
Server=192.168.23.129
[root@test2 ~]# service zabbix-agentd start
Starting Zabbix agent: [ OK ]
[root@test2 ~]# netstat -tnulp | grep zabbix
tcp 0 0 0.0.0.0:10050 0.0.0.0:* LISTEN 95294/zabbix_agentd
tcp 0 0 :::10050 :::* LISTEN 95294/zabbix_agentd
访问http://192.168.23.129/zabbix

点Next
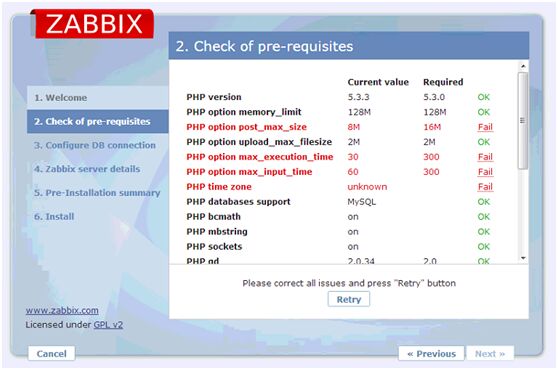
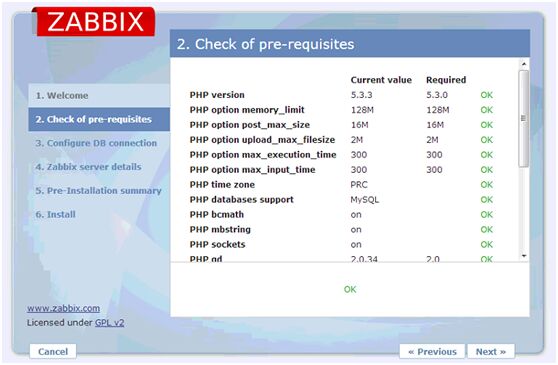
[root@test1 zabbix-mysql]# vim /etc/php.ini #(此处,改跳红的部分;PRC,people‘srepublic of china)
[PHP]
post_max_size = 16M
max_execution_time = 300
max_input_time = 300
[Date]
date.timezone = RPC
[root@test1 zabbix-mysql]# service httpd restart
Stopping httpd: [ OK ]
Starting httpd: httpd: Could not reliablydetermine the server‘s fully qualified domain name, using 192.168.23.129 forServerName
[ OK ]
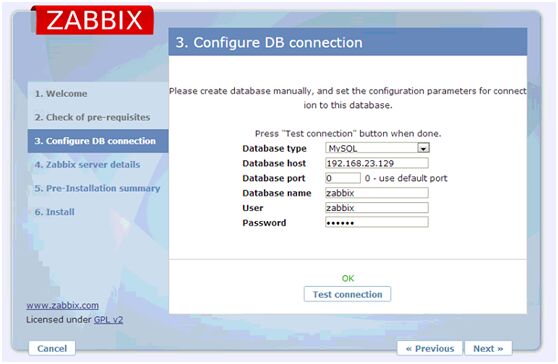
Database host(192.168.23.129)
Database port(0表示默认,即3306)
User(zabbix)
Password(zabbix)
点Test connection-->Next
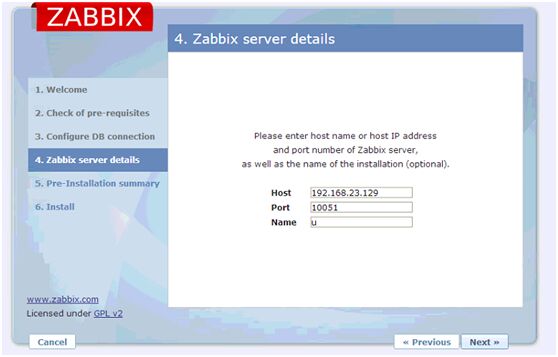
Host(192.168.23.129)
Port(10051)
Name(u)
点Next
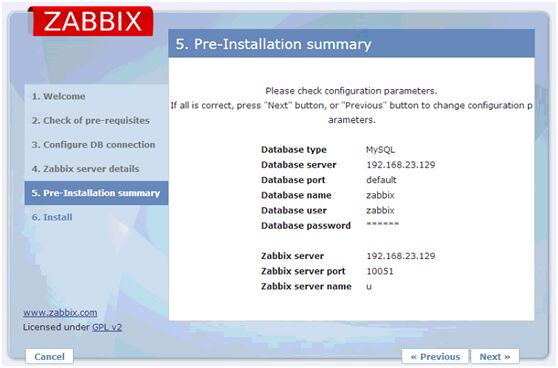
点Next
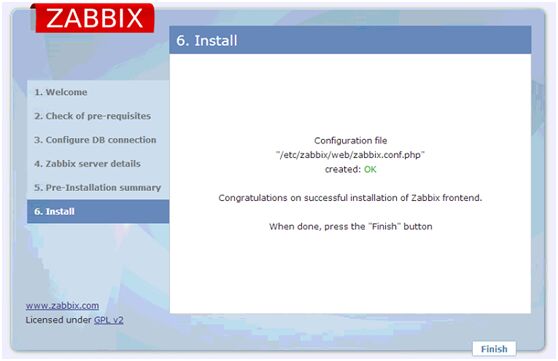
点Finish
[root@test1 zabbix-mysql]# ll /etc/zabbix/web/zabbix.conf.php
-rw-r--r--. 1 apache apache 427 Nov 5 20:42 /etc/zabbix/web/zabbix.conf.php

Username(Admin)
Password(zabbix)
若切至中文有乱码,解决办法:
1、查看/etc/httpd/conf.d/zabbix.conf得知zabbix网页目录为/usr/share/zabbix/;
2、查看/usr/share/zabbix/include/defines.inc.php得知字体目录位置:
define(‘ZBX_FONTPATH‘, ‘/usr/share/fonts/dejavu‘);// where to search for font (GD > 2.0.18)
define(‘ZBX_GRAPH_FONT_NAME‘, ‘DejaVuSans‘); // font file name;
3、将win中的任意字体(控制面板-->字体,例如仿宋或华文雅黑)复制到/usr/share/fonts/dejavu/下并覆盖改名为DejaVuSans.ttf;
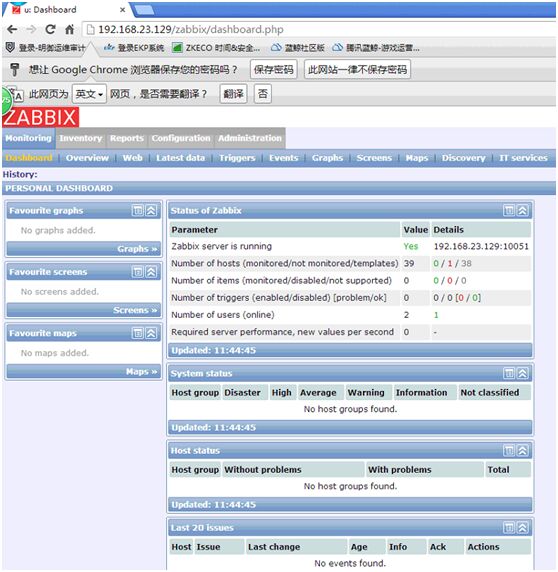
关闭guest用户,改Admin密码:
Administration-->Users-->选Guests,Disabled selected,Go(1),确定
Administration-->Users-->点Members列的Admin(Zabbix administrators),点Change password
注:下图,监控中、资产记录、报表、组态、管理;

Administration仅super admin才能看到,标签有:
一般;
分布管理;
认证(internal、ldap、http);
用户(重要,权限是根据用户组设的,生产中不同的部门为不同的用户组);
示警媒介类型(默认三种email、jabber、sms,若用email本地要启动相关的服务还要认证,通常使用自定义脚本);
脚本;
审计(谁干了什么事);
队列;
警报;
安装;
右上角Profile,可改language、theme
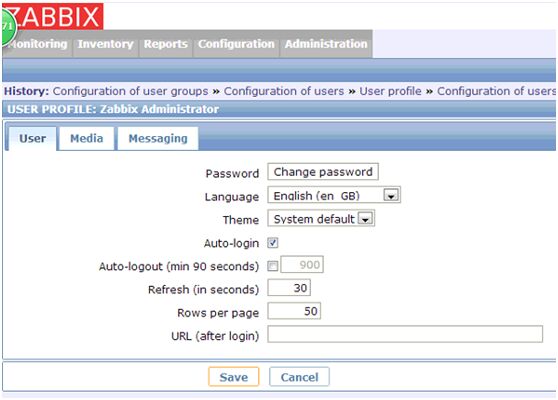
注:不允许监控项中的触发器是关闭状态,可先设为“维护模式”

组态中,标签有:
主机群组;
模板;
主机;
维修;
动作;
筛选;
简报片展示;
拓扑图;
搜索;
IT服务;
Configuration-->Hosts中,若Availability为红色的Z,点开其Name将IP改为192.168.23.129
添加主机:
Configuration-->Hosts,Createhost-->
Host name(test2)
Visable name(test2)
New group(demo)
IP address(192.168.23.130)
Port(10050)
Status(Monitored)

点Host标签旁的Templates,在Link new templates中搜索linux,选Template OS Linux,Add-->Save
Macros(宏,即变量,若用中文版为巨集)
Host inventory(主机资产记录,手动、自动)
Monitoring中,标签有:
DashBoard仪表板;
总览;
web;
最近数据;
触发器(事件管理、故障管理、问题管理;
事件;
图形(Group、Host、Graph;若字符集有问题,将win的微软雅黑copy至zabbix server);
筛选(常用,点右上角“+”,在仪表板中查看“常用的筛选”,在“组态”中选“筛选配置”);
拓扑图;
探索;
IT服务;

Monitoring-->Dashboard-->PERSONALDASHBOARD中
system status
host status
web monitoring
last 20 issues(最近20个议题,最近发生的事件)
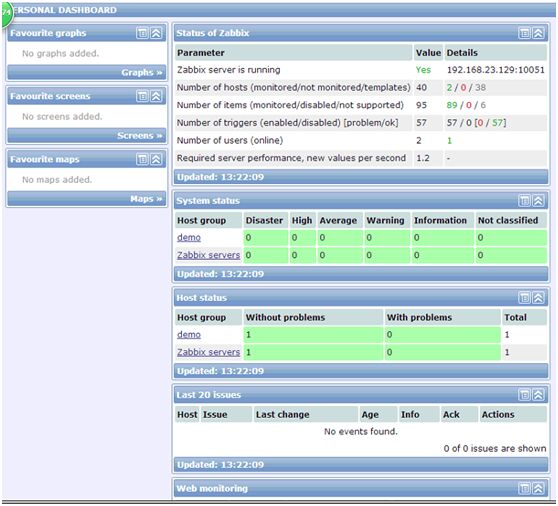
添加报警:
注:报警针对用户和用户组;生产环境最好有短信平台,或晚上用SMS,白天email;
Administration-->Users-->选Zabbixadministrators旁的Users-->右上角Create User,User标签(Alias(demo),Name(demo),Groups(Zabbix administrators),Password(demo)两次,勾选Auto-login)-->Media标签,Add,Type(Email),Send to(*@163.com),Add-->Permissions标签(User-type选Zabbix Super Admin)-->Save;
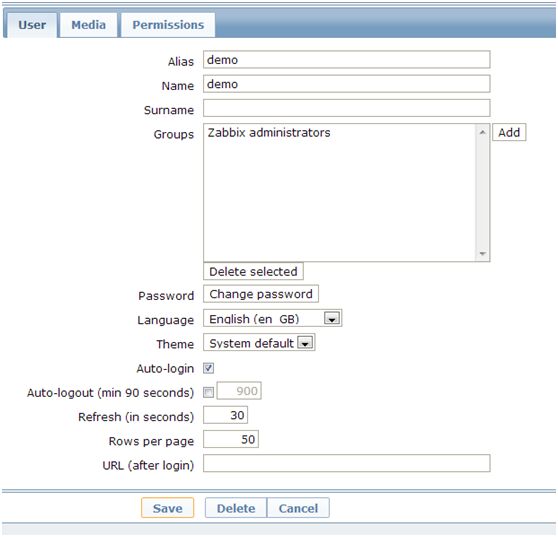


右上角logout,用demo登录;
注:Configuration-->Templates中的Applications应用集是监控项的集合,Item项目是监控的最小单位,有的Templates有Triggers有的没
注:在test2上设置检测脚本,因为test1的zabbix-server要用到DB;
Configuration-->Hosts,选test2中的Items-->点右上角Createitem,如下图创建,Name(mysql_check),Key(mysql_alive),update interval(in sec)(60),new flexible interval(300)-->Add,new application(MySQL),Description(MySQL Check)-->Save
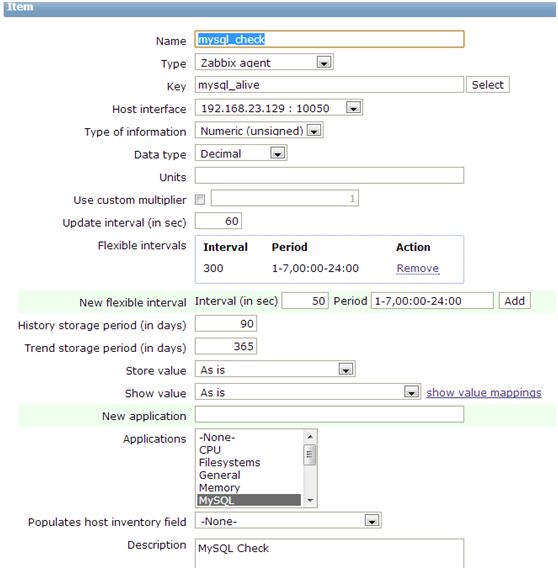
[root@test2 ~]# vim /etc/zabbix/zabbix_agentd.conf
UserParameter=mysql_alive,mysqladminping | grep -c alive
[root@test2 ~]# service zabbix-agentdrestart
Shutting down Zabbix agent: [ OK ]
Starting Zabbix agent: [ OK ]
Configuration-->Hosts,选test2的triggers,右上角Createtrigger-->Name(MySQL down),Expression(点Add,如下图,点Select,test2的mysql_check,Function(选Last (most recent) T value is NOT N,N(1))-->Insert-->Severity(disaster)
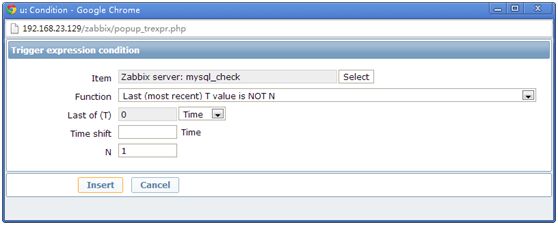
点Trigger标签旁边的Dependencies-->Add,选Zabbix agent on {HOST.NAME} is unreachable for 5minutes-->Save

Configuration-->Hosts,选test2的graph,右上角Creategraph,Name(mysql status),Graph type(Normal),Items-->Add,选test2的mysql_check,点Graph标签旁边的Preview可预览-->Save

Configuration-->Actions,将Reportproblems to Zabbix administrators的status改为Enabled-->点Report problems to Zabbix administrators,Action标签中的项(要精简,一条短信是70个字符),Conditions,Operations(Operation details,from 1 to 3,第1次到第3次报警每次发送通知给指定的人,Operation type选Send message)-->先点Update-->再Save


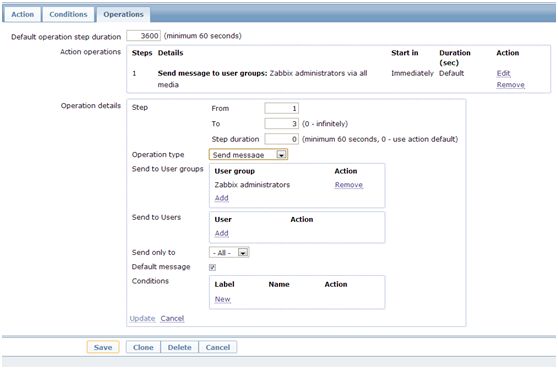
[root@test1 ~]# vim /etc/zabbix_server.conf
AlertScriptsPath=/var/lib/zabbixsrv/alertscripts
[root@test1 ~]# cd /var/lib/zabbixsrv/alertscripts/ #(此目录下的脚本必须支持三个参数,介质参数(email or SMS),title,content)
[root@test1 alertscripts]# service postfix restart
Shutting down postfix: [ OK ]
Starting postfix: [ OK ]
[root@test1 alertscripts]# vim send_mail.sh
#!/bin/bash
#
MAIL_TITLE=$2
MAIL_CON=$3
echo "$MAIL_CON" | /bin/mail -s "$MAIL_TITLE" $1
echo "$1 $2 $3" >> /tmp/alert
[root@test1 alertscripts]# chmod 755 send_mail.sh
Administration-->Media types-->Create media type,Name(send_mail),Type(Script),Script name(会自动生成),勾选Enabled-->Save

Configuration-->Actions-->点Report problems to Zabbix administrators-->选Operations,Edit,Operation details中,User group为zabbix administrator,Send only to选send_mail-->Update-->Save

Administration-->Users-->demo-->Media-->Add,Type(send_mail),Send to(jowinchai@163.com)-->Add-->Save

Administration-->Users-->Admin-->Media-->Add,Type(send_mail),Send to(root@localhost)-->Add-->Save

设置报警声音:
右上角Profile-->Messaging标签,勾选Frontend messaging;
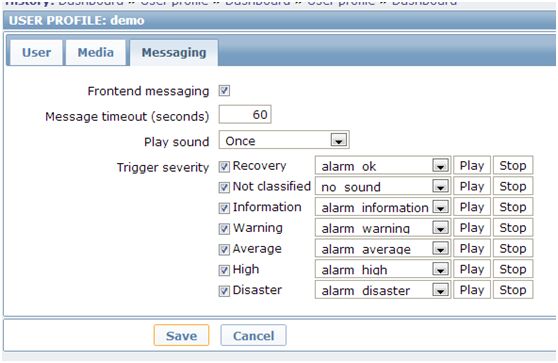
测试:
将test2的mysqld停掉,#service mysqld stop|start
在Monitoring-->Dashboard中查看System status、Host status、Last 20issues中的Actions
[root@test1 ~]# less /var/log/zabbixsrv/zabbix_server.log
……
[root@test1 ~]# tail -f /var/log/maillog
……
本文出自 “Linux运维重难点学习笔记” 博客,请务必保留此出处http://jowin.blog.51cto.com/10090021/1887630
VI zabbix
