首页 > 代码库 > Linux Oracle Rac 10G 搭建& Patch
Linux Oracle Rac 10G 搭建& Patch
Oracle Real Application Clusters 简称Oracle Rac 实施应用群集
环境接受
Virtual Machine(虚拟机):VirtualBox 4.2.18
系统平台:Oracle Enterprise Linux 5.7 X86_64
Software Packet:Oracle Database 10 R2 X86_64 for Linux
Oracle 10201_clusterware_linux
虚拟机设置
Linux 内存4G 硬盘大小60G(推荐)
双网卡
第一块网卡:Bridged Adapter (桥接模式)
第二块网卡:Internal Network (内网模式)
系统环境设置
加入光盘镜像
和普通安装linux 一样
第一步skip
第二步语言 English
第三步键盘 U.S.A English
第四步序列号 跳过序列号
第五步分区 默认分区即可
第六步网卡 网卡设置 需要启用两块
1.主机名
因为是节点一 vrh1.oracle.com
2.配置网卡IP
网卡1: 根据你的宿主机 IP信息 填写第一块网卡
172.20.2.169 / 255.255.255.0
网卡2: 因为是vip 所以设置一个私有网段的IP
192.168.1.191 / 255.255.255.0 vrh1-vip
Gateway :看宿主机网关 ipconfig /all 172.20.2.254
DNS:8.8.8.8
备用DNS :8.8.4.4
第七步输入root 密码
自己随意决定:oracle (我设置的)
第八步时区设定 只要保证 你的两台或多台相同就可以
第九步安装包 选择 clumsy later稍后自己安装
最后进行装包
reboot
重启后配置 系统信息
第一步 选择Yes 下一步
第二步 firewall 选择 Disabled
第三步 Selinux 选择 Disabled、
第四步 Kdump 不勾选
第五步 时区因为 第一块网卡 选择了 外网 所以可以选择NTP
第六步 更新服务 直接选否 跳过
第七步 创建用户 不创建 直接跳过
下一步 直至 结束 在此重启
二.配置
配置oracle yum source
1.mkdir /media/disk
2.mount /dev/cdrom /media/disk/
3.touch /etc/yum.repos.d/public-yum-el5.repo
4.vi /etc/yum.repos.d/public-yum-el5.repo
[oel]
name = Enterprise Linux 5.7 DVD
baseurl=file:///media/disk/Server/
gpgcheck=0
enabled=1
5.yum install oracle-validated
6.mkdir /s01
7.chown oracle:oinstall /s01
8.password oracle
oracle
oracle
9. vim /etc/hosts
# Do not remove the following line, or various programs
# that require network functionality will fail.
127.0.0.1 localhost.localdomain localhost
::1 localhost6.localdomain6 localhost6
172.20.2.169 vrh1 vrh1.oracle.com
172.20.2.170 vrh1-vip
172.20.2.171 vrh2 vrh2.oracle.com
172.20.2.172 vrh2-vip
192.168.1.191 vrh1-priv
192.168.1.192 vrh2-priv
:wq
完成后 测试
ping vrh1
是否通?
ping vrh1-priv
是否
ok 第一台主机配置完成
init 6
Clone
1.右键选中关闭的主机 选择可爱的小绵羊clone
2.修改 New machina name 为xxx2
3.clone type : full clone
修改网卡配置
1.进入system-config-network 删除两个带bak的网卡 如果active 状态的选择 右上方的Deactivete 在Delete
2.修改 eth0
172.20.2.171
255.255.255.0
172.20.2.254
保存
Active
3.修改 eth1
192.168.1.192
255.255.255.0
保存
Active
4.修改DNS
中主机名修改为 vrh2.oracle.com
主DNS 8.8.8.8
辅DNS 8.8.4.4
file 保存
然后 修改 /etc/inittab 默认启动模式变成3
共享磁盘的创建
选择第一台创建的虚拟机
右键 Settings
选择Storage
选择 Controller:SATA 右边的磁盘加好的图标
点完后 选择 Create new disk (创建新的磁盘)
类型选择VDI
Next
这步非常重要 Fixed Size 固定大小 共享磁盘一定是固定下 要不会挂载出问题
磁盘文件创建位置 可以改变的不然默认是C盘 会很卡 所以 看到右边的文件夹带一个绿色箭头的图标了吗
共享磁盘大小不用太大 3G 就可以了
下面在做3个以上dbshare跟上面方法一样
大小5G 固定大小
现在做共享
上面选file
选择Virtual Media Manager
看到Hard drives
看到 ocr.vdi和dbshare1.vdi 一些刚才创建的虚拟盘
右键 选择 Modify
选择Shareable
OK
刚才主机1 也叫节点一 已经有了
现在主机2 也需要挂载 一下共享的磁盘 但是 不用Create new disk
我们选择 Choose existing disk 选择 你刚才 存放 ocr.vdi文件 和 dbshare.vdi 文件 即可
绑定服务
划分分区
打开主机一
先来 看一下 刚才挂载的共享盘
ll /dev/sd*
brw-r----- 1 root disk 8, 0 Sep 17 10:42 /dev/sda
brw-r----- 1 root disk 8, 1 Sep 17 10:42 /dev/sda1
brw-r----- 1 root disk 8, 2 Sep 17 10:42 /dev/sda2
brw-r----- 1 root disk 8, 16 Sep 17 10:42 /dev/sdb
brw-r----- 1 root disk 8, 32 Sep 17 10:42 /dev/sdc
brw-r----- 1 root disk 8, 48 Sep 17 10:42 /dev/sdd
brw-r----- 1 root disk 8, 64 Sep 17 10:42 /dev/sde
要做裸设备 需要把硬盘分区
先来做 ocr 和 Voting Disk
解释下什么是ocr
OCR - Oracle Cluster Registry(集群注册文件),记录每个节点的相关信息
主要用作记录 不用分配很多空间
Voting Disk
Voting Disk - Establishes quorum (表决磁盘),仲裁机制用于仲裁多个节点向共享节点同时写的行为,这样做是为了避免发生冲突
做两个分区
fdisk /dev/sdb
Command (m for help): n
Command action
e extended
p primary partition (1-4)
p
Partition number (1-4): 1
First cylinder (1-391, default 1): #这是不用填写
Using default value 1
Last cylinder or +size or +sizeM or +sizeK (1-391, default 391): +1500M
Command (m for help): n
Command action
e extended
p primary partition (1-4)
p
Partition number (1-4): 2
First cylinder (184-391, default 184): #这是不用填写
Using default value 184
Last cylinder or +size or +sizeM or +sizeK (184-391, default 391): #这是不用填写
Using default value 391
Command (m for help): p #查看下 时候有
Command (m for help): w
partprobe /dev/sdb #宣告给内核
ll - /dev/sdb*
ls: -: No such file or directory
brw-r----- 1 root disk 8, 16 Sep 17 10:49 /dev/sdb
brw-r----- 1 root disk 8, 17 Sep 17 10:49 /dev/sdb1
brw-r----- 1 root disk 8, 18 Sep 17 10:49 /dev/sdb2
现在开始做裸设备
裸设备 就是去除文件系统的限制 直接供给oracle 使用 个人理解
cd /etc/udev/rules.d/
ll
-rw-r--r-- 1 root root 515 Jul 23 2011 05-udev-early.rules
-rw-r--r-- 1 root root 992 Jul 9 2011 40-multipath.rules
-rw-r--r-- 1 root root 16732 Jul 23 2011 50-udev.rules
-rw-r--r-- 1 root root 471 Jul 23 2011 51-hotplug.rules
-rw-r--r-- 1 root root 58016 Jun 7 2007 60-libsane.rules
-rw-r--r-- 1 root root 143 Jun 8 2011 60-net.rules
-rw-r--r-- 1 root root 1088 Jun 6 2007 60-pcmcia.rules
-rw-r--r-- 1 root root 528 Sep 17 10:52 60-raw.rules
-rw-r--r-- 1 root root 9366 Jul 23 2011 60-wacom.rules
-rw-r--r-- 1 root root 129 Jul 23 2011 61-uinput-stddev.rules
-rw-r--r-- 1 root root 214 Jul 23 2011 61-uinput-wacom.rules
-rw-r--r-- 1 root root 1823 Nov 5 2008 85-pcscd_ccid.rules
-rw-r--r-- 1 root root 175 Jul 23 2011 88-clock.rules
-rw-r--r-- 1 root root 114 Nov 5 2008 90-alsa.rules
-rw-r--r-- 1 root root 61 Jul 23 2011 90-dm.rules
-rw-r--r-- 1 root root 82 Jan 14 2011 90-hal.rules
-rw-r--r-- 1 root root 107 Jul 23 2011 95-pam-console.rules
-rw-r--r-- 1 root root 292 May 11 2011 98-kexec.rules
-rw-r--r-- 1 root root 2319 Jul 15 2008 bluetooth.rules
vi 60-raw.rules #裸设备配置文件
加入下面字段
ACTION=="add", KERNEL=="sdb1", RUN+="/bin/raw /dev/raw/raw1 %N"
ACTION=="add", KERNEL=="sdb2", RUN+="/bin/raw /dev/raw/raw2 %N"
ACTION=="add", KERNEL=="raw*", OWNER=="oracle", GROUP=="oinstall", MODE=="0660"
:wq
start_udev #启动udev
查看
ll /dev/raw
total 0
crw-rw---- 1 oracle oinstall 162, 1 Sep 17 11:58 raw1
crw-rw---- 1 oracle oinstall 162, 2 Sep 17 11:58 raw2
制作 ASM裸设备
ASM(自动存储管理)的来由:
ASM是Oracle 10g R2中为了简化Oracle数据库的管理而推出来的一项新功能,这是Oracle自己提供的卷管理器,主要用于替代操作系统所提供的LVM,它不仅支持单实例,同时对RAC的支持也是非常好。ASM可以自动管理磁盘组并提供有效的数据冗余功能。 www.2cto.com 使用ASM(自动存储管理)后,数据库管理员不再需要对ORACLE中成千上万的数据文件进行管理和分类,从而简化了DBA的工作量,可以使得工作效率大大提高。
为了节省时间 用一个脚本(by:marklean_liu)
for i in c d e; # in 后面跟的是/sdb /sdc /sde 等等 最后的字母如果多个可以继续添加
do
echo "KERNEL==\"sd*\", BUS==\"scsi\", PROGRAM==\"/sbin/scsi_id -g -u -s %p\", RESULT==\"`scsi_id -g -u -s /block/sd$i`\", NAME=\"asm-disk$i\", OWNER=\"oracle\", GROUP=\"oinstall\", MODE=\"0660\""
done
执行后 会显示如下信息
[root@vrh1 raw]# for i in c d e;
> do
> echo "KERNEL==\"sd*\", BUS==\"scsi\", PROGRAM==\"/sbin/scsi_id -g -u -s %p\", RESULT==\"`scsi_id -g -u -s /block/sd$i`\", NAME=\"asm-disk$i\", OWNER=\"oracle\", GROUP=\"oinstall\", MODE=\"0660\""
> done
KERNEL=="sd*", BUS=="scsi", PROGRAM=="/sbin/scsi_id -g -u -s %p", RESULT=="SATA_VBOX_HARDDISK_VB3135e0d2-443af4bc_", NAME="asm-diskc", OWNER="oracle", GROUP="oinstall", MODE="0660"
KERNEL=="sd*", BUS=="scsi", PROGRAM=="/sbin/scsi_id -g -u -s %p", RESULT=="SATA_VBOX_HARDDISK_VB4a191055-dd7f8a7e_", NAME="asm-diskd", OWNER="oracle", GROUP="oinstall", MODE="0660"
KERNEL=="sd*", BUS=="scsi", PROGRAM=="/sbin/scsi_id -g -u -s %p", RESULT=="SATA_VBOX_HARDDISK_VB8ab4d9e0-3dc6fdc1_", NAME="asm-diske", OWNER="oracle", GROUP="oinstall", MODE="0660"
然后我们需要touch 一个文件
在/etc/udev/rules.d目录下
[root@vrh1 rules.d]# touch 99-oracle-asmdevices.rules
vi 99-oracle-asmdevices.rules
加入 刚才 脚本语句 列出的内容
KERNEL=="sd*", BUS=="scsi", PROGRAM=="/sbin/scsi_id -g -u -s %p", RESULT=="SATA_VBOX_HARDDISK_VB3135e0d2-443af4bc_", NAME="asm-diskc", OWNER="oracle", GROUP="oinstall", MODE="0660"
KERNEL=="sd*", BUS=="scsi", PROGRAM=="/sbin/scsi_id -g -u -s %p", RESULT=="SATA_VBOX_HARDDISK_VB4a191055-dd7f8a7e_", NAME="asm-diskd", OWNER="oracle", GROUP="oinstall", MODE="0660"
KERNEL=="sd*", BUS=="scsi", PROGRAM=="/sbin/scsi_id -g -u -s %p", RESULT=="SATA_VBOX_HARDDISK_VB8ab4d9e0-3dc6fdc1_", NAME="asm-diske", OWNER="oracle", GROUP="oinstall", MODE="0660"
:wq
在此 启动 start_udev
然后 查看一下
ll /dev/asm*
brw-rw---- 1 oracle oinstall 8, 32 Sep 17 11:58 /dev/asm-diskc
brw-rw---- 1 oracle oinstall 8, 48 Sep 17 11:58 /dev/asm-diskd
brw-rw---- 1 oracle oinstall 8, 64 Sep 17 11:58 /dev/asm-diske
下一步 把两个改好的复制到第二台节点上的 相应目录下的
scp 60-raw.rules vrh2:/etc/udev/rules.d/
The authenticity of host ‘vrh2 (172.20.2.171)‘ can‘t be established.
RSA key fingerprint is 1e:b5:bb:12:53:44:90:eb:ef:01:7a:3a:5e:37:70:d6.
Are you sure you want to continue connecting (yes/no)? yes
Warning: Permanently added ‘vrh2,172.20.2.171‘ (RSA) to the list of known hosts.
root@vrh2‘s password:
60-raw.rules 100% 528 0.5KB/s
[root@vrh1 rules.d]# scp 99-oracle-asmdevices.rules vrh2:/etc/udev/rules.d/
root@vrh2‘s password:
Permission denied, please try again.
root@vrh2‘s password:
99-oracle-asmdevices.rules 100% 543 0.5KB/s 00:00
因为起初两个hosts 文件加入了 域名解析 如果你担心依然可以使用IP
节点传输完成 节点 使用start_udev
启动udev
然后再次查看
[root@vrh2 rules.d]# ll /dev/raw*
crw-rw---- 1 oracle oinstall 162, 0 Sep 17 12:00 /dev/rawctl
/dev/raw:
total 0
crw-rw---- 1 oracle oinstall 162, 1 Sep 17 12:31 raw1
crw-rw---- 1 oracle oinstall 162, 2 Sep 17 12:31 raw2
[root@vrh2 rules.d]# ll /dev/asm*
brw-rw---- 1 oracle oinstall 8, 32 Sep 17 12:31 /dev/asm-diskc
brw-rw---- 1 oracle oinstall 8, 48 Sep 17 12:31 /dev/asm-diskd
brw-rw---- 1 oracle oinstall 8, 64 Sep 17 12:31 /dev/asm-diske
到此共享存储 已经完成
我们需要两台oracle 主机可以互相访问 不要密码
这时候 我们就需要 ssh等价了 小白老师 在Kickstart的时候讲到过
以下所有 1、2节点都需要做
由于是oracle 用户使用
所以 先su — oracle
然后我需要使用 ssh-keygen -t rsa
创建 .ssh这个隐藏目录
[root@vrh1 rules.d]# su - oracle
[oracle@vrh1 ~]$ ssh-keygen -t rsa
Generating public/private rsa key pair.
Enter file in which to save the key (/home/oracle/.ssh/id_rsa):
Created directory ‘/home/oracle/.ssh‘.
Enter passphrase (empty for no passphrase):
Enter same passphrase again:
Your identification has been saved in /home/oracle/.ssh/id_rsa.
Your public key has been saved in /home/oracle/.ssh/id_rsa.pub.
The key fingerprint is:
0d:0e:07:61:e3:a0:1f:af:d6:9b:9a:1e:b8:4e:ce:89 oracle@vrh1.oracle.com
然后我们需要 在使用 ssh-keygen -t dsa
创建密钥
[oracle@vrh2 ~]$ ssh-keygen -t dsa
Generating public/private dsa key pair.
Enter file in which to save the key (/home/oracle/.ssh/id_dsa):
Enter passphrase (empty for no passphrase):
Enter same passphrase again:
Your identification has been saved in /home/oracle/.ssh/id_dsa.
Your public key has been saved in /home/oracle/.ssh/id_dsa.pub.
The key fingerprint is:
1e:ff:96:4d:d8:fd:43:6c:a6:71:aa:e5:b8:55:1a:16 oracle@vrh2.oracle.com
主机一操作
然后 进入
cd /home/oracle/.ssh/
ll
-rw------- 1 oracle oinstall 672 Sep 17 12:48 id_dsa
-rw-r--r-- 1 oracle oinstall 612 Sep 17 12:48 id_dsa.pub
-rw------- 1 oracle oinstall 1675 Sep 17 12:44 id_rsa
-rw-r--r-- 1 oracle oinstall 404 Sep 17 12:44 id_rsa.pub
-rw-r--r-- 1 oracle oinstall 399 Sep 17 12:56 known_hosts
然后touch authorized_keys 授权key
把公钥文件追加到 授权Key 里面
cat id_dsa.pub >> authorized_keys
cat id_rsa.pub >> authorized_keys
第二台主机的公钥文件 也要追加到这个授权Key 里面
ssh vrh2 cat /home/oracle/.ssh/id_dsa.pub >> authorized_keys
ssh vrh2 cat /home/oracle/.ssh/id_rsa.pub >> authorized_keys
拷贝到第二节点相应的./ssh 目录下
scp authorized_keys vrh2:~/.ssh
这样 以后 相互登陆就不用密码了
[oracle@vrh1 .ssh]$ ssh vrh2
Last login: Tue Sep 17 13:06:28 2013 from vrh1
[oracle@vrh2 ~]$
时间同步问题
节点1:
command
[oracle@vrh1 .ssh]$ date ; ssh vrh2 date
Tue Sep 17 14:00:34 CST 2013
Tue Sep 17 14:00:35 CST 2013
[oracle@vrh1 .ssh]$ date ; ssh vrh2 date
Tue Sep 17 14:00:36 CST 2013
Tue Sep 17 14:00:36 CST 2013
[oracle@vrh1 .ssh]$ date ; ssh vrh2 date
Tue Sep 17 14:00:37 CST 2013
Tue Sep 17 14:00:37 CST 2013
[oracle@vrh1 .ssh]$ date ; ssh vrh2-priv date
Tue Sep 17 14:01:05 CST 2013
The authenticity of host ‘vrh2-priv (192.168.1.192)‘ can‘t be established.
RSA key fingerprint is 1e:b5:bb:12:53:44:90:eb:ef:01:7a:3a:5e:37:70:d6.
Are you sure you want to continue connecting (yes/no)? yes
Warning: Permanently added ‘vrh2-priv,192.168.1.192‘ (RSA) to the list of known hosts.
Tue Sep 17 14:01:07 CST 2013
[oracle@vrh1 .ssh]$ date ; ssh vrh2-priv date
Tue Sep 17 14:01:09 CST 2013
Tue Sep 17 14:01:09 CST 2013
[oracle@vrh1 .ssh]$ date ; ssh vrh2-priv date
Tue Sep 17 14:01:10 CST 2013
Tue Sep 17 14:01:10 CST 2013
[oracle@vrh1 .ssh]$ date ; ssh vrh1 date
Tue Sep 17 14:01:27 CST 2013
The authenticity of host ‘vrh1 (172.20.2.169)‘ can‘t be established.
RSA key fingerprint is 1e:b5:bb:12:53:44:90:eb:ef:01:7a:3a:5e:37:70:d6.
Are you sure you want to continue connecting (yes/no)? yes
Warning: Permanently added ‘vrh1,172.20.2.169‘ (RSA) to the list of known hosts.
Tue Sep 17 14:01:29 CST 2013
[oracle@vrh1 .ssh]$ date ; ssh vrh1 date
Tue Sep 17 14:01:30 CST 2013
Tue Sep 17 14:01:30 CST 2013
[oracle@vrh1 .ssh]$ date ; ssh vrh1 date
Tue Sep 17 14:01:32 CST 2013
Tue Sep 17 14:01:32 CST 2013
[oracle@vrh1 .ssh]$ date ; ssh vrh1-priv date
Tue Sep 17 14:01:44 CST 2013
The authenticity of host ‘vrh1-priv (192.168.1.191)‘ can‘t be established.
RSA key fingerprint is 1e:b5:bb:12:53:44:90:eb:ef:01:7a:3a:5e:37:70:d6.
Are you sure you want to continue connecting (yes/no)?
Host key verification failed.
[oracle@vrh1 .ssh]$ date ; ssh vrh1-priv date
Tue Sep 17 14:01:48 CST 2013
The authenticity of host ‘vrh1-priv (192.168.1.191)‘ can‘t be established.
RSA key fingerprint is 1e:b5:bb:12:53:44:90:eb:ef:01:7a:3a:5e:37:70:d6.
Are you sure you want to continue connecting (yes/no)? yes
Warning: Permanently added ‘vrh1-priv,192.168.1.191‘ (RSA) to the list of known hosts.
Tue Sep 17 14:01:49 CST 2013
[oracle@vrh1 .ssh]$ date ; ssh vrh1-priv date
Tue Sep 17 14:01:50 CST 2013
Tue Sep 17 14:01:50 CST 2013
[oracle@vrh1 .ssh]$ date ; ssh vrh1-priv date
Tue Sep 17 14:01:51 CST 2013
Tue Sep 17 14:01:51 CST 2013
[oracle@vrh1 .ssh]$ date ; ssh vrh1-priv date
Tue Sep 17 14:01:52 CST 2013
Tue Sep 17 14:01:52 CST 2013
节点2
command
[oracle@vrh2 .ssh]$ date ; ssh vrh1 date
Tue Sep 17 14:03:29 CST 2013
Tue Sep 17 14:03:29 CST 2013
[oracle@vrh2 .ssh]$ date ; ssh vrh1 date
Tue Sep 17 14:03:30 CST 2013
Tue Sep 17 14:03:30 CST 2013
[oracle@vrh2 .ssh]$ date ; ssh vrh1-priv date
Tue Sep 17 14:03:36 CST 2013
The authenticity of host ‘vrh1-priv (192.168.1.191)‘ can‘t be established.
RSA key fingerprint is 1e:b5:bb:12:53:44:90:eb:ef:01:7a:3a:5e:37:70:d6.
Are you sure you want to continue connecting (yes/no)? yes
Warning: Permanently added ‘vrh1-priv,192.168.1.191‘ (RSA) to the list of known hosts.
Tue Sep 17 14:03:38 CST 2013
[oracle@vrh2 .ssh]$ date ; ssh vrh1-priv date
Tue Sep 17 14:03:39 CST 2013
Tue Sep 17 14:03:39 CST 2013
[oracle@vrh2 .ssh]$ date ; ssh vrh1-priv date
Tue Sep 17 14:03:40 CST 2013
Tue Sep 17 14:03:40 CST 2013
[oracle@vrh2 .ssh]$ date ; ssh vrh2 date
Tue Sep 17 14:03:48 CST 2013
The authenticity of host ‘vrh2 (172.20.2.171)‘ can‘t be established.
RSA key fingerprint is 1e:b5:bb:12:53:44:90:eb:ef:01:7a:3a:5e:37:70:d6.
Are you sure you want to continue connecting (yes/no)? yes
Warning: Permanently added ‘vrh2,172.20.2.171‘ (RSA) to the list of known hosts.
Tue Sep 17 14:03:50 CST 2013
[oracle@vrh2 .ssh]$ date ; ssh vrh2 date
Tue Sep 17 14:03:51 CST 2013
Tue Sep 17 14:03:51 CST 2013
[oracle@vrh2 .ssh]$ date ; ssh vrh2-priv date
Tue Sep 17 14:03:56 CST 2013
The authenticity of host ‘vrh2-priv (192.168.1.192)‘ can‘t be established.
RSA key fingerprint is 1e:b5:bb:12:53:44:90:eb:ef:01:7a:3a:5e:37:70:d6.
Are you sure you want to continue connecting (yes/no)? yes
Warning: Permanently added ‘vrh2-priv,192.168.1.192‘ (RSA) to the list of known hosts.
Tue Sep 17 14:03:58 CST 2013
[oracle@vrh2 .ssh]$
安装中需要的的介质 及 下载地址
10201_clusterware_linux_x86_64.cpio
http://124.202.164.14/download/30916062/38908834/2/gz/230/83/1350905190630_851/10201_clusterware_linux_x86_64.cpio.gz
10201_database_linux_x86_64.cpio
http://download.oracle.com/otn/linux/oracle10g/10201/10201_database_linux_x86_64.cpio.gz
p8202632_10205_Linux-x86-64
ftp://61.135.158.199/pub/Oracle10g-10.2.0.5/p8202632_10205_Linux-x86-64.zip
安装 oracle_10201_clusterware及 升级 10205
升级原因 因为 10201有很多bug 所以升级到 10205
使用 你习惯的方法 把文件上传到 虚拟机节点1 /s01目录下(下载的gz格式要解压的)
root 登陆
付权限 chmod 755 10201_clusterware_linux_x86_64.cpio
chmod 755 10201_database_linux_x86_64.cpio
然后 选择System 中log out
换成oracle 用户登陆
[oracle@vrh1 s01]$ ls
10201_clusterware_linux_x86_64.cpio p8202632_10205_Linux-x86-64.zip
10201_database_linux_x86_64.cpio
[oracle@vrh1 s01]$ mkdir 10201_crs
然后cd 10201_crs
然后解压 cpio -idvm < ../10201_clusterware_linux_x86_64.cpio
[oracle@vrh1 10201_crs]$ ls
clusterware
[oracle@vrh1 10201_crs]$ cd clusterware/
[oracle@vrh1 clusterware]$ ls
cluvfy install rootpre runInstaller upgrade
doc response rpm stage welcome.html
执行 runInstaller
报错
[oracle@vrh1 clusterware]$ ./runInstaller
********************************************************************************
Please run the script rootpre.sh as root on all machines/nodes. The script can be found at the toplevel of the CD or stage-area. Once you have run the script, please type Y to proceed
Answer ‘y‘ if root has run ‘rootpre.sh‘ so you can proceed with Oracle Clusterware installation.
Answer ‘n‘ to abort installation and then ask root to run ‘rootpre.sh‘.
********************************************************************************
Has ‘rootpre.sh‘ been run by root? [y/n] (n)
需要执行一个rootpre.sh 脚本 必须用root 用户去运行
在开一个终端 切换root
如下路径
[root@vrh1 ~]# cd /s01/10201_crs/clusterware/rootpre/
[root@vrh1 rootpre]# ll
total 4
-rwxr-xr-x 1 oracle oinstall 2981 Oct 23 2005 rootpre.sh
[root@vrh1 rootpre]# ./rootpre.sh
No OraCM running
[root@vrh1 rootpre]#
回到图形界面
Has ‘rootpre.sh‘ been run by root? [y/n] (n)
y
Starting Oracle Universal Installer...
Checking installer requirements...
Checking operating system version: must be redhat-3, SuSE-9, redhat-4, UnitedLinux-1.0, asianux-1 or asianux-2
Failed <<<<
Exiting Oracle Universal Installer, log for this session can be found at /tmp/OraInstall2013-09-17_04-25-11PM/installActions2013-09-17_04-25-11PM.log
依然报错 因为 10201 支持的授权版本 是 red hat linux 4.0及以下版本
所以执行 ./时候 后面加上
[oracle@vrh1 clusterware]$ ./runInstaller -ignoreSysprereqs
********************************************************************************
Please run the script rootpre.sh as root on all machines/nodes. The script can be found at the toplevel of the CD or stage-area. Once you have run the script, please type Y to proceed
Answer ‘y‘ if root has run ‘rootpre.sh‘ so you can proceed with Oracle Clusterware installation.
Answer ‘n‘ to abort installation and then ask root to run ‘rootpre.sh‘.
********************************************************************************
Has ‘rootpre.sh‘ been run by root? [y/n] (n)
y
Starting Oracle Universal Installer...
Checking installer requirements...
Checking operating system version: must be redhat-3, SuSE-9, redhat-4, UnitedLinux-1.0, asianux-1 or asianux-2
Failed <<<<
>>> Ignoring required pre-requisite failures. Continuing...
Preparing to launch Oracle Universal Installer from /tmp/OraInstall2013-09-17_04-39-12PM. Please wait ...[oracle@vrh1 clusterware]$ Oracle Universal Installer, Version 10.2.0.1.0 Production
Copyright (C) 1999, 2005, Oracle. All rights reserved.
/runInstaller 后加上" -ignoreSysPreReqs" 参数忽略sys检测
不过不推荐这种方式,因为这可能会错过对操作系统内核参数以及oracle必需的包的检测
但是没办法
进入图形安装
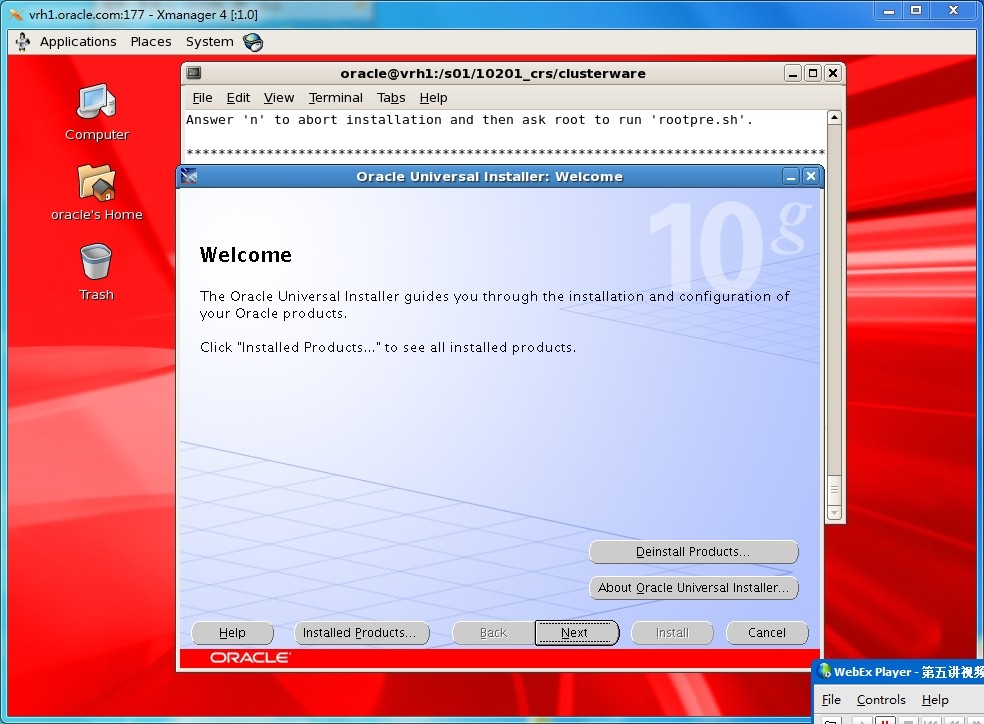
第一个界面 Next
下一个修改 路径 /s01/oralnventory
在下一个修改路径 /s01/oracle/app/product/crs_1 oracle 最优路径的选择
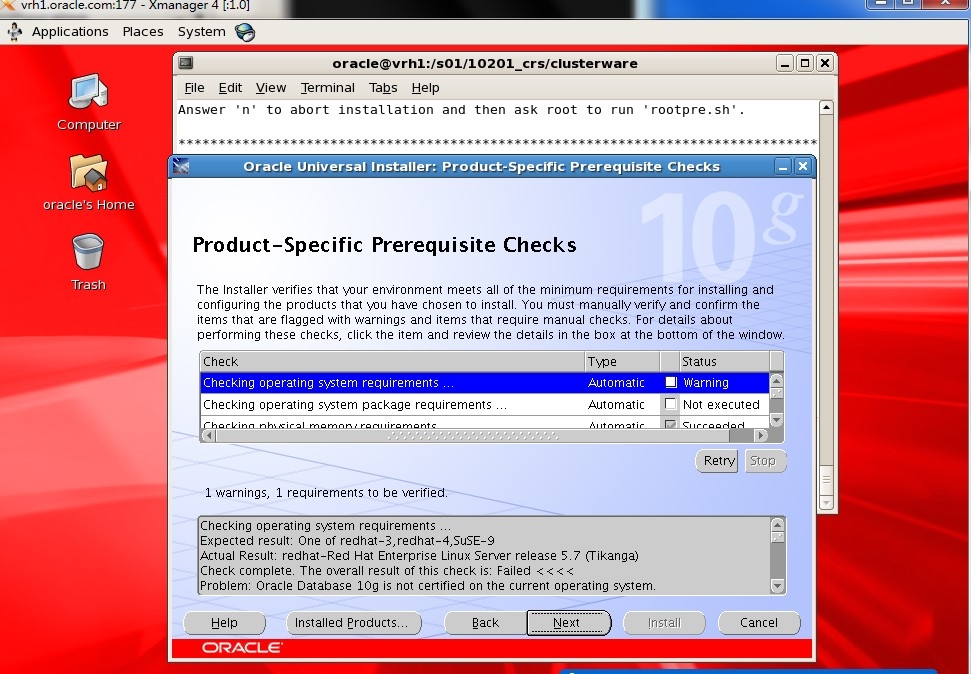
在下一个 安装检测到的问题 还是刚才的版本问题 所以一些包也安装不到
所以 自己 勾选缺失的两个对勾
Next
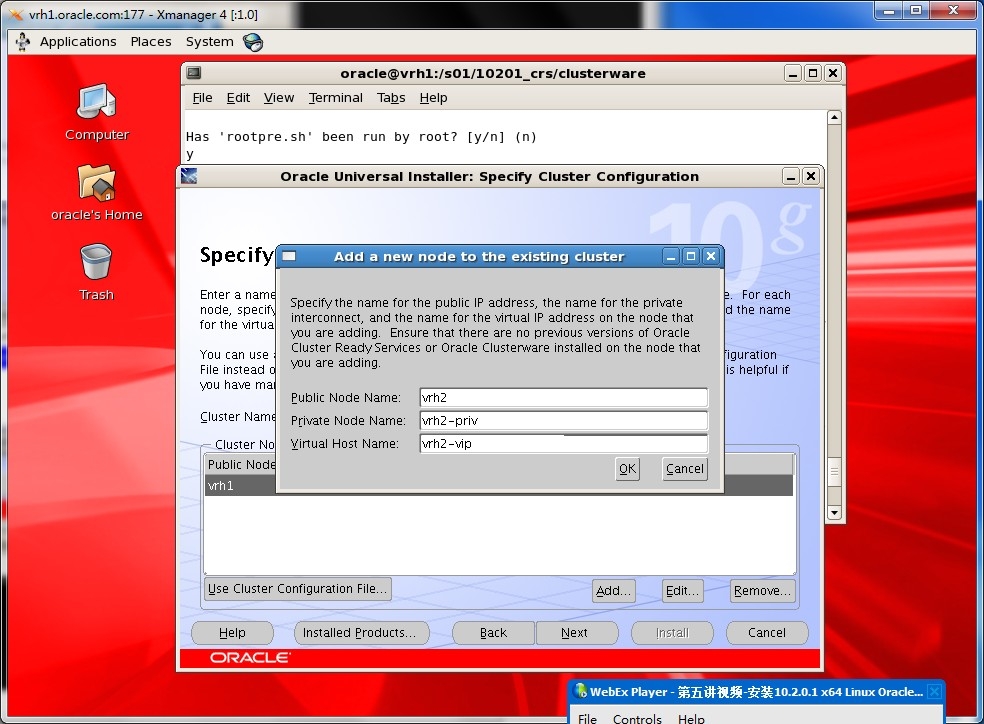
Add选项 添加节点
Public Node Name: vrh2
Private Node Name: vrh2-priv
Virtual Host Name: vrh2-vip
Next
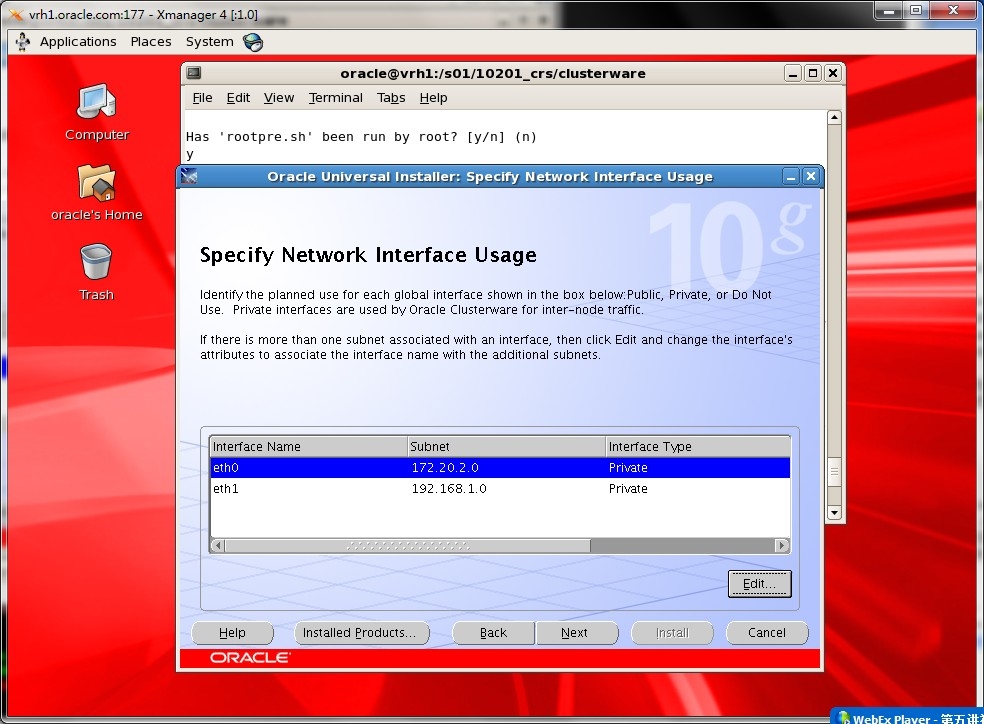
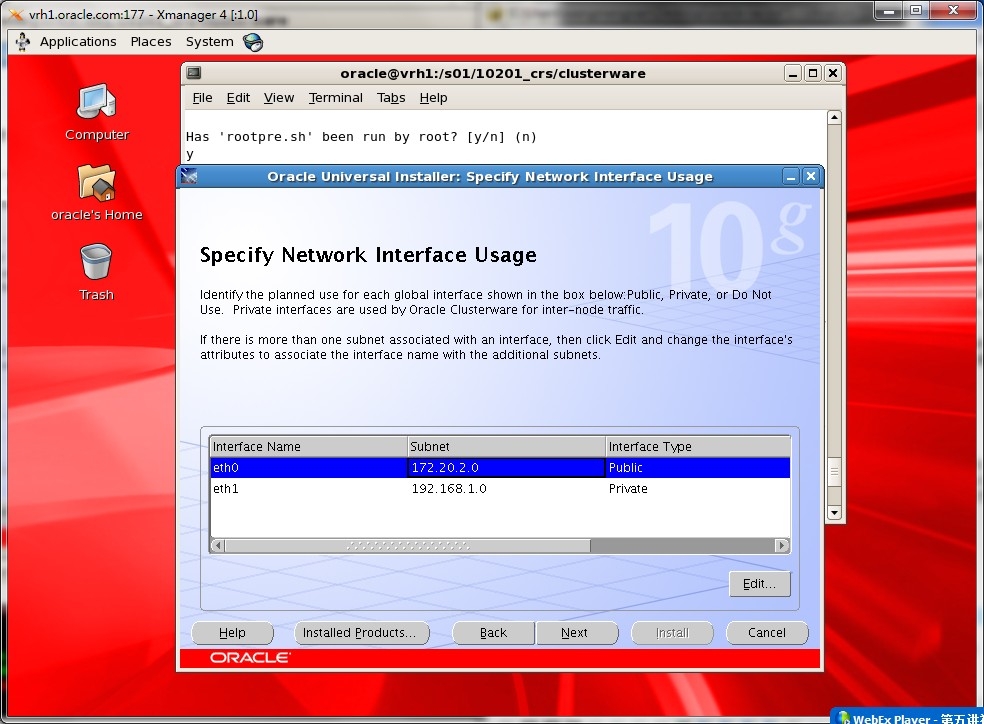
选择一个公有网络 需要修改一下
172.20.2.0 是一个public 共有网络
所以 Edit
选择 public
Next
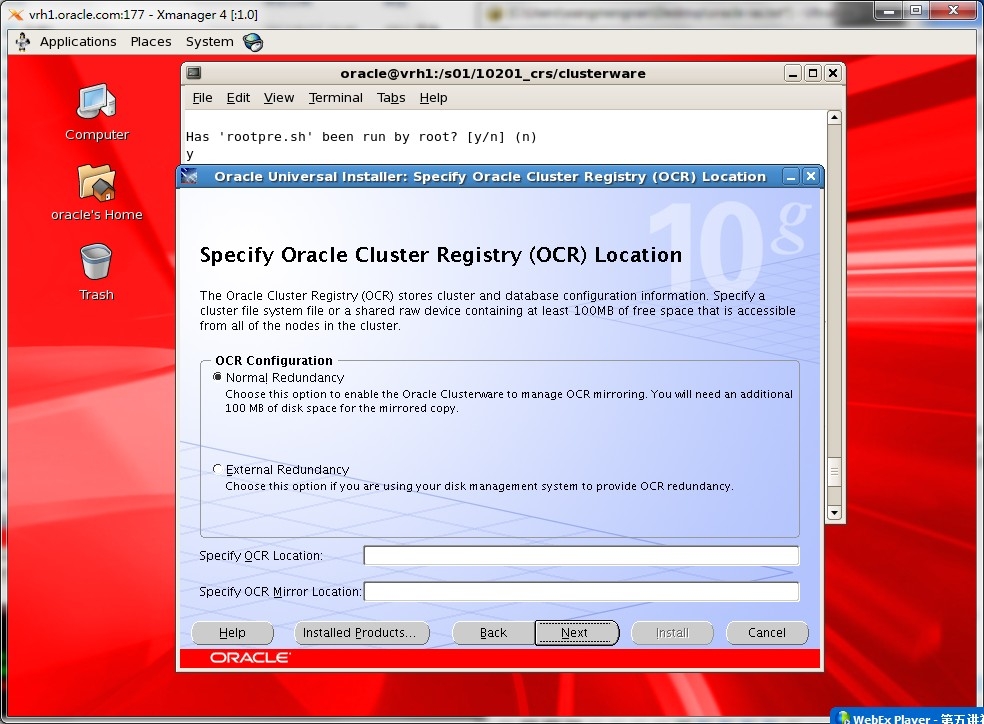
选择 OCR
因为是裸设备 所以选择 External Redundancy 外部冗余 模式
外部冗余(external redundancy):表示Oracle不帮你管理镜像,功能由外部存储系统实现,比如通过RAID技术;有效磁盘空间是所有磁盘设备空间的大小之和。
如同RAID 效果
扩展:
、 外部冗余(external redundancy):表示Oracle不帮你管理镜像,功能由外部存储系统实现,比如通过RAID技术;有效磁盘空间是所有磁盘设备空间的大小之和。
2、 默认冗余(normal redundancy):表示Oracle提供2份镜像来保护数据,有效磁盘空间是所有磁盘设备大小之和的1/2 (使用最多)
3、 高度冗余(high redundancy):表示Oracle提供3份镜像来保护数据,以提高性能和数据的安全,最少需要三块磁盘(三个failure group);有效磁盘空间是所有磁盘设备大小之和的1/3,虽然冗余级别高了,但是硬件的代价也最高。
这里只能挂在一块裸设备
所以 /dev/raw/raw1
Next
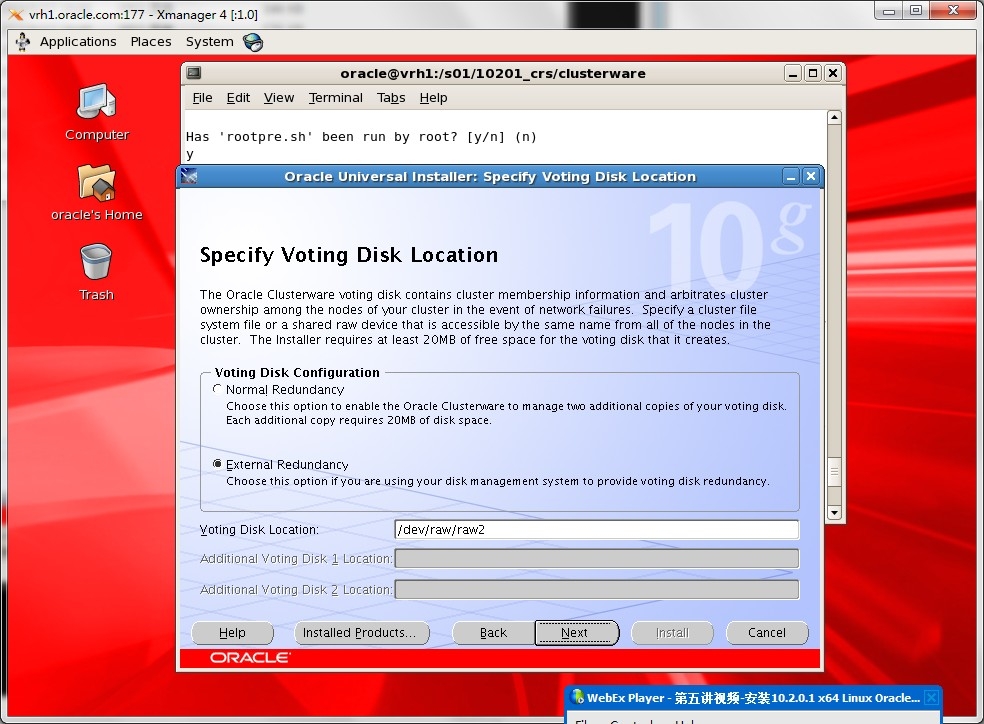
下面 来写Voling Disk 文件路径
继续选择
External Redundancy
使用 /dev/raw/raw2
Next
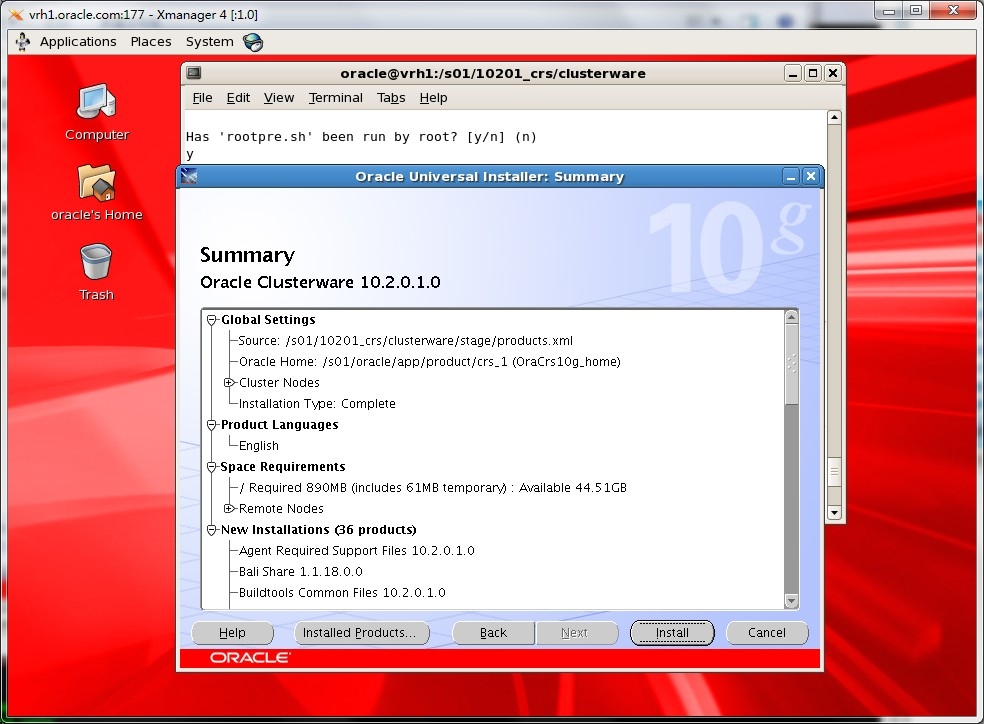
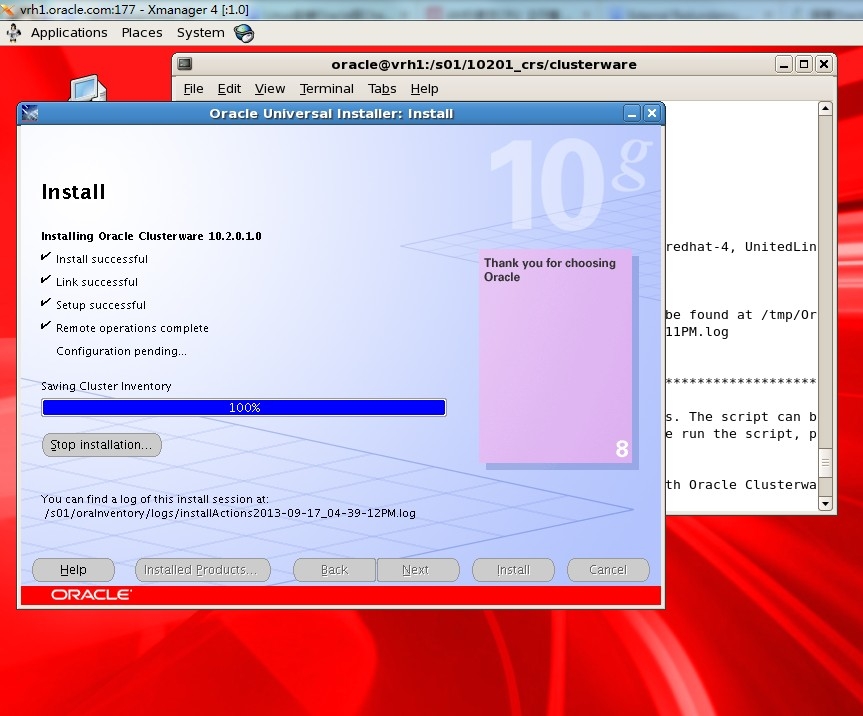
最后安装 install
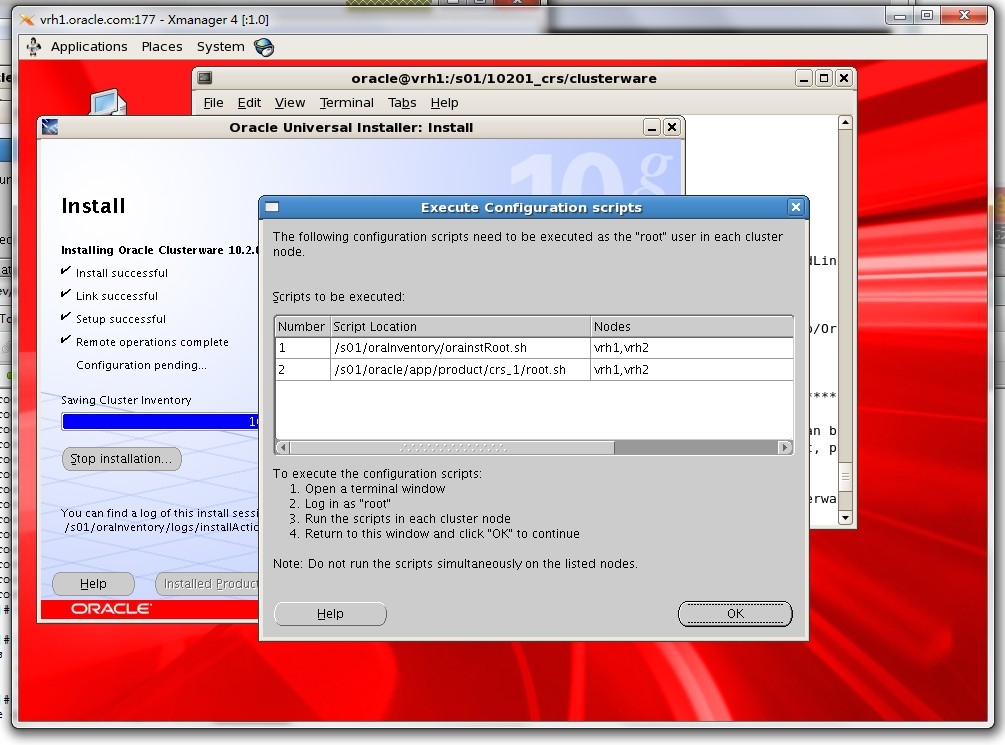
安装完以后需要执行两个脚本
[root@vrh1 rootpre]# /s01/oraInventory//orainstRoot.sh
Changing permissions of /s01/oraInventory to 770.
Changing groupname of /s01/oraInventory to oinstall.
The execution of the script is complete
[root@vrh1 rootpre]# /s01/oracle/app/product/crs_1/r
racg/ rdbms/ relnotes/ root.sh
[root@vrh1 rootpre]# /s01/oracle/app/product/crs_1/r
racg/ rdbms/ relnotes/ root.sh
[root@vrh1 rootpre]# /s01/oracle/app/product/crs_1/root.sh
节点2 执行相同的步骤
root@vrh2 rules.d]# /s01/oraInventory/orainstRoot.sh
Changing permissions of /s01/oraInventory to 770.
Changing groupname of /s01/oraInventory to oinstall.
The execution of the script is complete
You have new mail in /var/spool/mail/root
[root@vrh2 rules.d]# /s01/oracle/app/product/crs_1/root.sh
检测
[root@vrh1 rootpre]# /s01/oracle/app/product/crs_1/bin/crsctl query crs activeversion
CRS active version on the cluster is [10.1.0.2.0]
[root@vrh1 s01]# /s01/oracle/app/product/crs_1/bin/crsctl check crs
CSS appears healthy
CRS appears healthy
EVM appears healthy
安装上 10.2.0.1
把CRS 关闭
以便安装 10205
/s01/oracle/app/product/crs_1/bin/crsctl stop crs
图形界面安装
cd /s01/
mkdir 10205_patch
cd /10205_patch
unzip ../p8202632_10205_Linux-x86-64.zip
[oracle@vrh1 10205_patch]$ ls
Disk1 README.htm
[oracle@vrh1 10205_patch]$ cd Disk1/
[oracle@vrh1 Disk1]$ ls
install patch_note.htm response runInstaller stage
在此安装
[oracle@vrh1 Disk1]$ ./runInstaller
Starting Oracle Universal Installer...
Checking installer requirements...
Checking operating system version: must be redhat-3, SuSE-9, SuSE-10, redhat-4, redhat-5, redhat-6, UnitedLinux-1.0, asianux-1, asianux-2, asianux-3, enterprise-4, enterprise-5 or SuSE-11
Passed
All installer requirements met.
Preparing to launch Oracle Universal Installer from /tmp/OraInstall2013-09-17_06-09-34PM. Please wait ...[oracle@vrh1 Disk1]$ Oracle Universal Installer, Version 10.2.0.5.0 Production
Copyright (C) 1999, 2010, Oracle. All rights reserved.
再一次安装 就不会出现新的错误
因为
Checking operating system version: must be redhat-3, SuSE-9, SuSE-10, redhat-4, redhat-5, redhat-6, UnitedLinux-1.0, asianux-1, asianux-2, asianux-3, enterprise-4, enterprise-5 or SuSE-11
Passed
兼容了 以上版本
安装 第二步的时候 要注意 home的安装目录
手动鼠标点一下 就和变回 安装时候调好的
Next 将会检测你是群集
然后开始在此检测 配置
warning 把钩选上 继续 install
/s01/oracle/app/product/crs_1/install/root102.sh
This script will automatically start the CRS daemons on the
patched node upon completion.
这点很重要 要执行一个脚本
[root@vrh1 rootpre]# cd /s01/oracle/app/product/crs_1/install/
[root@vrh1 install]# ll
total 184
-rw-rw---- 1 oracle oinstall 32 Sep 17 17:23 cluster.ini
-rwxr-xr-x 1 oracle oinstall 1092 Oct 18 2005 cmdllroot.sh
-rw-rw---- 1 oracle oinstall 197 Sep 17 17:23 envVars.properties
-rwxr-xr-x 1 oracle oinstall 38 Apr 19 2005 install.excl
-rwxr-xr-x 1 oracle oinstall 0 Feb 23 2005 install.incl
-rw-rw---- 1 oracle oinstall 4703 Sep 17 17:23 make.log
-rw-rw---- 1 oracle oinstall 461 Sep 17 17:22 paramfile.crs
drwxr-xr-x 33 oracle oinstall 4096 Sep 17 18:18 patch102
-rwxr-xr-x 1 oracle oinstall 4580 Sep 17 17:22 preupdate.sh
-rw-rw---- 1 oracle oinstall 893 Sep 17 18:19 readme.txt
-rwxr-xr-x 1 oracle oinstall 34724 Sep 17 18:18 root102.sh
-r-xr-xr-x 1 oracle oinstall 4150 Aug 11 2005 rootaddnode.sbs
-r-xr-xr-x 1 oracle oinstall 32764 Sep 17 17:22 rootconfig
-r-xr-xr-x 1 oracle oinstall 8169 Sep 17 17:22 rootdeinstall.sh
-r-xr-xr-x 1 oracle oinstall 3928 Sep 17 17:22 rootdeletenode.sh
-r-xr-xr-x 1 oracle oinstall 12087 Sep 17 17:22 rootdelete.sh
-r-xr-xr-x 1 oracle oinstall 3595 Sep 17 17:22 rootinstall
-rw-rw---- 1 oracle oinstall 9640 Sep 17 17:22 rootlocaladd
-r-xr-xr-x 1 oracle oinstall 17044 Sep 17 17:22 rootupgrade
-rw-rw---- 1 oracle oinstall 2800 Jun 7 2005 templocal
[root@vrh1 install]# pwd
/s01/oracle/app/product/crs_1/install
[root@vrh1 install]#
[root@vrh1 install]# ./root102.sh
Creating pre-patch directory for saving pre-patch clusterware files
节点一 执行完了 执行节点二
cd /s01/oracle/app/product/crs_1/install/
./root102.sh
进入 oracle 用户 或者退回oracle 用户
修改环境变量
[oracle@vrh2 ~]$ vim .bash_profile
vim .bash_profile
# .bash_profile
# Get the aliases and functions
if [ -f ~/.bashrc ]; then
. ~/.bashrc
fi
# User specific environment and startup programs
ORA_CRS_HOME=/s01/oracle/app/product/crs_1
PATH=$ORA_CRS_HOME/bin:$PATH
export ORA_CRS_HOME PATH
~
[oracle@vrh2 ~]$ scp .bash_profile vrh1:~/
crsctl query csr activeversion
[oracle@vrh1 ~]$ crsctl query crs activeversion
CRS active version on the cluster is [10.2.0.5.0]
设置vip
我们需要退出oracle 用户
进入root用户
root 没有加 .bash_profile
所以必须绝对路径
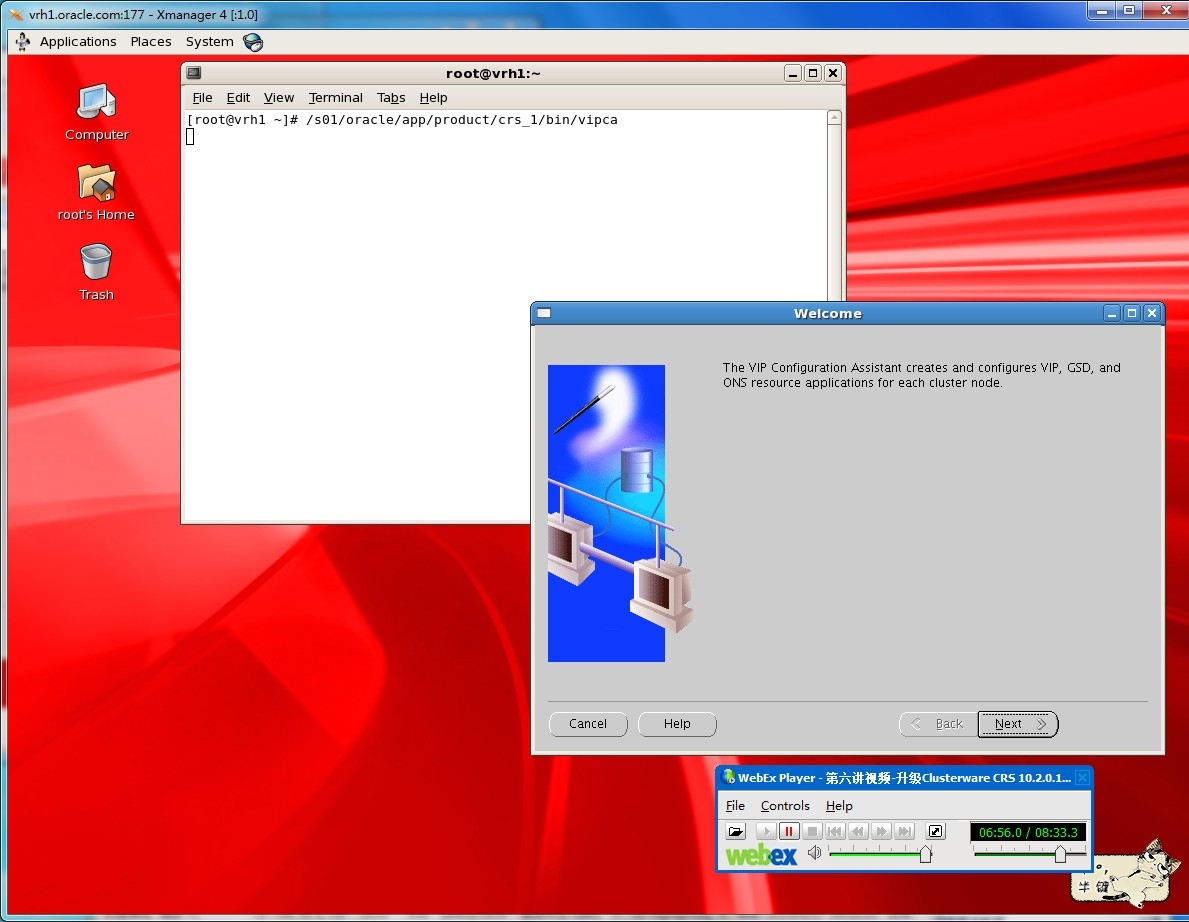
[root@vrh1 ~]# /s01/oracle/app/product/crs_1/bin/vipca
next
next
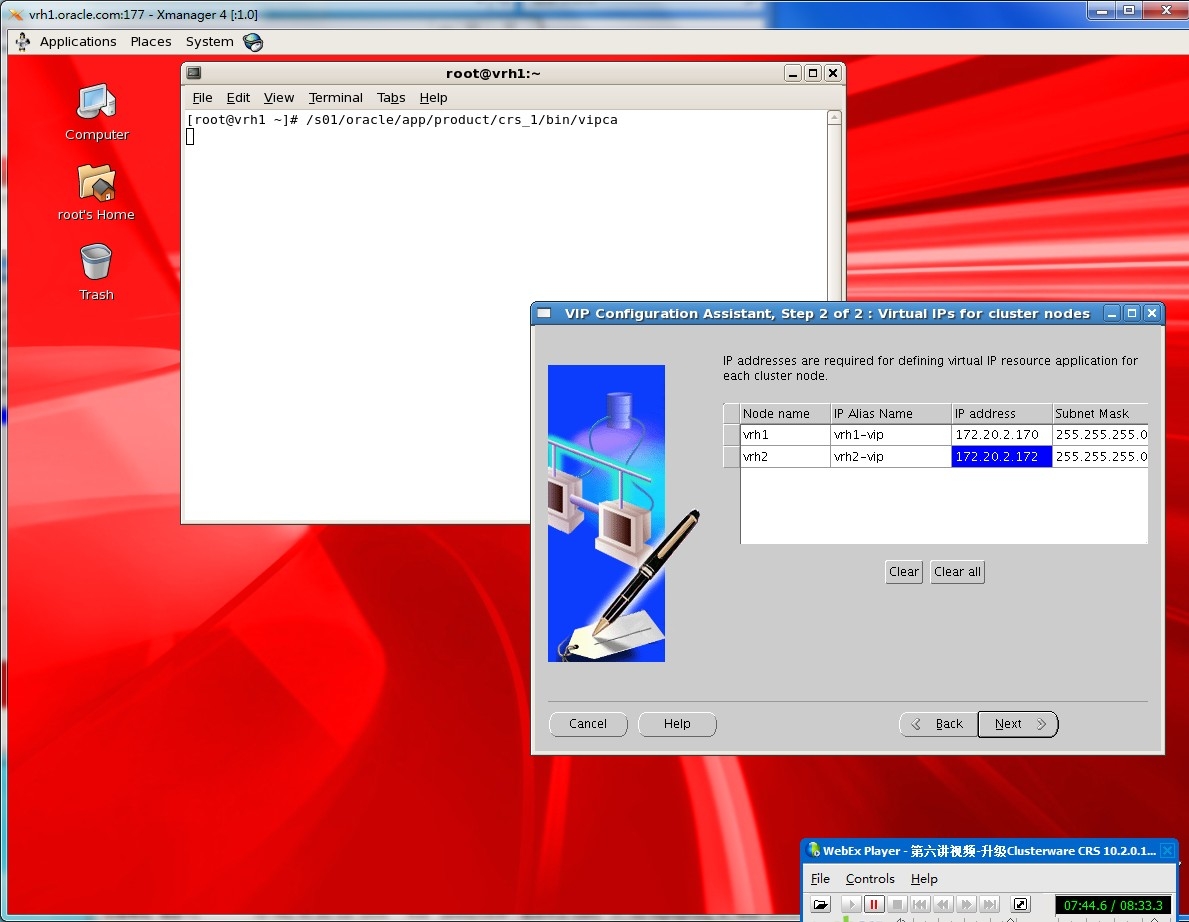
选择 eth0
在第一个方框 填入 vrh1-vip点击ip address 下面方框
在下面的第一个方框 填入 vrh2-vip 点击 ip address 下面方框
就会出现设置过的vip
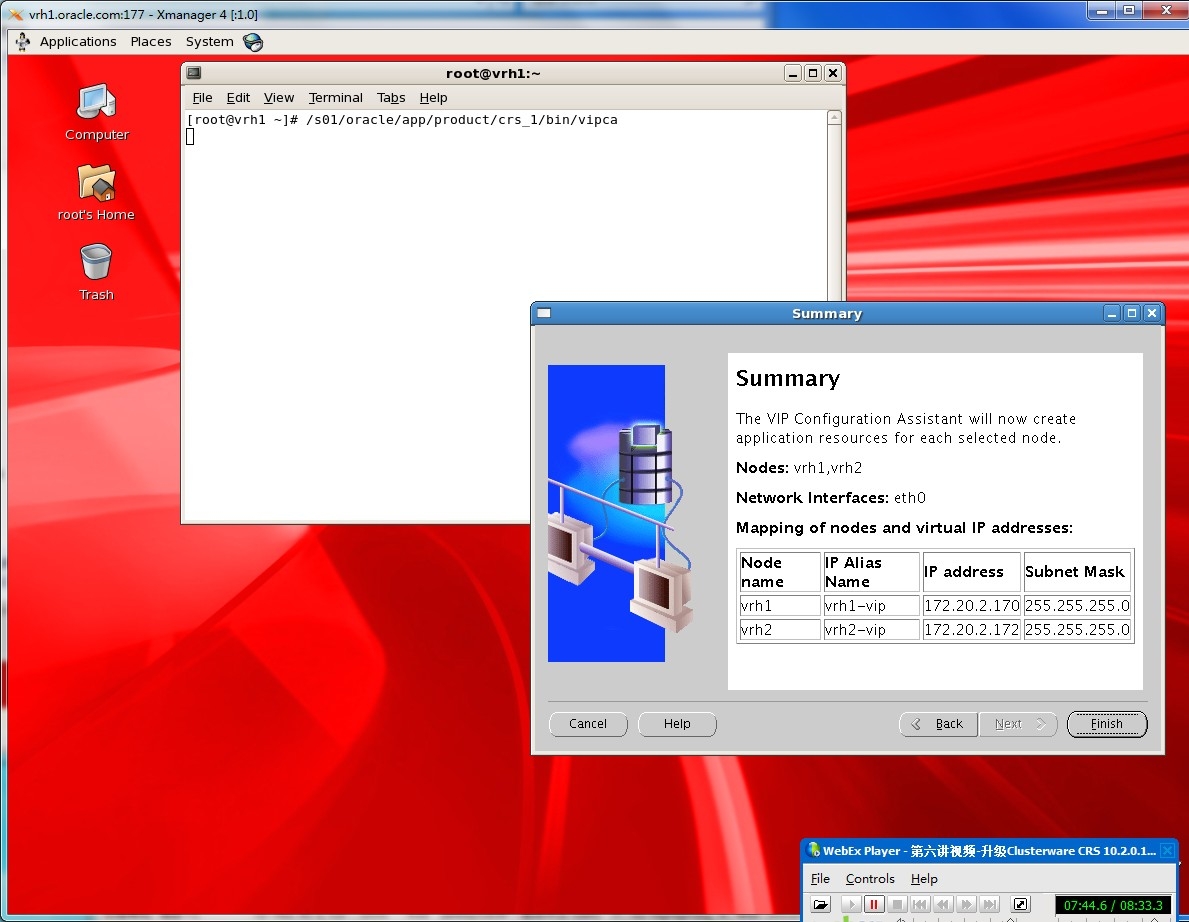
next
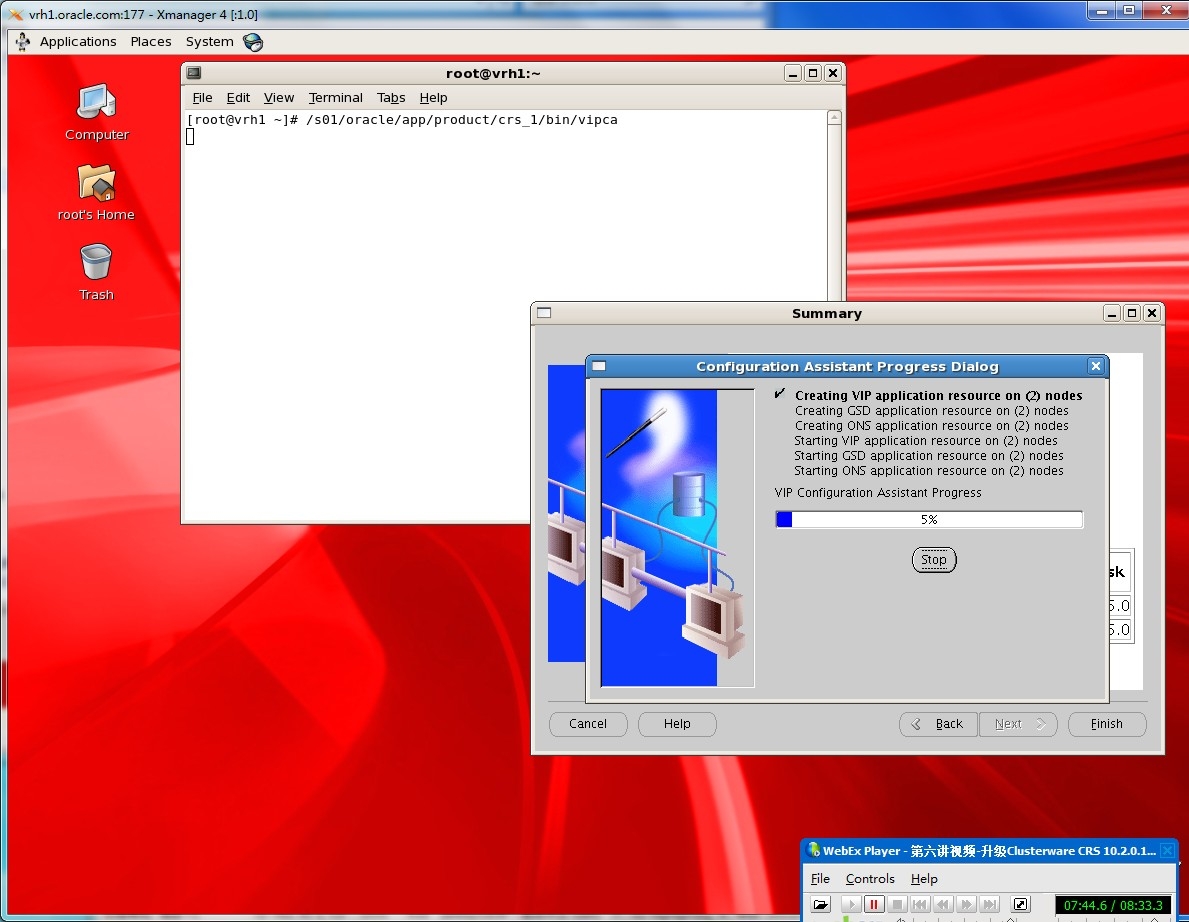
选择 finish
查看服务状态
[oracle@vrh1 ~]$ crs_stat -t
Name Type Target State Host
------------------------------------------------------------
ora.vrh1.gsd application ONLINE ONLINE vrh1
ora.vrh1.ons application ONLINE ONLINE vrh1
ora.vrh1.vip application ONLINE ONLINE vrh1
ora.vrh2.gsd application ONLINE ONLINE vrh2
ora.vrh2.ons application ONLINE ONLINE vrh2
ora.vrh2.vip application ONLINE ONLINE vrh2
Last login: Tue Sep 17 18:55:20 2013 from 172.20.2.36
[root@vrh1 ~]# ifconfig
eth0 Link encap:Ethernet HWaddr 08:00:27:18:83:3F
inet addr:172.20.2.169 Bcast:172.20.2.255 Mask:255.255.255.0
UP BROADCAST RUNNING MULTICAST MTU:1500 Metric:1
RX packets:3962609 errors:0 dropped:0 overruns:0 frame:0
TX packets:1986152 errors:0 dropped:0 overruns:0 carrier:0
collisions:0 txqueuelen:1000
RX bytes:4883339603 (4.5 GiB) TX bytes:1975414889 (1.8 GiB)
eth0:1 Link encap:Ethernet HWaddr 08:00:27:18:83:3F
inet addr:172.20.2.170 Bcast:172.20.2.255 Mask:255.255.255.0
UP BROADCAST RUNNING MULTICAST MTU:1500 Metric:1
eth1 Link encap:Ethernet HWaddr 08:00:27:FD:1C:69
inet addr:192.168.1.191 Bcast:192.168.1.255 Mask:255.255.255.0
UP BROADCAST RUNNING MULTICAST MTU:1500 Metric:1
RX packets:13612 errors:0 dropped:0 overruns:0 frame:0
TX packets:16205 errors:0 dropped:0 overruns:0 carrier:0
collisions:0 txqueuelen:1000
RX bytes:5732070 (5.4 MiB) TX bytes:10594903 (10.1 MiB)
lo Link encap:Local Loopback
inet addr:127.0.0.1 Mask:255.0.0.0
UP LOOPBACK RUNNING MTU:16436 Metric:1
RX packets:15478 errors:0 dropped:0 overruns:0 frame:0
TX packets:15478 errors:0 dropped:0 overruns:0 carrier:0
collisions:0 txqueuelen:0
RX bytes:4124141 (3.9 MiB) TX bytes:4124141 (3.9 MiB)
[root@vrh1 ~]#
vip 也出来了
然后安装库
节点1上用oracle 用户登陆
(图形安装)
[oracle@vrh1 s01]$ mkdir 10201_db
[oracle@vrh1 s01]$ cd 1020
10201_clusterware_linux_x86_64.cpio 10201_database_linux_x86_64.cpio 10205_patch/
10201_crs/ 10201_db/
[oracle@vrh1 s01]$ cd 10201_d
10201_database_linux_x86_64.cpio 10201_db/
[oracle@vrh1 s01]$ cd 10201_d
10201_database_linux_x86_64.cpio 10201_db/
[oracle@vrh1 s01]$ cd 10201_db
[oracle@vrh1 10201_db]$ cpio -idvm < ../10201_database_linux_x86_64.cpio
解压完以后
安装图形界面
[oracle@vrh1 ~]$ crsctl check crs
CSS appears healthy
CRS appears healthy
EVM appears healthy
[oracle@vrh1 ~]$ cd /s01/
[oracle@vrh1 s01]$ ls
10201_clusterware_linux_x86_64.cpio 10205_patch
10201_crs oracle
10201_database_linux_x86_64.cpio oraInventory
10201_db p8202632_10205_Linux-x86-64.zip
[oracle@vrh1 s01]$ cd 10201_db/
[oracle@vrh1 10201_db]$ ls
database
[oracle@vrh1 10201_db]$ cd database/
[oracle@vrh1 database]$ ls
doc install response runInstaller stage welcome.html
[oracle@vrh1 database]$ ./runInstaller
[oracle@vrh1 database]$ ./runInstaller -ignoreSysPrereqs
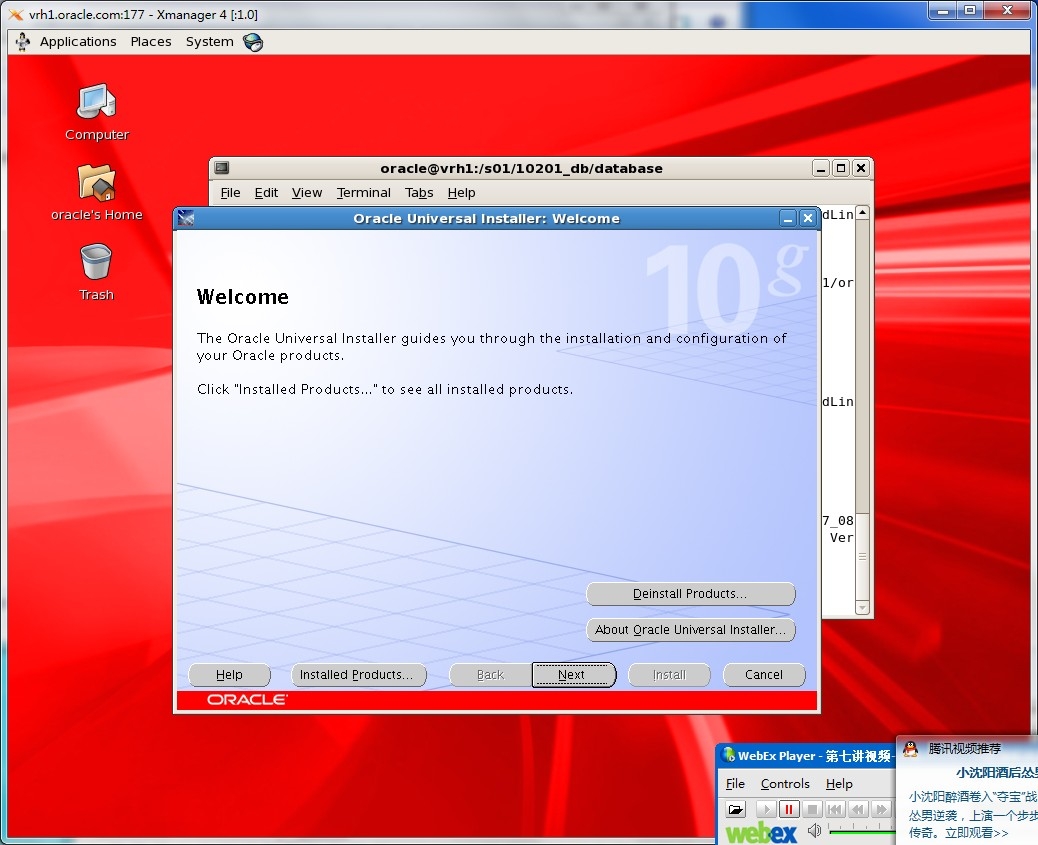
next
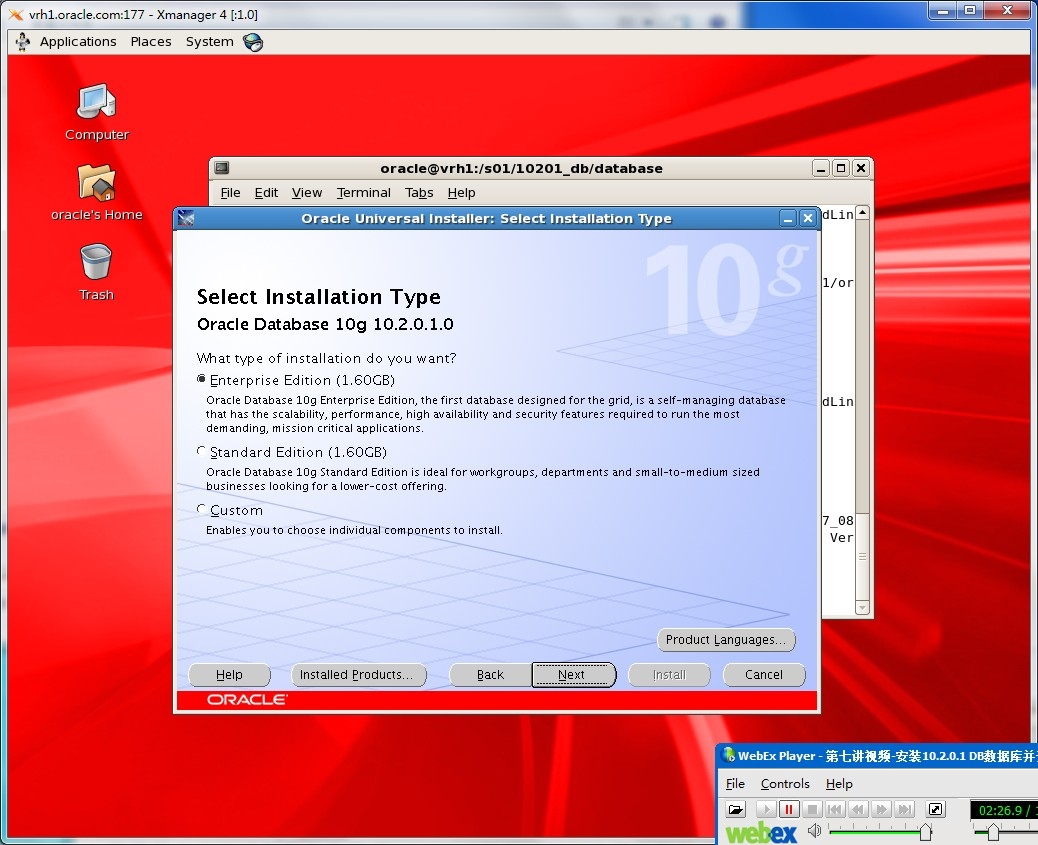
第二步 选择第一个 施强讲过这个 Enterprise Edition
第三步 修改安装路径 /s01/oracle/product/10.2.0/db_1
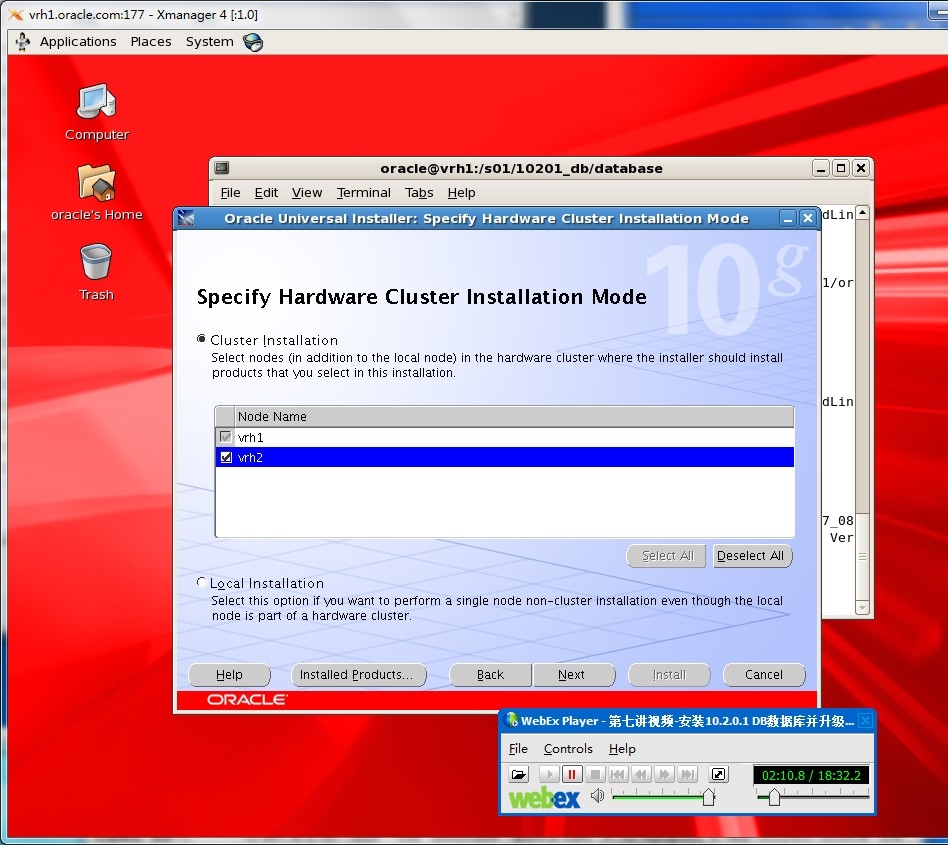
第四步 选择两个节点 Cluster Installation
第五步 检查并全部勾选
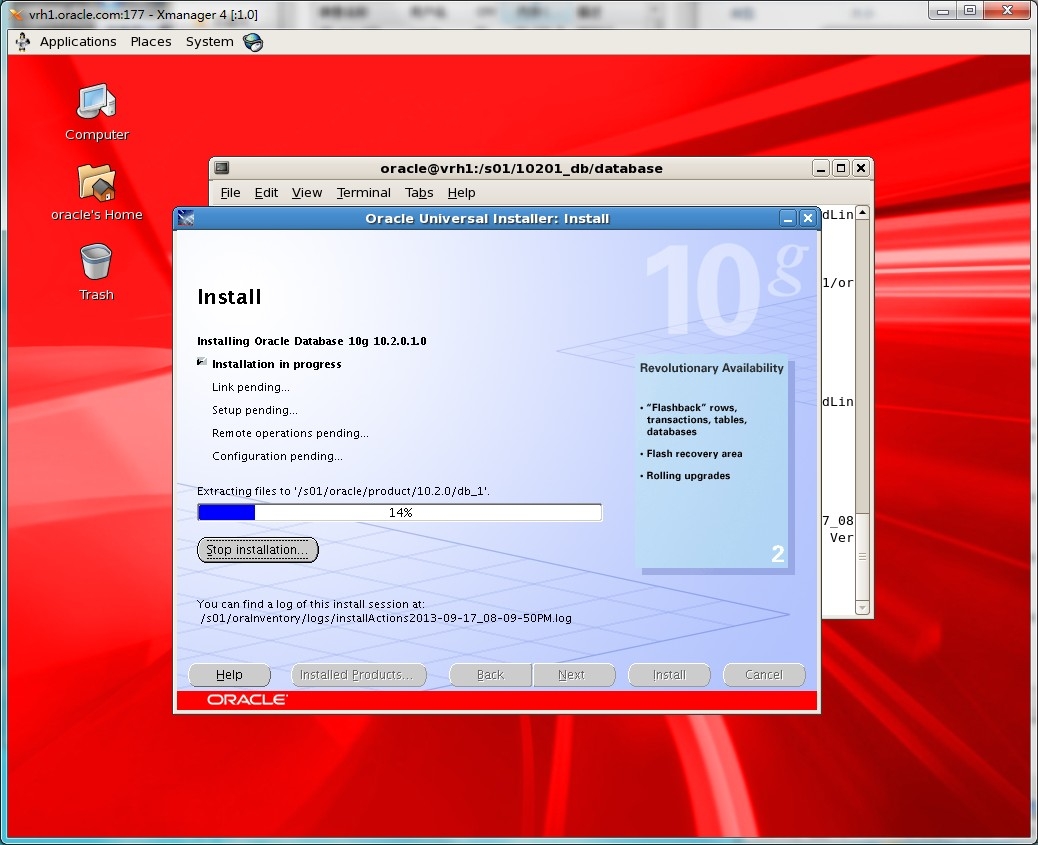
第六步 Install database Software only
安装升级 10205
[oracle@vrh1 ~]$ cd /s01/
[oracle@vrh1 s01]$ ls
10201_clusterware_linux_x86_64.cpio 10205_patch
10201_crs oracle
10201_database_linux_x86_64.cpio oraInventory
10201_db p8202632_10205_Linux-x86-64.zip
[oracle@vrh1 s01]$ cd 10205_patch/
[oracle@vrh1 10205_patch]$ ls
Disk1 README.htm
[oracle@vrh1 10205_patch]$ cd Disk1/
[oracle@vrh1 Disk1]$ ./runInstaller
[oracle@vrh1 ~]$ su - root
Password:
[root@vrh1 ~]# cd /s01/oracle/product/10.2.0/db_1/
[root@vrh1 db_1]# ./root.sh
Running Oracle 10g root.sh script...
The following environment variables are set as:
ORACLE_OWNER= oracle
ORACLE_HOME= /s01/oracle/product/10.2.0/db_1
Enter the full pathname of the local bin directory: [/usr/local/bin]:
The file "dbhome" already exists in /usr/local/bin. Overwrite it? (y/n)
[n]:
The file "oraenv" already exists in /usr/local/bin. Overwrite it? (y/n)
[n]:
The file "coraenv" already exists in /usr/local/bin. Overwrite it? (y/n)
[n]:
Entries will be added to the /etc/oratab file as needed by
Database Configuration Assistant when a database is created
Finished running generic part of root.sh script.
Now product-specific root actions will be performed.
修改.bash_profile
oracle用户登录
# .bash_profile
# Get the aliases and functions
if [ -f ~/.bashrc ]; then
. ~/.bashrc
fi
# User specific environment and startup programs
ORA_CRS_HOME=/s01/oracle/app/product/crs_1
ORACLE_HOME=/s01/oracle/product/10.2.0/db_1
PATH=$ORACLE_HOME/bin:$ORA_CRS_HOME/bin:$PATH
ORACLE_SID=WMN
ORACLE_BASE=/s01
export ORA_CRS_HOME PATH ORACLE_HOME ORACLE_SID ORACLE_BASE
:wq
source .bash_profile
log out in
再从新登录oracle 用户的图形界面
我们可以测试一下 是不是 10205版本
oracle 用户下
[oracle@vrh1 ~]$ sqlplus
SQL*Plus: Release 10.2.0.5.0 - Production on Wed Sep 18 14:07:56 2013
Copyright (c) 1982, 2010, Oracle. All Rights Reserved.
Enter user-name:
然后
创建库
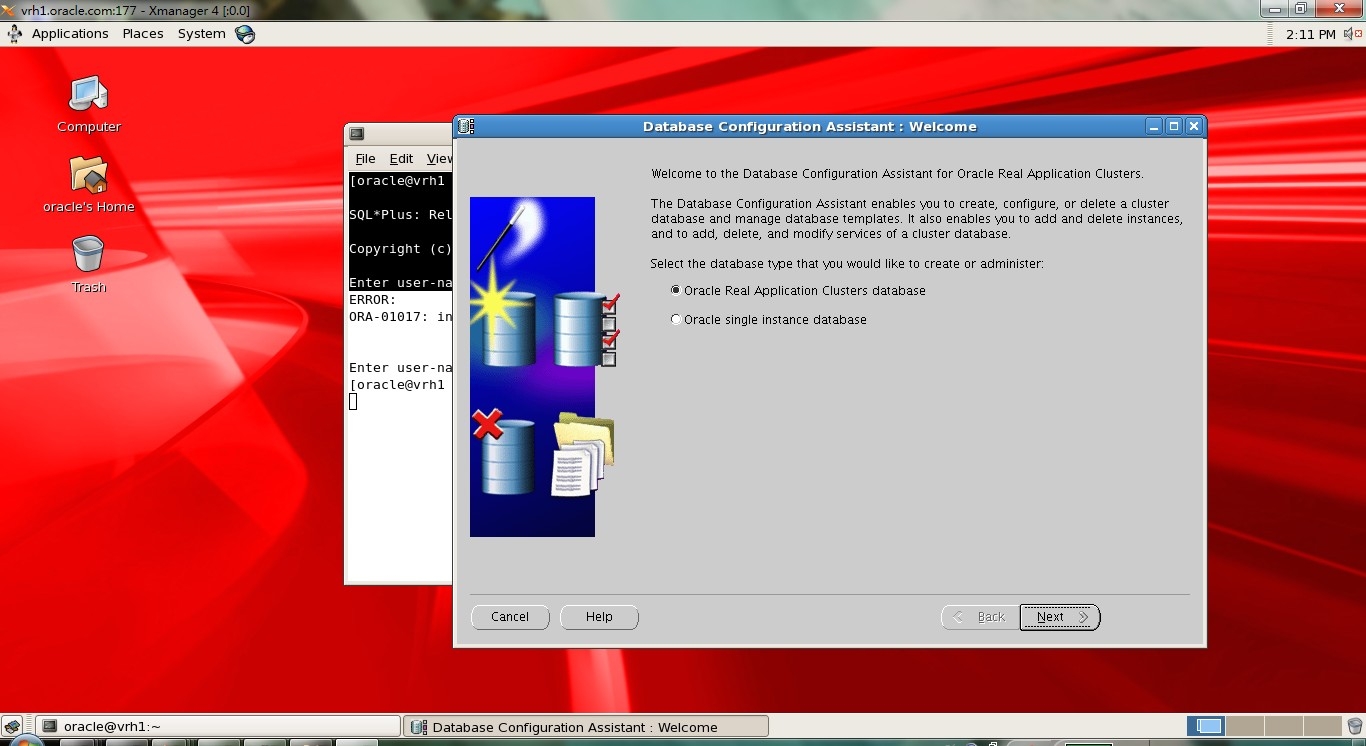
dbca
选择第一个oracle real application clusters database
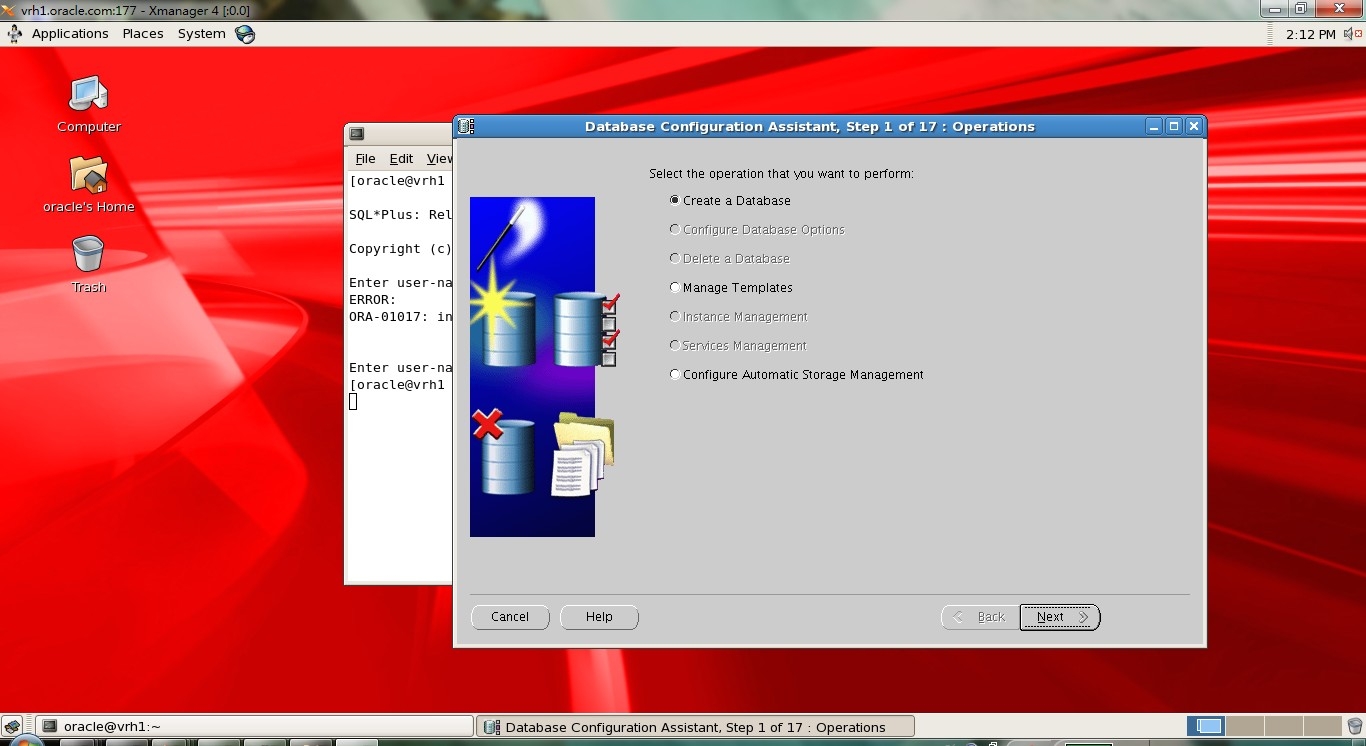
第二步 create a database
第三步看到 Select all 选择 因为是两个节点
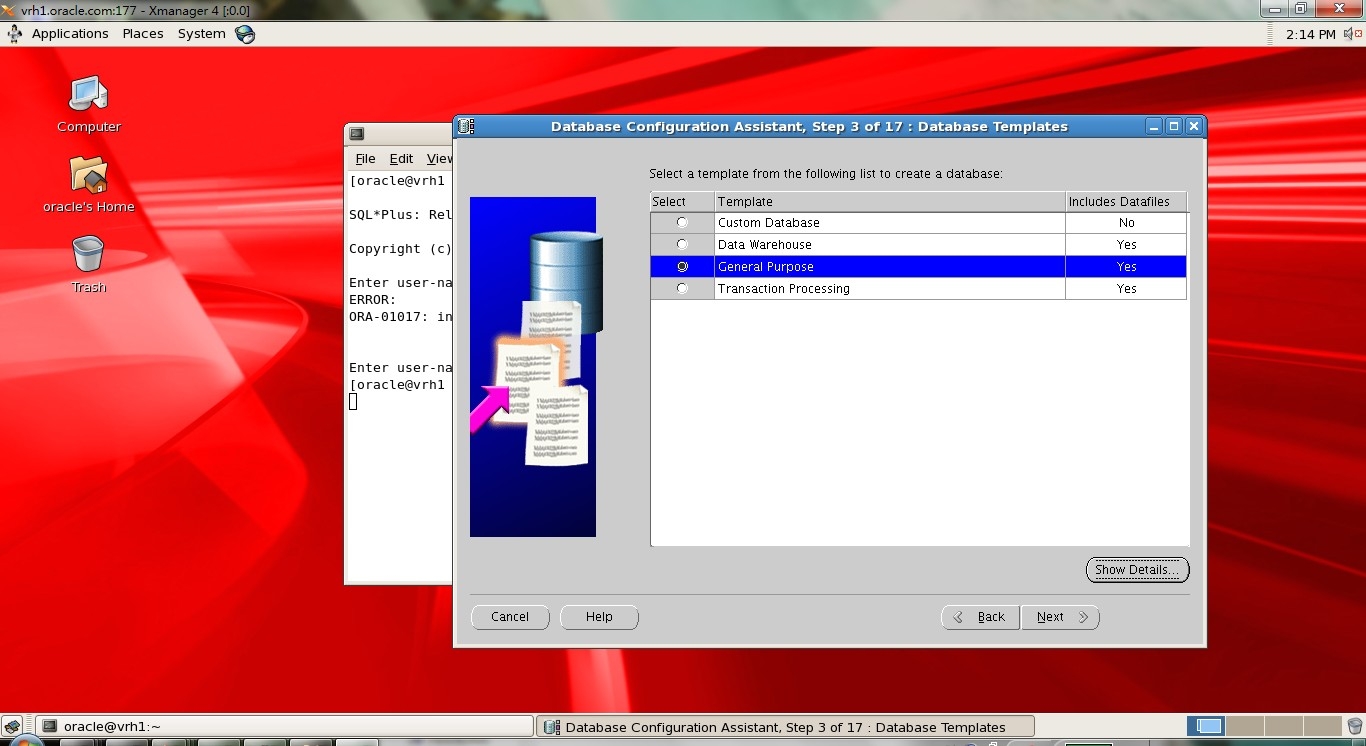
第四步 选择General purpose
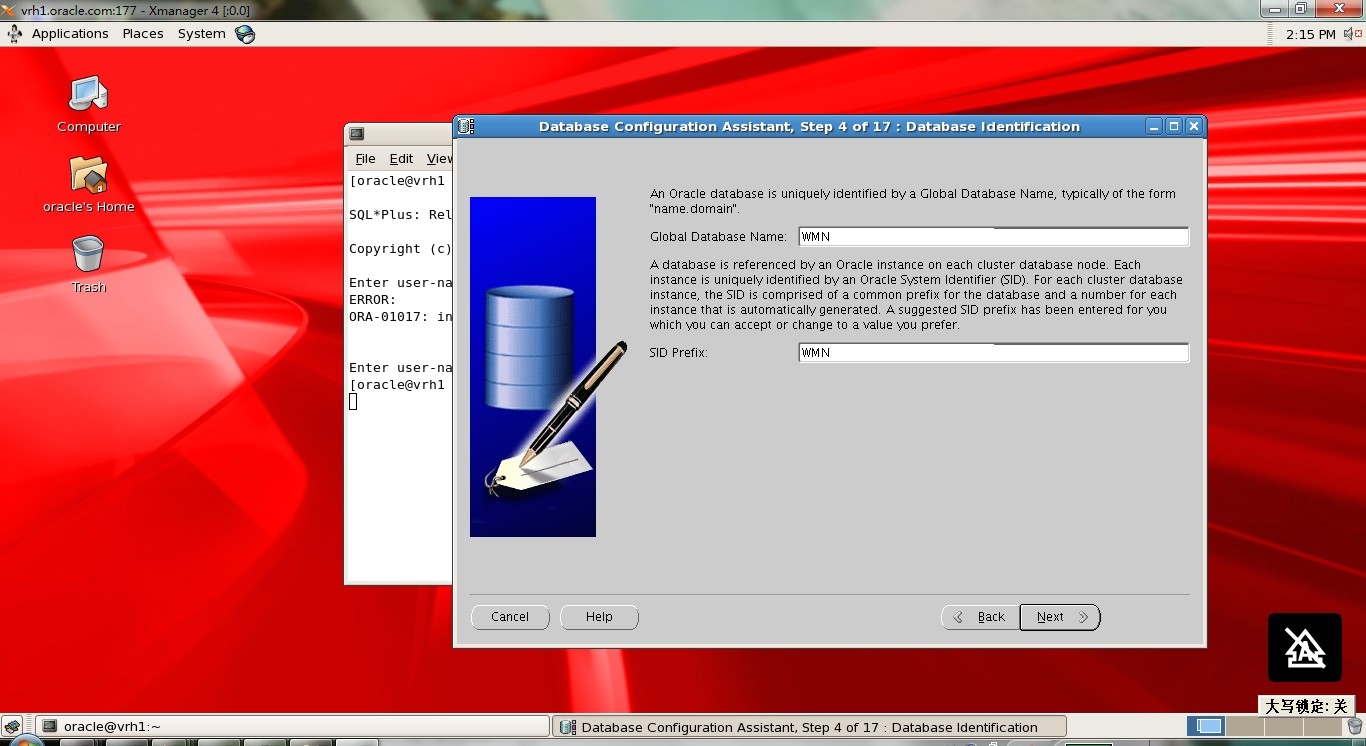
第五步 我们填写库名 和 ORACLE_SID 是对应的 所以 也就说 你在.bash_profile文件里如何填写的 SID 名字 这里就要对应上 WMN
第六步 我们选择不使用配置页
第七步 创建库密码 随意 你记得住就行 我这里使用oracle
第八步 非常重要 选择存储的方式 选择ASM 这就是开始 为什么建立ASM 三块共享裸设备
第九步 设置 ASM 密码 还有 ifile 共享盘 配置文件
第十步 选择ok
第十一步 他会自动帮你创建listen mode 选择ok
第十二步 选择添加设备 选择 Create New
第十三部 选择添加设备的路径 Change Disk Discovery Path
第十四 五步 填入路径 /dev/asm*
第十六步 磁盘组名字 还有 Redundancy 冗余模式 External 外部冗余
然后勾选 所有Disk 磁盘组 ok
第十七 十八 十九 直接 Next
第二十步 选择 Specify Flash Recovery Area 和 Enable Archiving 开启闪回 和归档日志
第二十一 选择 Sample Schemas 实例架构 勾选 NEXT
第二十二 查看你的实例名 等信息 Next
第二十三 配置信息设置
第二十四 修改Database Character Set 数据库字符集 选择UTF8 并且 National Character Set 国家字符集 UTF8
最后直接安装就可以 了
NEXT
查看个日志
[oracle@vrh1 cfgtoollogs]$ ls
cfgfw configToolAllCommands configToolAllCommands.bak dbca emca oui
[oracle@vrh1 cfgtoollogs]$ taif -f c
cfgfw/ configToolAllCommands configToolAllCommands.bak
[oracle@vrh1 cfgtoollogs]$ taif -f configToolAllCommands
-bash: taif: command not found
[oracle@vrh1 cfgtoollogs]$ ls
cfgfw configToolAllCommands configToolAllCommands.bak dbca emca oui
[oracle@vrh1 cfgtoollogs]$ cd dbca/
[oracle@vrh1 dbca]$ ls
trace.log WMN
[oracle@vrh1 dbca]$ cd WMN/
[oracle@vrh1 WMN]$ ls
cloneDBCreation.log CreateClustDBViews.log postScripts.log tempControl.ctl
CloneRmanRestore.log mkplug_v3_WMN1.log rmanRestoreDatafiles.sql tts_example_imp.log
[oracle@vrh1 WMN]$ taif -f cloneDBCreation.log
-bash: taif: command not found
[oracle@vrh1 WMN]$ tail -f cloneDBCreation.log
162 oracle@vrh1.oracle.com (CKPT) 1
163 oracle@vrh1.oracle.com (LGWR) 1
164 oracle@vrh1.oracle.com (DBW0) 1
165 oracle@vrh1.oracle.com (MMAN) 1
166 oracle@vrh1.oracle.com (LMD0) 1
167 oracle@vrh1.oracle.com (LMON) 1
168 oracle@vrh1.oracle.com (PSP0) 1
169 oracle@vrh1.oracle.com (DIAG) 1
170 oracle@vrh1.oracle.com (PMON) 1
AL16UTF16
安装日志 会随时变化
安装完成
当我启动sqlplus / as sysdba
startup 我们发现出现了问题
后经查询 是 两个节点的ORACLE_SID 相同了
然后使用ORACLE用户 修改.bash_profile中的ORACLE_SID=WMN1
节点二 的修改成为 ORACLE_SID=WMN2
ok 安装完成 测试一下
[oracle@vrh1 ~]$ sqlplus / as sysdba;
SQL*Plus: Release 10.2.0.5.0 - Production on Wed Sep 18 15:29:04 2013
Copyright (c) 1982, 2010, Oracle. All Rights Reserved.
Connected to:
Oracle Database 10g Enterprise Edition Release 10.2.0.5.0 - 64bit Production
With the Partitioning, Real Application Clusters, OLAP, Data Mining
and Real Application Testing options
SQL> select count(*) from gv$instance;
COUNT(*)
----------
2
SQL> select * from v$vsrsion
2 ;
select * from v$vsrsion
*
ERROR at line 1:
ORA-00942: table or view does not exist
SQL> select * from v$version;
BANNER
----------------------------------------------------------------
Oracle Database 10g Enterprise Edition Release 10.2.0.5.0 - 64bi
PL/SQL Release 10.2.0.5.0 - Production
CORE10.2.0.5.0Production
TNS for Linux: Version 10.2.0.5.0 - Production
NLSRTL Version 10.2.0.5.0 - Production
SQL>
到此 oracle 10201 cluster 升级并 安装 已经完成
希望这份文档 对感兴趣的朋友有帮助
--------------------AndyK : 王孟楠
下面付一些图 如果 上述讲解 不清晰 请参照图片进行安装










本文出自 “fatherhome” 博客,请务必保留此出处http://andykbrave.blog.51cto.com/6231609/1406034
