首页 > 代码库 > centos 6.2系统下编译安装lamp环境
centos 6.2系统下编译安装lamp环境
系统环境:centOs 6.2(纯净系统环境,已做初步系统优化)
系统内核:2.6.32-220.el6.x86_64
软件版本:http-2.4.2; mysql-5.5.23; php-5.3.13
闲言碎语:通过源码方式安装软件,需要准备好安装环境(如gcc等工具)
个人学习、交流QQ:875656692
yum -y install gcc gcc-c++ openssl openssl-devel
yum install -y ncurses ncurses-devel
1. 编译安装http-2.4.2
1.1 下载所需软件包
http : http://www.apache.org/
apr : http://www.apache.org/
pcre : http://www.pcre.org/
1.2 解压
tar -xf httpd-2.4.2.tar.bz2
tar -xf apr-util-1.4.1.tar.bz2
tar -xf apr-1.4.6.tar.bz2
tar -xf apr-iconv-1.2.1.tar.bz2
tar -xf pcre-8.35.tar.gz
1.3 编译、安装
cd apr-1.4.6
./configure --with-apr=/usr/local/apr
make && make install
cd ..
cd apr-util-1.4.1
./configure --prefix=/usr/local/apr-util --with-apr=/usr/local/apr/
make && make install
cd ..
cd apr-iconv-1.2.1
./configure --prefix=/usr/local/apr-iconv --with-apr=/usr/local/apr/
make && make install
cd ..
cd pcre-8.35
./configure --prefix=/usr/local/pcre
make && make install
cd ..
cd httpd-2.4.2
./configure --prefix=/usr/local/apache2 --with-apr=/usr/local/apr --with-apr-util=/usr/local/apr-util --with-apr-iconv=/usr/local/apr-iconv --with-pcre=/usr/local/pcre --enable-ssl --enable-rewrite --enable-dav --enable-authz --enable-cgid --enable-cgi --enable-module=so
make && make install
cd ..
##### http-2.4.2 编译安装完成 #####
1.4 配置
创建apache程序用户(用于替代默认daemon)
useradd  -M -s /sbin/nologin web(不创建家目录;禁止登陆)
编辑apache配置文件vim /usr/local/apache/conf/http.conf
修改“DirectoryIndex index.html”为“DirectoryIndex index.html index.php”
##添加对PHP文件的解析
修改“Options Indexes FollowSymLinks”为“Options FollowSymLinks”
##不显示目录结构
修改“AllowOverride None ”为“AllowOverride All”
##开启apache支持伪静态,有三处
去掉注释“#LoadModule rewrite_module modules/mod_rewrite.so”为“ LoadModule rewrite_module modules/mod_rewrite.so”
##开启apache支持伪静态
去掉注释“#ServerName www.example.com:80”为“ServerName www.name.com:80”
添加apache到全局环境变量
echo "export PATH=$PATH:/usr/local/apache2/bin" >> /etc/profile && source /etc/profile
检查语法
/usr/local/apache/bin/apachectl -t
Syntax OK
启动apache
/usr/local/apache/bin/apachectl
打开浏览器输入:IP/index.html
It Works !
2. 编译安装mysql-5.5.23
2.1 下载所需软件包
cmake :http://www.cmake.org/
mysql :http://www.mysql.com/downloads/
2.2 解压
tar -xf cmake-2.8.8.tar.gz
tar -xf mysql-5.5.23.tar.gz
2.3 编译、安装
cd cmake-2.8.8
./configure
make && make install
cd ..
cd mysql-5.5.23
cmake -DCMAKE_INSTALL_PREFIX=/usr/local/mysql-5.5.23 -DMYSQL_DATADIR=/usr/local/mysql-5.5.23/data/ -DDEFAULT_CHARSET=utf8 -DDEFAULT_COLLATION=utf8_general_ci -DWITH_EXTRA_CHARSETS:STRING=all -DWITH_MYISAM_STORAGE_ENGINE=1 -DWITH_INNOBASE_STORAGE_ENGINE=1 -DWITH_ARCHIVE_STORAGE_ENGINE=1 -DWITH_READLINE=1 -DENABLED_LOCAL_INFILE=1 -DMYSQL_USER=mysql -DWITH-EMBEDDED_SERVER=1 -DSYSCONFDIR=/usr/local/mysql-5.5.23/conf/my.cnf -DMYSQL_TCP_PORT=3308 -DWITH_SSL=yes -DWITH_MEMORY_STORAGE_ENGINE=1 -DWITH_FEDERATED_STORAGE_ENGINE=1 -DWITH_PARTITION_STORAGE_ENGINE=1 -DINSTALL_PLUGINDIR=/usr/local/mysql-5.5.23/plugin
make && make install
cd ..
添加软连接,以便于mysql版本升级
ln -s /usr/local/mysql-5.5.23/ /usr/local/mysql
##### mysql-5.5.23 编译安装完成 #####
2.4 配置mysql
创建mysql用户(禁止登陆、不创建家目录)
useradd -M -s /sbin/nologin mysql

初始化CMD
/usr/local/mysql-5.5.23/scripts/mysql_install_db --basedir=/usr/local/mysql-5.5.23/ --datadir=/usr/local/mysql-5.5.23/data/ --user=mysql

初始化结果展示
WARNING: The host ‘84‘ could not be looked up with resolveip.
This probably means that your libc libraries are not 100 % compatible
with this binary MySQL version. The MySQL daemon, mysqld, should work
normally with the exception that host name resolving will not work.
This means that you should use IP addresses instead of hostnames
when specifying MySQL privileges !
Installing MySQL system tables...
OK
Filling help tables...
OK
To start mysqld at boot time you have to copy
support-files/mysql.server to the right place for your system
PLEASE REMEMBER TO SET A PASSWORD FOR THE MySQL root USER !
To do so, start the server, then issue the following commands:
/usr/local/mysql-5.5.23//bin/mysqladmin -u root password ‘new-password‘
/usr/local/mysql-5.5.23//bin/mysqladmin -u root -h 84 password ‘new-password‘
Alternatively you can run:
/usr/local/mysql-5.5.23//bin/mysql_secure_installation
which will also give you the option of removing the test
databases and anonymous user created by default.  This is
strongly recommended for production servers.
See the manual for more instructions.
You can start the MySQL daemon with:
cd /usr/local/mysql-5.5.23/ ; /usr/local/mysql-5.5.23//bin/mysqld_safe &
You can test the MySQL daemon with mysql-test-run.pl
cd /usr/local/mysql-5.5.23//mysql-test ; perl mysql-test-run.pl
Please report any problems with the /usr/local/mysql-5.5.23//scripts/mysqlbug script!
配置mysql全局环境变量
echo "export PATH=$PATH:/usr/local/mysql/bin/mysql" >> /etc/profile  $$ source /etc/profile
拷贝mysql配置文件到指定路径下
cp /usr/local/mysql/support-files/my-innodb-heavy-4G.cnf /usr/local/mysql/conf/my.cnf
编译mysql配置文件,根据自己的实际情况修改my.cnf
basedir = /usr/local/mysql/
datadir = /usr/local/mysql/data

授权mysql用户对数据目录的操作权限
chown -R mysql:mysql /usr/local/mysql-5.5.23/data
启动mysql
mysqld_safe  --defaults-file=/usr/local/mysql/conf/my.cnf &
设定mysql用户root的登陆密码(初次安装完成mysql,root登陆密码为空,可直接登陆)
mysqladmin -u root password ‘new-password‘
PS:导出、导入数据(方法很多,可自行选择)
导出:mysqldump -uroot -p(passwd) DB_name > /dir/DB_name.sql
导入:mysql -uroot -p(passwd) DB_name < /dir/DB_name.sql
3. 编译安装php-5.3.13
3.1 解压
tar -xf php-5.3.13.tar.bz2
3.2 编译、安装
PS:参数可以自己选择,选择的越多,所要安装的依赖也越多(个人理解,仅供参考)我这里需要安装一个 ibxml2-devel
yum install -y libxml2-devel
cd php-5.3.13
./configure --prefix=/usr/local/php-5.3.13 --with-config-file-path=/usr/local/php-5.5.13/etc --with-mysql=/usr/local/mysql-5.5.23/ --with-mysqli=/usr/local/mysql-5.5.23/bin/mysql_config --with-iconv-dir --with-libxml-dir --with-freetype-dir --with-jpeg-dir --with-png-dir --with-zlib --with-pcre-dir=/usr/local/pcre --enable-xml --with-apxs2=/usr/local/apache2/bin/apxs --enable-inline-optimization --enable-zip --with-bz2 --without-pear --with-curl=/usr/local/curl-7.3

make && make install
cd ..
##### php-5.3.13 编译安装完成 #####
3.3 配置php(此处参考http://sonice.blog.51cto.com/994545/796317)
cp /usr/local/src/php-5.5.23/php.ini-production  /usr/local/php5/etc/php.ini
vi /usr/local/php5/etc/php.ini
找到“;open_basedir =”;修改为“open_basedir = .:/tmp/”##防止php木马跨站
找到“disable_functions =”;修改为“disable_functions = passthru,exec,system,chroot,scandir,chgrp,chown,shell_exec,proc_open,proc_get_status,ini_alter,ini_alter,ini_restore,dl,openlog,syslog,readlink,symlink,popepassthru,stream_socket_server,escapeshellcmd,dll,popen,disk_free_space,checkdnsrr,checkdnsrr,getservbyname,getservbyport,disk_total_space,posix_ctermid,posix_get_last_error,posix_getcwd, posix_getegid,posix_geteuid,posix_getgid, posix_getgrgid,posix_getgrnam,posix_getgroups,posix_getlogin,posix_getpgid,posix_getpgrp,posix_getpid, posix_getppid,posix_getpwnam,posix_getpwuid, posix_getrlimit, posix_getsid,posix_getuid,posix_isatty, posix_kill,posix_mkfifo,posix_setegid,posix_seteuid,posix_setgid, posix_setpgid,posix_setsid,posix_setuid,posix_strerror,posix_times,posix_ttyname,posix_uname”
##列出PHP可以禁用的函数,如果某些程序需要用到这个函数,可以删除,以取消禁用
找到“;date.timezone =”;修改为“date.timezone = PRC”
找到“expose_php = On”;修改为“expose_php = OFF ” ##禁止显示php版本的信息找到“display_errors = On”;修改为“display_errors = OFF“##关闭错误提示
配置apache支持php
vi /usr/local/apache2/conf/httpd.conf
##编辑apache配置文件
在LoadModule php5_module modules/libphp5.so这一行下面添加、AddType application/x-httpd-php .php (注意:php .php这个点前面有一个空格)
service httpd restart #重启apache
PS:配置完后需重新加载apache
/usr/local/apache/bin/apache graceful
#如配置过全局环境变量,可直接apache graceful
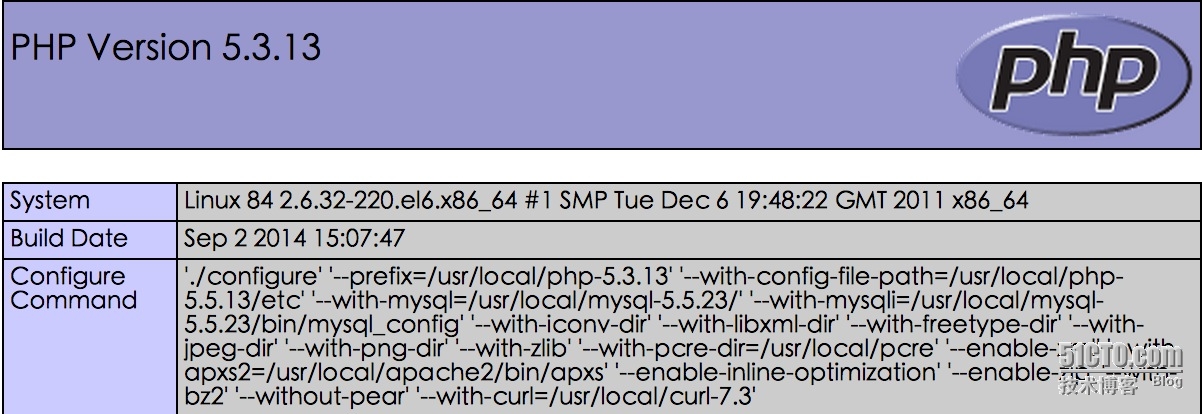
验证配置结果
#在apache根目录下放置如下php文件,打开浏览器输入:ip/index.php可看到php的一系列信息
cat index.php
<?php
phpinfo();
?>

结论:本片博文旨在个人总结、记录之用,属***作,虽然参考了网上很多其它人的优秀博文,但仍有很多不足之处,希望对有缘的读者有所帮助,后续会补充。
本文出自 “有容乃大” 博客,请务必保留此出处http://yumao.blog.51cto.com/9298275/1547950
centos 6.2系统下编译安装lamp环境
