首页 > 代码库 > ansible 安装与基本功能的使用
ansible 安装与基本功能的使用
实验环境:
centos6.6 IP 192.168.38.152 (安装ansible)
centos6.6 IP 192.168.38.155(hostname: web155.com,实验用的客户机)
安装方法:
利用yum 安装ansible,要求系统的python要是2.6以上
1.1 开始安装:
1.1.1 需要在152的机器安装一下epel外部源,可以使用阿里云的源:
更新源的方法:
1. 首先卸载以前装的epel 以免影响
  rpm -e epel-release
2. 下载阿里提供的epel ,PS  感谢马云。
wget -P /etc/yum.repos.d/ http://mirrors.aliyun.com/repo/epel-6.repo
3. yum clean all
4. yum makecache


  好了,其实到这里,就已经更新完毕了。

如果想全部改成阿里云的源,可以按照下面的方法进行。进行前请先将自己的源做一下备份。


1. rm -rf /etc/yum.repos.d/*    (执行此操作的时候记得事先装好wget    不然 你就得挂载光盘用rpm装wget了。)
2. wget -P /etc/yum.repos.d/ http://mirrors.aliyun.com/repo/epel-6.repo http://mirrors.aliyun.com/repo/Centos-6.repo

这个时候,执行 yum repolist的结果如下
[root@di02 ~]# yum repolist
已加载插件:fastestmirror
Loading mirror speeds from cached hostfile
* base: mirrors.aliyun.com
* epel: mirrors.aliyun.com
* extras: mirrors.aliyun.com
* updates: mirrors.aliyun.com
1.1.2 yum安装ansible:
yum install -y ansible
1.1.3 配置ssh 登陆
由于ansible使用的登陆方式是ssh所以,在做实验的两台主机需要配置ssh秘钥对,这样ansible才能正常使用。
在152 的主机上,执行:
ssh-keygen -t rsa 直接回车即可,不用设置密钥密码。
然后将公钥(id_rsa.pub)拷贝到155的机器上:copy-id -i root@IP 这个命令就能生成authorized_keys文件的,没必要一个一个无复制.pub文件,那样反而麻烦容易错误的
本机152也要操作:
cat /root/.ssh/id_rsa.pub >> /root/.ssh/authorized_keys
chmod 600 /root/.ssh/authorized_keys
在152和155的机器上关闭selinux: setenforce 0
测试ssh是否可以登录:
在152的机器:ssh 192.168.38.155 ,成功登录155的机器。
1.2 修改ansible的hosts文件
在152的机器:
vim /etc/ansible/hosts 在末尾添加:

testhosts 是服务器组的名字,用来统一管理服务器。
web155.com是192.168.38.155 这台服务器,当然,这里可以直接写IP地址。
如果写成域名的形式,则需要修改一下dns的指向或者/etc/hosts ,让dns可以找到web155.com的IP指向了哪个服务器。
修改/etc/hosts :

修改完/etc/ansible/hosts 保存后退出。
现在就可以用ansible进行远程操作的测试了。
2. ansible远程操作
2.1 执行w命令,查看服务器的状态:
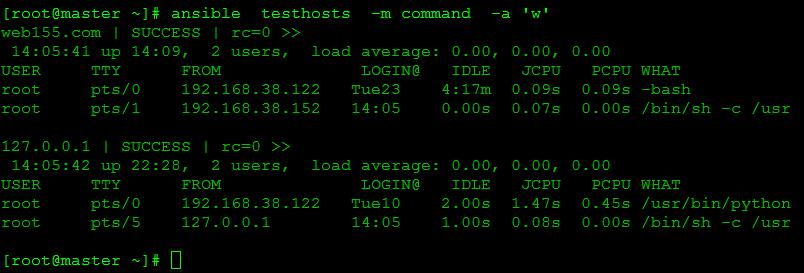
ansible testhosts -m command -a ‘w‘

testhosts 是刚刚配置的远程服务器的组名,-m 后面的是ansible 的模块名字,这里用的是command 模块,-a 后面是在远程服务器是执行的命令。
由于做实验只用了两天服务器,所以将127.0.0.1的IP地址也加到了testhosts 组里了。可以看到,ansible同样也是可以将127.0.0.1 和192.168.38.155 的w 命令的执行结果返回的。
如果发现ansible执行远程命令的速度响应很慢,慢到有十几秒,可以尝试修改一下:
编辑配置文件 /etc/ssh/sshd_config vim /etc/ssh/sshd_config 找到 UseDNS选项,如果没有注释,将其注释 #UseDNS yes 添加 UseDNS no
找到 GSSAPIAuthentication选项,如果没有注释,将其注释 #GSSAPIAuthentication yes 添加 GSSAPIAuthentication no
保存配置文件
重启 OpenSSH服务器 /etc/init.d/sshd restart
2.2 ansible 拷贝文件或者目录
利用ansible可以很方便地将本地的目录或者文件同步到远程的服务器:
命令格式:
ansible testhosts -m copy -a "src=http://www.mamicode.com/etc/ansible dest=/tmp/ansibletest owner=root group=root mode=0644"
注意:源目录放到目标目录下面去,如果目标指定的目录不存在,它会自动创建。如果拷贝的是文件,dest指定的名字和源的不同,并且它不是已经存在的目录,相当于拷贝过去后,又重命名。但相反,如果dest是目标机器已经存在的目录,则会直接把文件拷贝到该目录下。
ansible testhosts -m copy -a "src=http://www.mamicode.com/etc/passwd dest=/tmp/123"
这里的/tmp/123和源机器上的/etc/passwd是一致的,但如果目标机器上已经有了/tmp/123,即123是一个目录名的时候,则passwd将被拷贝到123目录下面。
2.3 ansible远程执行脚本
首次按创建一个简单的脚本:
vim /tmp/test.sh
#!/bin/bash
echo  `date` > /tmp/ansible_test.txt
然后,将脚本分发到各个服务器,并且赋予执行权限:
ansible testhosts -m command -a "src=http://www.mamicode.com/tmp/test.sh dest=/tmp/test.sh mode=0755"
复制的结果:

可以看到,已经在155的机器上复制成功了。
然后,就可以批量执行该脚本了:
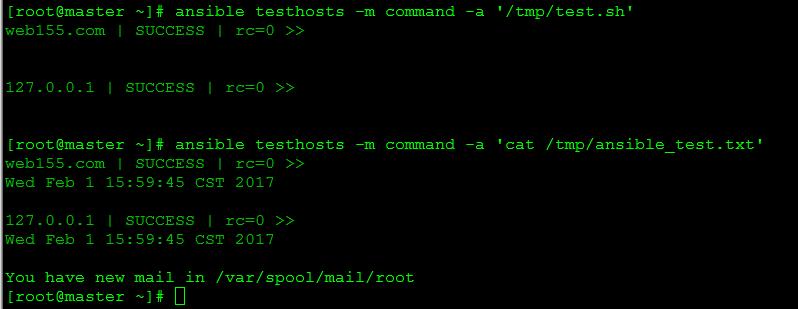
ansible testhosts -m shell -a ‘/tmp/test.sh‘
在客户端,检查一下:

已经创建了/tmp/ansible_test.txt 文件了,并且在ansible_test.txt文件里写入了结果。测试成功。
这里用到了shell模块,它是支持远程执行命令,并且能够使用管道符号:
ansible testhosts -m shell -a ‘cat /etc/passwd | wc -l‘
2.4 ansible实现远程任务执行
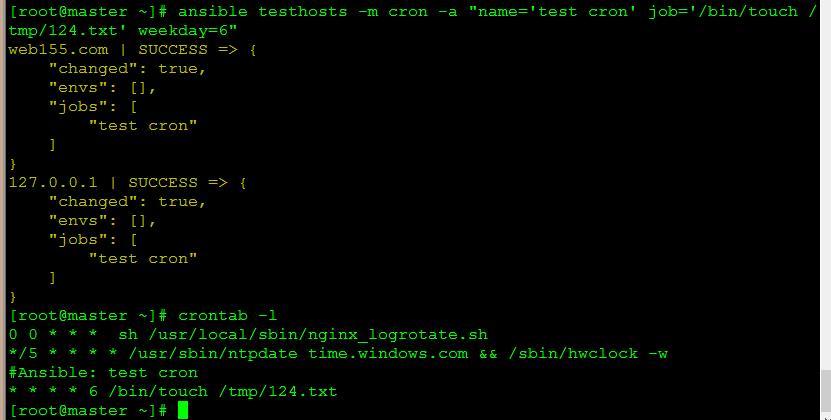
利用ansible 的cron 模块,给远程的服务器批量增加任务计划
ansible testhosts -m cron -a "name=‘test cron‘ job=‘/bin/touch /tmp/124.txt‘ weekday=6"
每个星期天都重新创建一个文件/tmp/124.txt

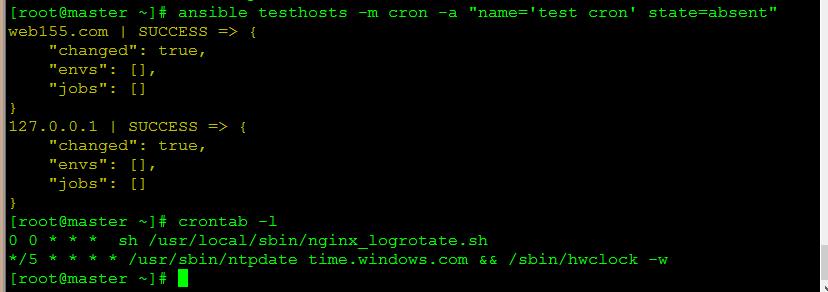
如果想删除任务计划,则只要增加state=absent,如下图,已经在任务计划里,将刚刚增加的任务删除了:

2.5 ansible安装rpm包和管理服务
安装rpm包,用yum模块,参数name是必须的,还可以加上state,但不是必须的。
state的状态有state must be one of: running,started,stopped,restarted,reloaded

管理系统服务,则用到service模块,enabled控制是否和系统一起启动。

2.6 ansible-doc -l 查看ansible的模块
遇到的报错:
# ansible-doc -l
[DEPRECATION WARNING]: docker is kept for backwards compatibility but usage is discouraged. The module documentation details page may explain more about this rationale..
This feature will be removed in
a future release. Deprecation warnings can be disabled by setting deprecation_warnings=False in ansible.cfg.
[ERROR]: unable to parse /usr/lib/python2.6/site-packages/ansible/modules/extras/cloud/misc/rhevm.py
ERROR! module rhevm has a documentation error formatting or is missing documentation
解决方法:
sed -i ‘s/^#deprecation_warnings = True/deprecation_warnings = False/‘ /etc/ansible/ansible.cfg
rm -f /usr/lib/python2.6/site-packages/ansible/modules/extras/cloud/misc/rhevm.py
重新执行 ansible-doc -l

也可以单独查看某个模块,例如:
ansible-doc cron

本文出自 “dayAndNight” 博客,请务必保留此出处http://hellocjq.blog.51cto.com/11336969/1894565
ansible 安装与基本功能的使用
