首页 > 代码库 > varnish简单入门
varnish简单入门
在nginx里我们引入了缓存功能,把对某些请求的结果缓存下来,下次请求直接使用数据响应,这样极大的节省了系统获取源数据资源的时间,若我们把大量的请求结果都使用缓存服务器来响应,那么我们可以大大减少计算机数量减少成本。既然要使用缓存那么就会引来问题,缓存的数据什么时间失效,万一多台缓存服务器损坏一台后,缓存结果怎么处理。
# 目录
varnish控制
缓存运作方式
缓存项控制
日志
实践
# varnish控制
缓存服务器的类型常用的有memched、squid、varnish,这里我们使用varnish,因为它的功能更加多样更加便捷,正在取代squid;squid是传统运行比较稳健的缓存服务器,memched比较老旧。
varnish的架构图

varnish主要包含三个部分
management提供管理接口,并控制缓存进程的特性
child/cache提供缓存功能,记录日志,访问控制,后端服务器管理
vcl给child/cache提供配置文件的编译
varnish程序结构
/etc/varnish/varnish.params: 配置varnish服务进程的工作特性,例如监听的地址和端口,缓存机制;
/etc/varnish/default.vcl:配置各Child/Cache线程的缓存工作属性;
主程序:
/usr/sbin/varnishd
CLI interface:
/usr/bin/varnishadm
Shared Memory Log交互工具:
/usr/bin/varnishhist
/usr/bin/varnishlog
/usr/bin/varnishncsa
/usr/bin/varnishstat
/usr/bin/varnishtop
测试工具程序:
/usr/bin/varnishtest
VCL配置文件重载程序:
/usr/sbin/varnish_reload_vcl
Systemd Unit File:
/usr/lib/systemd/system/varnish.service
varnish服务
/usr/lib/systemd/system/varnishlog.service
/usr/lib/systemd/system/varnishncsa.service
日志持久的服务;
# 缓存运作方式
缓存的数据存储方式:key/value的方式存储,还记得nginx存储时,是把key保存在内存中,把value的数据存储在磁盘上,这里就有问题了,同样是在磁盘里存储数据,为什么使用key/value存储方式数据是可以提高获取速度的提高,因为文件系统读取数据需要遍历存储树,而我们缓存的时候使用的是一个层级结构,数据的位置可以预测。这里涉及到我们缓存使用的算法,我们把请求报文进行进行hash运算后按照hash结果的后两位的数据的数值创建文件夹,每个对应每个对应位都放在相应的文件夹,然后再把后3和4位数据创建文件夹。
vanish的缓存数据的方式有三种
vanish -s [name=]type[,options]
type的三种类型
· malloc[,size]
内存存储,[,size]用于定义空间大小;重启后所有缓存项失效;
· file[,path[,size[,granularity]]]
文件存储,黑盒;重启后所有缓存项失效;
· persistent,path,size
文件存储,黑盒;重启后所有缓存项有效;实验;
varnish程序的选项:
程序选项:/etc/varnish/varnish.params文件
-a address[:port][,address[:port][...],默认为6081端口;
-T address[:port],默认为6082端口;
-s [name=]type[,options],定义缓存存储机制;
-u user
-g group
-f config:VCL配置文件;
-F:运行于前台;
...
运行时参数:/etc/varnish/varnish.params文件, DEAMON_OPTS
DAEMON_OPTS="-p thread_pool_min=5 -p thread_pool_max=500 -p thread_pool_timeout=300"
-p param=value:设定运行参数及其值; 可重复使用多次;
-r param[,param...]: 设定指定的参数为只读状态;
在使用内存缓存数据时,我们需要考虑内存回收和内存空间碎片化,我们的使用方法是把内存提前分片,然后使用。varnish使用内存是使用c语言的malloc,jemalloc-3.6.0-1.el7.x86_64提供这个功能
线程相关的参数,在线程池内部,其每一个请求由一个线程来处理; 其worker线程的最大数决定了varnish的并发响应能力;
thread_pools #child数量,最好小于或等于CPU核心数量;
thread_pool_max #每个进程最多可以开启的线程数
thread_pool_min #额外意义为“最大空闲线程数”;
最大并发连接数=thread_pools * thread_pool_max
thread_pool_timeout:Thread idle threshold. Threads in excess of thread_pool_min, which have been idle for at least this long, will be destroyed.
thread_pool_add_delay:Wait at least this long after creating a thread.
thread_pool_destroy_delay:Wait this long after destroying a thread.
设置方式:
vcl.param
永久有效的方法:
vim /etc/varnish/varnish.params
DEAMON_OPTS="-p PARAM1=VALUE -p PARAM2=VALUE"
# 缓存项控制
以上是控制child程序运行的基本属性,真正实现缓存功能的定义来至于vcl定义的属性,vcl才varnish真正的配置文件,vcl的配置文件是/etc/default.vcl这个配置文件的属性如下
vcl的语法格式:
(1) VCL配置文件需要以vcl 4.0这个配置开始;
(2) //, # 和 /* foo */作注释;
(3) 可以定义函数然后调用; 例如sub vcl_recv { ...};
(4) No loops, state-limited variables(受限于引擎的内建变量);
(5) Terminating statements with a keyword for next action as argument of the return() function, i.e.: return(action);用于实现状态引擎转换;
(6) Domain-specific;
The VCL Finite State Machine
(1) Each request is processed separately;
(2) Each request is independent from others at any given time;
(3) States are related, but isolated;
(4) return(action); exits one state and instructs Varnish to proceed to the next state;
(5) Built-in VCL code is always present and appended below your own VCL;
### 结构
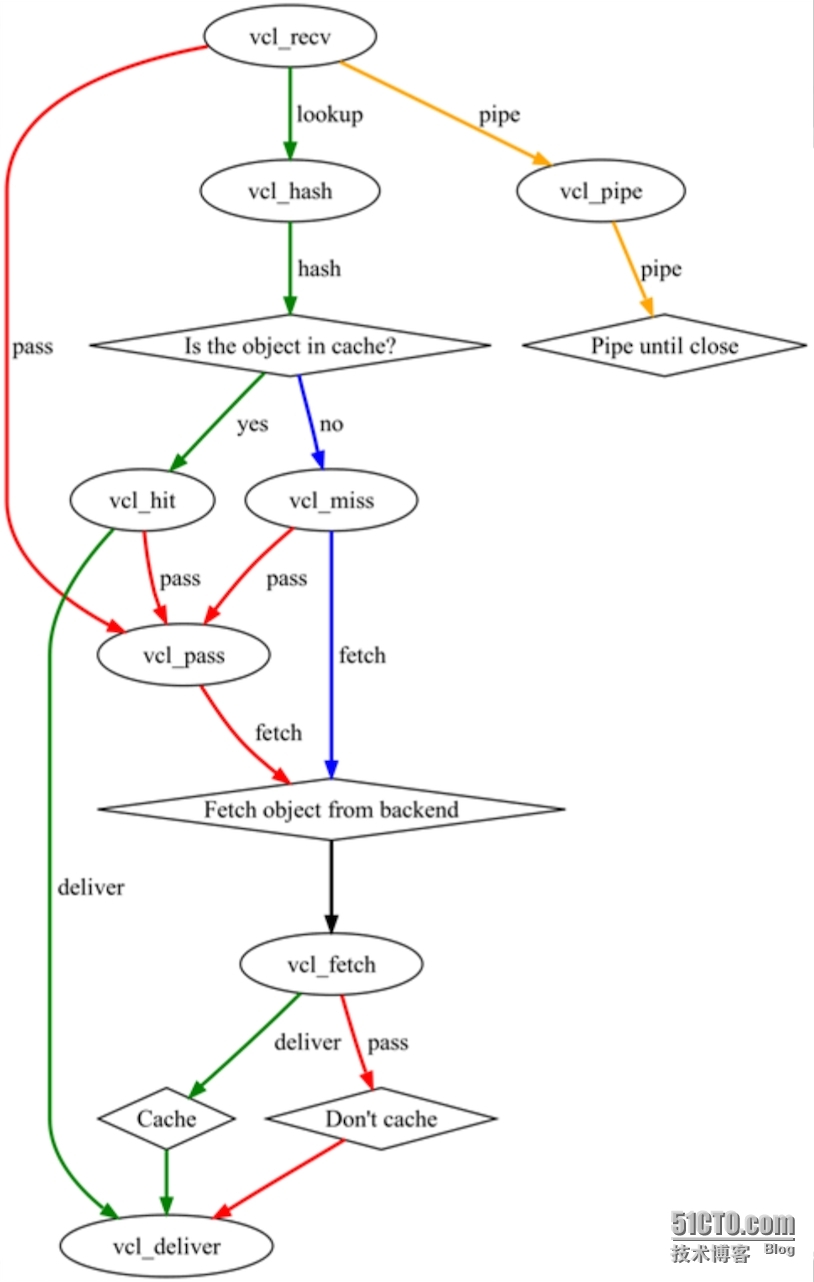
介绍配置之前我们需要了解varnish的child的运行是调用个状态引擎的顺序,VCL有多个状态引擎,状态之间存在相关性,但状态引擎彼此间互相隔离;每个状态引擎可使用return(x)指明关联至哪个下一级引擎;每个状态引擎对应于vcl文件中的一个配置段,即为subroutine,各引擎调用关系如下

### 引擎
我们调用引擎使用return命令就可以了,这些引擎可以分为两类,一种是面对客户端的,一种是面对后端服务器的
客户端的
vcl_rev #内可以调用这些引擎,在这个引擎内我们可以定义对哪些请求进行使用缓存不使用缓存
hash:vcl_hash #查缓存
pass: vcl_pass
pipe: vcl_pipe
synth: vcl_synth
purge: vcl_hash --> vcl_purge
vcl_deliver #使用缓存响应
vcl_hit
vcl_miss
vcl_pass #不使用缓存
vcl_synth
vcl_purge #对已经缓存的数据进行修剪,重新缓存
vcl_pipe
后端服务器的
vcl_backend_fetch
vcl_backend_response
vcl_backend_error
### 变量
内建变量
req.*:request,表示由客户端发来的请求报文相关;
req.http.*
req.http.User-Agent, req.http.Referer, ...
bereq.*:由varnish发往BE主机的httpd请求相关;
bereq.http.*
beresp.*:由BE主机响应给varnish的响应报文相关;
beresp.http.*
resp.*:由varnish响应给client相关;
obj.*:存储在缓存空间中的缓存对象的属性;只读;
常用变量:
bereq.*, req.*:
bereq.http.HEADERS
bereq.request:请求方法;
bereq.url:请求的url;
bereq.proto:请求的协议版本;
bereq.backend:指明要调用的后端主机;
req.http.Cookie:客户端的请求报文中Cookie首部的值;
req.http.User-Agent ~ "chrome"
beresp.*, resp.*:
beresp.http.HEADERS
beresp.status:响应的状态码;
reresp.proto:协议版本;
beresp.backend.name:BE主机的主机名;
beresp.ttl:BE主机响应的内容的余下的可缓存时长;
obj.*
obj.hits:此对象从缓存中命中的次数;
obj.ttl:对象的ttl值
server.*
server.ip
server.hostname
client.*
client.ip
用户自定义:
set
unset
# 日志
1、varnishstat - Varnish Cache statistics
-1
-1 -f FILED_NAME
-l:可用于-f选项指定的字段名称列表;
MAIN.cache_hit
MAIN.cache_miss
# varnishstat -1 -f MAIN.cache_hit -f MAIN.cache_miss
2、varnishtop - Varnish log entry ranking
-1 Instead of a continously updated display, print the statistics once and exit.
-i taglist,可以同时使用多个-i选项,也可以一个选项跟上多个标签;
-I <[taglist:]regex>
-x taglist:排除列表
-X <[taglist:]regex>
3、varnishlog - Display Varnish logs
4、 varnishncsa - Display Varnish logs in Apache / NCSA combined log format
# 实践
这里我做的实验是,varnish有两个后端主机,网页使用缓存,但是login目录下的内容不使用缓存,这里我们把后端主机的/login下页面定义不一样,这样我们可以看到不使用缓存的效果,同时varnish主机自己可以刷新缓存数据。

### varnish的配置
varnish在epel源中,版本是4.0.4
yum install varnish
vim /etc/varnish/varnish.params #只更改如下一行
VARNISH_LISTEN_PORT=80
vim /etc/varnish/default.vcl
vcl 4.0;
import directors;
backend default {
.host = "127.0.0.1";
.port = "8080";
}
probe check {
.url = "/index.html";
.window = 5;
.threshold = 3;
.interval = 2s;
.timeout = 1s;
}
backend server1 {
.host = "172.16.29.10";
.port = "80";
.probe = check;
}
backend server2 {
.host = "172.16.29.20";
.port = "80";
.probe = check;
}
sub vcl_init {
new static = directors.round_robin();
static.add_backend(server1);
static.add_backend(server2);
}
sub vcl_recv {
set req.backend_hint = static.backend();
if (req.url ~ "(?i)^/login") {
return(pass);
}
acl purgers {
"127.0.0.0"/8;
}
sub vcl_recv {
if (req.method == "PURGE") {
if (!client.ip ~ purgers) {
return(synth(405,"Purging not allowed for " + client.ip));
}
return(purge);
}
}
sub vcl_purge {
return (synth(200,"Purged"));
}
sub vcl_backend_response {
}
sub vcl_deliver {
}
* 注意:default.vcl的配置文件使用的类c语言的编程方式,那么就会有一个问题,被调用的函数需要在调用前定义,所有定义引擎的时候需要注意顺序
### server1的配置
yum install httpd
echo 1 > /var/www/html/index.html
mkdir /var/www/html/login/
echo login1 > /var/www/html/login/index.html
### server2的配置
yum install httpd
echo 2 > /var/www/html/index.html
mkdir /var/www/html/login/
echo login2 > /var/www/html/login/index.html
### 使用zabbix监控varnish的模板
下载路径如下https://raw.githubusercontent.com/rdvn/zabbix-templates/master/varnish
* 注意:下载的时候要在raw把内容复制到一个文件里,然后导入使用,右键另存为的不是源码不可以使用。
zabbix的使用可以参考http://oldking.blog.51cto.com/10402759/1889514
# 总结
在这个缓存为王的时代,熟练使用varnish很重要。
本文出自 “老王linux旅程” 博客,请务必保留此出处http://oldking.blog.51cto.com/10402759/1895032
varnish简单入门
