首页 > 代码库 > 项目整合ckeditor实现图片上传到远程服务器
项目整合ckeditor实现图片上传到远程服务器
最近手头上的一个Java项目需要做一个门户网站,其中有一个模块就是用来发布最新的业界安全动态的模块,因此需要用到后台发布新闻的功能;刚开始的时候在网上搜了一下,大部分都是关于PHP和.NET的,关于Java不多,而且查到的都是说用ckeditor+ckfinder来实现,ckeditor实现文本的编辑,ckfinder实现图片的上传,刚开始我也是准备用ckeditor+ckfinder来实现的,但是后来研究ckfinder的时候不知道如何配置ckfinder的图片上传路径问题,网上可以找到好多例子来配置ckfinder,但是我安照网上方法配置却找不到上传后的图片放在本地的路径,只好做罢。
后来搜索到直接用ckeditor就可以实现图片的上传,ckeditor的图片上传功能是默认隐藏掉的需要自己开启才能够实现;大家可以先看http://blog.csdn.net/quzishen/article/details/5834207 这个同行的博客来配置再看我的这篇,不然可能会有点看不懂,我现在写的是自己工程中需要把图片上传到远程服务器并从远程服务器读取上传图片的操作。
废话不多说,首先大家需要先下载ckeditor(我之前下载的ckeditor,百度云盘下载路径:http://pan.baidu.com/share/link?shareid=307782472&uk=3238478175),下载后解压后放在工程的根目录下如同:
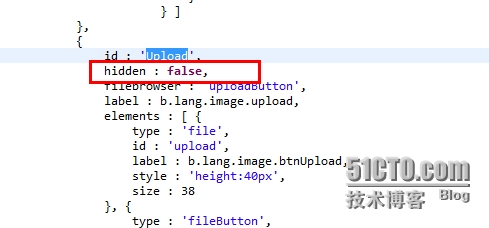
其次需要打开ckeditor的图片上传功能,在ckeditor->plugins->image->dialogs目录下找到image.js文件,在image.js文件中搜索upload,找到
如图所示地方:
把hidden:true 改为如图所示的false,第三步配置ckeditor->config.js文件,我的配置如下:
/**
 * @ /**
 * @license Copyright (c) 2003-2013, CKSource - Frederico Knabben. All rights reserved.
 * For licensing, see LICENSE.html or http://ckeditor.com/license
 */
CKEDITOR.editorConfig = function( config ) {
// Define changes to default configuration here. For example:
config.language = ‘zh-cn‘; // 配置语言
//config.uiColor = ‘#FFF‘; // 背景颜色
config.width = ‘auto‘; // 宽度
config.height = ‘300px‘; // 高度
config.skin = ‘kama‘;//界面v2,kama,office2003
config.toolbar = ‘Full‘;// 工具栏风格Full,Basic
config.image_previewText = ‘ ‘;//把预览区置空
config.font_names = ‘宋体;楷体_GB2312;新宋体;黑体;隶书;幼圆;微软雅黑;Arial;Comic Sans MS;Courier New;Tahoma;Times New Roman;Verdana‘; // 字体
config.toolbar_Full =
    [
        [‘Source‘, ‘-‘, ‘Preview‘, ‘-‘, ‘Templates‘],
        [‘Cut‘, ‘Copy‘, ‘Paste‘, ‘PasteText‘, ‘PasteFromWord‘, ‘-‘, ‘Print‘, ‘SpellChecker‘, ‘Scayt‘],
        [‘Undo‘, ‘Redo‘, ‘-‘, ‘Find‘, ‘Replace‘, ‘-‘, ‘SelectAll‘, ‘RemoveFormat‘],
        [‘Form‘, ‘Checkbox‘, ‘Radio‘, ‘TextField‘, ‘Textarea‘, ‘Select‘, ‘Button‘, ‘ImageButton‘, ‘HiddenField‘],
        ‘/‘,
        [‘Bold‘, ‘Italic‘, ‘Underline‘, ‘Strike‘, ‘-‘, ‘Subscript‘, ‘Superscript‘],
        [‘NumberedList‘, ‘BulletedList‘, ‘-‘, ‘Outdent‘, ‘Indent‘, ‘Blockquote‘, ‘CreateDiv‘],
        [‘JustifyLeft‘, ‘JustifyCenter‘, ‘JustifyRight‘, ‘JustifyBlock‘],
        [‘Link‘, ‘Unlink‘, ‘Anchor‘],
          [‘Image‘, ‘Flash‘, ‘Table‘, ‘HorizontalRule‘, ‘Smiley‘, ‘SpecialChar‘, ‘PageBreak‘],
        ‘/‘,
        [‘Styles‘, ‘Format‘, ‘Font‘, ‘FontSize‘],
        [‘TextColor‘, ‘BGColor‘],
        [‘Maximize‘, ‘ShowBlocks‘, ‘-‘, ‘About‘]
    ];
    //下面是上传图片的action,我的是struts完成的
    //可以.do或者.action大家按照自己实际情况来改一下
    config.filebrowserUploadUrl = ‘/sys/uploadImage.shtml‘;
};
配置好以后,看jsp页面
<!DOCTYPE HTML PUBLIC "-//W3C//DTD HTML 4.01 Transitional//EN">
<%@ page contentType="text/html; charset=gbk"%>
<%@ taglib uri="../WEB-INF/tlds/struts-bean.tld" prefix="bean"%>
<%@ taglib uri="../WEB-INF/tlds/struts-html.tld" prefix="html"%>
<%@ taglib uri="../WEB-INF/tlds/struts-logic.tld" prefix="logic"%>
<html>
<head>
<meta http-equiv="Content-Type" content="text/html; charset=gbk">
<title>LCSOC</title>
<link href="http://www.mamicode.com/css/master.css" rel="stylesheet" type="text/css">
<link href="http://www.mamicode.com/css/table.css" rel="stylesheet" type="text/css">
<script type="text/javascript" src="http://www.mamicode.com/ckeditor/ckeditor.js"></script> //引入ckeditor.js
</head>
<body>
<div id="wrap">
<form id="releaseForm" action="/sys/addMainEventInfo.shtml" method="post" enctype=‘multipart/form-data‘>
<div class="table-contain" style="margin:0; width:100%;">
<div style="text-align: center;">
      <textarea  cols="80" id="content" name="content" rows="10">
     CKEditor Test......()</textarea>
     <script type="text/javascript">
           CKEDITOR.replace(‘content‘);
     </script>
</div>
<table  class="tab01">
  <tr class="tab_bottom" >
    <td  align="center">
      <input type="button" name="Submit" value="http://www.mamicode.com/发布"" onclick="checkForm()"/>
      <input type="reset" name="Submit" value="http://www.mamicode.com/重置"/>
      <input type="button" name="Submit" value="http://www.mamicode.com/关闭" onClick="window.close()" />    </td>
    </tr>
</table>
</form>
</div>
</body>
<script type="text/javascript">
function checkForm(){
var frm = $(‘#releaseForm‘);
frm.action = "/sys/addMainEventInfo.shtml?content="+CKEDITOR.instances.content.getData();
frm.submit();
}
</script>
</html>
上传图片到服务器和从服务器获取图片到预览区代码:
public String uploadImage(){
    HttpServletRequest req = ActionContext.getActionContext().getRequest();
    HttpServletResponse resp = ActionContext.getActionContext().getResponse();
    //获取服务器配置路径(System.getProperty("config.dir"))
    String filePath = System.getProperty("config.dir").replace("/", File.separator) + File.separator + "releaseNews" + File.separator;
    resp.setCharacterEncoding("GBK");
    PrintWriter out = null;
try {
out = resp.getWriter();
} catch (IOException e1) {
e1.printStackTrace();
}
    String callback = req.getParameter("CKEditorFuncNum");

    if(upload!=null){
    int size = upload.getFileSize();
    if(size/1024/1024 >2){
    out.println("<script type=\"text/javascript\">");
                out.println("window.parent.CKEDITOR.tools.callFunction(" + callback
                        + ",‘‘," + "‘文件大小不得大于600k‘);");
                out.println("</script>");
                return null;
    }
    String type = upload.getFileName().substring(upload.getFileName().indexOf(".")+1, upload.getFileName().length());
    if(!"jpg".equals(type)&&!"jpeg".equals(type)&&!"bmp".equals(type)&&!"gif".equals(type)){
    out.println("<script type=\"text/javascript\">");
                out.println("window.parent.CKEDITOR.tools.callFunction(" + callback
                        + ",‘‘," + "‘文件格式不正确(必须为.jpg/.gif/.bmp/.png/.jpeg文件)‘);");
                out.println("</script>");
                return null;
    }
    String fileName = System.currentTimeMillis()+"."+type;
    if (fileName != null && !("").equals(fileName)) {
                File path = new File(filePath);
                if (!path.exists()) {
                    path.mkdirs();
                }
                InputStream is = null;
                FileOutputStream fos = null;
                try {
                is = upload.getInputStream();
                    fos = new FileOutputStream(filePath + fileName);
                    byte buffer[] = new byte[1024];
                    int count = 0;
                    while ((count = is.read(buffer)) > 0) {
                        fos.write(buffer, 0, count);
                    }
                    fos.close();
                    is.close();
                    out.println("<script type=\"text/javascript\">");
                // sys/reviewImage.shtml?name=fileName 来获取图片(类似于获取验证码图片)
                    out.println("window.parent.CKEDITOR.tools.callFunction(" + callback
                            + ",‘" + "/sys/reviewImage.shtml?name=" + fileName + "‘,‘‘)");
                    out.println("</script>");
                } catch (Exception e) {
                    e.printStackTrace();
                } finally {
                    try {
                        if (fos != null) {
                            fos.close();
                        }
                        if (is != null) {
                            is.close();
                        }
                    } catch (Exception ex) {
                        logger.error("关闭文件流错误 " + ex.toString());
                    }
                }
    }
    }
    return null;
    }

    public void reviewImage(){
    HttpServletRequest req = ActionContext.getActionContext().getRequest();
    HttpServletResponse response = ActionContext.getActionContext().getResponse();
    String imageName = req.getParameter("name");
    String filePath = System.getProperty("config.dir").replace("/", File.separator) + File.separator
                + "releaseNews" + File.separator + imageName;
    File f = new File(filePath);
    InputStream is = null;
    String fileName = f.getName();
    try {
if (!f.exists()) {
                logger.error("没有对应文件");
                setMessage("没有对应文件");
            }
is = new BufferedInputStream(new FileInputStream(f));// 文件的存放路径
            ServletOutputStream output = response.getOutputStream();
            byte[] buffer = new byte[is.available()];
            is.read(buffer);
            is.close();
            response.reset();
            response.setHeader("Content-Disposition",
            "attachment; filename=" + new String(f.getName().getBytes("ISO-8859-1"), "GBK"));
            response.setContentType("binary/octet-stream");
            response.setContentType("application/octet-stream");
            OutputStream toClient = new BufferedOutputStream(response.getOutputStream());
            toClient.write(buffer);
            toClient.flush();
            toClient.close();
} catch (UnsupportedEncodingException e) {
e.printStackTrace();
} catch (FileNotFoundException e) {
e.printStackTrace();
} catch (IOException e) {
e.printStackTrace();
}finally {
            if (is != null) {
                try {
                    is.close();
                } catch (IOException e) {
                    logger.error("文件流关闭失败!", e);
                }
            }
        }
    }
ok,搞定!
本文出自 “Java学习笔记” 博客,请务必保留此出处http://951753.blog.51cto.com/1669841/1559757
项目整合ckeditor实现图片上传到远程服务器
