首页 > 代码库 > Oracle 12cR2 RAC安装配置及一些坑
Oracle 12cR2 RAC安装配置及一些坑
Oracle 12cR2版本已经发布有一段时间,一直想测试安装RAC,从上周末到今天用了两个周末和今天一天的时间终于把RAC安装成功了。这里记录了安装时对操作系统的配置,以及安装过程中遇到的一些坑。
1、首先是操作系统的选择问题,Oracle现在认证的操作系统及内核版本如下:
Oracle Linux 7:
Oracle Linux 7 with the Unbreakable Enterprise kernel 3:3.8.13-35.3.1.el7uek.x86_64 or later
Oracle Linux 7 with the Red Hat Compatible kernel: 3.10.0-54.0.1.el7.x86_64 or later
Oracle Linux 6:
Oracle Linux 6.4 with the Unbreakable Enterprise kernel 2: 2.6.39-400.211.1.el6uek.x86_64or later
Oracle Linux 6.4 with the Red Hat Compatible kernel: 2.6.32-358.el6.x86_64 or later
Red Hat Enterprise Linux 7:
Red Hat Enterprise Linux 7: 3.10.0-54.0.1.el7.x86_64 or later
Red Hat Enterprise Linux 6:
Red Hat Enterprise Linux 6.4: 2.6.32-358.el6.x86_64 or later
SUSE Linux Enterprise Server:
SUSE Linux Enterprise Server 12 SP1: 3.12.49-11.1 or later
今天安装成功是在rhel6.7操作系统上
[root@rhel6 ~]# uname -a
Linux rhel6 2.6.32-573.el6.x86_64 #1 SMP Wed Jul 1 18:23:37 EDT 2015 x86_64 x86_64 x86_64 GNU/Linux
[root@rhel6 ~]# cat /etc/redhat-release
Red Hat Enterprise Linux Server release 6.7 (Santiago)
之所以选择使用rhel6.7,是因为之前在rhel7.2和OEL7.3上尝试安装过,但因为可能是有BUG或使用的笔记本的资源不够用导致没有安装成功。不过在rhel7.2上即使安装单实例的grid会报错CLSRSC-400: A system reboot is required to continue installing.。于是就选择了rhel6.7版本。
2、操作系统的资源分配问题
如果你是使用服务器,资源足够用那么可以忽略这一条。
如果想用笔记本上的虚拟机安装12cR2的RAC请慎重些,尤其是内存较小(小于16G)的。
我用的笔记本内存是12G,每个虚拟机分5G,其他应用全部关闭,内存一直撑在95%左右。另外同事的一台16G内存的笔记本在安装grid时,多次在85%左右时虚拟机直接重启,一直没有安装成功。
今天用的是公司同事配置的一台vmware esxi虚拟服务器,内存也只有16G,但没有其他虚拟机在跑,每台虚拟机分配了7G的内存,安装过程中内存也一直在90%以上。
3、操作系统的配置
这个没有什么好说的,直接按官方文档的要求一步一步的配置就行,下面给出了我做的配置,有兴趣的朋友可以参考:
#install rpms
yum install -y binutils*
yum install -y compat-libcap1*
yum install -y compat-libstdc++*
yum install -y compat-libstdc++*686*
yum install -y e2fsprogs*
yum install -y e2fsprogs-libs*
yum install -y glibc*686*
yum install -y glibc*
yum install -y glibc-devel*
yum install -y glibc-devel*686*
yum install -y ksh*
yum install -y libgcc*686*
yum install -y libgcc*
yum install -y libs*
yum install -y libstdc++*
yum install -y libstdc++*686*
yum install -y libstdc++-devel*
yum install -y libstdc++*686*
yum install -y libaio*
yum install -y libaio*686*
yum install -y libaio-devel*
yum install -y libaio-devel*686*
yum install -y libXtst*
yum install -y libXtst*686*
yum install -y libX11*686*
yum install -y libX11*
yum install -y libXau*686*
yum install -y libXau*
yum install -y libxcb*686*
yum install -y libxcb*
yum install -y libXi*
yum install -y libXi*686*
yum install -y make*
yum install -y net-tools*
yum install -y nfs-utils*
yum install -y sysstat*
yum install -y smartmontools*
yum install -y unixODBC*
yum install -y unixODBC-devel*
yum install -y unixODBC*686*
yum install -y unixODBC-devel*686*
#configure kernel
/etc/sysctl.conf
fs.aio-max-nr = 1048576
fs.file-max = 6815744
kernel.shmall = 67108864
kernel.shmmax = 274877906944
kernel.shmmni = 4096
kernel.sem = 250 32000 100 128
net.ipv4.ip_local_port_range = 9000 65500
net.ipv4.tcp_rmem = 4096 87380 4194304
net.ipv4.tcp_wmem = 4096 16384 4194304
net.core.rmem_default = 262144
net.core.rmem_max = 4194304
net.core.wmem_default = 262144
net.core.wmem_max = 1048576
#configure user limit
/etc/security/limits.conf
grid soft nofile 1024
grid hard nofile 65536
grid soft nproc 2047
grid hard nproc 16384
grid soft stack 10240
grid hard stack 32768
oracle soft nofile 1024
oracle hard nofile 65536
oracle soft nproc 2047
oracle hard nproc 16384
oracle soft stack 10240
oracle hard stack 32768
#configure pam
/etc/pam.d/login
session required pam_limits.so
#configure network
/etc/hosts
#public
192.168.1.31 rac1
192.168.1.33 rac2
#private
192.168.0.11 rac1-priv
192.168.0.12 rac2-priv
#virtual
192.168.1.32 rac1-vip
192.168.1.34 rac2-vip
#scan ip
192.168.1.35 rac-scan
#configure hostname
/etc/sysconfig/network
HOSTNAME=rac1
#disable transparent hugepages
vi /etc/rc.local
if test -f /sys/kernel/mm/redhat_transparent_hugepage/enabled; then
echo never > /sys/kernel/mm/redhat_transparent_hugepage/enabled
fi
#disable fireware
service iptables stop
chkconfig --del iptables
#disable selinux
/etc/selinux/config
SELINUX=disabled
#create users and groups
groupadd -g 54421 oinstall
groupadd -g 54422 dba
groupadd -g 54423 oper
groupadd -g 54424 backupdba
groupadd -g 54425 dgdba
groupadd -g 54426 kmdba
groupadd -g 54428 asmoper
groupadd -g 54427 asmdba
groupadd -g 54429 asmadmin
groupadd -g 54430 racdba
useradd -u 54321 -g oinstall -G dba,asmdba,oper,asmadmin,asmdba,backupdba,dgdba,asmoper,kmdba,racdba oracle
useradd -u 54322 -g oinstall -G asmadmin,asmdba,asmoper grid
passwd oracle
passwd grid
#configure directories
mkdir -p /u01/app/12.2.0/grid
mkdir -p /u01/app/grid
mkdir -p /u01/app/oracle/product/12.2.0/db1
chown -R oracle:oinstall /u01
chown -R grid:oinstall /u01/app/12.2.0
chown -R grid:oinstall /u01/app/grid
chmod -R 775 /u01
#configure environment variables
rac1:
grid
export ORACLE_SID=+ASM1
export ORACLE_HOME=/u01/app/12.2.0/grid
export ORACLE_BASE=/u01/app/grid
export PATH=$ORACLE_HOME/bin:$PATH
oracle
export ORACLE_SID=rac1
export ORACLE_BASE=/u01/app/oracle
export ORACLE_HOME=$ORACLE_BASE/product/12.2.0/db1
export PATH=$ORACLE_HOME/bin:$PATH
rac2:
grid
export ORACLE_SID=+ASM2
export ORACLE_HOME=/u01/app/12.2.0/grid
export ORACLE_BASE=/u01/app/grid
export PATH=$ORACLE_HOME/bin:$PATH
oracle
export ORACLE_SID=rac2
export ORACLE_BASE=/u01/app/oracle
export ORACLE_HOME=$ORACLE_BASE/product/12.2.0/db1
export PATH=$ORACLE_HOME/bin:$PATH
#configure ssh
ssh-keygen -t dsa
ssh-keygen -t tsa
ssh rac1 cat ~/.ssh/id_rsa.pub >> authorized_keys
ssh rac2 cat ~/.ssh/id_rsa.pub >> authorized_keys
ssh rac1 cat ~/.ssh/id_dsa.pub >> authorized_keys
ssh rac2 cat ~/.ssh/id_dsa.pub >> authorized_keys
#configure raw disks
raw /dev/raw/raw1 /dev/sdb
raw /dev/raw/raw2 /dev/sdc
raw /dev/raw/raw3 /dev/sdd
raw /dev/raw/raw4 /dev/sde
raw /dev/raw/raw5 /dev/sdf
raw /dev/raw/raw6 /dev/sdg
chown grid:asmadmin /dev/raw/raw*
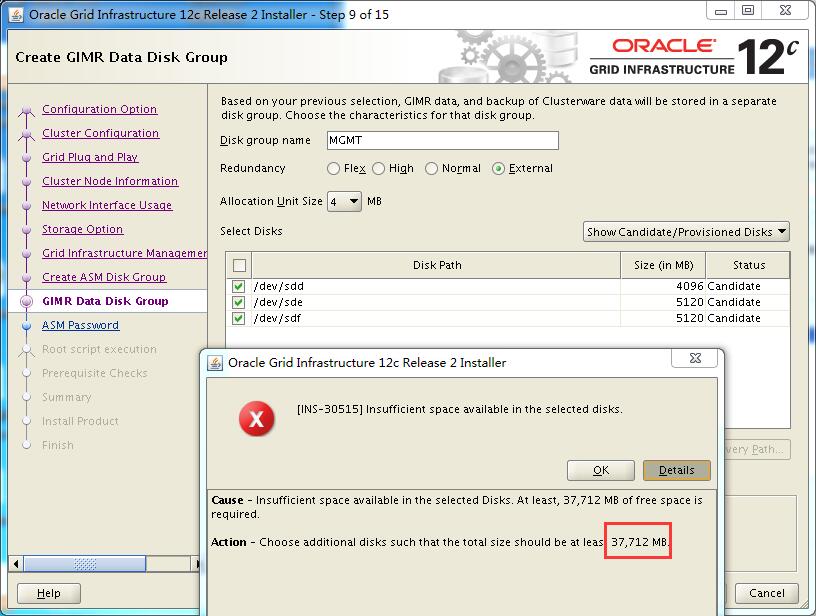
这里说一下配置磁盘,在Oracle12c里引入了MGMTDB的概念,这个在12.1的RAC里是与OCR在同一个磁盘组里,而且占用的空间大概有几个G,但到了12cR2中,MGMT可以与OCR在同一个磁盘组也可以单独使用一个磁盘组,Oracle默认是单独使用,但在12cR2中MGMTDB占的空间特别的大,要求磁盘空间要在38G以上才行。所以我这里分配的空间容量是sdb和sdc做OCR的磁盘,每个2G,sdd和sde做MGMT的磁盘,每个20G,sdf和sdg做DATA的磁盘。如果空间不中会安装时会报如下图的错误:
 4、安装grid
这里说一说安装grid时需要注意的。
第一是在哪里解压,12cR2的grid的名字与以往版本的不同,linuxx64_12201_grid_home.zip,文件名字中带了一个home,我想这是Oracle想告诉大家这个文件直接解压到GRID_HOME下吧。也的确如此,直接把文件解压到指定的GRID_HOME目录下,它不需要安装时再把文件copy到GRID_HOME目录下了。解压完了记得把解压包从GRID_HOME中移走,免得在安装grid过程中还把这个压缩包也传到其他节点上去。
再来说安装,解压完后可以看到这个不象以前那样有一个grid目录,grid目录里runInstaller脚本等文件。这个解压就像是直接安装了一样,解压出来很多的文件。而且目录里也没有runInstaller脚本了,取而代之的是gridSetup.sh脚本,运行这个脚本来执行grid的安装。
之后在图形界面的各种选择与之前的版本没有太大的区别。安装完后执行root.sh脚本。在执行root.sh过程中出问题最多,这也是RAC能否安装成功的决定性因素。我做测试的过程中出现了如下三种报错:
CLSRSC-400: A system reboot is required to continue installing.
CRS-1704: Initialization of the required component GPNP failed; details at (:CSSSC00005:) in
CRS-2674: Start of ‘ora.cssd‘ on ‘node1‘ failed
Disk groups created successfully. Check /u01/app/grid/cfgtoollogs/asmca/asmca-170325AM010920.log for details.
2017/03/25 01:10:23 CLSRSC-184: Configuration of ASM failed
2017/03/25 01:10:27 CLSRSC-258: Failed to configure and start ASM
Died at /u01/app/12.2.0/grid/crs/install/crsinstall.pm line 2091.
查了GOOGLE和MOS都没有找到相关的文章来解决。不过今天在rhel6.7上没有出现上面的问题,顺利的安装成功了。
5、安装oracle软件和dbca创建数据库
安软件与dbca建库与之前的版本没有大太区别,软件还是用runInstaller来调图形界面安装,参照以往的方式安装就行了。
就先写到这里了,由于今天做测试时没有想到会安装成功,所以就没有做截图,但大体的流程还以往版本还是大同小异,这里也建议多对照官方文档进行操作,可以免去不必要的一些麻烦和错误。
官方文档:http://docs.oracle.com/database/122/CWLIN/toc.htm
参考:http://blog.csdn.net/ljunjie82/article/details/51577841
本文出自 “DBA Fighting!” 博客,请务必保留此出处http://hbxztc.blog.51cto.com/1587495/1910922
Oracle 12cR2 RAC安装配置及一些坑
