首页 > 代码库 > Hibernate自身一对多和多对多关系映射
Hibernate自身一对多和多对多关系映射
一对多关系映射大家都明白,关系双方都一个含有对方多个引用,但自身一对多很多同学都不明白什么意思,那么首先我就说明一下什么是自身一对多,其实也很好理解,自身一对多就是自身含有本身的多个引用,例如新闻类别,新闻包含体育新闻和政治新闻,体育新闻内有含有足球新闻和篮球新闻,其实他们都属于新闻,只是名字不同而已,下面我们就以新闻类别为例来具体说明一下:
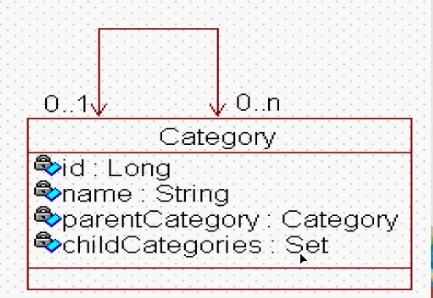
首先我们来看一下新闻类别的类图:
类图:category

从上面的图我们可以看出:每一个新闻类别都有一个父类别和一个孩子类别的set集合,这个父类别和孩子类别里面都是自身的引用,这样就行了自身一对多的对象关系
下面看一下具体的新闻实体类:Category.Java
- public class Category
- {
- private Long id;
- private String name;
- private Category parentCategory;
- private Set<Category> childCategories;
- public Category(String name, Category parentCategory,
- Set<Category> childCategories)
- {
- this.name = name;
- this.parentCategory = parentCategory;
- this.childCategories = childCategories;
- }
- public Category()
- {
- }
- *******set、get方法省略
- }
看完具体的实体类之后我们下面看一下其具体的配置,其实他的配置中没什么特别的地方,仅仅只是他的配置中包含了一对多和多对一的共同标签存在而已:他即含有多的一方的<set>标签。也含有一的一方的<many-to-one>标签:
Category.hbm.xml配置文件
- <?xml version="1.0"?>
- <!DOCTYPE hibernate-mapping PUBLIC "-//Hibernate/Hibernate Mapping DTD 3.0//EN"
- "http://hibernate.sourceforge.net/hibernate-mapping-3.0.dtd">
- <hibernate-mapping>
- <class name="com.shengsiyuan.hibernate.Category" table="categories">
- <id name="id" column="id" type="long">
- <generator class="increment"></generator>
- </id>
- <property name="name" type="string" >
- <column name="name" length="50" ></column>
- </property>
- <set name="childCategories" cascade="all" inverse="true">
- <key column="category_id"></key>
- <one-to-many class="com.shengsiyuan.hibernate.Category"/>
- </set>
- <many-to-one name="parentCategory" column="category_id" class="com.shengsiyuan.hibernate.Category">
- </many-to-one>
- </class>
- </hibernate-mapping>
下面我们来看一下在自身一对多的关系下进行增删改查的示例:
- import java.util.HashSet;
- import org.hibernate.Session;
- import org.hibernate.SessionFactory;
- import org.hibernate.Transaction;
- import org.hibernate.cfg.Configuration;
- public class HibernateTest2
- {
- private static SessionFactory sessionFactory;
- static
- {
- try
- {
- sessionFactory = new Configuration().configure()
- .buildSessionFactory();
- }
- catch (Exception ex)
- {
- ex.printStackTrace();
- }
- }
- public static void main(String[] args)
- {
- Session session = sessionFactory.openSession();
- Transaction tx = null;
- try
- {
- tx = session.beginTransaction();
- Category category1 = new Category("level1", null, new HashSet<Category>());
- Category category2 = new Category("level2", null, new HashSet<Category>());
- Category category3 = new Category("level2", null, new HashSet<Category>());
- Category category4 = new Category("level3", null, new HashSet<Category>());
- Category category5 = new Category("level3", null, new HashSet<Category>());
- Category category6 = new Category("level3", null, new HashSet<Category>());
- Category category7 = new Category("level3", null, new HashSet<Category>());
- category2.setParentCategory(category1);
- category3.setParentCategory(category1);
- category1.getChildCategories().add(category2);
- category1.getChildCategories().add(category3);
- category4.setParentCategory(category2);
- category5.setParentCategory(category2);
- category2.getChildCategories().add(category4);
- category2.getChildCategories().add(category5);
- category6.setParentCategory(category3);
- category7.setParentCategory(category3);
- category3.getChildCategories().add(category6);
- category3.getChildCategories().add(category7);
- Category category = (Category)session.get(Category.class, new Long(1));
- System.out.println(category.getChildCategories().iterator().next().getName());
- session.delete(category);
- tx.commit();
- }
- catch(Exception ex)
- {
- if(null != tx)
- {
- tx.rollback();
- }
- }
- finally
- {
- session.close();
- }
- }
- }
在很多实际开发过程中,多对多的映射关系也是比较常见的,最为明显的例子就是我们常用的学生选课示例,一个学生可以选多门课,一门课也可以由多个学生去选,这样就形成了多对多的映射关系,现在我们就以学生选课的实例来看一看多对多关系映射。由于在多对多映射中,双向多对多用的的比较多,并且单向多对多也比较简单,所以我们就以双向多对多进行讲解
我们先把必要的实体类和实体映射文件写好:
先简单看一下实体类:
student.java
- /** 学生实体类 */
- public class Student {
- private Long id; //对象标识符(OID)
- private String name; //姓名
- private String grade; //所在班级
- private Set<Course> courses; //所有所选课程的集合
- public Student(){} //无参数的构造方法
- ******set、get方法省略
- }
Course.java
- /** 课程实体类 */
- public class Course {
- private Long id; //对象标识符(OID)
- private String name; //课程名
- private Double creditHours; //课时数
- private Set<Student> students; //选择了这门课程的学生的集合
- public Course(){} //无参数的构造方法
- ******set、get方法省略
- }
下一步编写实体映射文件:
Student.hbm.xml
- <?xml version="1.0" encoding="UTF-8"?>
- <!DOCTYPE hibernate-mapping PUBLIC
- "-//Hibernate/Hibernate Mapping DTD 3.0//EN"
- "http://hibernate.sourceforge.net/hibernate-mapping-3.0.dtd">
- <hibernate-mapping>
- <!-- 映射持久化类 -->
- <class name="com.zxf.domain.Student" table="student">
- <!-- 映射对象标识符 -->
- <id name="id" column="id" type="long">
- <generator class="native" />
- </id>
- <!-- 映射普通属性 -->
- <property name="name" />
- <property name="grade" />
- <!-- 映射集合属性,指定连接表 -->
- <set name="courses" table="student_course">
- <!-- 用key元素指定本持久类在连接表中的外键字段名 -->
- <key column="student_id" />
- <!-- 映射多对多关联类 -->
- <many-to-many column="course_id"
- class="com.zxf.domain.Course" />
- </set>
- </class>
- </hibernate-mapping>
- Course.hbm.xml:
- <?xml version="1.0" encoding="UTF-8"?>
- <!DOCTYPE hibernate-mapping PUBLIC
- "-//Hibernate/Hibernate Mapping DTD 3.0//EN"
- "http://hibernate.sourceforge.net/hibernate-mapping-3.0.dtd">
- <hibernate-mapping>
- <!-- 映射持久化类 -->
- <class name="com.zxf.domain.Course" table="course">
- <!-- 映射对象标识符 -->
- <id name="id" column="id" type="long">
- <generator class="native" />
- </id>
- <!-- 映射普通属性 -->
- <property name="name" />
- <property name="creditHours" column="credit_hours" />
- <!-- 映射集合属性,指定连接表 -->
- <set name="students" table="student_course" inverse="true">
- <!-- 用key元素指定本持久类在连接表中的外键字段名 -->
- <key column="course_id" />
- <!-- 映射多对多关联类 -->
- <many-to-many column="student_id" class="com.zxf.domain.Student" />
- </set>
- </class>
- </hibernate-mapping>
下面具体看一下增删改查的具体测试的关键代码:
增加数据测试:
- <span xmlns="http://www.w3.org/1999/xhtml" style=""><span xmlns="http://www.w3.org/1999/xhtml" style="">tran = session.beginTransaction();
- Student stu1 = new Student("xiaoli", "two");
- Student stu2 = new Student("xiaoming", "two");
- Student stu3 = new Student("xiaoqiang", "two");
- Course course1 = new Course("java", 3.0);
- Course course2 = new Course("c#", 5.0);
- //stuset.add(stu1);
- //stuset.add(stu2);
- //course1.setStudents(stuset);
- //session.save(course1);
- couset.add(course1);
- couset.add(course2);
- stu1.setCourses(couset);
- session.save(stu1);
- tran.commit();</span></span>
测试结论:如果想保存数据成功,不管是主控方还是被控方,如果想通过一次保存即可把双方数据保存,需要把实体配置中的cascade属性设置为all或者save-update,由于设置为all包含delete,在删除数据中,删除一条信息会导致相对应表的多条或者全部信息被删掉,所以一般配置save-update。
Hibernate自身一对多和多对多关系映射
