首页 > 代码库 > ansible实现lnamp自动化安装
ansible实现lnamp自动化安装
简介
ansible是新出现的自动化运维工具,基于Python开发,集合了众多运维工具(puppet、cfengine、chef、func、fabric)的优点,实现了批量系统配置、批量程序部署、批量运行命令等功能。ansible是基于模块工作的,本身没有批量部署的能力。真正具有批量部署的是ansible所运行的模块,ansible只是提供一种框架。
ansible特点:
模块化,调用特定的模块,完成特定的任务;
基于Python语言实现,由Paramiko、PyYAML和Jinja2三个关键模块;
部署简单,agentless;
主从模式
支持自定义模块
支持Playbook: 使用yaml语言定制剧本playbook
幂等性: 就是多次相同的操作,结果都不变
实战
目标:ansible实现lnamp自动化安装,自动化部署wordpress
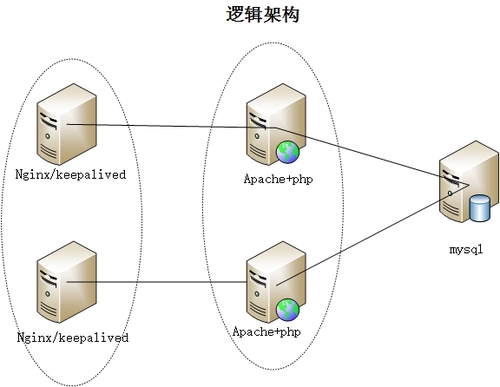
逻辑机构图:

物理结构图:

一.ansible环境的配置
ansible的安装与ssh信任配置
  #yum install ansible
  ##ssh-keygen -t rsa -P ‘‘
  #ssh-copy-id -i .ssh/id_rsa.pub root@192.168.180.140
  #ssh-copy-id -i .ssh/id_rsa.pub root@192.168.180.141
2.定义ansible主机
[root@localhost ~]# vim /etc/ansible/hosts
[web]
192.168.180.140
192.168.180.141
[nginx]
192.168.180.140  state=MASTER priority=100
192.168.180.141  state=BACKUP priority=90

[mysql]
192.168.180.140
二.配置ansible roles及playbook
1.创建各个角色的目录
#cd /etc/ansible/roles
#mkdir -pv{mysql,apache,nginx,keepalived}/{files,tasks,templates,var,handlers,meta,defult}2.mysql角色的配置
(1)#vim mysql/tasks/main.yml
-  name: install mysql
   yum: name=mysql-server state=present
-  name: copy config  file
   copy: src=http://www.mamicode.com/my.cnf  dest=/etc/my.cnf"mysqladmin -u root  password 123456"
-  name: config mysql
   shell: "mysql -uroot -hlocalhost -p123456 </tmp/mysql.sql"
(2)创建sql脚本
#vim mysql/files/mysql.sql
create database wpdb;
grant all on wpdb.* TO wpuser@‘%.%.%.%‘ IDENTIFIED BY ‘123456‘;
grant all  on wpdb.* TO wpuser@‘localhost‘  IDENTIFIED BY ‘123456‘;
FLUSH PRIVILEGES;
(3)拷贝mysql的配置文件到mysql角色的files目录
#vim mysql/files/my.cnf
[mysqld]
datadir=/var/lib/mysql
socket=/var/lib/mysql/mysql.sock
user=mysql
# Disabling symbolic-links is recommended to prevent assorted security risks
symbolic-links=0
[mysqld_safe]
log-error=/var/log/mysqld.log
pid-file=/var/run/mysqld/mysqld.pid
skip_name_resolve = ON       //关闭域名解析
innodb_file_per_table = ON    // 开启每表空间一个文件
(4)编写安装mysql的playbook
[root@localhost /]# cat mysql.yml
- hosts: mysql
  remote_user: root
  roles:
  - mysql
3.apache角色的配置
(1)编写tasks任务
[root@localhost roles]# vim apache/tasks/main.yml
- name: install apache packages
yum: name={{ item }}
with_items:
- httpd
- php
- php-mysql
- name: config the httpd
copy: src=http://www.mamicode.com/httpd.conf dest=/etc/httpd/conf/httpd.conf> (2)编写apache重启服务的触发器
[root@localhost handlers]# vim main.yml
- name: reload the service
service: name=httpd state=restarted
(3)拷贝httpd.conf配置文件到apache角色底下的files目录
注意:这里httpd.conf修改了监听端口为8080,其他配置默认
#cp /etc/httpd/conf/httpd.conf /ect/ansible/role/apache/files/httpd.conf
(4) 修改wordpress配置后进行打包,将打包后的wordpress文件到apache角色底下的files目录
[root@localhost wordpress]# vim wp-config.php
define(‘DB_NAME‘, ‘wp‘);
/** MySQL数据库用户名 */
define(‘DB_USER‘, ‘wpuser‘);
/** MySQL数据库密码 */
define(‘DB_PASSWORD‘, ‘123456‘);
/** MySQL主机 */
define(‘DB_HOST‘, ‘192.168.180.140‘);
/** 创建数据表时默认的文字编码 */
define(‘DB_CHARSET‘, ‘utf8‘);
/** 数据库整理类型。如不确定请勿更改 */
define(‘DB_COLLATE‘, ‘‘);
[root@localhost files]# tar -zcf wordpress.tar.gz2 wordpress
[root@localhost files]# ls
httpd.conf wordpress wordpress.tar.gz
(5)编写安装apache的playbook
[root@localhost /]# cat apache.yml
- hosts: web
remote_user: root
roles:
- apache
4.nginx角色的配置
(1)编写tasks任务
[root@localhost nginx]# vim tasks/main.yml
- name: install nginx package
yum: name=nginx state=present
- name: install conf file
template: src=http://www.mamicode.com/nginx.conf.j2 dest=/etc/nginx/nginx.conf"mv /etc/nginx/conf.d/default.conf /etc/nginx/conf.d/default.conf.bak"
tags: mv
- name: start service
service: name=nginx state=started enabled=true
(2)编写触发器
[root@localhost nginx]# vim handlers/main.yml
- name: restart nginx
service: name=nginx state=restarted
(3)修改nginx配置文件,并存放到nginx角色底下的templates目录下
[root@localhost templates]# cat nginx.conf.j2
# For more information on configuration, see:
# * Official English Documentation: http://nginx.org/en/docs/
# * Official Russian Documentation: http://nginx.org/ru/docs/
user {{ username }}; //配置变量
worker_processes {{ansible_processor_vcpus}}; //配置变量
error_log /var/log/nginx/error.log;
pid /var/run/nginx.pid;
# Load dynamic modules. See /usr/share/nginx/README.dynamic.
include /usr/share/nginx/modules/*.conf;
events {
worker_connections 1024;
}
http {
log_format main ‘$remote_addr - $remote_user [$time_local] "$request" ‘
‘$status $body_bytes_sent "$http_referer" ‘
‘"$http_user_agent" "$http_x_forwarded_for"‘;
access_log /var/log/nginx/access.log main;
sendfile on;
tcp_nopush on;
tcp_nodelay on;
keepalive_timeout 65;
types_hash_max_size 2048;
gzip on;
include /etc/nginx/mime.types;
default_type application/octet-stream;
# Load modular configuration files from the /etc/nginx/conf.d directory.
# See http://nginx.org/en/docs/ngx_core_module.html#include
# for more information.
include /etc/nginx/conf.d/*.conf;
upstream web {
least_conn;
server 192.168.180.140:8080 weight=2 max_fails=2 fail_timeout=6s;
server 192.168.180.141:8080 weight=4 max_fails=2 fail_timeout=6s;
}
server {
listen 80;
root html;
index index.html index.htm index.php;
location / {
proxy_pass http://web;
}
}
} (4)编写安装nginx的playbook
[root@localhost /]# cat nginx.yml
- hosts: all
remote_user: root
roles:
- { role: nginx,username: adm }5.keepalvied角色的配置
(1)编写task任务
[root@localhost keepalived]# vim tasks/main.yml
- name: install keepalived
yum: name=keepalived state=present
- name: config file
template: src=http://www.mamicode.com/keepalived.conf.j2 dest=/etc/keepalived/keepalived.conf>
(2)编写触发器
[root@localhost keepalived]# vim handlers/main.yml
- name: reload keepalived
service: name=keepalived state=restarted
~
(3)修改keepalived配置文件并放到keepalived角色底下的templates目录下
[root@localhost templates]# cat keepalived.conf.j2
! Configuration File for keepalived
global_defs {
notification_email {
acassen@firewall.loc
failover@firewall.loc
sysadmin@firewall.loc
}
notification_email_from Alexandre.Cassen@firewall.loc
smtp_server 192.168.200.1
smtp_connect_timeout 30
router_id LVS_DEVEL
}
vrrp_instance VI_1 {
state {{ state }} #使用变量
interface eth0
virtual_router_id 51
priority {{ priority }} #使用变量
advert_int 1
authentication {
auth_type PASS
auth_pass 1111
}
virtual_ipaddress {
192.168.180.150
}
}
[root@localhost templates]# ls
keepalived.conf.j2 (4)编写安装keepalived的playbook
[root@localhost /]# cat keepalived.yml
- hosts: nginx
remote_user: root
roles:
- keepalived
6.运行各个playbook
[root@localhost /]# ansible-playbook mysql.yml
[root@localhost /]# ansible-playbook apache.yml
[root@localhost /]# ansible-playbook nginx.yml
[root@localhost /]# ansible-playbook keepalived.yml
三.验证与测试:
1.在其中一台集群主机上查看各个端口,如图所示,我们安装的各个服务端口已经开启
[root@www1 conf]# ss -tnl
State Recv-Q Send-Q Local Address:Port Peer Address:Port
LISTEN 0 128 :::11211 :::*
LISTEN 0 128 *:11211 *:*
LISTEN 0 128 *:80 *:*
LISTEN 0 128 :::8080 :::*
LISTEN 0 128 :::22 :::*
LISTEN 0 128 *:22 *:*
LISTEN 0 100 ::1:25 :::*
LISTEN 0 100 127.0.0.1:25 *:*
LISTEN 0 128 :::10050 :::*
LISTEN 0 128 *:10050 *:*
LISTEN 0 50 *:3306 *:*
[root@www1 conf]#
2.查看keepalived的maste角色是否生产vip地址
[root@www1 conf]# ip address list
1: lo: <LOOPBACK,UP,LOWER_UP> mtu 16436 qdisc noqueue state UNKNOWN
link/loopback 00:00:00:00:00:00 brd 00:00:00:00:00:00
inet 127.0.0.1/8 scope host lo
inet6 ::1/128 scope host
valid_lft forever preferred_lft forever
2: eth0: <BROADCAST,MULTICAST,UP,LOWER_UP> mtu 1500 qdisc pfifo_fast state UP qlen 1000
link/ether 00:0c:29:d0:2e:20 brd ff:ff:ff:ff:ff:ff
inet 192.168.180.140/24 brd 192.168.180.255 scope global eth0
inet 192.168.180.150/32 scope global eth0 //我们配置的地址
inet6 fe80::20c:29ff:fed0:2e20/64 scope link
valid_lft forever preferred_lft forever
3.通过浏览器访问vip地址访问wordpress,如图所示,访问成功

本文出自 “test” 博客,请务必保留此出处http://3636699.blog.51cto.com/3626699/1915178
ansible实现lnamp自动化安装
