首页 > 代码库 > 2、kvm虚拟化管理平台WebVirtMgr部署
2、kvm虚拟化管理平台WebVirtMgr部署
场景:当KVM宿主机越来越多,需要对宿主机的状态进行调控。这里我采用WebVirtMgr作为kvm虚拟化的web管理工具,图形化的WEB,让人能更方便的查看kvm 宿主机的情况和操作
介绍:官网 https://www.webvirtmgr.net/ ; WebVirtMgr是近两年来发展较快,比较活跃,非常清新的一个KVM管理平台,提供对宿主机和虚机的统一管理,它有别于kvm自带的图形管理工具(virtual machine manager),让kvm管理变得更为可视化
WebVirtMgr特点:
操作简单,易于使用
通过libvirt的API接口对kvm进行管理
提供对虚拟机生命周期管理
WebVirtMgr 功能
宿主机管理支持以下功能
CPU利用率
内存利用率
网络资源池管理
存储资源池管理
虚拟机镜像
虚拟机克隆
快照管理
日志管理
虚机迁移
虚拟机管理支持以下功能
CPU利用率
内存利用率
光盘管理
关/开/暂停虚拟机
安装虚拟机
VNC console连接
创建快照
一、首先要安装KVM虚拟化环境,这里安装不做介绍:
已安装kvm的主机IP为 192.168.1.189
二、Kvm的管理工具webvirtmgr安装和使用
1 安装支持的软件源,关闭防火墙
yum -y novnc //安装该服务使支持vnc连接
yum -y install http://dl.fedoraproject.org/pub/epel/6/i386/epel-release-6-8.noarch.rpm
setenforce 0
vim /etc/sysconfig/selinux //修改其中 SELINUX=disabled
2 安装相关软件
yum -y install git python-pip libvirt-python libxml2-python python-websockify supervisor nginx
3 从git-hub中下载相关的webvirtmgr代码
cd /usr/local/src/
git clone git://github.com/retspen/webvirtmgr.git
4 安装webvirtmgr
cd webvirtmgr/
pip install -r requirements.txt //我在这一步的时候执行出现错误,但多执行几次又不报错了
5 安装数据库
yum install python-sqlite2
6 对django进行环境配置
[root@k1 webvirtmgr]#pwd
/usr/local/src/webvirtmgr
[root@k1 webvirtmgr]#python manage.py syncdb #默认是python执行,若出现如下报错,换用其他版本的python
注意此处用默认的python执行上面命令,一般会报错,如下:
ImportError: No module named django.core.management
............
............
You just installed Django‘s auth system, which means you don‘t have any superusers defined.
Would you like to create one now? (yes/no): yes
Username (leave blank to use ‘root‘): Admin
Email address: 邮箱账号
Password: *********
Password (again): *********
--------------------- --------------------- --------------------- ---------------------
[root@k1 webvirtmgr]#python manage.py collectstatic #生成配置文件
WARNING:root:No local_settings file found.
You have requested to collect static files at the destination
location as specified in your settings.
This will overwrite existing files!
Are you sure you want to do this?
Type ‘yes‘ to continue, or ‘no‘ to cancel: yes
..........
..........
[root@k1 webvirtmgr]#python manage.py createsuperuser #添加管理员账号
WARNING:root:No local_settings file found.
Username: Aaron #这个是管理员账号,用上面的Admin和这个管理员账号都可以登陆webvirtmgr的web界面管理平台
Email address: 邮箱账号
Password:
Password (again):
Superuser created successfully.
7 拷贝web到 相关目录
[root@k1 webvirtmgr]#mkdir -pv /data/www && mkdir -pv /data/log/nginx/
[root@k1 webvirtmgr]# cp -Rv /usr/local/src/webvirtmgr /data/www/webvirtmgr
8 设置ssh
[root@k1 webvirtmgr]#ssh-keygen -r rsa #产生公私钥
[root@k1 webvirtmgr]#ssh-copy-id 192.168.1.189 #由于这里webvirtmgr和kvm服务部署在同一台机器,所以这里本地信任。如果kvm部署在其他机器,那么这个是它的ip
[root@k1 webvirtmgr]#ssh 192.168.1.189 -L localhost:8000:localhost:8000 -L localhost:6080:localhost:60
9 编辑nginx配置文件
提前确保/etc/nginx/nginx.conf文件里开启了“include /etc/nginx/conf.d/*.conf;”
[root@k1 webvirtmgr]#vim /etc/nginx/conf.d/webvirtmgr.conf #添加下面内容到文件中
server {
listen 80 default_server;
server_name $hostname;
access_log /data/log/nginx/webvirtmgr_access_log;
location /static/ {
root /data/www/webvirtmgr/webvirtmgr; # or /srv instead of /var
expires max;
}
location / {
proxy_pass http://127.0.0.1:8000;
proxy_set_header X-Real-IP $remote_addr;
proxy_set_header X-Forwarded-for $proxy_add_x_forwarded_for;
proxy_set_header Host $host:$server_port;
proxy_set_header X-Forwarded-Proto $remote_addr;
proxy_connect_timeout 600;
proxy_read_timeout 600;
proxy_send_timeout 600;
client_max_body_size 1024M; # Set higher depending on your needs
}
}
[root@k1 webvirtmgr]# mv /etc/nginx/conf.d/default.conf /etc/nginx/conf.d/default.conf.bak
10 启动nginx
[root@k1 webvirtmgr]#/etc/init.d/nginx restart
11 设置 supervisor
[root@k1 webvirtmgr]#chown -R nginx:nginx /var/www/webvirtmgr
[root@k1 webvirtmgr]#vim /etc/supervisord.conf #在文件末尾添加
[program:webvirtmgr]
command=/usr/bin/python /data/www/webvirtmgr/manage.py run_gunicorn -c /data/www/webvirtmgr/conf/gunicorn.conf.py #启动8000端口
directory=/data/www/webvirtmgr
autostart=true
autorestart=true
logfile=/data/log/supervisor/webvirtmgr.log
log_stderr=true
user=nginx
[program:webvirtmgr-console]
command=/usr/bin/python /data/www/webvirtmgr/console/webvirtmgr-console #启动6080端口(这是控制台vnc端口)
directory=/data/www/webvirtmgr
autostart=true
autorestart=true
stdout_logfile=/data/log/supervisor/webvirtmgr-console.log
redirect_stderr=true
user=nginx
[root@k1 webvirtmgr]# vim /data/www/webvirtmgr/conf/gunicorn.conf.py #确保下面bind绑定的是本机的8000端口,这个在nginx配置中定义了,被代理的端口
bind = ‘127.0.0.1:8000‘
12 设置开机启动
[root@k1 webvirtmgr]#chkconfig supervisord on
[root@k1 webvirtmgr]#vim /etc/rc.local
/usr/sbin/setsebool httpd_can_network_connect true
13 启动进程
[root@k1 webvirtmgr]#/etc/init.d/supervisord restart
14 查看进程
[root@k1 webvirtmgr]#netstat -lnpt #即可以看到6080和8000已经启动,不成功可指定配置文件进行重启
15 web访问
http://192.168.1.189/
这里用超级管理员登陆,只有超级管理员登陆后才能看到“基础构架”窗口
普通用户登陆后,只能看到“WebVirtMgr”一个窗口


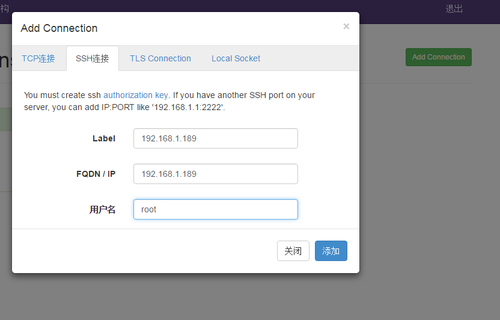
点击 Add Connection
选择“SSH链接“,设置Label,IP,用户
注意:Label与IP要相同


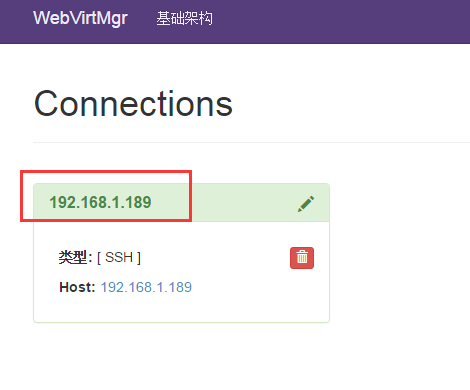
打开后,无提示报错则成功,如下图

若有报错可参考以下链接
https://www.cnblogs.com/kevingrace/p/5737724.html
本文出自 “lmlinux” 博客,请务必保留此出处http://1121914451.blog.51cto.com/11002746/1863540
2、kvm虚拟化管理平台WebVirtMgr部署
