首页 > 代码库 > 自动化部署操作系统-Kickstart+PXE自动部署
自动化部署操作系统-Kickstart+PXE自动部署
Kickstart+PXE自动部署
目录:
无人值守安装简介
实战:PXE批量部署linux操作系统
前言
部署dhcp服务
HTTP服务
TFTP服务
复制PXE启动时需要的文件
修改引导启动菜单
配置kickstart自动安装文件(ks.cfg)
装机测试
无人值守安装简介
无人值守安装(Unattended Setup)指软件安装时无需任何用户干预,直接按默认或通过应答文件设置安装,这对于无特殊需求的用户或企业大批量部署安装操作系统及软件时非常方便。无人值守安装也称为静默安装,在安装过程中可以静默安装好预先设计集成的一些常用软件,安装结束以后软件就已经可以使用,很多软件都支持静默安装
PXE:Pre-boot Execution Environment:一种引导方式,计算机含有个PXE支持的网卡(NIC),即网卡中必须要有PXE Client,这样就可以通过PXE协议从网络启动计算机(网卡必须有PXE芯片),协议分为Client和Server端,PXE Client在网卡的ROM中,当计算机启动引导时,BIOS把PXE Client调入内存运行,由PXE Client将放置在远端的文件通过网络下载到本地运行。运行PXE协议需要设置DHCP服务器和TFTP服务器,DHCP服务器用来给PXE Client (需要安装系统的主机)分配一个IP地址,由于是给PXE Client分配IP地址,所以在配置DHCP服务器时需要增加相应的PXE设置!此外,PXE Client的ROM中,已经存在了TFTPClient。PXE Client 通过TFTP协议到TFTPServer上下载所需文件!
KickStart是一种无人职守安装方式。KickStart的工作原理是通过记录典型的安装过程中所需人工干预填写的各种参数,并生成一个名为 ks.cfg的文件;在其后的安装过程中(不只局限于生成KickStart安装文件的机器)当出现要求填写参数的情况时,安装程序会首先去查找 KickStart生成的文件,当找到合适的参数时,就采用找到的参数,当没有找到合适的参数时,才需要安装者手工干预。这样,如果KickStart文件涵盖了安装过程中出现的所有需要填写的参数时,安装者完全可以只告诉安装程序从何处取ks.cfg文件,然后去忙自己的事情。等安装完毕,安装程序会根据ks.cfg中设置的重启选项来重启系统,并结束安装
实战:PXE批量部署linux操作系统
前言
在真实的生产环境中,我们如果遇到新上线很多服务器的话,装系统是件很麻烦的事情,而且工作效率很低,机房辐射这么大,我们掌握了批量安装的技能,就可以在一个小时内,解决几百台或者更多的系统安装,下面来讲下Kickstart+PXE自动部署,以后还会更新Cobbler大家记得关注下
部署dhcp服务
安装dhcp服务器并关闭selinux及iptables
[root@localhost ~]# setenforce 0            #设置selinux为permissive模式
[root@localhost ~]# getenforce
Permissive
[root@localhost ~]# service iptables stop   #关闭防火墙

[root@localhost ~]# yum -y install dhcp                            #安装
[root@localhost ~]# rpm -ql dhcp |grep "dhcpd.conf"                  #检查
[root@localhost ~]# cp /usr/share/doc/dhcp-4.1.1/dhcpd.conf.sample /etc/dhcp/dhcpd.conf
cp: overwrite `/etc/dhcp/dhcpd.conf‘? y
[root@localhost ~]# vim /etc/dhcp/dhcpd.conf                        #配置
配置dhcp服务器
ddns-update-style none;    # 不进行DDNS的更新
ignore client-updates;     # 不允许客户机更新DNS记录

subnet 192.168.1.0 netmask 255.255.255.0    # 与下面的range配合声明可分配IP的范围
{
        option routers 192.168.1.1 ;        # 设置网关
        range 192.168.1.110 192.168.1.120;   # 可分配的起始IP 结束IP
        option subnet-mask 255.255.255.0;      # 设定netmask
        default-lease-time 21600;              # 设置默认的IP租用期限
        max-lease-time 43200;                 # 设置最大的IP租用期限
        next-server 192.168.1.2 ;           # 用来告知主机TFTP服务器的ip
        filename "/pxelinux.0";      # tftp服务器根目录下面的文件名(pxelinux.0是PXE专用的一个boot loader 文件)
}
启动服务
[root@localhost ~]# service dhcpd start                      #启动
[root@localhost ~]# chkconfig dhcpd on                       #设置开机启动
[root@localhost ~]# netstat -nlptu |grep dhcp                  #检查服务
[root@localhost ~]# sed -i ‘s/DHCPDARGS= /DHCPDARGS=eth1/g‘ /etc/sysconfig/dhcpd     #仅在eth1上提供dhcp服务
[root@localhost ~]# sed -i ‘s/net.ipv4.ip_forward = 0/net.ipv4.ip_forward = 1/g‘ /etc/sysctl.conf&&sysctl -p  #开启路由功能
HTTP服务
[root@localhost ~]# yum -y install httpd                     #安装
[root@localhost ~]# chkconfig httpd on                      #开机自启动
[root@localhost ~]# service httpd start                      #启动服务
[root@localhost ~]# mkdir -p /var/www/html/os/6                #创建挂载目录
[root@localhost ~]# mount /dev/cdrom /var/www/html/os/6           #挂载系统镜像
TFTP服务
[root@localhost ~]# yum -y install tftp-server                     #安装
[root@localhost ~]# vim /etc/xinetd.d/tftp                         #配置
service tftp
{
        socket_type                = dgram
        protocol                  = udp
        wait                     = yes
        user                    = root
        server                  = /usr/sbin/in.tftpd
        server_args               = -s /tftpboot        #指定默认目录
        disable                 = no                    #由原来的yes,改为no
        per_source              = 11
        cps                     = 100 2
        flags                   = IPv4
}
复制PXE启动时需要的文件
[root@localhost ~]# yum -y install syslinux  #安装引导程序(提pxelinux.0文件)
[root@localhost ~]# cp /usr/share/syslinux/pxelinux.0 /tftpboot/              #复制引导文件到TFTP的根目录
[root@localhost ~]# cp /usr/share/syslinux/{vesamenu.c32,boot.msg,splash.jpg} /tftpboot/
[root@localhost ~]# cp /var/www/html/os/6/images/pxeboot/vmlinuz /tftpboot/
[root@localhost ~]# cp /var/www/html/os/images/pxeboot/initrd.img /tftpboot/
[root@localhost ~]# mkdir -p /tftpboot/pxelinux.cfg
[root@localhost ~]# cp /var/www/html/os/6/isolinux/isolinux.cfg  /tftpboot/pxelinux.cfg/default    #拷贝启动菜单
修改引导启动菜单
[root@localhost ~]# vim /tftpboot/pxelinux.cfg/default
//然后修改下22行(即在后面添加ks=http://192.168.1.2/ks.cfg ksdevice=eth0 ip=dhcp)。第22行的意思是使安装程序通过http服务器访问kickstart文件。
#配置文件
label linux
  menu label ^Install or upgrade an existing system
  menu default
  kernel vmlinuz
  append initrd=initrd.img ks=http://192.168.1.2/ks.cfg ksdevice=eth0 ip=dhcp

//检测文件
[root@localhost ~]# chmod 644 /tftpboot/pxelinux.cfg/default                    #设置文件权限
[root@localhost ~]# ls /var/lib/tftpboot       #检查
boot.msg  initrd.img  pxelinux.0  pxelinux.cfg  splash.jpg  vesamenu.c32  vmlinuz
配置kickstart自动安装文件(ks.cfg)
[root@localhost ~]# yum -y install system-config-kickstart  #建议在图形化界面内安装配置
[root@localhost ~]# echo $LANG
en_US.UTF-8
[root@localhost ~]#.UTF-8
[root@localhost ~]# system-config-kickstart
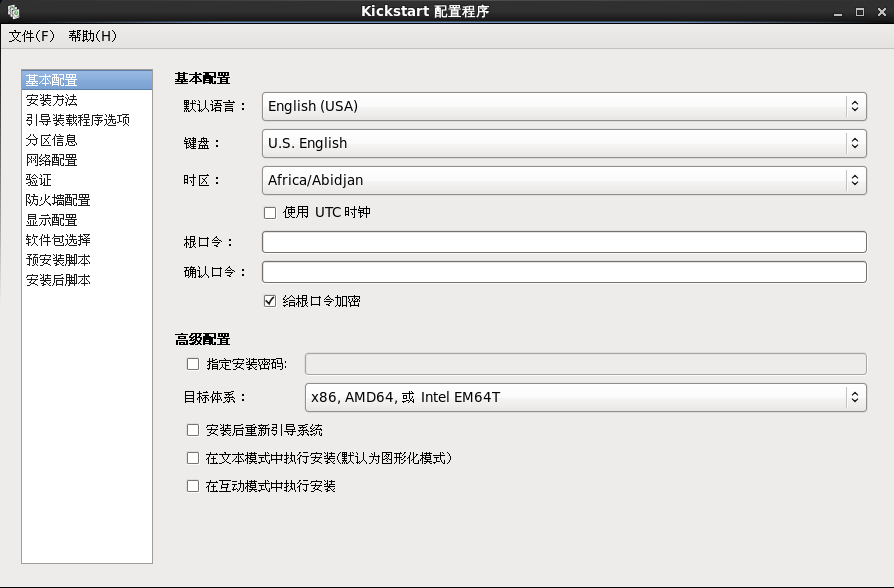
图形化界面配置:(终端中运行system-config-kickstart命令)图形界面不在介绍,可设置中文,和安装的选项没什么区别(保存到/var/www/html/目录下)前面引导菜单里面指定了

作者的ks.cfg 我是通过system-config-kickstart制作的
#platform=x86, AMD64, 或 Intel EM64T
#version=DEVEL
# Firewall configuration
firewall --disabled                     #禁止防火墙
# Install OS instead of upgrade
install                                 #告知安装程序,这是一次全新安装,而不是升级
# Use network installation
url --url="http://192.168.1.2/os/6"
# Root password
rootpw --iscrypted $1$H8k1EIfB$BD1WyfZ4SkDNsypX1jjgR0   #设定root的密码
# System authorization information
auth  --useshadow  --passalgo=sha512    #设置密码加密方式为sha512 启用shadow文件
# Use text mode install
text                                    #使用文本模式安装
firstboot --disable                     #禁止firstboot,firstboot就是我们使用图形化安装完系统,重启后有一个初始设置
# System keyboard
keyboard us                             #使用美式键盘
# System language
lang en_US                              #默认语言是英语
# SELinux configuration
selinux --disabled                      #禁止selinux
# Installation logging level
logging --level=info                    #设定安装过程中的日志级别
# Reboot after installation
reboot                                  #设定安装完成后重启
# System timezone
timezone  Asia/Shanghai                 #设置时区
# Network information
network  --bootproto=dhcp --device=eth0 --onboot=on #设置安装完成后的网络
# System bootloader configuration
bootloader --location=mbr
# Clear the Master Boot Record
zerombr                                 #清空mbr
# Partition clearing information
clearpart --all --initlabel             #清空所有分区
# Disk partitioning information
part /boot --fstype="ext4" --size=200   #新建/boot分区
part swap --fstype="swap" --size=2048   #新建swap分区
part / --fstype="ext4" --grow --size=1  #新建swap分区

%post
#加上优化脚本
mkdir /shell
cd /shell
/usr/bin/wget http://192.168.1.2/shell.tar.gz
/bin/tar -zxf shell.tar.gz
/bin/sh *.sh
%end
#安装包我选择的是Basic模式,添加了中文支持
%packages
@base
@chinese-support
@development
@kde-desktop

%end
注意:如果自己制作ks.cfg root的密码生成
grub-crypt                            #密方式为sha512生成的密码
Password: rhce
Retype password: rhce
$6$QHOksakPohOoVUL9$CNCHfAMYDZZZzZixAGGKCWdPkK8qVvpRk9DkaDOJtrRXlJkzk5GHMZ9zqCTdr8Qiozl9qHOVT5XnbGaZKt06d0
装机测试
新建一台虚拟机,如果不是千万不要把网卡调到第一位,不然会一直重装,客户端必须能获取分配的地址

安装成功,登录界面

本文出自 “家住海边喜欢浪” 博客,请务必保留此出处http://zhang789.blog.51cto.com/11045979/1853388
自动化部署操作系统-Kickstart+PXE自动部署
