首页 > 代码库 > Linux 系统安全 -- 防暴力破解
Linux 系统安全 -- 防暴力破解
fail2ban防止暴力破解
1. 下载stable稳定版解压缩1
2. 编译安装1
3. 拷贝启动脚本1
4. 修改配置文件1
5. 启动fail2ban2
6. 测试,ssh连接,连续输入3次密码2
7. 此时在查看服务端的防火墙和failban状态2
8. 解锁被failban禁止登录的ip3
9. 自动部署的脚本3
防止暴力破解的一般方法:
1) 密码足够复杂 2)修改端口号 3) 禁用root登 4)第三方防爆破软件
fail2ban实现锁IP
说明:监视系统日志,然后通过匹配日志(/var/log/secure)错误信息(正则匹配),执行相应的屏蔽动作(将满足动作的相关IP利用iptables加入到drop列表一定的时间),如禁止登录,而且可以发送邮件提示
除了ssh,fail2ban还支持多项服务,具体查看配置文件
官网:http://www.fail2ban.org
系统基于centos
1. 下载stable稳定版解压缩
[root@mfsdata03 ~]# wget https://codeload.github.com/fail2ban/fail2ban/tar.gz/0.8.14
[root@mfsdata03 ~]# tar -xf 0.8.14
[root@mfsdata03 ~]# cd fail2ban-0.8.14/
2. 编译安装
说明:要求python版本需大于2.4;
安装方式 python setup.py install
[root@mfsdata03 fail2ban-0.8.14]# python -V
Python 2.6.6
[root@mfsdata03 fail2ban-0.8.14]# python setup.py install
3. 拷贝启动脚本
[root@mfsdata03 fail2ban-0.8.14]# cp files/redhat-initd /etc/init.d/fail2ban
说明:该文件中含有开机启动级别chkconfig,即可以认为是启动脚本
[root@mfsdata03 fail2ban-0.8.14]# cat /etc/init.d/fail2ban |grep chkconfig
# chkconfig: - 92 08
4. 修改配置文件
[root@mfsdata03 fail2ban-0.8.14]# cp /etc/fail2ban/jail.conf /etc/fail2ban/jail.conf.ori
解释:
enabled = ture #开启功能
logpath = /var/log/secure #ssh登录日志文件
maxrty = 3 #尝试3次
findtime = 300 #监控300次 #需要新添加
bantime = 3600 #禁用IP时间,1小时 #需要新添加

[DEFAULT] #全局设置
ignoreip = 127.0.0.1/8 #忽略的IP列表,不受设置限制
bantime = 600 #屏蔽时间,单位:秒
findtime = 500 #这个时间段内超过规定次数会被ban掉
maxretry = 3 #最大尝试次数
backend = auto
[root@mfsdata03 fail2ban-0.8.14]# diff /etc/fail2ban/jail.conf /etc/fail2ban/jail.conf.ori
96c96
< enabled = true
---
> enabled = false
100,103c100,101
< logpath = /var/log/secure
< maxretry = 3
< findtime = 300
< bantime = 3600
---
> logpath = /var/log/sshd.log
> maxretry = 5
5. 启动fail2ban
[root@mfsdata03 fail2ban-0.8.14]# service fail2ban start
Starting fail2ban: [ OK ]
6. 测试,ssh连接,连续输入3次密码
结果:被拒绝3600秒不能再次登录
root@ubuntu:~# ssh leco@192.168.5.104
leco@192.168.5.104‘s password: #第一次故意输错密码
Permission denied, please try again.
leco@192.168.5.104‘s password: #第二次故意输错密码
Permission denied, please try again.
leco@192.168.5.104‘s password: #第三次故意输错密码
Permission denied (publickey,gssapi-keyex,gssapi-with-mic,password).
root@ubuntu:~# ssh leco@192.168.5.104 #此时再次登录的时候就被拒绝了
ssh: connect to host 192.168.5.104 port 22: Connection refused
7. 此时在查看服务端的防火墙和failban状态
[root@mfsdata03 ~]# fail2ban-client status ssh-iptables
Status for the jail: ssh-iptables
|- filter
| |- File list:/var/log/secure
| |- Currently failed:0
| `- Total failed:9
`- action
|- Currently banned:1
| `- IP list:192.168.5.201
`- Total banned:3
[root@mfsdata03 fail2ban-0.8.14]# iptables -L -n
Chain INPUT (policy ACCEPT)
target prot opt source destination
fail2ban-SSH tcp -- 0.0.0.0/0 0.0.0.0/0 tcp dpt:22
Chain FORWARD (policy ACCEPT)
target prot opt source destination
Chain OUTPUT (policy ACCEPT)
target prot opt source destination
Chain fail2ban-SSH (1 references)
target prot opt source destination
REJECT all -- 192.168.5.201 0.0.0.0/0 reject-with icmp-port-unreachable
RETURN all -- 0.0.0.0/0 0.0.0.0/0
#此时可以看到在被禁止以后,防火墙自动添加一条规则
我使用一条192.168.5.201机器试图登录192.168.5.104机器,密码三次输错以后就被锁定1小时(配置文件可以修
改),锁定就是通过防火墙策略,时间过了限制期后自动解锁也就是删除该iptables的命令。
注:fail2ban一定后于iptables启动,即重启iptables一定要重启fail2ban,相反重启fail2ban不用重新启iptables。
8. 解锁被failban禁止登录的ip
[root@mfsdata03 ~]# iptables -L -n --line-number
Chain INPUT (policy ACCEPT)
num target prot opt source destination
1 fail2ban-SSH tcp -- 0.0.0.0/0 0.0.0.0/0 tcp dpt:22
Chain FORWARD (policy ACCEPT)
num target prot opt source destination
Chain OUTPUT (policy ACCEPT)
num target prot opt source destination
Chain fail2ban-SSH (1 references)
num target prot opt source destination
1 REJECT all -- 192.168.5.201 0.0.0.0/0 reject-with icmp-port-unreachable
2 RETURN all -- 0.0.0.0/0 0.0.0.0/0
[root@mfsdata03 ~]# iptables -t filter -D INPUT 1
也就是iptables删除第一条规则。
9. 自动部署的脚本
1 2 3 4 5 6 7 8 9 10 11 12 13 14 15 16 17 18 19 20 21 22 23 24 25 26 27 28 29 30 31 32 33 | #自动部署shell脚本#!/bin/bash#fail2ban-0.8.14.tar.gz#python 版本要大于 2.4#user:roottar -zxf fail2ban-0.8.14.tar.gzcd /root/fail2ban-0.8.14/python setup.py install cp /root/fail2ban-0.8.14/files/redhat-initd /etc/init.d/fail2banchkconfig --add fail2bansleep 1rm -rf /root/fail2ban-0.8.14/rm -rf /root/fail2ban-0.8.14.tar.gz[ -f /etc/fail2ban/jail.bak ]if [ $? -eq 0 ];then exit 0else cp /etc/fail2ban/jail.conf /etc/fail2ban/jail.bakfised -i ‘96c enable = true‘ /etc/fail2ban/jail.confsed -i ‘100c logpath = /var/log/secure‘ /etc/fail2ban/jail.confsed -i ‘101c maxretry = 3‘ /etc/fail2ban/jail.confsed -i ‘101a\bantime = 3600‘ /etc/fail2ban/jail.confsed -i ‘101a\findtime = 300‘ /etc/fail2ban/jail.confsleep 1[ -f /var/log/secure.bak ]if [ $? -eq 0 ];then exit 0else cp /var/log/secure /var/log/secure.bakfi> /var/log/secure/etc/init.d/fail2ban start &>/dev/null |
至此配置工作完成了,另外,需要注意以下一些小问题。
1. 如果配置错误,如误操作把自己禁止掉,只要执行>/var/log/secure,清空日志文件,因为fail2ban的工作原理就是读取一定时间内的日志文件,通过配置进行过滤的。
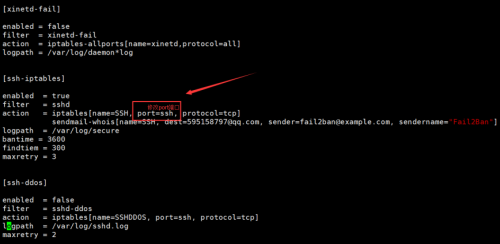
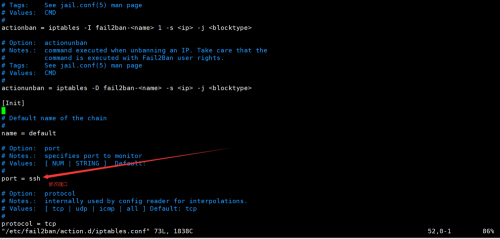
2. 很多企业一般不用默认的22端口,会使用其他端口,这个是配置文件和防火墙端口要做相应的更改,如下图以下是要修改的2个地方。
A. vim /etc/fail2ban/jail.conf

B. vim /etc/fail2ban/action.d/iptables.conf

3. 如果使用想要永久禁用某个ip登录,可以使用脚本结合crond定期执行:脚本如下:
1 2 3 4 5 6 7 8 9 10 11 12 13 14 15 16 17 | #!/bin/bash# author :caimengzhi# date :2016-03-12# Version:V1.0cat /var/log/secure | awk ‘/Failed/{print $(NF-3)}‘|sort|uniq -c|awk ‘{print $2" = "$1}‘ >>/root/log_fail2ban.txtDEFINE=‘10‘ #定义失败次数上限for each in $(cat /root/log_fail2ban.txt)do ip = $(echo $each | awk -F"=" ‘{print $1}‘) Count = $(echo $each | awk -F"=" ‘{print $2}‘) if [ $Count -gt $DEFINE ];then grep $ip /etc/hosts.deny >/dev/null if [ $? -gt 0 ];then echo "sshd:$ip" >> /etc/hosts.deny fi fidone |
本文出自 “高好亮” 博客,转载请与作者联系!
Linux 系统安全 -- 防暴力破解
