首页 > 代码库 > linux服务控制
linux服务控制
配置yum: ##清除centos默认yum源,它默认yum源是国外的,速度慢
cd /etc/yum.repos.d/
rm -rf ./*
配置yum源: ##配置个本地yun源
    cat <<END >>ctos.repo
        [local]
        name=local
        baseurl=file:///mnt/
        enabled=1
        gpgcheck=0
        END
mount /dev/cdrom /mnt  ##挂载光盘
ls /mnt/
##至此就可以使用本地yum源了
或者直接使用公网yum源:
wget -O /etc/yum.repos.d/CentOS-Base.repo http://mirrors.aliyun.com/repo/Centos-6.repo ##centos6 yum源
wget -O /etc/yum.repos.d/CentOS-Base.repo http://mirrors.aliyun.com/repo/Centos-7.repo ##centos7 yun源
    [root@qiu ~]# ls /etc/yum.repos.d/
    CentOS-Base.repo  centos.repo
使用yun安装常用软件:
yum -y install ntsysv vsftpd man vim wget lftp
1.系统安装完成后的设置:
1)关闭防火墙:
/etc/init.d/iptables stop ##清空防火墙当前运行规则
chkconfig iptables off ##设置防火墙开机不加载
iptables -L ##查看防火墙规则
    [root@qiu ~]# /etc/init.d/iptables stop
    [root@qiu ~]# chkconfig iptables off
    [root@qiu ~]# iptables -L
    Chain INPUT (policy ACCEPT)
    target     prot opt source               destination

    Chain FORWARD (policy ACCEPT)
    target     prot opt source               destination

    Chain OUTPUT (policy ACCEPT)
    target     prot opt source               destination
2)关闭selinux:
getenforce ##查看selinux状态
setenforce 0 ##临时关闭selinux
sed -i ‘/^SELINUX/s/enforcing/disabled/g‘ /etc/selinux/config ##永久禁用selinux
reboot ##重启验证
[root@qiu ~]# getenforce
Permissive
[root@qiu ~]# setenforce 0
[root@qiu ~]# vim /etc/sysconfig/selinux
    .....
    SELINUX=disabled
    .....
[root@qiu ~]# reboot
[root@qiu ~]# getenforce
Disabled
3)开机引导过程:
BIOS-->MBR引导-->GRUB菜单加载-->加载内核(kernel)-->init进程-->读取配置文件-->启动服务-->启动tty等待登陆
配置文件:
/etc/inittab ##设置默认运行级别
/etc/init/rc.conf ##系统配置默认配置文件
运行级别:0:关机;1:单用户模式;2:不带网络的字符界面;3:正常的多用户字符界面;4:未使用;5:图形;6:重启;在使用过程中注意:
0,1,6不能被设置为默认的级别
一般设置级别3或者5. 1常被用户于修改密码。
案例:
runlevel ##查看运行级别
init 6 ##重启
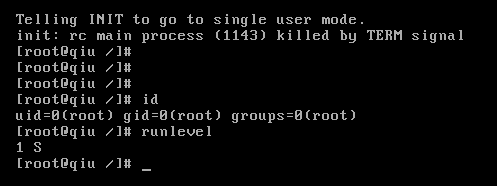
init 1 ##进入单用户 (会断开终端)
init 5 ##进入图形界面,切换到图形界面的快捷键只有在初始启动图形后才能使用,进入图形的前提需要安装图形套件。
    [root@qiu ~]# runlevel
    N 3
    [root@qiu ~]# init 1
    [root@qiu ~]#
    Connection closed by foreign host.

    Disconnected from remote host(192.168.100.150:22) at 11:30:06.

    Type `help‘ to learn how to use Xshell prompt.

     [c:\~]$

2.服务的控制:
方式一:service 服务名 控制类型
方式二:/etc/init.d/服务名 控制类型(start,stop,restart)
案例:远程连接linux
1)设置虚拟机的网卡模式为“host-only”,设置真的host-only的ip为:192.168.100.1/24.
2)给虚拟机设置ip地址:在linux中输入命令“dhclient -d eth0 ”获取地址后ctrl+c退出;使用命令“ip a”查看ip地址。
3)使用crt连接,选择ssh2协议+22端口+账户完成连接
4)/etc/init.d/sshd status ##查看sshd服务状态
/etc/init.d/sshd stop ##停止,再次使用crt连接linux,无法连接
/etc/init.d/sshd start ##启动服务,crt连接成功
    [root@qiu ~]# ip a
    1: lo: <LOOPBACK,UP,LOWER_UP> mtu 16436 qdisc noqueue state UNKNOWN
        link/loopback 00:00:00:00:00:00 brd 00:00:00:00:00:00
        inet 127.0.0.1/8 scope host lo
        inet6 ::1/128 scope host
           valid_lft forever preferred_lft forever
    2: eth0: <BROADCAST,MULTICAST,UP,LOWER_UP> mtu 1500 qdisc pfifo_fast state UP qlen 1000
        link/ether 00:0c:29:75:38:e1 brd ff:ff:ff:ff:ff:ff
        inet 192.168.100.150/24 brd 192.168.100.255 scope global eth0
        inet6 fe80::20c:29ff:fe75:38e1/64 scope link
           valid_lft forever preferred_lft forever
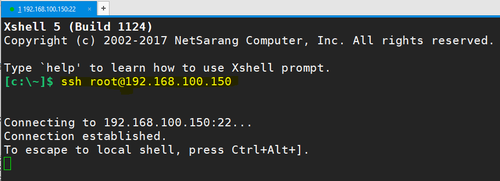
在xshll终端中输入 ssh 用户名@IP地址 -->验证密码后连接


[root@qiu ~]#
[root@qiu ~]# /etc/init.d/sshd status
openssh-daemon (pid  1908) 正在运行...
[root@qiu ~]# /etc/init.d/sshd stop
停止 sshd:                                                [确定]
[root@qiu ~]# /etc/init.d/sshd status
openssh-daemon 已停
返回连接失败
[c:\~]$ ssh root@192.168.100.150
Connecting to 192.168.100.150:22...
Could not connect to ‘192.168.100.150‘ (port 22): Connection failed.
Type `help‘ to learn how to use Xshell prompt.
启动后再次尝试连接 连接成功
[root@qiu ~]# /etc/init.d/sshd start
正在启动 sshd:                                            [确定]
[root@qiu ~]# /etc/init.d/sshd status
openssh-daemon (pid  1981) 正在运行...
[c:\~]$ ssh root@192.168.100.150
Connecting to 192.168.100.150:22...
Connection established.
To escape to local shell, press Ctrl+Alt+].
Last login: Sat Aug  5 19:45:26 2017 from 192.168.100.10
[root@qiu ~]#
终端已经建立连接了的 sshd服务停止后,连接仍然存在。
注意:
推荐使用/etc/init.d/服务名 控制类型,可以使用tab补齐,同时配合多tab使用。
service --status-all |grep running ##查看系统中所有的开启的服务
    [root@qiu ~]# service --status-all |grep 正在运行
    auditd (pid  1636) 正在运行...
    crond (pid  1831) 正在运行...
    hald (pid  1688) 正在运行...
    messagebus (pid  1664) 正在运行...
    master (pid  1821) 正在运行...
    rsyslogd (pid  1652) 正在运行...
    openssh-daemon (pid  1981) 正在运行...
3.linux开机启动控制:ntsysv;chkconfig
1)ntsysv交互界面批量控制服务
语法:
ntsysv --level 运行级别
ntsysv --level 35 ##在3和5运行级别调整开机启动服务;tab跳转,*表示开机启动,空格键取消*。
[root@qiu ~]# ntsysv --level 3

2)chkconfig单个处理服务开机启动
案例:
chkconfig --help ##获取帮助
chkconfig sshd on ##设置服务gpm在2345开机启动
chkconfig --list sshd ##只查看gpm服务的开机启动情况
chkconfig --list |grep 3:on ##查看在运行级别3中开机启动的所有服务
    [root@qiu ~]# chkconfig --help
    chkconfig 版本 1.3.49.5 - 版权 (C) 1997-2000 Red Hat, Inc.
    在 GNU 公共许可的条款下,本软件可以被自由发行。
    用法:   chkconfig [--list] [--type <type>] [name]
             chkconfig --add <name>
             chkconfig --del <name>
             chkconfig --override <name>
             chkconfig [--level <levels>] [--type <type>] <name> <on|off|reset|resetpriorities>
    [root@qiu ~]# chkconfig sshd on
    [root@qiu ~]# chkconfig --list sshd
    sshd           0:关闭1:关闭2:启用3:启用4:启用5:启用6:关闭
    [root@qiu ~]# chkconfig --list |grep 3:启用

    auditd         0:关闭1:关闭2:启用3:启用4:启用5:启用6:关闭
    blk-availability0:关闭1:启用2:启用3:启用4:启用5:启用6:关闭
    crond          0:关闭1:关闭2:启用3:启用4:启用5:启用6:关闭
    gpm            0:关闭1:关闭2:启用3:启用4:启用5:启用6:关闭
    haldaemon      0:关闭1:关闭2:关闭3:启用4:启用5:启用6:关闭
    ip6tables      0:关闭1:关闭2:启用3:启用4:启用5:启用6:关闭
    libvirt-guests 0:关闭1:关闭2:启用3:启用4:启用5:启用6:关闭
    lvm2-monitor   0:关闭1:启用2:启用3:启用4:启用5:启用6:关闭
    messagebus     0:关闭1:关闭2:启用3:启用4:启用5:启用6:关闭
    netfs          0:关闭1:关闭2:关闭3:启用4:启用5:启用6:关闭
    network        0:关闭1:关闭2:启用3:启用4:启用5:启用6:关闭
    postfix        0:关闭1:关闭2:启用3:启用4:启用5:启用6:关闭
    rsyslog        0:关闭1:关闭2:启用3:启用4:启用5:启用6:关闭
    sshd           0:关闭1:关闭2:启用3:启用4:启用5:启用6:关闭
    udev-post      0:关闭1:启用2:启用3:启用4:启用5:启用6:关闭
补充知识:总结开机过程initrd的窍门和服务器启动控制
cd /tmp/
cp /boot/initramfs-2.6.32-431.el6.x86_64.img /tmp/
file initramfs-2.6.32-431.el6.x86_64.img
mv initramfs-2.6.32-431.el6.x86_64.img initrd.img.gz
gunzip initrd.img.gz
ls
mkdir initdir
mv initrd.img initdir/
cd initdir/
ls
cpio -ivmd <initrd.img
ls -l
ls --color=no
更多命令练习:
yum -y install gpm ##安装字符下的鼠标服务
/etc/init.d/gpm status ##查看gpm的状态
/etc/init.d/gpm stop ##停止鼠标服务gpm、请移动鼠标
service gpm start ##启动gpm服务,请移动鼠标
   [root@qiu ~]#
   [root@qiu ~]# yum -y install gpm &>/dev/null
   [root@qiu ~]# /etc/init.d/gpm status
   gpm 已停
   [root@qiu ~]# /etc/init.d/gpm start
   启动控制台鼠标服务:                                       [确定]
/etc/init.d/sshd stop ##停止远程登录sshd服务
service sshd start ##启动服务
service sshd stop ##停止服务
/etc/init.d/sshd start ##启动服务
   [root@qiu ~]# /etc/init.d/sshd stop
   停止 sshd:                                                [确定]
   [root@qiu ~]# service sshd start
   正在启动 sshd:                                            [确定]
   [root@qiu ~]# service sshd stop
   停止 sshd:                                                [确定]
   [root@qiu ~]# service sshd status
   openssh-daemon 已停
   [root@qiu ~]# /etc/init.d/sshd start
   正在启动 sshd:                                            [确定]
ls /etc/init.d/ ##查看系统中的所有服务的名称
    [root@qiu ~]# ls /etc/init.d/
    auditd            gpm        iptables        lvm2-monitor  network      rsyslog    sshd
    blk-availability  haldaemon  killall         messagebus    postfix      sandbox    svnserve
    crond             halt       libvirt-guests  netconsole    rdisc        saslauthd  udev-post
    functions         ip6tables  lvm2-lvmetad    netfs         restorecond  single     vsftpd
/etc/init.d/network restart ##重启网络服务
[root@qiu ~]# /etc/init.d/network restart
    正在关闭接口 eth0:                                        [确定]
    关闭环回接口:                                             [确定]
    弹出环回接口:                                             [确定]
    弹出界面 eth0: Determining if ip address 192.168.100.150 is already in use for device eth0...
                                                               [确定
service -h ##查看帮助
[root@qiu ~]# service -h
Usage: service < option > | --status-all | [ service_name [ command | --full-restart ] ]
service --status-all ##列出所有服务的状态
        [root@qiu ~]# service --status-all
        auditd (pid  1636) 正在运行...
        crond (pid  1831) 正在运行...
        gpm (pid  18242) 正在运行...
        hald (pid  1688) 正在运行...
        表格:filter
        Chain INPUT (policy ACCEPT)
        num  target     prot opt source               destination
        1    ACCEPT     all      ::/0                 ::/0                state RELATED,ESTABLISHED
        2    ACCEPT     icmpv6    ::/0                 ::/0
        3    ACCEPT     all      ::/0                 ::/0
        4    ACCEPT     tcp      ::/0                 ::/0                state NEW tcp dpt:22
        5    REJECT     all      ::/0                 ::/0                reject-with icmp6-adm-prohibited

        Chain FORWARD (policy ACCEPT)
        num  target     prot opt source               destination
        1    REJECT     all      ::/0                 ::/0                reject-with icmp6-adm-prohibited

        Chain OUTPUT (policy ACCEPT)
        num  target     prot opt source               destination

        iptables:未运行防火墙。
        started
        lvmetad 已停
        messagebus (pid  1664) 正在运行...
        模块 netconsole 未被加载
        配置设备:
        lo eth0
        当前的活跃设备:
        lo eth0
        master (pid  1821) 正在运行...
        rdisc 已停
        rsyslogd (pid  1652) 正在运行...
        sandbox is stopped
        saslauthd 已停
        openssh-daemon (pid  18303) 正在运行...
        svnserve 已停
        vsftpd 已停
history ##查看历史命令
    [root@qiu ~]# history
        1  >.bash_history
        2  poweroff
        3  ipa
        4  ls
        5  ip a
        6  ping www.baidu.com
        7  poweroff
        8  cat /etc/yum.repos.d/centos.repo
        9  vi /etc/yum.repos.d/centos.repo
       10  poweroff
       11  ip a
       12   wget -O /etc/yum.repos.d/CentOS-Base.repo http://mirrors.aliyun.com/repo/Centos-6.repo
       13  ls /etc/yum.repos.d/
       14  yum -y install ntsysv vsftpd  man vim wget lftp
       ......
cat .bash_history ##查看历史命令的文件
    [root@qiu ~]# cat .bash_history
        >.bash_history
        poweroff
        ipa
        ls
        ip a
        ping www.baidu.com
        poweroff
        cat /etc/yum.repos.d/centos.repo
        vi /etc/yum.repos.d/centos.repo
        poweroff
        ip a
         wget -O /etc/yum.repos.d/CentOS-Base.repo http://mirrors.aliyun.com/repo/Centos-6.repo
        ls /etc/yum.repos.d/
        yum -y install ntsysv vsftpd  man vim wget lftp
        /etc/init.d/iptables stop
        chkconfig iptables off
        iptables -L
        getenforce
        setenforce 0
        cat /etc/sysconfig/selinux
        cat /etc/sysconfig/selinux -n
        cat /etc/sysconfig/selinux -7n
        ......
ntsysv ##打开系统启动服务的配置工具
[root@qiu ~]# ntsysv

chkconfig --help ##查看单个服务开机启动设置命令的帮助
chkconfig --list vsftpd ##查看vsftpd服务的开机启动情况
chkconfig --del vsftpd ##删除vsftpd服务
chkconfig --list vsftp ##查看,报错提示不是系统服务
    [root@qiu ~]# chkconfig --help
        chkconfig 版本 1.3.49.5 - 版权 (C) 1997-2000 Red Hat, Inc.
        在 GNU 公共许可的条款下,本软件可以被自由发行。

        用法:   chkconfig [--list] [--type <type>] [name]
                 chkconfig --add <name>
                 chkconfig --del <name>
                 chkconfig --override <name>
                 chkconfig [--level <levels>] [--type <type>] <name> <on|off|reset|resetpriorities>
        [root@qiu ~]# chkconfig --list vsftpd
        vsftpd         	0:关闭	1:关闭	2:关闭	3:关闭	4:关闭	5:关闭	6:关闭
        [root@qiu ~]# chkconfig --del vsftpd
        [root@qiu ~]# chkconfig --list vsftpd
        vsftpd 服务支持 chkconfig,但它在任何级别中都没有被引用(运行“chkconfig --add vsftpd”)
head -10 /etc/init.d/vsftpd ##查看vsftpd服务脚本的前10行,关注第一行和chkconfig、description行
chkconfig --add vsftpd ##添加vsftpd为系统服务
chkconfig --list vsftpd ##再次查看
chkconfig vsftpd on ##
chkconfig --list vsftpd
chkconfig vsftpd off
chkconfig --list vsftpd
chkconfig --level 35 vsftpd on
chkconfig --list vsftpd
  [root@qiu ~]# head -10 /etc/init.d/vsftpd
     #!/bin/bash
     #
     ### BEGIN INIT INFO
     # Provides: vsftpd
     # Required-Start: $local_fs $network $named $remote_fs $syslog
     # Required-Stop: $local_fs $network $named $remote_fs $syslog
     # Short-Description: Very Secure Ftp Daemon
     # Description: vsftpd is a Very Secure FTP daemon. It was written completely from
     #              scratch
     ### END INIT INFO
     [root@qiu ~]# chkconfig --add vsftpd
     [root@qiu ~]# chkconfig --list vsftpd
     vsftpd         	0:关闭	1:关闭	2:关闭	3:关闭	4:关闭	5:关闭	6:关闭
     [root@qiu ~]# chkconfig vsftpd on
     [root@qiu ~]# chkconfig --list vsftpd
     vsftpd         	0:关闭	1:关闭	2:启用	3:启用	4:启用	5:启用	6:关闭
     [root@qiu ~]# chkconfig --level 35 vsftpd on
     [root@qiu ~]# chkconfig --list vsftpd
     vsftpd         	0:关闭	1:关闭	2:启用	3:启用	4:启用	5:启用	6:关闭
     [root@qiu ~]#
ls /etc/rc3.d/
ll /etc/rc3.d/
  [root@qiu ~]# ls /etc/rc3.d/
     K10saslauthd    K89rdisc         S10network     S25blk-availability  S55sshd     S90crond
     K15svnserve     K92iptables      S11auditd      S25netfs             S60vsftpd   S99libvirt-guests
     K50netconsole   S02lvm2-monitor  S12rsyslog     S26haldaemon         S80postfix  S99local
     K87restorecond  S08ip6tables     S22messagebus  S26udev-post         S85gpm
     [root@qiu ~]# ll /etc/rc3.d/
     总用量 0
     lrwxrwxrwx. 1 root root 19 3月  12 2016 K10saslauthd -> ../init.d/saslauthd
     lrwxrwxrwx. 1 root root 18 3月  12 2016 K15svnserve -> ../init.d/svnserve
     lrwxrwxrwx. 1 root root 20 3月  12 2016 K50netconsole -> ../init.d/netconsole
     lrwxrwxrwx. 1 root root 21 3月  12 2016 K87restorecond -> ../init.d/restorecond
     lrwxrwxrwx. 1 root root 15 3月  12 2016 K89rdisc -> ../init.d/rdisc
     lrwxrwxrwx. 1 root root 18 8月   5 19:13 K92iptables -> ../init.d/iptables
     lrwxrwxrwx. 1 root root 22 3月  12 2016 S02lvm2-monitor -> ../init.d/lvm2-monitor
     lrwxrwxrwx. 1 root root 19 3月  12 2016 S08ip6tables -> ../init.d/ip6tables
     lrwxrwxrwx. 1 root root 17 3月  12 2016 S10network -> ../init.d/network
     lrwxrwxrwx. 1 root root 16 3月  12 2016 S11auditd -> ../init.d/auditd
     lrwxrwxrwx. 1 root root 17 3月  12 2016 S12rsyslog -> ../init.d/rsyslog
     lrwxrwxrwx. 1 root root 20 3月  12 2016 S22messagebus -> ../init.d/messagebus
     lrwxrwxrwx. 1 root root 26 3月  12 2016 S25blk-availability -> ../init.d/blk-availability
     lrwxrwxrwx. 1 root root 15 3月  12 2016 S25netfs -> ../init.d/netfs
     lrwxrwxrwx. 1 root root 19 3月  12 2016 S26haldaemon -> ../init.d/haldaemon
     lrwxrwxrwx. 1 root root 19 3月  12 2016 S26udev-post -> ../init.d/udev-post
     lrwxrwxrwx  1 root root 14 8月   5 22:33 S55sshd -> ../init.d/sshd
     lrwxrwxrwx  1 root root 16 8月   5 23:04 S60vsftpd -> ../init.d/vsftpd
     lrwxrwxrwx. 1 root root 17 3月  12 2016 S80postfix -> ../init.d/postfix
     lrwxrwxrwx  1 root root 13 8月   5 22:32 S85gpm -> ../init.d/gpm
     lrwxrwxrwx. 1 root root 15 3月  12 2016 S90crond -> ../init.d/crond
     lrwxrwxrwx. 1 root root 24 3月  12 2016 S99libvirt-guests -> ../init.d/libvirt-guests
     lrwxrwxrwx. 1 root root 11 3月  12 2016 S99local -> ../rc.local
chkconfig --level 3 vsftpd off ##rc3.d下 是启动状态3的服务 s开头启动 k开头不启动
ls /etc/rc3.d/
     [root@qiu ~]# chkconfig --level 3 vsftpd off
     [root@qiu ~]# ls /etc/rc3.d/
     K10saslauthd   K87restorecond   S08ip6tables  S22messagebus        S26udev-post  S90crond
     K15svnserve    K89rdisc         S10network    S25blk-availability  S55sshd       S99libvirt-guests
     K50netconsole  K92iptables      S11auditd     S25netfs             S80postfix    S99local
     K50vsftpd      S02lvm2-monitor  S12rsyslog    S26haldaemon         S85gpm
     [root@qiu ~]#
chkconfig --level 3 vsftpd on
ls /etc/rc3.d/
      [root@qiu ~]# chkconfig --level 3 vsftpd on
     [root@qiu ~]# ls /etc/rc3.d/
     K10saslauthd    K89rdisc         S10network     S25blk-availability  S55sshd     S90crond
     K15svnserve     K92iptables      S11auditd      S25netfs             S60vsftpd   S99libvirt-guests
     K50netconsole   S02lvm2-monitor  S12rsyslog     S26haldaemon         S80postfix  S99local
     K87restorecond  S08ip6tables     S22messagebus  S26udev-post         S85gpm
vi /etc/init.d/iptables ##chkconfig:2345 (启动项) 08(开机启动顺序)92(关机关闭顺序)
            #!/bin/sh
            #
            # iptables      Start iptables firewall
            #
            # chkconfig: 2345 08 92
            # description:  Starts, stops and saves iptables firewall
            ......
grep chkconfig .
grep chkconfig /etc/init.d/iptables
ls /etc/rc3.d/
chkconfig --level 3 iptables on
ls /etc/rc3.d/
        [root@qiu ~]# vi /etc/init.d/iptables
        [root@qiu ~]# grep chkconfig /etc/init.d/iptables
        # chkconfig: 2345 08 92
        [root@qiu ~]# ls /etc/rc3.d/ |grep iptables
        K92iptables
        [root@qiu ~]# chkconfig --level 3 iptables on
        [root@qiu ~]# ls /etc/rc3.d/ |grep iptables
        S08iptables
本文出自 “向往技术的小白” 博客,请务必保留此出处http://lesliecheung.blog.51cto.com/12622169/1953817
linux服务控制
