首页 > 代码库 > Java中的静态代理、通用动态代理类以及原理剖析
Java中的静态代理、通用动态代理类以及原理剖析
代理模式和静态代理
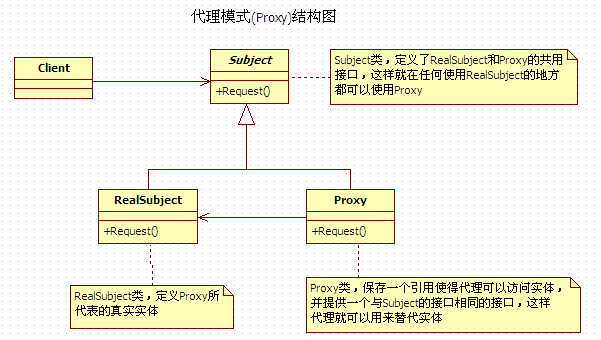
在开发中,代理模式是常用的模式之一,一般来说我们使用的代理模式基本上都是静态代理,实现模式大致如下 :

我们以网络代理为例,简单演示一下静态代理的实现 :
// 网络接口
interface Network {
	public void surfTheInternet();

	public void gotoFacebook();
}

// 普通网络
class CommonNetwork implements Network {

	@Override
	public void surfTheInternet() {
		System.out.println("直接上网,随便看点什么...");
	}

	@Override
	public void gotoFacebook() {
		System.out.println("上facebook,被墙了,没法弄啊!!!");
	}

}

// 网络代理
class NetworkProxy implements Network {
	@Override
	public void surfTheInternet() {
		System.out.println("代理上网");
	}

	@Override
	public void gotoFacebook() {
		System.out.println("上facebook, 即使被墙了,使用网络代理也能上!!!");
	}
}
main函数 : public static void main(String[] args) {
Network myNetwork = new CommonNetwork();
myNetwork.surfTheInternet();
myNetwork.gotoFacebook();
myNetwork = new NetworkProxy() ;
myNetwork.gotoFacebook();
} 输出 : 直接上网,随便看点什么... 上facebook,被墙了,没法弄啊!!! 上facebook, 即使被墙了,使用网络代理也能上!!!总之,代理对象就是把被代理对象包装一层,在其内部做一些额外的工作,比如用户需要上facebook, 而普通网络无法直接访问,网络代理帮助用户先翻墙,然后再访问facebook。这就是代理的作用了。
动态代理
上面的网络代理示例中,一个代理只能代理一种类型,而且是在编译器就已经确定被代理的对象。而动态代理是在运行时,通过反射机制实现动态代理,并且能够代理各种类型的对象。JDK 5中引入的动态代理机制,允许开发人员在运行时刻动态的创建出代理类及其对象。在运行时刻,可以动态创建出一个实现了多个接口的代理类。每个代理类的对象都会关联一个表示内部处理逻辑的InvocationHandler接 口的实现。当使用者调用了代理对象所代理的接口中的方法的时候,这个调用的信息会被传递给InvocationHandler的invoke方法。在 invoke方法的参数中可以获取到代理对象、方法对应的Method对象和调用的实际参数。invoke方法的返回值被返回给使用者,这种做法实际上相当于对方法调用进行了拦截,这样我们就可以在调用invoke的前后做自己想做的事。熟悉AOP的人对这种使用模式应该不陌生。但是这种方式不需要依赖AspectJ等AOP框架。下面我们看一个示例 :
新增一个被代理类 :
/**
 * 社会化组件, 带有授权、分享功能
 * @author mrsimple
 *
 */
public interface Socialize {
	// 授权
	public void doAothorize();
	// 分享
	public void share();
}

public class SocializeImpl implements Socialize {

	@Override
	public void doAothorize() {
		System.out.println("doAothorize");
	}

	@Override
	public void share() {
		System.out.println("share");
	}

}
通用动态代理类:
/**
 * 动态代理通用类, 实现InvocationHandler接口。
 *
 * @author mrsimple
 *
 */
public class CommonProxy implements InvocationHandler {

	/**
	 * 目标对象
	 */
	private Object mTarget;

	/**
	 * 方法调用日志
	 */
	private List<Method> mHistories = new ArrayList<Method>();

	/**
	 * 注入被代理的对象
	 * @param obj
	 */
	private CommonProxy(Object obj) {
		mTarget = obj;
	}

	/**
	 * 执行真正代码之前做的事
	 * @param md
	 * @param args
	 */
	private void before(Method md, Object[] args) {
		System.out.println("** 执行" + md.getName() + "函数之前, 记录到日志系统 **");
	}

	/*
	 * 调用任何函数都会以invoke函数为入口, proxy参数是被代理的真实对象,method为被调用的函数,arg为参数
	 */
	@Override
	public Object invoke(Object proxy, Method method, Object[] args) {

		// before
		before(method, args);
		// 将调用记录保存起来
		mHistories.add(method);
		try {
			// 执行真正的函数调用
			return method.invoke(mTarget, args);
		} catch (IllegalArgumentException e) {
			e.printStackTrace();
		} catch (IllegalAccessException e) {
			e.printStackTrace();
		} catch (InvocationTargetException e) {
			e.printStackTrace();
		}
		return null;
	}

	/**
	 * 通过代理创建对象, 返回的必须是接口类型
	 *
	 * @param obj
	 *            目标接口类型
	 * @return
	 */
	@SuppressWarnings("unchecked")
	public static <T> T createProxy(T obj) {

		return (T) Proxy.newProxyInstance(obj.getClass().getClassLoader(), obj
				.getClass().getInterfaces(), new CommonProxy(obj));

	}

	/**
	 *
	 * @return
	 */
	public List<Method> getHistories() {
		return mHistories;
	}

} 上面就是一个通用的动态代理类。创建代理对象的工厂方法createProxy中的Proxy类是至关重要的,参数也有点不好理解,我们来分析一下。Proxy.newProxyInstance(obj.getClass().getClassLoader(), obj .getClass().getInterfaces(), new CommonProxy(obj));通过Proxy.newProxyInstance函数来创建代理对象,我们看看这个函数的声明(去掉了一些相关说明):
    /**
     * Returns an instance of a proxy class for the specified interfaces
     * that dispatches method invocations to the specified invocation
     * handler.  This method is equivalent to:
     *
     * @param   loader the class loader to define the proxy class
     * @param   interfaces the list of interfaces for the proxy class
     *          to implement
     * @param   h the invocation handler to dispatch method invocations to
     * @return  a proxy instance with the specified invocation handler of a
     *          proxy class that is defined by the specified class loader
     *          and that implements the specified interfaces
     */
    @CallerSensitive
    public static Object newProxyInstance(ClassLoader loader,
                                          Class<?>[] interfaces,
                                          InvocationHandler h)
可以看到,第一个参数是被代理对象的ClassLoader, 参数2是被代理对象所有接口列表的Class数组,参数三为InvocationHandler对象,就是实现了InvocationHandler接口的类,对应上面的CommonProxy类型。看我们的实现 :
	public static <T> T createProxy(T obj) {

		return (T) Proxy.newProxyInstance(obj.getClass().getClassLoader(), obj
				.getClass().getInterfaces(), new CommonProxy(obj));

} 被代理对象obj通过参数传递进来,我们通过obj.getClass().getClassLoader()获取ClassLoader对象,然后通过obj.getClass().getInterfaces()获取它实现的所有接口,然后将obj包装到实现了InvocationHandler接口的CommonProxy对象中。通过newProxyInstance函数我们就获得了一个动态代理对象。下面看看这个动态代理类的使用:
	public static void main(String[] args) {
		// 获得对象
		Socialize mController = CommonProxy
				.createProxy(new SocializeImpl());
		// 调用方法
		mController.doAothorize();
		mController.share();

		// 获取动态代理对象,然后输出调用历史记录
		CommonProxy proxy = (CommonProxy) Proxy
				.getInvocationHandler(mController);
		for (Method md : proxy.getHistories()) {
			System.out.println("调用了: " + md.getName());
		}

		// 通用的动态代理类, 返回的是接口类型
		Network network = CommonProxy.createProxy(new CommonNetwork());
		network.surfTheInternet();
	}
输出 : ** 执行doAothorize函数之前, 记录到日志系统 ** doAothorize ** 执行share函数之前, 记录到日志系统 ** share 调用了: doAothorize 调用了: share ** 执行surfTheInternet函数之前, 记录到日志系统 ** 直接上网,随便看点什么...
可以看到,我们可以通过CommonProxy代理不同类型的对象,如果我们把对外的接口都通过动态代理来实现,那么所有的函数调用最终都会经过invoke函数的转发,因此我们就可以在这里做一些操作,比如日志系统、事务、拦截器、权限控制等。这也就是AOP(面向切面编程)的基本原理吧。
动态代理原理剖析
	public static void main(String[] args) {

		// 通用的动态代理类, 返回的是接口类型
		Network network = CommonProxy.createProxy(new CommonNetwork());
		network.surfTheInternet();

		// 输出network对象的类名
		System.out.println(network.getClass().getName());
		// 输出network所属类的所有函数
		for (Method md : network.getClass().getDeclaredMethods()) {
			System.out.println("函数 : " + md.getName());
		}

		// 输出network所属类的所有函数
		for (Class<?> cls : network.getClass().getInterfaces()) {
			System.out.println("实现的接口 : " + cls.getName());
		}

		// 输出network所属类的父类
		System.out.println(network.getClass().getGenericSuperclass());

	}
输出 : 直接上网,随便看点什么... com.thingking.in.java.proxy.$Proxy1 函数 : equals 函数 : toString 函数 : hashCode 函数 : surfTheInternet 函数 : gotoFacebook 实现的接口 : com.thingking.in.java.proxy.Network class java.lang.reflect.Proxy可以看到network所属的类是com.thingking.in.java.proxy.$Proxy1,其中.$Proxy之前是我的demo的报名,$Proxy1是network的类名。然后这个类实现的函数有equals, toString, hashCode, surfTheInternet, gotoFacebook这几个函数,前三个都是Object类的方法,后两个是Network接口的方法。实现的接口是Network,其父类是jdk中的java.lang.reflect.Proxy。输出的结果正好验证了我们上面所说的。
- import java.io.File;
- import java.io.FileWriter;
- import java.lang.reflect.Constructor;
- import java.lang.reflect.Method;
- import java.net.URL;
- import java.net.URLClassLoader;
- import javax.tools.JavaCompiler;
- import javax.tools.StandardJavaFileManager;
- import javax.tools.ToolProvider;
- import javax.tools.JavaCompiler.CompilationTask;
- public class Proxy {
- public static Object newProxyInstance(ClassLoader loader,Class infce, InvocationHandler h) throws Exception { //JDK6 Complier API, CGLib, ASM
- String methodStr = "";
- String rt = "\r\n";
- //利用反射,获得infce接口中方法,本例中就是获得Moveable接口的方法move
- Method[] methods = infce.getMethods();
- //拼接infce中所有方法字符串,用来重写infce中的方法,本例中拼出来就是重写的move方法
- for(Method m : methods) {
- methodStr += "@Override" + rt +
- "public void " + m.getName() + "() {" + rt +
- " try {" + rt +
- " Method md = " + infce.getName() + ".class.getMethod(\"" + m.getName() + "\");" + rt +
- /*方法最核心的代码,h是构造$Proxy1时传入的handler,本例中就是LogHandler对象,new Object[] { null}是move方法需要的参数,本例不需要,故为空。这一步将会使我们编写的处理类逻辑LogHandler的invoke方法得到调用。从而达到我们最初要在move方法前加日志逻辑的的目的,下面要做的就是把我们拼好的字符串生成类并load到内存就可以了这样就实现了动态生成代理类并加自己想加的逻辑*/
- " h.invoke(this, md,new Object[] { null});" + rt +
- " }catch(Exception e) {e.printStackTrace();}" + rt +
- "}";
- }
- String src =
- "package com.bjsxt.proxy;" + rt +
- "import java.lang.reflect.Method;" + rt +
- //这里动态实现infce接口,本例中就是Moveable,构造方法中让Proxy持有处理类Handler的引用
- "public class $Proxy1 implements " + infce.getName() + "{" + rt +
- " public $Proxy1(InvocationHandler h) {" + rt +
- " this.h = h;" + rt +
- " }" + rt +
- " com.bjsxt.proxy.InvocationHandler h;" + rt +
- //这里是需要重写Moveable中的方法,见上面该字符串的拼接过程
- methodStr +
- "}";
- String fileName =
- "d:/src/com/bjsxt/proxy/$Proxy1.java";
- File f = new File(fileName);
- FileWriter fw = new FileWriter(f);
- fw.write(src);
- fw.flush();
- fw.close();
- //compile编译上面拼好的字符串
- JavaCompiler compiler = ToolProvider.getSystemJavaCompiler();
- StandardJavaFileManager fileMgr = compiler.getStandardFileManager(null, null, null);
- Iterable units = fileMgr.getJavaFileObjects(fileName);
- CompilationTask t = compiler.getTask(null, fileMgr, null, null, null, units);
- t.call();
- fileMgr.close();
- //load into memory and create an instance加载进内存并创建对象
- URL[] urls = new URL[] {new URL("file:/" + "d:/src/")};
- URLClassLoader ul = new URLClassLoader(urls);
- Class c = ul.loadClass("com.bjsxt.proxy.$Proxy1");
- System.out.println(c);
- Constructor ctr = c.getConstructor(InvocationHandler.class);
- Object m = ctr.newInstance(h);
- //利用反射,这里就返回一个实现了infce接口也就是本例中Moveable接口的代理对像$Proxy1
- return m;
- }
- }
