首页 > 代码库 > ios的文件加载和保存
ios的文件加载和保存
最近,一直在看比较基础的知识,因为感觉自己需要整理一下最基层的东西,然后才能系统的结合起来,很多时候我们做项目都需要对文件加载和保存,我自己对已有知识整理了一下:
1、使用属性列表保存对象:
在Cocoa中,与一类名为属性列表的对象,常简称为plist。这些列表包含Cocoa知道如何操作的一组对象。具体来讲,Cocoa知道如何将它们保存到文件中并进行加载。属性列表类包括:NSArray,NSDictionary,NSString和NSData,以及它们的变体(Mutable)
- NSAutoreleasePool *pool = [[NSAutoreleasePool alloc] init];
- NSArray *array = [NSArray arrayWithObjects:@"First",
- @"second",@"third",@"fourth",@"fifth",nil];
- [array writeToFile:@"array.plist" atomically:YES];
遗憾的是,无法总是将对象信息表示为属性列表类。如果能将所有对象都表示为数组字典,我们就没有必要使用自己的类了。所幸,Cocoa具备一种机制来将对象自身转化为某种格式并保存到磁盘中。对象可以将它们的实例变量和其它数据编码为数据块,然后保存到磁盘中。遗憾将这些数据块读到内存中,并且还能基于保存的数据创建新对象。这个过程称为编码和解码,或称为序列化和反序列化。
通过NSCoding协议,可以使用自己的对象实现相同功能,实现它的两个方法:
- (void)encodeWithCoder:(NSCoder *)aCoder;
- (id)initWithCoder:(NSCoder *)aDecoder;
NSCoder是一个抽象类,定义一些有用的方法来在对象与NSData之间来回转换。完全不需要创建新NSCoder,因为它事件上并无多大作用。但是我们实际上要使用NSCoder的一些具体子类来编码和解码对象。我们将使用其中两个子类NSKeyedArchiver和NSKeyedUnArchiver.
下面是一个例子:
头文件类BookObj.h的源码:
- //
- // BookObj.h
- //
- #import <Cocoa/Cocoa.h>
- @interface BookObj:NSObject<NSCoding>{
- NSString *bookName;
- NSString *author;
- }
- @property (copy) NSString *bookName;
- @property (copy) NSString *author;
- -(id)initWithName:(NSString *)name
- author:(NSString *) au ;
实现类BookObj.m的源码:
- //
- // BookObj.m
- //
- #import "BookObj.h"
- @implementation BookObj
- @synthesize bookName;
- @synthesize author;
- -(id)initWithName:(NSString *)name
- author:(NSString *) au{
- if (self = [super init]) {
- self.bookName = name;
- self.author = au;
- }
- return self;
- }
- - (void)encodeWithCoder:(NSCoder *)aCoder{
- [aCoder encodeObject:self.bookName forKey:@"bookName"];
- [aCoder encodeObject:self.author forKey:@"author"];
- }
- - (id)initWithCoder:(NSCoder *)aDecoder{
- if (self =[super init]) {
- self.bookName = [aDecoder decodeObjectForKey:@"bookName"];
- self.author = [aDecoder decodeObjectForKey:@"author"];
- }
- return self;
- }
- int main(int argc ,const char *argv[]){
- BookObj *bookObj = [[BookObj alloc] initWithName:@"iPhone编程指南"
- author:@"David"];
- [NSKeyedArchiver archiveRootObject:bookObj toFile:@"bookObj.plist"];
- NSLog(@"Success to archive file bookObj.plist!");
- BookObj *bookOb = [NSKeyedUnarchiver unarchiveObjectWithFile:@"bookObj.plist"];
- NSLog(@"The book name is :%@",bookOb.author);
- return 0;
- }
- @end
/==============================================================
下面镔哥具体介绍一下plist文件和NSCoding协议
在做iOS开发时,经常用到到plist文件, 那plist文件是什么呢? 它全名是:Property List,属性列表文件,它是一种用来存储串行化后的对象的文件。属性列表文件的扩展名为.plist ,因此通常被称为 plist文件。文件是xml格式的。
Plist文件通常用于储存用户设置,也可以用于存储捆绑的信息
1、创建项目Plistdemo
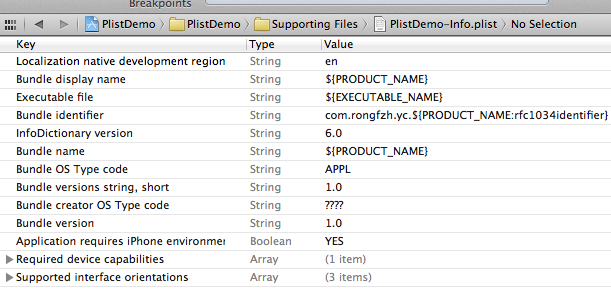
项目创建之后可以找到项目对应的plist文件,打开如下图所示:

在编辑器中显示类似与表格的形式,可以在plist上右键,用源码方式打开,就能看到plist文件的xml格式了。
2、创建plist文件。
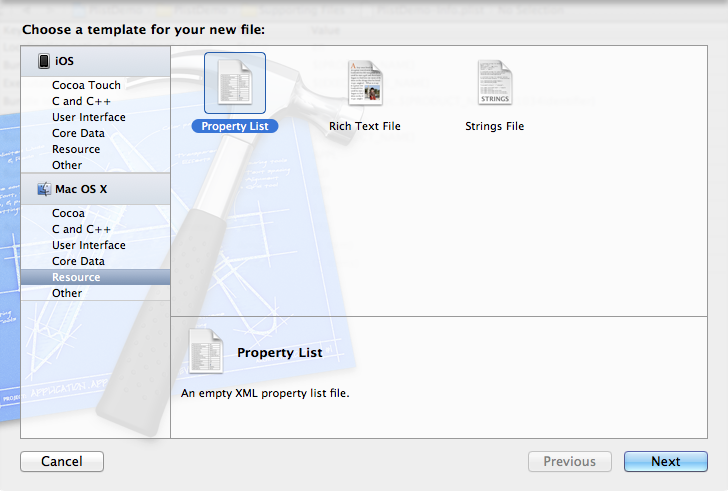
按command +N快捷键创建,或者File —> New —> New File,选择Mac OS X下的Property List


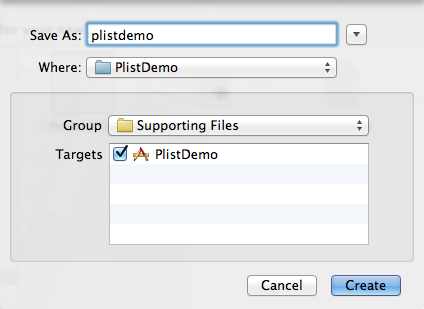
创建plist文件名为plistdemo。
打开plistdemo文件,在空白出右键,右键选择Add row 添加数据,添加成功一条数据后,在这条数据上右键看到 value Type选择Dictionary。点加号添加这个Dictionary下的数据

添加完key之后在后面添加Value的值,添加手机号和年龄
创建完成之后用source code查看到plist文件是这样的:
- <?xml version="1.0" encoding="UTF-8"?>
- <!DOCTYPE plist PUBLIC "-//Apple//DTD PLIST 1.0//EN" "http://www.apple.com/DTDs/PropertyList-1.0.dtd">
- <plist version="1.0">
- <dict>
- <key>jack</key>
- <dict>
- <key>phone_num</key>
- <string>13801111111</string>
- <key>age</key>
- <string>22</string>
- </dict>
- <key>tom</key>
- <dict>
- <key>phone_num</key>
- <string>13901111111</string>
- <key>age</key>
- <string>36</string>
- </dict>
- </dict>
- </plist>
3、读取plist文件的数据
现在文件创建成功了,如何读取呢,实现代码如下:- - (void)viewDidLoad
- {
- [super viewDidLoad];
- //读取plist
- NSString *plistPath = [[NSBundle mainBundle] pathForResource:@"plistdemo" ofType:@"plist"];
- NSMutableDictionary *data = [[NSMutableDictionary alloc] initWithContentsOfFile:plistPath];
- NSLog(@"%@", data);//直接打印数据。
- }
打印出来的结果:[cpp] view plaincopy- PlistDemo[6822:f803] {
- jack = {
- age = 22;
- "phone_num" = 13801111111;
- };
- tom = {
- age = 36;
- "phone_num" = 13901111111;
- };
- }
这样就把数据读取出来了。
4、创建和写入plist文件
在开发过程中,有时候需要把程序的一些配置保存下来,或者游戏数据等等。 这时候需要写入Plist数据。
写入的plist文件会生成在对应程序的沙盒目录里。
接着上面读取plist数据的代码,加入了写入数据的代码,
- <strong>- (void)viewDidLoad
- {
- [super viewDidLoad];
- //读取plist
- NSString *plistPath = [[NSBundle mainBundle] pathForResource:@"plistdemo" ofType:@"plist"];
- NSMutableDictionary *data = [[NSMutableDictionary alloc] initWithContentsOfFile:plistPath];
- NSLog(@"%@", data);
- //添加一项内容
- [data setObject:@"add some content" forKey:@"c_key"];
- //获取应用程序沙盒的Documents目录
- NSArray *paths=NSSearchPathForDirectoriesInDomains(NSDocumentDirectory,NSUserDomainMask,YES);
- NSString *plistPath1 = [paths objectAtIndex:0];
- //得到完整的文件名
- NSString *filename=[plistPath1 stringByAppendingPathComponent:@"test.plist"];
- //输入写入
- [data writeToFile:filename atomically:YES];
- //那怎么证明我的数据写入了呢?读出来看看
- NSMutableDictionary *data1 = [[NSMutableDictionary alloc] initWithContentsOfFile:filename];
- NSLog(@"%@", data1);
- // Do any additional setup after loading the view, typically from a nib.
- }
- </strong>
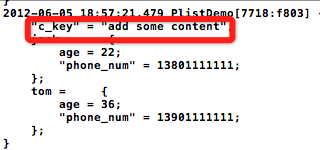
在获取到自己手工创建的plistdemo.plist数据后,在这些数据后面加了一项内容,证明输入写入了。怎么证明添加的内容写入了呢?下面是打印结果:
 NSCoding协议由于Sqlite数据库的blob数据和NSData的兼容比较好,我想尝试把一个NSArray存入Sqlite。Sqlite不支持数组的直接存储,所以我寻找了一些数组转化为NSData的方法。网上大多数的解决办法都是针对于字符数组,eg:
NSArray*array01= [[NSArrayalloc]initWithObjects:@"1",@"2",@"3",nil]; 这种数组的解决办法很简单,循环遍历数组,然后把每次取出的NSString转码成NSData类型,然后对最终的NSData数据进行一次次的循环拼接,实现把数组中所有的字符串拼接成一个完整的NSData,eg:NSMutableData *data01 =[[NSMutableDataalloc]init]; for (NSString *str in array01) { NSString*newStr = [str stringByAppendingString:@","];//添加间隔,为了区分数组的每个元素 [data01 appendData:temp];//data数据拼接到最终数据data01上 [temp release]; } 这样就实现了一个NSArray字符数组到NSData的转换。转换回来也很简单,把NSData转换成NSString,然后将NSString分割(这也就是我们为str添加末尾“,”的原因),eg:
NSArray *array02 = [string01 componentsSeparatedByStr ing :@","];//字符串根据@“,”拆分成一个数组,将数组还原NSData *data02 = [NSKeyedArchiver archivedDataWithRootObje
ct :array01];//通过归档对NSArray进行转码,保存了数组的序列一句代码就完成了!而且还保存了数组的有序性。转换回去也同样是一句话哦:),eg:
NSArray *array02 = [NSKeyedUnarchiver unarchiveObjectWithData:data02];//通过发归档进行NSData反转码,返回有序列的数组 是不是很方便呢??不是很,是太方便了吧。但是这个时候问题又来了,我如果在数组里存放的不是NSString类型的对象呢,如果存了自定义的类,是否也可以自动跳转呢?(有点异想天开。。),于是我自己创建了一个Student类,尝试相同的方式转换,发现程序无法运行了,问了同事,他告诉了我这个秘密。原来所有原生的类都是实现了NSCoding协议,在归档的过程中进行了转码,所以才可以归档成功。我研究了一下NSCoding协议,下面是API给我们的信息:
NSCoding Protocol Reference
encodeWithCoder:
Encodes the receiver using a given archiver. (required)
- (void)encodeWithCoder:(NSCoder*)encoder Parameters
- encoder
An archiver object.
Availability
- Available in iOS 2.0 and later.
Declared In
NSObject.hinitWithCoder:
Returns an object initialized from data in a given unarchiver.(required)
- (id)initWithCoder:(NSCoder*)decoder Parameters
- decoder
An unarchiver object.
Return Value
self, initialized using the dataindecoder. Availability
- Available in iOS 2.0 and later.
Declared In
NSObject.hNSCoding协议中只有两个方法,都是require的方法,一个是把本身的类进行转码,一个是逆转换成类对象,返回一个对象,我们实战一下这个协议的用法,看看是否好用,首先写一个自定义Student类:
@interfaceStudent : NSObject<NSCoding>
@property (nonatomic, retain) NSString *name;
@property (nonatomic, retain) NSString *ID;
-(Student *)initWithName :(NSString*)newName
and : (NSString *)newID; @end
Student类需要实现协议NSCoding,.m文件中是这样的:
@implementationStudent
@synthesize name = _name,ID = _ID;
//初始化学生类
-(Student *)initWithName:(NSString *)newName and:(NSString *)newID{
self = [super init]; if (self) { self.name = newName; self.ID= newID; } }
//学生类内部的两个属性变量分别转码
-(void)encodeWithCoder:(NSCoder *)aCoder{
[aCoder encodeObject:self.name forKey:@"name"]; [aCoder encodeObject:self.IDforKey:@"ID"]; }
//分别把两个属性变量根据关键字进行逆转码,最后返回一个Student类的对象
-(id)initWithCoder:(NSCoder *)aDecoder{
if (self = [super init]) { self.name = [aDecoder decodeObjectForKey:@"name"]; self.ID= [aDecoder decodeObjectForKey:@"ID"]; } }
@end
自定义类Student实现了NSCoding协议以后,就可以进行归档转换了,具体实现:
Student *stu1 = [[Student alloc]initWithName:@"124" and:@"111"];//学生对象stu1 Student *stu2 = [[Student alloc]initWithName:@"223" and:@"222"];//学生对象stu2 NSArray *stuArray =[NSArray arrayWithObjects:stu1,stu2, nil];//学生对象数组,里面包含stu1和stu2 NSData *stuData = http://www.mamicode.com/[NSKeyedArchiver archivedDataWithRootObje ct :stuArray];//归档NSLog(@"data = http://www.mamicode.com/%@",stuData); NSArray *stuArray2 =[NSKeyedUnarchiver unarchiveObjectWithData:stuData];//逆归档 NSLog(@"array2 = %@",stuArray2); 运行结果如下:
2012-09-25 10:44:24.944MagazineDemo[720:f803] data = http://www.mamicode.com/<62706c69 73743030d4010203 0405082b 2c542474 6f705824 6f626a65 63747358 2476657273696f6e 59246172 63686976 6572d106 0754726f 6f748001 aa090a1117181920 24252655 246e756c 6cd20b0c 0d105a4e 532e6f62>
2012-09-25 10:44:24.944MagazineDemo[720:f803] array2 = (
"<Student: 0x6883490>", "<Student: 0x68dd3c0>" )
成功啦:)自定义类Student转码成功.
ios的文件加载和保存
