首页 > 代码库 > Heartbeat+httpd+NFS 实现高可用的Web服务器
Heartbeat+httpd+NFS 实现高可用的Web服务器
准备工作
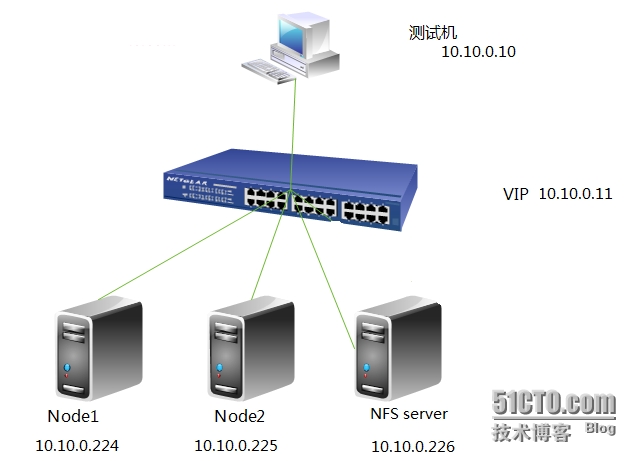
1、实验拓扑图

2、实验时最好事先关闭防火墙与SELinux (两节点都要配置)
node1,node2:
[root@node ~]# service iptables stop
[root@node ~]# vim /etc/selinux/config
SELINUX=disabled
3、节点之前主机名互相解析:一定确保主机名和uname -n一致
[root@node ~]# vim /etc/hosts
10.10.0.224 node1.test.com node1
10.10.0.225 node2.test.com node2
4、节点时间必须同步node1,node2:
[root@node ~]# ntpdate 10.10.0.11
[root@node ~]# date
Tue Jan 13 16:41:30 CST 2015
5、节点之间配置SSH互信
node1:
[root@node1 ~]# ssh-keygen -t rsa -f ~/.ssh/id_rsa -P ‘‘
[root@node1 ~]# ssh-copy-id -i .ssh/id_rsa.pub root@node2.test.com
[root@node1 ~]# ssh node2
[root@node2 ~]# ifconfig
node2:
[root@node2 ~]# ssh-keygen -t rsa -f ~/.ssh/id_rsa -P ‘‘
[root@node2 ~]# ssh-copy-id -i .ssh/id_rsa.pub root@node1.test.com
[root@node2 ~]# ssh node1
[root@node1 ~]# ifconfig
一、安装相关软件(两节点都需要安装)
1.heartbeat 安装组件说明
heartbeat 核心组件 *
heartbeat-devel 开发包
heartbeat-gui 图形管理接口 *
heartbeat-ldirectord 为lvs高可用提供规则自动生成及后端realserver健康状态检查的组件
heartbeat-pils 装载库插件接口 *
heartbeat-stonith 爆头接口 *
注:带*表示必须安装
2.安装heartbeat (node1,node2)
[root@node ~]# yum -y install heartbeat*
3.安装httpd
node1:
[root@node1~]# yum install -y httpd
[root@node1 ~]# service httpd start
启动 httpd: [确定]
[root@node1 ~]# echo "node1.test.com" > /var/www/html/index.html
测试访问页面
测试完成之后需要停用httpd,并禁止开机启动
[root@node1 ha.d]# service httpd stop
停止 httpd: [确定]
[root@node1 ha.d]# chkconfig httpd off
node2:
[root@node1~]# yum install -y httpd
[root@node1 ~]# service httpd start
[root@node1 ~]# echo "node2.test.com" > /var/www/html/index.html
测试访问页面
测试完成之后需要停用httpd,并禁止开机启动
[root@node1 ha.d]# service httpd stop
[root@node1 ha.d]# chkconfig httpd off
二、配置heartbeat
1、配置文件说明
[root@node1 ~]# cd /etc/ha.d/
[root@node1 ha.d]# ls
harc rc.d README.config resource.d shellfuncs shellfuncs.rpmsave、
说明:安装好的heartbeat默认是没有配置文件的,但提供了配置文件样本
[root@node1 heartbeat-2.1.4]# cp /usr/share/doc/heartbeat-3.0.4/{authkeys ha.cf haresources} /etc/ha.d/
说明:三个配置文件是我们需要的分别为,authkeys、ha.cf、haresources
authkeys #是节点之间的认证key文件,我们不能让什么服务器都加入集群中来,加入集群中的节点都是需要认证的
ha.cf #heartbeat的主配置文件
haresources #集群资源管理配置文件(在heartbeat所有版本中都是支持haresources来配置集群中的资源的)
2.配置authkeys文件
[root@node1 ha.d]# openssl rand -base64 8 #生成密钥随机数
[root@node1 ha.d]# vim authkeys
#auth 1
#1 crc
#2 sha1 HI!
#3 md5 Hello!
auth 1
1 md5 a4ef87crg
[root@node1 ha.d]# chmod 600 authkeys #修改密钥文件的权限为600
3.配置ha.cf文件
[root@node1 ha.d]# vim ha.cf
主要修改两处(其它都可以默认):
(1).修改心跳信息的传播方式(这里是广播)
bcast eth0
(2).配置集群中的节点数
node node1.test.com
node node2.test.com
4.配置haresources文件
[root@node1 ha.d]# vim haresources
node1.test.com IPaddr::10.10.0.11/24/eth0 httpd
5.复制以上三个配置文件到node2上
[root@node1 ha.d]# scp authkeys ha.cf haresources node2:/etc/ha.d/
6.启动node1与node2
[root@node1 ha.d]# ssh node2 "service heartbeat start"
[root@node1 ha.d]# service heartbeat start
三、测试web集群
1.查看启动的服务
[root@node1 ha.d]# netstat -ntulp
2.查看IP
[root@node1 ha.d]# ifconfig
3.测试
4.故障演示
1).关闭node1上的heartbeat
[root@node1 ha.d]# service heartbeat stop #将node1中的heartbeat关闭
2).查看node2上的IP
[root@node2 ~]# ifconfig # 查看node2的IP,可以看到立即转移到node2上
3).测试
大家可以看到,集群已经转移到node2上,从而实现了Web高可用。
四、共享存储
1.配置NFS服务器
[root@nfs ~]# mkdir -pv /web
[root@nfs ~]# vim /etc/exports
/web/ 10.10.0.0/16(ro,async)
[root@nfs /]# echo ‘NFS Server‘ > /web/index.html
[root@nfs /]# service portmap start
[root@nfs /]# service nfs start
[root@nfs /]# showmount -e 10.10.0.226
Export list for 10.10.0.226:
/web 10.10.0.0/12
2.节点测试挂载
node1:
[root@node1 ~]# mount -t nfs 10.10.0.226:/web /mnt
[root@node1 mnt]# mount
[root@node1 ~]# umount /mnt
[root@node1 ~]# mount
node2:
[root@node2 ~]# mount -t nfs 10.10.0.226:/web /mnt
[root@node1 mnt]# mount
[root@node1 ~]# umount /mnt
[root@node1 ~]# mount
3.修改haresource文件
[root@node1 ~]# vim /etc/ha.d/haresources
node1.test.com IPaddr::10.10.0.11/12/eth0 Filesystem::10.10.0.226:/web::/var/www/html::nfs httpd
4.同步haresource配置文件
[root@node1 ~]# cd /etc/ha.d/
[root@node1 ha.d]# scp haresources node2:/etc/ha.d/
5.重启一下heartbeat
[root@node1 ha.d]# ssh node2 "service heartbeat restart"
[root@node1 ha.d]# service heartbeat restart
6.查看一下端口
[root@node1 ha.d]# netstat -ntulp
7.测试一下Web服务
[root@node1 ha.d]# mount
/dev/sda2 on / type ext3 (rw)
proc on /proc type proc (rw)
sysfs on /sys type sysfs (rw)
devpts on /dev/pts type devpts (rw,gid=5,mode=620)
/dev/sda1 on /boot type ext3 (rw)
tmpfs on /dev/shm type tmpfs (rw)
none on /proc/sys/fs/binfmt_misc type binfmt_misc (rw)
sunrpc on /var/lib/nfs/rpc_pipefs type rpc_pipefs (rw)
10.10.0.226:/web on /var/www/html type nfs (rw,addr=10.10.0.226)
本文出自 “ngames” 博客,请务必保留此出处http://ngames.blog.51cto.com/3187187/1603610
Heartbeat+httpd+NFS 实现高可用的Web服务器
