首页 > 代码库 > 第二、UIScrollView的使用大全
第二、UIScrollView的使用大全
UIScrollView UIPageControl 的使用
//
// scrollView.contentSize = CGSizeMake(self.view.frame.size.width * 10, self.view.frame.size.height);
// [self.view addSubview:scrollView];
// scrollView.delegate = self;
// scrollView.pagingEnabled = YES;
// scrollView.showsHorizontalScrollIndicator = NO;
// for (int i = 0; i < 10; i++) {
// UIImage *image = [UIImage imageNamed:@"Default"];
// UIImageView *imageView = [[UIImageView alloc] initWithImage:image];
// imageView.frame = CGRectMake(self.view.frame.size.width * i, 0, self.view.frame.size.width, self.view.frame.size.height);
// [scrollView addSubview:imageView];
//
mainScrollView.contentSize=CGSizeMake(self.view.frame.size.width * 2, self.view.frame.size.height);
//[self.view addSubview:mainScrollView];
[mainScrollViewsetDelegate:self];
mainScrollView.pagingEnabled =YES;
mainScrollView.showsHorizontalScrollIndicator =NO;
viewOne.frame =CGRectMake(self.view.frame.size.width * 0, 0, self.view.frame.size.width,self.view.frame.size.height);
[mainScrollViewaddSubview:viewOne];
viewTwo.frame =CGRectMake(self.view.frame.size.width * 1, 0, self.view.frame.size.width,self.view.frame.size.height);
[mainScrollViewaddSubview:viewTwo];
iPhone 使用UIScrollView实现滚屏效果
程序要像Spring一样在一屏中手指滑动实现多个页面的滑动切换可使用UIScrollView来实现
- - (void)viewDidLoad
- {
- [super viewDidLoad];
- _scrollView = [[UIScrollView alloc] initWithFrame:CGRectMake(0.0, 0.0, self.view.frame.size.width, self.view.frame.size.height)];
- _scrollView.userInteractionEnabled = YES;
- _scrollView.directionalLockEnabled = YES;
- _scrollView.pagingEnabled = YES;
- _scrollView.showsVerticalScrollIndicator = NO;
- _scrollView.showsHorizontalScrollIndicator = NO;
- _scrollView.delegate = self;
- CGRect frame = self.view.frame;
- frame.origin.y = 0.0f;
- UIView* viewFirst = [[[UIView alloc] initWithFrame:frame] autorelease];
- viewFirst.backgroundColor = [UIColor greenColor];
- frame.origin.x += self.view.frame.size.width;
- UIView* viewSecond = [[[UIView alloc] initWithFrame:frame] autorelease];
- viewSecond.backgroundColor = [UIColor blueColor];
- frame.origin.x += self.view.frame.size.width;
- UIView* viewThird = [[[UIView alloc] initWithFrame:frame] autorelease];
- viewThird.backgroundColor = [UIColor redColor];
- _scrollView.contentSize = CGSizeMake(self.view.frame.size.width*3, self.view.frame.size.height);
- [_scrollView addSubview:viewFirst];
- [_scrollView addSubview:viewSecond];
- [_scrollView addSubview:viewThird];
- CGSize sizePageControl = CGSizeMake(120, 40);
- CGRect framePageControl = CGRectMake((self.view.frame.size.width-sizePageControl.width)/2, (self.view.frame.size.height-sizePageControl.height-40), sizePageControl.width, sizePageControl.height);
- _pageControl = [[UIPageControl alloc] initWithFrame:framePageControl];
- _pageControl.hidesForSinglePage = YES;
- _pageControl.userInteractionEnabled = NO;
- _pageControl.backgroundColor = [UIColor clearColor];
- _pageControl.numberOfPages = 3;
- [self.view addSubview:_scrollView];
- [self.view addSubview:_pageControl];
- }
同时你的ViewController 要实现UIScrollViewDelegate 协议的如下方法, 根据scroll 更新UIPageControl(当然如过你用到UIPageControl的话就无所谓了...)
- - (void) scrollViewDidEndDecelerating:(UIScrollView *)scrollView
- {
- int index = fabs(_scrollView.contentOffset.x)/self.view.frame.size.width;
- _pageControl.currentPage = index;
- }
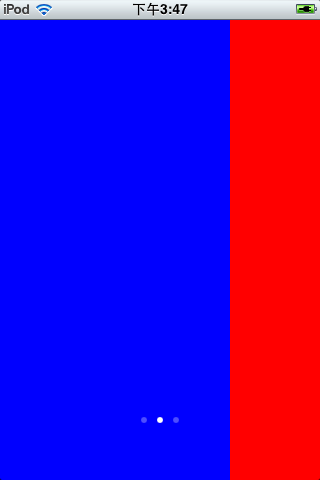
下面是效果图:

第二、UIScrollView的使用大全
UIScrollView 原理详解
ScrollView
UIScrollView
UIScrollView为了显示多于一个屏幕的内容或者超过你能放在内存中的内容。
Scroll View为你处理缩小放大手势,UIScrollView实现了这些手势,并且替你处理对于它们的探测和回应。其中需要注意的子类是UITableView以及UITextView(用来显示大量的文字)。还有一个UIWebView,尽管那不是UIScrollView的直接子类,它适用UIScrollView去显示网页内容
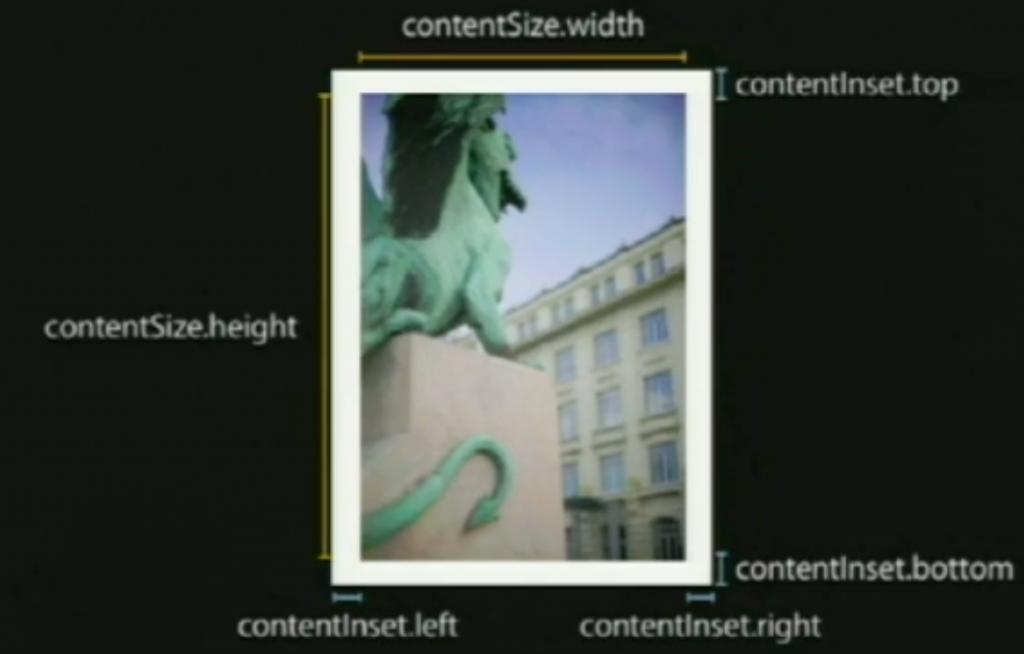
contentsize是内容的宽和高,contentsize.width是内容的宽度,contentsize.heght是高度,contentsize是UIScrollView的一个属性,它是一个CGSize,是由核心图形所定义的架构,那定义了你可以滚轴内容的宽度和高度,你也可以添加可以上下滚动的额外区域。第一种方法是你可以通过添加内容的大小来完成。另外一个比较动态的选择是UIScrollView的另一个属性contentInset,contentInset增加你在contentsize中指定的内容能够滚动的上下左右区域数量contentInset.top以及contentInset.buttom分别表示上面和下面的距离。

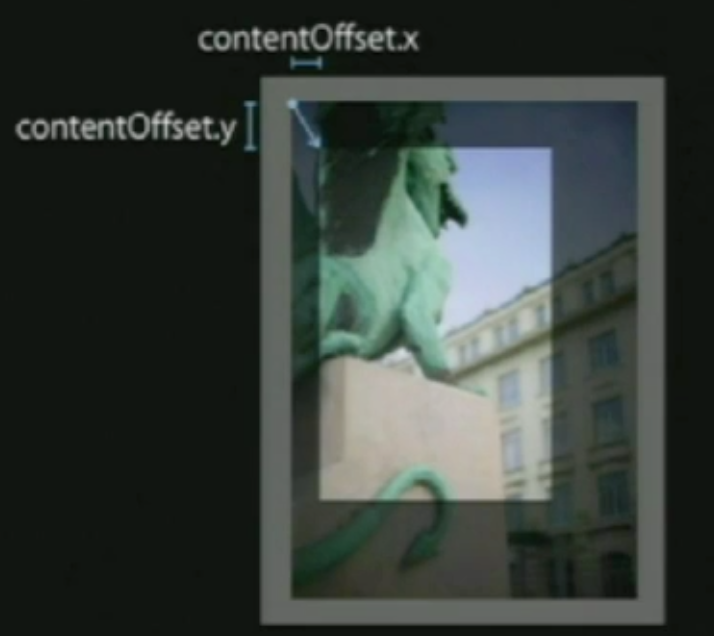
在滚轴视图中,有一个叫做ContentOffset的属性跟踪UIScrollView的具体位置,你能够自己获取和设置它,ContentOffset是你当前可视内容在滚轴视图边界的左上角那个点。如图:

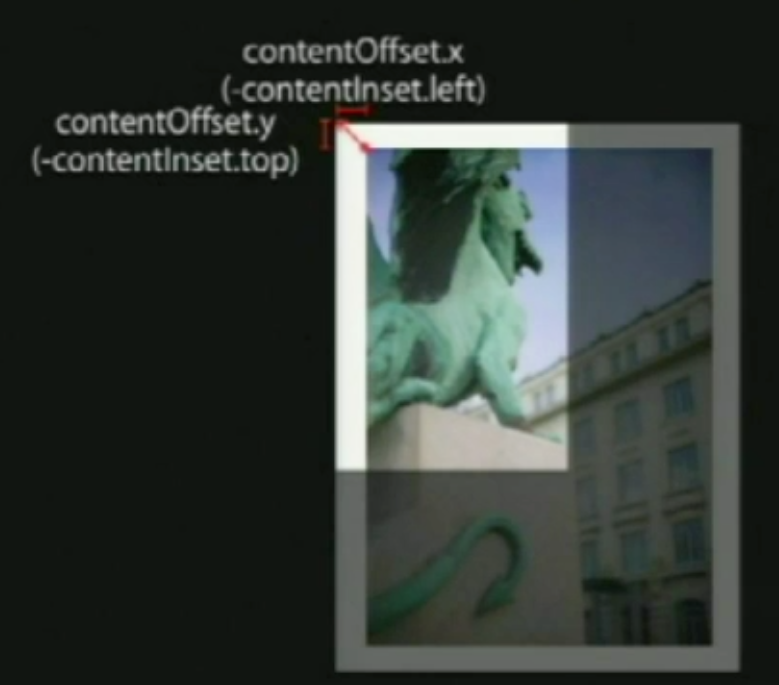
可以看出,ContentOffset内容中的那个点不是从contentInset的左上角开始的,而是内容的左上角,此时的ContentOffset是正值,但有时也是负值,如下图所示:

使用一个ScrollView
创建一个UIScrollView
CGRectframe = CGRectMake( 0, 0, 200, 200);
scrollView= [[UIScrollView alloc] initWithFrame: frame];
添加子视图(框架可以超过scroll view的边界)
frame= CGRectMake( 0, 0, 500, 500);
myImageView= [[UIImageView alloc] initWithFrame: frame];
[scrollViewaddSubview:myImageView];
设置内容尺寸
scrollView.contentSize= CGSize(500,500);
扩展Scroll View 的行为
应用程序通常需要知道有关的滚图的事件
scrolloffset改变的时候
拖动开始和结束
减速的开始和结束
通过子类化扩展Scroll View 的行为
创建一个子类
重写一些功能并改变行为
关于这种方式的争议
应用程序的逻辑和行为变成了视图本身的一部分,就像,你可能有一些定制的滚轴逻辑,,在那你只在意一个视图控制,但你想在不同地方重复使用你的滚轴视图,如果你必须为每个都子类化,你最后会有很多不同的滚轴视图子类以及在视图中的特定应用逻辑。
编写很多子类是很沉闷的事情,你最后会有很多无法重复使用的单独视图,而MVC的视图部分的一个重点是视图是可以在不同的控制器和不同的模式之中重复使用的,如果我们把所有逻辑都放在视图中,它减少了可复用性。
你的代码变得很牢固地配对在一起,它实际上变成了超类的一部分,你无法从UIScrollView中析取它,之后用其它东西代替,如果它在你控制器中且为控制器的一部分,在之后更容易改变它工作的方式和重新安排你应用程序的一些部分。
通过委派来扩展Scroll View 的行为(常用的)
委派是一个单独的对象,协议,定义了委派会实现的一系列功能的Objective-C协议,它创建了一系列很清晰的撤销点,在那里你能定制行为和外观。它在这些对象之间保持了松散的配对,视图本身与视图控制器或任何其它的控制器对象,委派不是滚轴视图的直接子类,它比起牢固配对的子类更加的松散。
首先引用别人分析一篇不错的文章,同时也感谢这位朋友的分享:http://www.cocoachina.com/iphonedev/sdk/2010/1224/2503.html
在滚动过程当中,其实是在修改原点坐标。当手指触摸后, scroll view会暂时拦截触摸事件,使用一个计时器。假如在计时器到点后没有发生手指移动事件,那么 scroll view 发送 tracking events 到被点击的 subview。假如在计时器到点前发生了移动事件,那么 scroll view 取消 tracking 自己发生滚动。
子类可以重载
touchesShouldBegin:withEvent:inContentView: 决定自己是否接收 touch 事件
pagingEnabled:当值是 YES 会自动滚动到 subview 的边界,默认是NO
touchesShouldCancelInContentView: 开始发送 tracking messages 消息给 subview 的时候调用这个方法,决定是否发送 tracking messages 消息到subview。假如返回 NO,发送。YES 则不发送。
假如 canCancelContentTouches属性是NO,则不调用这个方法来影响如何处理滚动手势。
scroll view 还处理缩放和平移手势,要实现缩放和平移,必须实现委托 viewForZoomingInScrollView:、scrollViewDidEndZooming:withView:atScale:
两个方法。另外 maximumZoomScale和minimumZoomScale 两个属性要不一样。
几个属性介绍
tracking
当 touch 后还没有拖动的时候值是YES,否则NO
zoomBouncing
当内容放大到最大或者最小的时候值是 YES,否则 NO
zooming
当正在缩放的时候值是 YES,否则 NO
decelerating
当滚动后,手指放开但是还在继续滚动中。这个时候是 YES,其它时候是 NO
decelerationRate
设置手指放开后的减速率
maximumZoomScale
一个浮点数,表示能放最大的倍数
minimumZoomScale
一个浮点数,表示能缩最小的倍数
pagingEnabled
当值是 YES 会自动滚动到 subview 的边界。默认是NO
scrollEnabled
决定是否可以滚动
delaysContentTouches
是个布尔值,当值是 YES 的时候,用户触碰开始,scroll view要延迟一会,看看是否用户有意图滚动。假如滚动了,那么捕捉 touch-down 事件,否则就不捕捉。假如值是NO,当用户触碰, scroll view 会立即触发 touchesShouldBegin:withEvent:inContentView:,默认是 YES
canCancelContentTouches
当值是 YES 的时候,用户触碰后,然后在一定时间内没有移动,scrollView 发送 tracking events,然后用户移动手指足够长度触发滚动事件,这个时候,scrollView 发送了 touchesCancelled:withEvent: 到 subview,然后 scroView 开始滚动。假如值是 NO,scrollView 发送 tracking events 后,就算用户移动手指,scrollView 也不会滚动。
contentSize
里面内容的大小,也就是可以滚动的大小,默认是0,没有滚动效果。
showsHorizontalScrollIndicator
滚动时是否显示水平滚动条
showsVerticalScrollIndicator
滚动时是否显示垂直滚动条
bounces
默认是 yes,就是滚动超过边界会反弹有反弹回来的效果。假如是 NO,那么滚动到达边界会立刻停止。
bouncesZoom
和 bounces 类似,区别在于:这个效果反映在缩放上面,假如缩放超过最大缩放,那么会反弹效果;假如是 NO,则到达最大或者最小的时候立即停止。
directionalLockEnabled
默认是 NO,可以在垂直和水平方向同时运动。当值是 YES 时,假如一开始是垂直或者是水平运动,那么接下来会锁定另外一个方向的滚动。 假如一开始是对角方向滚动,则不会禁止某个方向
indicatorStyle
滚动条的样式,基本只是设置颜色。总共3个颜色:默认、黑、白
scrollIndicatorInsets
设置滚动条的位置
最后加上,我刚定的一个例子,可以缩放,及对使用的代理方法加了注释
// ScrollViewViewController.m
// ScrollView
//
// Created by ch_soft on 11-11-8.
// Copyright 2011年 __MyCompanyName__. All rights reserved.
//
#import"ScrollViewViewController.h"
#import"CustomA.h"
#import"CustomB.h"
@implementation ScrollViewViewController
- (void)didReceiveMemoryWarning
{
// Releases the view if it doesn‘t have a superview.
[superdidReceiveMemoryWarning];
// Release any cached data, images, etc that aren‘t in use.
}
#pragma mark - View lifecycle
// Implement viewDidLoad to do additional setup after loading the view, typically from a nib.
- (void)viewDidLoad
{
scrollview =[[UIScrollViewalloc]initWithFrame:CGRectMake(50,0,200,400)];
scrollview.contentSize=CGSizeMake(400,400);
scrollview.backgroundColor=[UIColororangeColor];
scrollview.pagingEnabled=YES;//是否自己动适应
viewA=[[CustomAalloc]initWithFrame:CGRectMake(50,0,100,400)];
viewA.backgroundColor=[UIColorblueColor];
[scrollviewaddSubview:viewA];
[viewArelease];
CustomB * viewB=[[CustomB alloc] initWithFrame:CGRectMake(250,0,100,400)];
viewB.backgroundColor=[UIColoryellowColor];
[scrollviewaddSubview:viewB];
[viewB release];
[self.viewaddSubview:scrollview];
scrollview.maximumZoomScale=2.0;
scrollview.minimumZoomScale=0.5;
// scrollview.decelerationRate=1;
scrollview.delegate=self;
//canCancelContentTouches:YES-移动手指足够长度触发滚动事件,NO-scrollView发送 tracking events 后,就算用户移动手指,scrollView也不会滚动。
scrollview.canCancelContentTouches=NO;
//当值是 YES的时候,用户触碰开始.要延迟一会,看看是否用户有意图滚动。假如滚动了,那么捕捉 touch-down事件,否则就不捕捉。假如值是NO,当用户触碰, scroll view会立即触发
scrollview.delaysContentTouches=YES;
[scrollviewrelease];
[superviewDidLoad];
}
#pragma mark UIScrollViewDelegate
//只要滚动了就会触发
- (void)scrollViewDidScroll:(UIScrollView *)scrollView;
{
// NSLog(@" scrollViewDidScroll");
NSLog(@"ContentOffset x is %f,yis %f",scrollView.contentOffset.x,scrollView.contentOffset.y);
}
//开始拖拽视图
- (void)scrollViewWillBeginDragging:(UIScrollView *)scrollView;
{
NSLog(@"scrollViewWillBeginDragging");
}
//完成拖拽
- (void)scrollViewDidEndDragging:(UIScrollView *)scrollView willDecelerate:(BOOL)decelerate;
{
NSLog(@"scrollViewDidEndDragging");
}
//将开始降速时
- (void)scrollViewWillBeginDecelerating:(UIScrollView *)scrollView;
{
NSLog(@"scrollViewWillBeginDecelerating");
}
//减速停止了时执行,手触摸时执行执行
- (void)scrollViewDidEndDecelerating:(UIScrollView *)scrollView;
{
NSLog(@"scrollViewDidEndDecelerating");
}
//滚动动画停止时执行,代码改变时出发,也就是setContentOffset改变时
- (void)scrollViewDidEndScrollingAnimation:(UIScrollView *)scrollView;
{
NSLog(@"scrollViewDidEndScrollingAnimation");
}
//设置放大缩小的视图,要是uiscrollview的subview
- (UIView *)viewForZoomingInScrollView:(UIScrollView *)scrollView;
{
NSLog(@"viewForZoomingInScrollView");
return viewA;
}
//完成放大缩小时调用
- (void)scrollViewDidEndZooming:(UIScrollView *)scrollView withView:(UIView *)view atScale:(float)scale;
{
viewA.frame=CGRectMake(50,0,100,400);
NSLog(@"scale between minimum and maximum. called after any ‘bounce‘ animations");
}// scale between minimum and maximum. called after any ‘bounce‘ animations
//如果你不是完全滚动到滚轴视图的顶部,你可以轻点状态栏,那个可视的滚轴视图会一直滚动到顶部,那是默认行为,你可以通过该方法返回NO来关闭它
- (BOOL)scrollViewShouldScrollToTop:(UIScrollView *)scrollView;
{
NSLog(@"scrollViewShouldScrollToTop");
returnYES;
}
- (void)scrollViewDidScrollToTop:(UIScrollView *)scrollView;
{
NSLog(@"scrollViewDidScrollToTop");
}
- (void)viewDidUnload
{
[super viewDidUnload];
// Release any retained subviews of the main view.
// e.g. self.myOutlet = nil;
}
- (BOOL)shouldAutorotateToInterfaceOrientation:(UIInterfaceOrientation)interfaceOrientation
{
// Return YES for supported orientations
return (interfaceOrientation == UIInterfaceOrientationPortrait);
}
@end
完毕,如发现在有新的内容再更新
- 上一篇tree20
- 下一篇对UITextField的键盘处理方法
第二、UIScrollView的使用大全
