首页 > 代码库 > 马哥2016全新Linux+Python高端运维班第五周作业
马哥2016全新Linux+Python高端运维班第五周作业
本周作业内容:
1、显示当前系统上root、fedora或user1用户的默认shell;
# 没有fedora、user1用户,添加fadora,user1模拟环境
[root@localhost ~]# useradd -s /sbin/nologin fedora && useradd -s /bin/sh user1
# 添加fadora、user1用户,并指定不同的默认shell
[root@localhost ~]# getent passwd fedora
fedora:x:1001:1001::/home/fedora:/sbin/nologin
[root@localhost ~]# getent passwd user1
user1:x:1002:1002::/home/user1:/bin/sh
# 过滤/etc/passwd中root、fedora或user1用户,切割显示其对应的默认shell
[root@localhost ~]# egrep "^(root|fedora|user1)" /etc/passwd | cut -d: -f7
/bin/bash
/sbin/nologin
/bin/sh
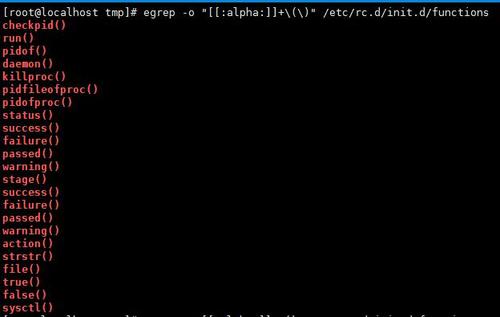
2、找出/etc/rc.d/init.d/functions文件中某单词后面跟一组小括号的行,形如:hello();
# 过滤每行中,匹配所有字母,然后跟一组小括号的行
# 使用egrep扩展正则的话,()需要转义
[root@localhost ~]# egrep -o "[[:alpha:]]+\(\)" /etc/rc.d/init.d/functions
# 或者
[root@localhost ~]# grep -o "[[:alpha:]]\+()" /etc/rc.d/init.d/functions
3、使用echo命令输出一个绝对路径,使用grep取出其基名;
# 匹配基名,就是最后的/后的文件名,使用-o选项精确匹配,匹配[^/]结尾的,
[root@localhost ~]# echo "/etc/sysconfig/network-scripts/ifcfg-eth0" | grep -o ‘[^/]\+$‘
ifcfg-eth0

扩展:取出其路径名
# 匹配路径名,使用-o选项精确匹配,匹配最后一个/前的内容
[root@localhost ~]# echo "/etc/sysconfig/network-scripts/ifcfg-eth0" | grep -o ‘^/.*/‘
/etc/sysconfig/network-scripts/
# 然后把最后的/也去掉
[root@localhost ~]# echo "/etc/sysconfig/network-scripts/ifcfg-eth0" | grep -o ‘^/.*/‘ | grep -o ‘^/.*[^/]‘
/etc/sysconfig/network-scripts

4、找出ifconfig命令结果中的1-255之间数字;
# 找出1-255之间数字,使用-o选项精确匹配,[1-9]找出1-9,[1-9][0-9]找出10-99,1[0-9]{2}找出100-199,2[0-5]{2}找出200-255
# 排序,去重
[root@localhost ~]# # ifconfig | egrep -o ‘\b(2[0-5]{2}|1[0-9]{2}|[1-9][0-9]|[1-9])\b‘ | sort -n -u
5、挑战题:写一个模式,能匹配合理的IP地址;
# A类地址范围:1.0.0.1—126.255.255.254   B类地址范围:128.0.0.1—191.255.255.254
# C类地址范围:192.0.0.1—223.255.255.254  D类地址范围:224.0.0.1—239.255.255.254
# E类地址范围:240.0.0.1—255.255.255.254  127.X.X.X是保留地址,用做循环测试用的
# 匹配范围为 1-255.0-255.0-255.1-254
# ifconfig | egrep -o "(2[0-5]{2}|1[0-9]{2}|[1-9][0-9]|[1-9])\.((2[0-5]{2}|1[0-9]{2}|[1-9][0-9]|[0-9])\.){2}\<(2[0-5][0-4]|1[0-9]{2}|[1-9][0-9]|[1-9])\>"
6、挑战题:写一个模式,能匹配出所有的邮件地址;
# 邮件地址,匹配用户名@邮件服务器,用户名可以是数字或字母,服务器名是字母或者数字,顶级域名是字母
# 添加一些测试用的邮件地址
[root@localhost ~]# cat > /tmp/test_mail.txt << EOF
123456@qq.com
12345678@456.com
123456te@123.net
123983@163.cn
12cd@123.com
EFgh@qq.com
EOF
# egrep -o "[[:alnum:]]+@[[:alnum:]]+\.[[:alpha:]]+"
[root@localhost ~]# egrep -o "[[:alnum:]]+@[[:alnum:]]+\.[[:alpha:]]+" /tmp/test_mail.txt

7、查找/var目录下属主为root,且属组为mail的所有文件或目录;
# find /var -user root -group mail
[root@localhost var]# find /var -user root -group mail -ls
3153    0 drwxrwxr-x   2 root     mail           45 Sep  2 09:33 /var/spool/mail
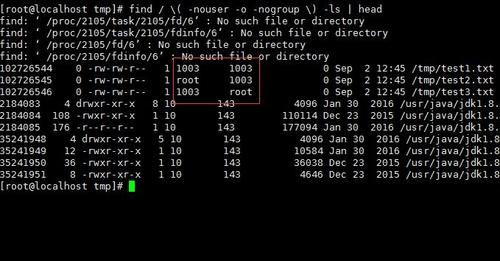
8、查找当前系统上没有属主或属组的文件;
# find / \( -nouser -o -nogroup \)

# 新建几个测试文件,直观比较
[root@localhost ~]# useradd user2
[root@localhost ~]# su - user2
[user2@localhost ~]$ cd /tmp
[user2@localhost tmp]$ touch test{1..3}.txt
[root@localhost tmp]# chown root test2.txt
[root@localhost tmp]# chown .root test3.txt
[root@localhost tmp]# userdel -r user2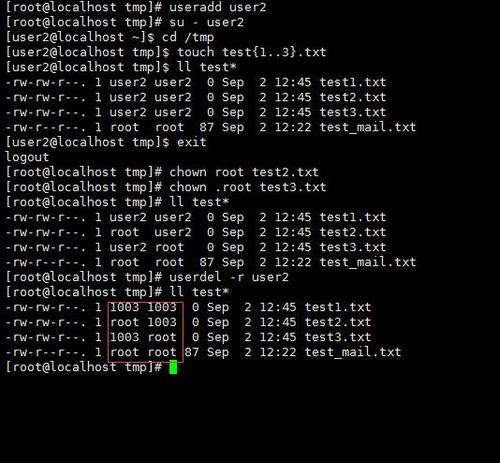
# 显示部分内容
[root@localhost tmp]# find / \( -nouser -o -nogroup \) -ls | head
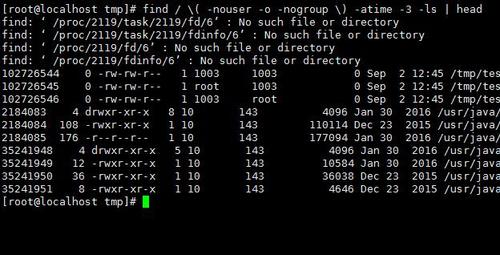
进一步:查找当前系统上没有属主或属组,且最近3天内曾被访问过的文件或目录;
# find / \( -nouser -o -nogroup \) -atime -3
# 显示部分内容
[root@localhost tmp]# find / \( -nouser -o -nogroup \) -atime -3 -ls | head
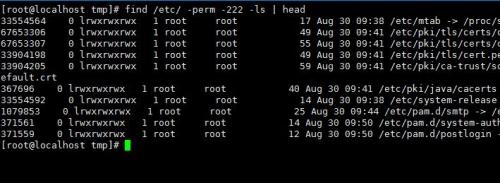
9、查找/etc目录下所有用户都有写权限的文件;
# 所有用户同时满足写权限,使用-222
# find /etc/ -perm -222
10、查找/etc目录下大于1M,且类型为普通文件的所有文件;
# find /etc/ -size +1M -type f

11、查找/etc/init.d/目录下,所有用户都有执行权限,且其它用户有写权限的文件;
# find /etc/init.d -perm -113
[root@localhost tmp]# find /etc/init.d -perm -113 -ls
33709906    0 lrwxrwxrwx   1 root     root           11 Aug 30 09:39 /etc/init.d -> rc.d/init.d
12、查找/usr目录下不属于root、bin或hadoop的文件;
# find /usr ! \( -user root -o -user bin -o -user hadoop \)
或者
# find /usr ! -user root ! -user bin ! -user hadoop

13、查找/etc/目录下至少有一类用户没有写权限的文件;
# -222是所有用户都有写权限,使用!取反,就是除了所有用户都有写权限的文件,就是至少一类用户是没有写权限
# find /etc ! -perm -222

14、查找/etc目录下最近一周内其内容被修改过,且不属于root或hadoop的文件;
# find /etc -mtime -7 ! \( -user root -o -user hadoop \)
或者
# find /etc -mtime -7 ! -user root ! -user hadoop

本文出自 “ld0381的学习之旅” 博客,转载请与作者联系!
马哥2016全新Linux+Python高端运维班第五周作业
声明:以上内容来自用户投稿及互联网公开渠道收集整理发布,本网站不拥有所有权,未作人工编辑处理,也不承担相关法律责任,若内容有误或涉及侵权可进行投诉: 投诉/举报 工作人员会在5个工作日内联系你,一经查实,本站将立刻删除涉嫌侵权内容。
