首页 > 代码库 > nginx实用配置
nginx实用配置
一.配置虚拟主机和流量统计,密码验证。
[root@localhost html]# mkdir web1 web2
[root@localhost html]# echo ‘This is web1!!!‘ >> web1/index.html
[root@localhost html]# echo ‘This is web2!!!‘ >> web2/index.html
[root@localhost html]# chown nginx web1 web2
[root@localhost html]#htpasswd -c /usr/local/nginx/conf/htpasswd dragon //创建加密的帐号密码,htpasswd是apache下的一个加密工具。
[root@localhost html]# ll
总计 16
drwxr-xr-x 2 nginx root 4096 11-10 04:40 web1
drwxr-xr-x 2 nginx root 4096 11-10 04:42 web2
[root@localhost html]# vim /usr/local/nginx/conf/nginx.conf
在http{}内加入以下两句,导入虚拟主机的配置文件。
include /usr/local/nginx/conf/web1.conf;
include /usr/local/nginx/conf/web2.conf;
创建虚拟主机的配置文件,并写入主要配置
[root@localhost html]# cat >> /usr/local/nginx/conf/web1.conf <<
server {
listen 80;
server_name www.web1.com;
location / {
root /var/www/html/web1;
index index.html index.htm index.php;
}
location /status {
stub_status on;
access_log /usr/local/nginx/logs/www1_status.log;
auth_basic "NginxStatus"; #开启nginx统计功能。
auth_basic_user_file ../htpasswd; #开启密码验证,导入验证文件
}
}
[root@localhost html]# cat >> /usr/local/nginx/conf/web2.conf <<
server {
listen 80;
server_name www.web2.com;
location / {
root /var/www/html/web2;
index index.html index.htm index.php;
}
location /status {
stub_status on;
access_log /usr/local/nginx/logs/www2_status.log;
auth_basic "NginxStatus";
auth_basic_user_file ../htpasswd;
}
}
[root@localhost html]# cat >> /etc/hosts << END
> 192.168.1.122 www.web1.com
> 192.168.1.122 www.web2.com
> END
#测试所用,在 hosts写入DNS解析。
浏览www.web1.com

浏览www.web2.com

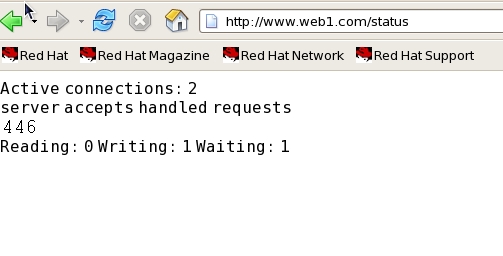
查看nginx统计信息时需要密码验证。

查看统计信息,active connections 表示当前活动的连接数量,server accepts handled requests 表示已经处理的连接信息。reading :表示nginx读取到客户端Header信息数,“waiting”表示表示nginx返回给客户端的header信息数,“waiting”表示nginx已经处理完,正在等候下一次请求命令时的驻留的连接数。

二.重定向实现新旧域名的过渡
#主要的配置,当用户访问www.web1.com时会被重定向到www.web2.com
server {
listen 80;
server_name www.web1.com;
rewrite ^/(.*)$ http://www.web2.com/$1 permanent;
#charset koi8-r;
#access_log logs/host.access.log main;
location / {
root /var/www/html;
index index.html index.htm index.php;
}
include /usr/local/nginx/conf/web2.conf;
}
另一种方法,通过判断nginx核心变量host实现重定向功能
server {
server_name www.web1.com www.web2.com;
if ($host != ‘www.web2.com‘)
rewrite
rewrite ^/(.*)$ http://www.web2.com/$1 permanent;
include /usr/local/nginx/conf/web2.conf;
}
三.隐藏nginx版本号
1、修改nginx.conf文件,在httpd区域中加入server_tokens off;如:
http {
……省略
sendfile on;
tcp_nopush on;
keepalive_timeout 60;
tcp_nodelay on;
server_tokens off;
…….省略
}
3.修改/usr/local/nginx/conf/下的php-fpm配置文件。
找到:
fastcgi_param SERVER_SOFTWARE nginx/$nginx_version;
改为:
fastcgi_param SERVER_SOFTWARE nginx;
记得重载nginx和php-fpm
四.nginx自定义404页面
自定义nginx 404错误页面是提高用户体验的一个细节,如果是正规站,我们就必须做好它。你可以对每个网站的错误页面分别设置,也可以设置一个全局的404页面。
为指定位置设定一个404页面
location /my_blog {
error_page 404 = /article_not_found.html;
}
整个网站的404页面
server {
listen 80;
error_page 404 /page_not_found.html;
...
你可以用单个错误页面一起来处理多个错误代码
location /my_blog {
error_page 500 502 503 504 = /server_error.html
}
重定向到一个完全不同的服务器,假设你在http区域定义有一个上游服务器server2:
upstream server2 {
server 10.0.0.1:80;
}
server {
location /my_blog {
error_page 404 = @try_server2;
}
location @try_server2 {
proxy_pass http://server2;
}
本文出自 “龙爱雪琪” 博客,请务必保留此出处http://dragon123.blog.51cto.com/9152073/1575478
nginx实用配置
