首页 > 代码库 > Linux 运维工具---pxe&dhcp
Linux 运维工具---pxe&dhcp
Linux 运维工具---pxe&dhcp&tftp
============================================================================
概述:
============================================================================
运维工作
1.运维工具(Operations)介绍
★BootStraping:安装系统工具
Bare Metal(物理设备):pxe, cobbler
Virtaul Machine(虚拟设备):image files
★Configuration:系统配置工具
puppet(ruby) 重量级的工具
saltstack(python)
ansible 轻量级工具
chef
cfengine
...
★Command and Control:指挥控制工具
func
ansible
fabric
...
2.程序发布
★方式:
人工智能(手动发布)
脚本
发布程序(运维系统)
★要求:
不能影响用户体验;
系统不能停机;
不能导致系统故障或造成系统完全不可用;
★灰度模型:
基于主机
基于用户
★发布路径:要在老版本的基础上发布,出现故障方便回滚
/webapps/data/waimai
/webapps/data/waimai-1.1
/webapps/data/waimai-1.2
/webapps/data/waimai-1.3
/webapps/data/waimai-1.4
★基于主机灰度发布过程:
在调度器上下线一批主机(标记为维护模式)--> 关闭服务 --> 部署新版本 --> 启动服务 --> 在调度器启用这一批主机;
BootStraping:系统提供(OS Provision)
1.技术介绍
★涉及技术:
pxe --> preboot excution environment(预引导执行环境),inter公司开发
cobbler:可以将多个pxe整合在一起,让用户判断选择要安装哪个系统
Cobbler is a network install server.Cobbler supports PXE, ISO virtualized installs, and re-installing existing Linux machines.
★pxe所依赖的服务:
dhcp service (ip/nemask, gw, dns; filename, next-server)完成地址自动分配
tftp server :提供bootloader, kernel, initrd文件
yum repository :可以基于ftp, http, https, nfs提供
kickstart
附图:
pxe装机过程
dhcp server:
1.服务介绍
★DHCP:Dynamic Host Configuration Protocol(动态主机配置协议)
arp --> address resolving Protocol //地址解析协议
功能:IP --> MAC
rarp --> reverse arp //反向地址解析协议
功能:MAC --> IP
☉bootp --> boot protocol //引导协议(无盘工作站)
dhcp: lease time, bootp //引入租约的概念,向后兼容bootp协议
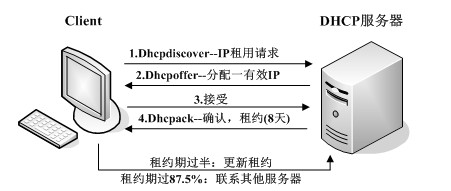
★工作流程:
☉全程都为广播,在局域网内,无法跨域物理路由
Client:dhcp discover;客户端发送发现报文
Server: dhcp offer(IP/Netmask, GW, DNS Server, NTP Server, Wins Server, .) 服务器收到报文之后提供响应报文
Client:dhcp request //客户端租约的选择
Server:dhcp ack //服务端租约确认
★lease time:租约期限;过程
续租:50%, 75%, 87.5%, 93.75%
dhcp discover,.
再次续租:(单播)..
dhcp request
dhcp ack|nak
☉dhcp如果想为多个网络提供服务,要用到dhcp relay(中继)
附图:
dhcp工作流程
★dhcp协议的实现:
dhcp(isc.org)
-The dhcp package provides the ISC DHCP service and relay agent.
dnsmasq (dns, dhcp)
[root@centos7 ~]# yum info dhcp
Loaded plugins: fastestmirror, langpacks
Loading mirror speeds from cached hostfile
Available Packages
Name        : dhcp
Arch        : x86_64
Epoch       : 12
Version     : 4.2.5
Release     : 42.el7.centos
Size        : 511 k
Repo        : CDROM
Summary     : Dynamic host configuration protocol software
URL         : http://isc.org/products/DHCP/
License     : ISC
Description : DHCP (Dynamic Host Configuration Protocol) is a protocol which
            : allows individual devices on an IP network to get their own
            : network configuration information (IP address, subnetmask,
            : broadcast address, etc.) from a DHCP server. The overall
            : purpose of DHCP is to make it easier to administer a large
            : network.
            :
            : To use DHCP on your network, install a DHCP service (or relay
            : agent), and on clients run a DHCP client daemon.  The dhcp
            : package provides the ISC DHCP service and relay agent.
2.DHCP程序环境介绍
★程序环境:
☉dhcp server:
程序:/usr/sbin/dhcp
IPV4网络:
配置文件: /etc/dhcp/dhcpd.conf
UNit File:/usr/lib/systemd/system/dhcpd.service
IPV6网络:
配置文件: /etc/dhcp/dhcpd6.conf
UNit File:/usr/lib/systemd/system/dhcpd6.service
☉dhcrelay:中继器
程序:/usr/sbin/dhcrelay
UNit File:/usr/lib/systemd/system/dhcrelay.service
★监听的地址和端口:
Server: 67/udp
Client: 68/udp
3.DHCP配置介绍
★配置文件:
/etc/dhcp/dhcpd.conf(CentOS 7需把示例文件复制过来)
☉配置指令
option选项:配置给客户端的相信息(如网关,dns等);
指令:定义dhcp server的工作特性;
☉配置有级别之分:
全局配置
子网配置
主机配置
注意:作用范围越小,优先级越高
☉常用的配置:
实验:
1.实验环境描述:
准备两台虚拟主机(我这里是两台CentOS 7),一台作为DNS服务器,一台作为客户端;
因为dns是局域网的协议,所以要保证两台主机要在同一网段,为了保证外网不受干扰,我这里的两台虚拟机模式为 VMnat1通信;
2.配置DNS服务器,设定子网和起始地址;
1)编辑配置文件/etc/dhcp/dhcpd.conf(这里是复制的示例文件),添加自己定义的配置均项,如下:

2)保存退出,然后启动dhcp服务,并查看监听的端口67/udp
[root@centos7 dhcp]# systemctl start dhcpd.service
[root@centos7 dhcp]# ss -unl
State       Recv-Q Send-Q                                      Local Address:Port                                                     Peer Address:Port
UNCONN      0      0                                                       *:67                                                                  *:*
UNCONN      0      0                                                       *:68                                                                  *:*
UNCONN      0      0                                                       *:43328                                                               *:*
UNCONN      0      0                                               127.0.0.1:323                                                                 *:*
UNCONN      0      0                                                       *:16300                                                               *:*
UNCONN      0      0                                                       *:514                                                                 *:*
UNCONN      0      0                                                      :::20100                                                              :::*
UNCONN      0      0                                                     ::1:323                                                                :::*
UNCONN      0      0                                                      :::63303                                                              :::*
UNCONN      0      0                                                      :::514                                                                :::*
3.启动客户端主机,查看能否自动获取的地址,地址是否在我们限定的子网网段中
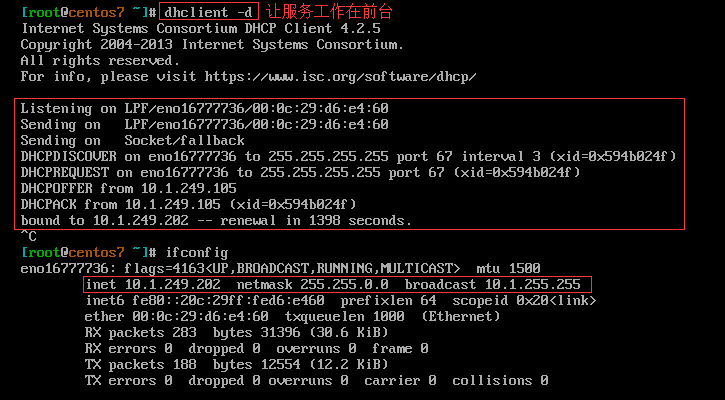
1)客户端主机获取地址过程如下,获取到的地址为10.1.249.202,在我们限定的子网中;

客户端网关如下

4.我们也可以给一个主机固定分配地址,只要获取该主机的MAC地址即可
1)首先编辑dns服务器的配置文件,添加 host passacaglia配置段即可,如下:

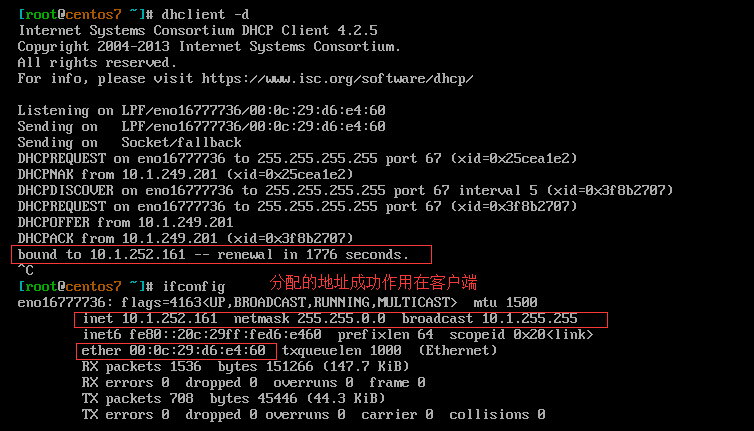
2)再次查看客户端的ip,发现我们设置的地址成功作用在客户端,IP地址如下:

网关如下:(说明:全局配置段中已经指明网关,但是作用范围越小,优先级越高)

如上,DNS服务器的配置和使用的整个过程。。。
=======================================================================================
PXE用到的其他指令:
在pxe主机启动时,除了会分配ip地址外,还要告诉其内核文件的引导文件名称和地址,所用到的指令如下:
★filename:指明引导文件名称;
★next-server:指明引导文件所在的服务器的主机IP;(为tftp server)
示例:
 filename “pxelinux.0";
 next-server 10.1.0.6;()
    tftp server
tftp server:
安装配置详解
★tftp:Trivial File Transfer Protocol(简单文件传输协议)
☉作用:用于引导无盘工作站
[root@centos7 ~]# yum info tftp-server Loaded plugins: fastestmirror, langpacks Loading mirror speeds from cached hostfile Available Packages Name : tftp-server Arch : x86_64 Version : 5.2 Release : 12.el7 Size : 44 k Repo : CDROM Summary : The server for the Trivial File Transfer Protocol (TFTP) URL : http://www.kernel.org/pub/software/network/tftp/ License : BSD Description : The Trivial File Transfer Protocol (TFTP) is normally used only for : booting diskless workstations. The tftp-server package provides the : server for TFTP, which allows users to transfer files to and from a : remote machine. TFTP provides very little security, and should not be : enabled unless it is expressly needed.★安装
# yum install tftp-server tftp -y
★监听端口:
69/udp
★启动程序
CentOS 7:
# systemctl start tftp.socket
CentOS 6:
# chkconfig tftp on
# service xinetd restart
★默认的文件根目录:
/var/lib/tftpboot/
演示:
1.安装tftp-server,tftp(客户端),然后查看其生成的文件如下:
[root@centos7 ~]# yum install tftp-server tftp -y
[root@centos7 ~]# rpm -ql tftp-server
/etc/xinetd.d/tftp
/usr/lib/systemd/system/tftp.service
/usr/lib/systemd/system/tftp.socket     # 启动服务
/usr/sbin/in.tftpd                      # 主程序文件
/usr/share/doc/tftp-server-5.2
/usr/share/doc/tftp-server-5.2/CHANGES
/usr/share/doc/tftp-server-5.2/README
/usr/share/doc/tftp-server-5.2/README.security
/usr/share/man/man8/in.tftpd.8.gz
/usr/share/man/man8/tftpd.8.gz
/var/lib/tftpboot                       # 默认的文件根目录
2.启动tftp-server服务,查看端口69/udp
[root@centos7 ~]# systemctl start tftp.socket
[root@centos7 ~]# ss -unl
State       Recv-Q Send-Q Local Address:Port               Peer Address:Port
UNCONN      0      0              *:68                         *:*
UNCONN      0      0      127.0.0.1:323                        *:*
UNCONN      0      0              *:3031                       *:*
UNCONN      0      0              *:514                        *:*
UNCONN      0      0             :::69                        :::*
UNCONN      0      0             :::46863                     :::*
UNCONN      0      0            ::1:323                       :::*
UNCONN      0      0             :::514                       :::*
3.现在我们用客户端命令tftp验证tftp-server服务能否正常工作
[root@centos7 tmp]# cp /etc/fstab /var/lib/tftpboot/ # 首先向默认目录下复制一个文件
[root@centos7 tmp]# tftp 10.1.249.201                # 使用客户端命令连接服务器
tftp> help
tftp-hpa 5.2
Commands may be abbreviated.  Commands are:

connect 	connect to remote tftp
mode    	set file transfer mode
put     	send file
get     	receive file
quit    	exit tftp
verbose 	toggle verbose mode
trace   	toggle packet tracing
literal 	toggle literal mode, ignore ‘:‘ in file name
status  	show current status
binary  	set mode to octet
ascii   	set mode to netascii
rexmt   	set per-packet transmission timeout
timeout 	set total retransmission timeout
?       	print help information
help    	print help information
tftp> get fstab    # 下载复制过去的文件
tftp> quit         # 退出
[root@centos7 tmp]# ls
fstab              # 查看下载成功
综上,有了DHCP和tftp-server之后我们就可以配置pxe环境了。。。
Linux 运维工具---pxe&dhcp


