首页 > 代码库 > 源码编译搭建LAMP环境
源码编译搭建LAMP环境
源码编译搭建LAMP环境
一:实验目标
源码编译LAMP环境
二:实验环境
xuegod63.cn IP:192.168.1.63
LAMP环境的概述
LAMP(Linux- Apache-MySQL-PHP)一般用来做网站架构的,是目前国际流行的Web框架,该框架包括:Linux操作系统,Apache网络服务器,MySQL数据 库,Perl、PHP或者Python编程语言。LAMP具有通用、跨平台、高性能、低价格的 优势,因此LAMP无论是性能、质量还是价格都是企业搭建网站的首选平台。
对于大流量、大并发量的网站系统架构来说,除了硬件上使用高 性能的服务器、负载均衡、CDN等之外,在软件架构上需要重点关注下面几个环节:使用高性能的操作系统(OS)、高性能的网页服务器(Web Server)、高性能的数据库(Database)、高效率的编程语言等。下面我将从这几点对其一一讨论。
操作系统
Linux操作系统有很多个不同的发行版,如Red Hat Enterprise Linux、SUSE Linux Enterprise、Debian、Ubuntu、CentOS等,每一个发行版都有自己的特色,比如RHEL的稳定,Ubuntu的易用,基于稳定性 和性能的考虑,操作系统选择CentOS(Community ENTerprise Operating System)是一个理想的方案。
Web服务器、缓存和PHP加速
Apache是LAMP架构最核心的Web Server,开源、稳定、模块丰富是Apache的优势。但Apache的缺点是有些臃肿,内存和CPU开销大,性能上有损耗,不如一些轻量级的Web 服务器(例如nginx)高效,轻量级的Web服务器对于静态文件的响应能力来说远高于Apache服务器。
数据库
开源的数据库中,MySQL在性能、稳定性和功能上是首选,可以达到百万级别的数据存储,网站初期可以将MySQL和Web服务器放在一起,但是当访问 量达到一定规模后,应该将MySQL数据库从Web Server上独立出来,在单独的服务器上运行,同时保持Web Server和MySQL服务器的稳定连接。
当数据库访问量达到更大的级别,可以考虑使用MySQL Cluster等数据库集群或者库表散列等解决方案。
总的来说,LAMP架构的网站性能会远远优于Windows IIS + ASP + Access(例如月光博客)这样的网站,可以负载的访问量也非常大,国内的大量个人网站如果想要支撑大访问量,采用LAMP架构是一个不错的方案。
三:实验代码
LAMP=Linux+Apache+Mysql+PHP
1:安装apache
Apache源码包:httpd-2.2.25.tar.gz
1)解压httpd软件包
[root@xuegod63 ~]# tar -zxvf httpd-2.2.25.tar.gz -C /usr/local/src/
[root@xuegod63 ~]#cd /usr/local/src/httpd-2.2.25
[root@xuegod63 httpd-2.2.25]# yum install openssl*
2)源码编译安装apache
[root@xuegod63 httpd-2.2.25]# ./configure --prefix=/usr/local/apache2 --enable-so --enable-rewrite --enable-ssl
配置参数用途:
--prefix=/usr/local/apache2 #存放网站的根目录:
--enable-so # 支持动态加载模块
--enable-rewrite #支持网站地址重写
--enable-ssl # 支持ssl加密
[root@xuegod63 httpd-2.2.25]#make -j 4 #使用4个CPU来编译 。不要使用大于你的物理CPU个数
[root@xuegod63 httpd-2.2.25]#make install
[root@xuegod63 apache2]# ls
bin cgi-bin error icons lib man modules
build conf htdocs include logs manual
http配置文件位置:
[root@xuegod63 httpd-2.2.25]# ls /usr/local/apache2/conf/httpd.conf
/usr/local/apache2/conf/httpd.conf
存放网站的根目录:
[root@xuegod63 httpd-2.2.25]# ls /usr/local/apache2/htdocs/
index.html
[root@xuegod63 httpd-2.2.25]# cat /usr/local/apache2/htdocs/index.html
<html><body><h1>It works!</h1></body></html>
3)启用apache时,让apache可以开机启动并且可以使用service命令启动apache服务器
[root@xuegod63 httpd-2.2.25]# cp /usr/local/apache2/bin/apachectl /etc/init.d/
[root@xuegod63 httpd-2.2.25]# /etc/init.d/httpd stop
[root@xuegod63 httpd-2.2.25]# chkconfig httpd off
#让apache开机启动,还要再在apachectl文件的头部的注释中加两条命令。
[root@xuegod63 httpd-2.2.25]# vim /etc/init.d/apachectl # 添加以下红色内容
[root@xuegod63 httpd-2.2.25]# head !$
head /etc/init.d/apachectl
#!/bin/sh
# chkconfig: 2345 64 36 # 2345是系统级别下开些服务 ,64 启动顺序 , 36 关闭顺序
# description: Activates/Deactivates all network interfaces configured to \
#可以参照:
[root@xuegod63 ~]# vim /etc/init.d/network

注:启动时,要比network服务启动的晚一些。先让网络服务器启动起来,其它依靠网络相关的服务才可以正常启动。 启动的时候先启动网络,再启动httpd,关闭的时候,先关闭httpd。再关闭网络。
4)设置开机自动启动:
[root@xuegod63 apache2]# chkconfig --add apachectl
[root@xuegod63 apache2]# chkconfig --list apachectl
apachectl 0:off 1:off 2:on 3:on 4:on 5:on6:off
5)启动apache:
[root@xuegod63 apache2]# /etc/init.d/apachectl start # 启动之后80端口就启动了
6)测试:

注释:源码编译安装的apache运行身份是: daemon ;rpm安装的httpd运行身份是:apache

注:网站目录权限设置:
[root@xuegod63 htdocs]# id daemon
uid=2(daemon) gid=2(daemon) groups=2(daemon),1(bin),4(adm),7(lp)
[root@xuegod63 htdocs]# chown daemon:daemon kaixin001/data #这里不需要写============================================================
2:Mysql的源码包安装
msyql源码包:MySQL-5.5.30-1.el6.src.rpm
1)安装前,如果不存在mysql 用户,则建立
[root@xuegod63 ~]# useradd -s /sbin/nologin mysql
[root@xuegod63 Desktop]# vim /etc/passwd #不让mysql用户登录系统
改成: mysql:x:501:501::/home/mysql:/sbin/nologin
2)解压安装
[root@xuegod63 ~]# tar zxvf mysql-5.5.30.tar.gz -C /usr/local/src/
[root@xuegod63 src]# cd /usr/local/src/mysql-5.5.30/
3)Mysql 5.5.15使用了新的cmake编译方式,所以先安装cmake
cmake是什么?
CMake是一个跨平台的安装(编译)工具,可以用简单的语句来描述所有平台的安装(编译过程)。他能够输出各种各样的makefile或者project文件,能测试编译器所支持的C++特性,类似UNIX下的automake。
安装cmake:
[root@uplook mysql-5.5.30]# yum install -y cmake
#cmake-2.6.4-5.el6.x86_64.rpm软件包,RHEL系统自带,配置好yum源,
4)开始编译:
[root@xuegod63 mysql-5.5.30]# mkdir /server/
[root@xuegod63 mysql-5.5.30]# cmake -DCMAKE_INSTALL_PREFIX=/server/mysql-5.5 -DMYSQL_UNIX_ADDR=/tmp/mysql.sock -DDEFAULT_CHARSET=utf8 -DDEFAULT_COLLATION=utf8_general_ci -DWITH_EXTRA_CHARSETS=all -DWITH_MYISAM_STORAGE_ENGINE=1 -DWITH_INNOBASE_STORAGE_ENGINE=1 -DWITH_MEMORY_STORAGE_ENGINE=1 -DWITH_READLINE=1 -DENABLED_LOCAL_INFILE=1 -DMYSQL_DATADIR=/server/mysql/data -DMYSQL_USER=mysql
cmake 编译选项含意:
-DCMAKE_INSTALL_PREFIX=/server/mysql-5.5
#指定mysql安装的根目录,只要/server目录存在就可以了,mysql-5.5在安装时,会自动创建。这个值可以在服务器启动时,通过--basedir来设置。
-DMYSQL_UNIX_ADDR=/tmp/mysql.sock
#mysql服务器用于监听的套接字,这个必需是一个绝对路径,默认是/tmp/mysql.sock。在服务器启动时,可通过--socket 来改变。
-DDEFAULT_CHARSET=utf8
设置mysql默认使用utf8字符集,不指定,默认使用latin1 西欧字符集。
-DDEFAULT_COLLATION=utf8_general_ci #默认字符校对。 db.opt
DWITH_EXTRA_CHARSETS=all #指定mysql扩展字符集支持所有的字符集,默认mysql支持所有字符集
-DWITH_MYISAM_STORAGE_ENGINE=1
-DWITH_INNOBASE_STORAGE_ENGINE=1
-DWITH_MEMORY_STORAGE_ENGINE=1
#静态编译Myisam、Innobase、Memory存储引擎到mysql服务器。这样mysql服务器就支持这三种存储引擎了。
-DWITH_READLINE=1 #支持readline库。
-DENABLED_LOCAL_INFILE=1 #允许从本地导入数据,启用加载本地数据
-DMYSQL_DATADIR=/server/mysql/data#mysql数据库存放数据的目录
-DMYSQL_USER=mysql #指定运行mysql服务的用户
注:具体编译参数参考:
http://dev.mysql.com/doc/refman/5.5/en/source-configuration-options.ht ml
最终会像configure一样生成Makefile。
5)安装:
[root@xuegod63 mysql-5.5.30]# make -j 4
#注:-j 用来指定CPU核心数,可加快编译速度。
[root@xuegod63 mysql-5.5.30]# make install
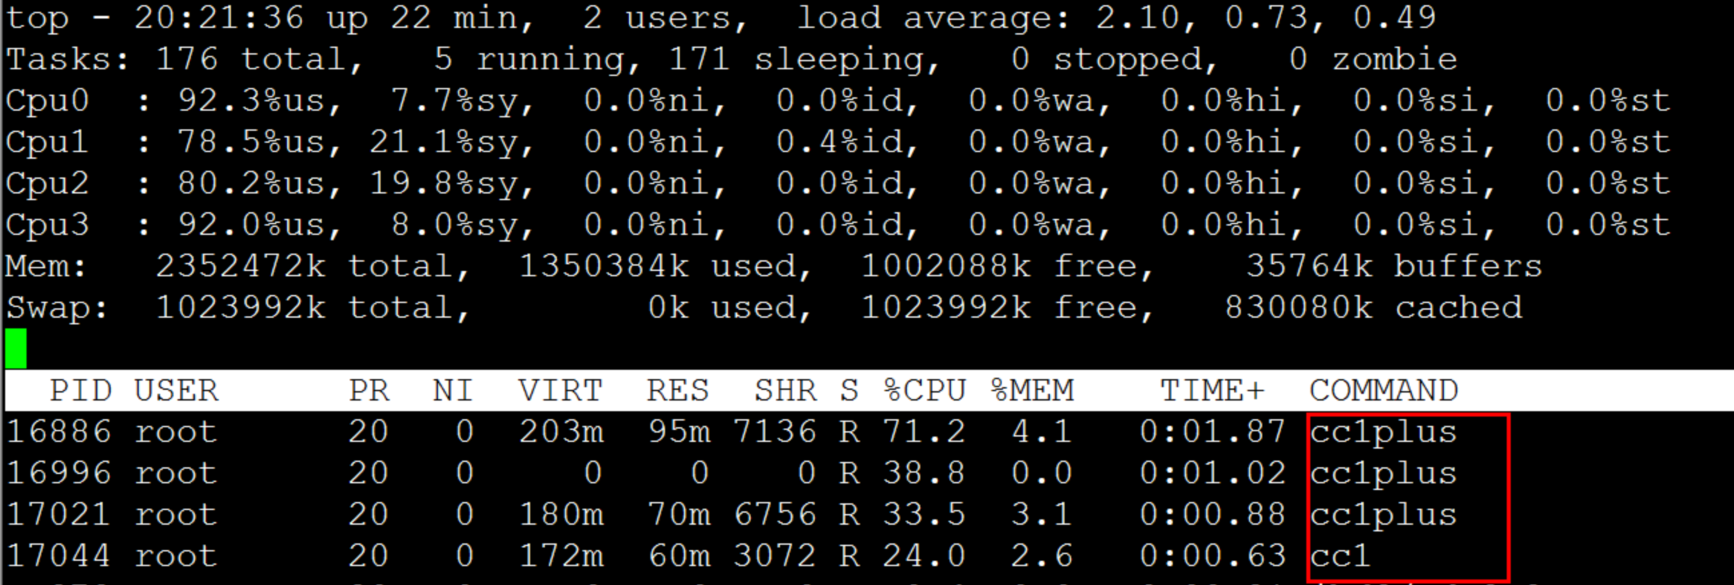
在编译时,查看CPU使用情况:
top-》P 查看CPU使用情况:

cc1plus #cc1plus是C++编译器程序,用于该软件对C++程序的编译功能。
扩展:
gcc是GNU Compiler Collection,它的意思是“GNU的编译器集合”,而不是“GNU C Compiler”.gcc就是所谓的front -end -driver, 由它驱动相应的编译器、汇编器、链接器来完成整个由源代码到可执行文件的处理过程。CC程序叫做C Compiler。在linux中CC是gcc的一软链接。
[root@xuegod63 mysql-5.5.30]# which cc
/usr/bin/cc
[root@xuegod63 mysql-5.5.30]# ll /usr/bin/cc
lrwxrwxrwx. 1 root root 3 Dec 18 2012 /usr/bin/cc -> gcc
6)配置mysql运行环境:
[root@xuegod63 mysql-5.5.30]# chown -R mysql:mysql /server/mysql-5.5#修改mysql安装目录权限,允许mysql用户对mysql数据库文件夹读写。
复制mysql配置文件
[root@xuegod63 mysql-5.5.30]# cp /usr/local/src/mysql-5.5.30/support-files/my-large.cnf /etc/my.cnf
设置mysqld5.5服务开机启动:
[root@xuegod63~]#cp/usr/local/src/mysql-5.5.30/support-files/mysql.server /etc/init.d/mysqld5.5
[root@xuegod63 ~]# chmod +x /etc/init.d/mysqld5.5
7)复制mysql开机启动文件,以后可以使用service命令来启动和关闭mysql
[root@xuegod63 ~]# vim/etc/init.d/mysqld5.5(编辑此文件,查找并修改以下变量内容:)
将原文件中:
basedir=
datadir=
修改成:
basedir=/server/mysql-5.5 #mysql安装目录
datadir=/server/mysql-5.5/data #mysql数据库存放数据的目录
加入开机启动项:
[root@xuegod63 Desktop]# chkconfig mysqld5.5 on
[root@xuegod63 Desktop]# chkconfig --list mysqld5.5
mysqld5.5 0:off 1:off 2:on 3:on 4:on 5:on 6:off
8)初始化编译mysql数据库:
[root@xuegod63 scripts]# pwd
/usr/local/src/mysql-5.5.30/scripts
[root@xuegod63 scripts]# chmod +x mysql_install_db
[root@xuegod63 scripts]# ./mysql_install_db --defaults-file=/etc/my.cnf --basedir=/server/mysql-5.5 --datadir=/server/mysql-5.5/data --user=mysql #类似于 rpm包
安装的mysql数据库,第一次启动弹出的消息
........
You can test the MySQL daemon with mysql-test-run.pl
cd /server/mysql-5.5/mysql-test ; perl mysql-test-run.pl
Please report any problems with the /server/mysql-5.5/scripts/mysqlbug script!
[root@xuegod63 scripts]#
9)开启mysql
[root@xuegod63 scripts]# /etc/init.d/mysqld5.5 start
Starting MySQL.... [ OK ]
10)测试登录:
[root@xuegod63 scripts]# mysql

11)设置mysqlroot密码:
[root@xuegod63 Desktop]# mysqladmin -uroot password ‘123456‘
[root@xuegod63 Desktop]# mysql -u root -p123456
12)设置mysql只允许局域组中的服务器和本地回环口连接3306端口:
[root@xuegod63 Desktop]# iptables -A INPUT -s 192.168.1.0/255.255.255.0 -p tcp --dport 3306 -j ACCEPT
[root@xuegod63 Desktop]# iptables -A INPUT -s 127.0.0.1 -p tcp --dport 3306 -j ACCEPT
[root@xuegod63 Desktop]# iptables -A INPUT ! -s 127.0.0.1 -p tcp --dport 3306 -j DROP
保存规则:
[root@wt1 mysql-5.5.24]# /etc/init.d/iptables save
LAMP 都运行在一台机器上
============================================================
3:安装PHP
PHP软件包:php-5.4.14.tar.bz2
1)解压 php-5.4.14.tar.bz2 软件包
[root@xuegod63 ~]# tar -jxvf php-5.4.14.tar.bz2 -C /usr/local/src/
[root@xuegod63 ~]# cd /usr/local/src/php-5.4.14/
2)源码编译安装
[root@xuegod63 php-5.4.14]# ./configure --prefix=/server/php-5.4 --with-mysql=/server/mysql-5.5 --with-apxs2=/usr/local/apache2/bin/apxs --with-config-file-path=/server/php-5.4
#弹出以一信息,说明php环境检查通过
。。。
Thank you for using PHP.
注解:
--prefix=/server/php-5.4 #安装PHP的目录
--with-apxs2=/usr/local/apache2/bin/apxs:用apache的apxs工具把php编译成apache的一个模块
--with-mysql=/usr/local/mysql:与mysql结合
--with-config-file-path=/usr/local/php#指定php配置文件路径
查看服务器原先参数:
[root@xuegod63 ~]# /server/php-5.4/bin/php -i | grep configure
Configure Command => ‘./configure‘ ‘--prefix=/server/php-5.4‘ ‘--with-mysql=/server/mysql-5.5‘ ‘--with-apxs2=/usr/local/apache2/bin/apxs‘ ‘--with-config-file-path=/server/php-5.4‘
PHP Warning: Unknown: It is not safe to rely on the system‘s timezone settings. You are *required* to use the date.timezone setting or the date_def
[root@xuegod63 ~]#make -j 4
[root@xuegod63 ~]#make install
扩展: 释放cache : 不建意这样做。
[root@xuegod63 vm]# free -m
total used free shared buffers cached
Mem: 2297 1642 654 0 29 1183
-/+ buffers/cache: 429 1867
Swap: 999 0 999
[root@xuegod63 vm]# sync #把内存中没有保存的数据,写到磁盘上。
[root@xuegod63 vm]# echo 3 > /proc/sys/vm/drop_caches
[root@xuegod63 vm]# free -m
total used free shared buffers cached
Mem: 2297 1642 654 0 29 64
-/+ buffers/cache: 429 1867
Swap: 999 0 999
3:)生成php配置文档:php.ini
[root@xuegod63 Desktop]# cp /usr/local/src/php-5.4.14/php.ini-production /server/php-5.4/php.ini
4)如果一切顺利,会成功一个模块:
[root@xuegod63 ~]# ls /usr/local/apache2/modules/
httpd.exp libphp5.so
让apache支持PHP模块:
[root@xuegod63 Desktop]# vim /usr/local/apache2/conf/httpd.conf
<IfModule dir_module>
DirectoryIndex index.html index.php #默认首页支持index.php
</IfModule>

在此文件311行下,添加:
AddType application/x-httpd-php .php

5)重启服务,测试Apache及php支持
[root@xuegod63 Desktop]# cd /usr/local/apache2/htdocs/
[root@xuegod63 htdocs]# ls
index.html
[root@xuegod63 htdocs]# mv index.html index.html.back
[root@xuegod63 htdocs]# vim index.php
[root@xuegod63 htdocs]# cat index.php
<?php
phpinfo();
?>
[root@xuegod63 htdocs]# /etc/init.d/apachectl stop
[root@xuegod63 htdocs]# /etc/init.d/apachectl start

本文出自 “末班车” 博客,请务必保留此出处http://blxueyuan.blog.51cto.com/9673381/1870900
源码编译搭建LAMP环境
