首页 > 代码库 > 演示 zabbix LLD(Low-Level Discovery) 如何使用
演示 zabbix LLD(Low-Level Discovery) 如何使用
演示 zabbix LLD(Low-Level Discovery) 如何使用
2016/11/30
目的:以监控 couchbase 上多个 buckets 的需求来举例说明 zabbix lld 是如何工作的。
关于 lld,网络上的文章也挺多的,希望自己能写一个简单明了的 howto 来帮助初学者。
一、准备工作
1、【zabbix-agent】
1)脚本示例
[root@node33 scripts]# cat monitor_couchbase.sh
#!/bin/bash
#
#2016/11/25
#v1.3
#PC
#echo "[`date`] $1 $2 $3" >>/tmp/test.log

cb_opts=‘-c 127.0.0.1:8091 -u Administrator -p xxx‘
curl_opts=‘-s -u Administrator:xxx http://127.0.0.1:8091/pools/default/buckets‘

##
usage(){
    cat <<_EOF

usage:  $0  [cluster_info|cluster_list|cluster_healthy]
        $0  [node_healthy|node_active]
        $0  [bucket_list|bucket_info|bucket_lld]

_EOF
}

###### cb cluster details ######
cb_cluster_info(){
    /opt/couchbase/bin/couchbase-cli server-info $cb_opts
}

cb_cluster_list(){
    /opt/couchbase/bin/couchbase-cli server-list $cb_opts
}

cb_cluster_healthy(){
    cb_cluster_list |grep -o ‘8091 healthy active‘ |wc -l
}

###### cb current node status ######
cb_node_healthy(){
    local stat=`cb_cluster_info |jq ‘.status‘ |cut -d ‘"‘ -f2`
    if [ "X$stat" == "Xhealthy" ]; then echo 1; else echo 0;fi
}

cb_node_active(){
    local stat=`cb_cluster_info |jq ‘.clusterMembership‘ |cut -d ‘"‘ -f2`
    if [ "X$stat" == "Xactive" ]; then echo 1; else echo 0;fi
}

###### cb bucket details ######
cb_bucket_list(){
    /opt/couchbase/bin/couchbase-cli bucket-list $cb_opts |sed -E ‘/(bucketType|authType|saslPassword|proxyPort|numReplicas|ramQuota|ramUsed)/d‘
}

cb_bucket_info(){
    # exp:
    # memUsed, dataUsed, diskUsed, itemCount, diskFetches, opsPerSec, quotaPercentUsed
    local bucket_name=$1
    curl $curl_opts/$bucket_name |jq ".basicStats.$2" |cut -d ‘"‘ -f2
}

cb_bucket_lld_pre(){
    local buckets=`cb_bucket_list`
    echo $buckets |grep -o ‘ERROR‘ >/dev/null && exit 2
    for i in $buckets
    do
        printf ‘\t\t{\n‘
        echo -e "\t\t\t\"{#BUCKETNAME}\": \"$i\""
        printf ‘\t\t},\n‘
    done
}

cb_bucket_lld(){
    printf ‘{\n‘
    printf ‘\t"data": [\n‘
    cb_bucket_lld_pre |sed ‘$d‘
    printf ‘\t\t}\n‘
    printf ‘\t]\n‘
    printf ‘}\n‘
}

##
case $1 in
    cluster_info|cluster_list|cluster_healthy|node_healthy|node_active|bucket_list|bucket_info|bucket_lld)
        cb_$1 $2 $3
        ;;
    *)
        usage
        ;;
esac
2)zabbix-agent 配置示例
[root@node33 scripts]# cat /etc/zabbix/zabbix_agentd.d/userparameter_couchbase.conf
## cluster
UserParameter=couchbase.cluster.healthy[*], /bin/bash /etc/zabbix/scripts/monitor_couchbase.sh cluster_healthy
## node
UserParameter=couchbase.node.healthy[*], /bin/bash /etc/zabbix/scripts/monitor_couchbase.sh node_healthy
UserParameter=couchbase.node.active[*], /bin/bash /etc/zabbix/scripts/monitor_couchbase.sh node_active
## bucket
UserParameter=couchbase.bucket.discovery[*], /bin/bash /etc/zabbix/scripts/monitor_couchbase.sh bucket_lld
UserParameter=couchbase.bucket.get[*], /bin/bash /etc/zabbix/scripts/monitor_couchbase.sh bucket_info $1 $2
3)重启zabbix-agent
[root@node33 scripts]# service zabbix-agent restart
2、【zabbix-server】
1)测试 discovery 得到的数据
[root@zabbix-server ~]# zabbix_get -s 10.50.200.33 -k ‘couchbase.bucket.discovery‘
{
        "data": [
                {
                        "{#BUCKETNAME}": "account"
                },
                {
                        "{#BUCKETNAME}": "bbs"
                },
                {
                        "{#BUCKETNAME}": "client"
                },
                {
                        "{#BUCKETNAME}": "pay"
                },
                {
                        "{#BUCKETNAME}": "shop"
                }
        ]
}
2)如上所示的格式,才是 zabbix lld 执行后所期望得到的数据。
二、在 zabbix web 上配置模版和对应的 lld 规则
1)新建一个模版:zbx_couchbase
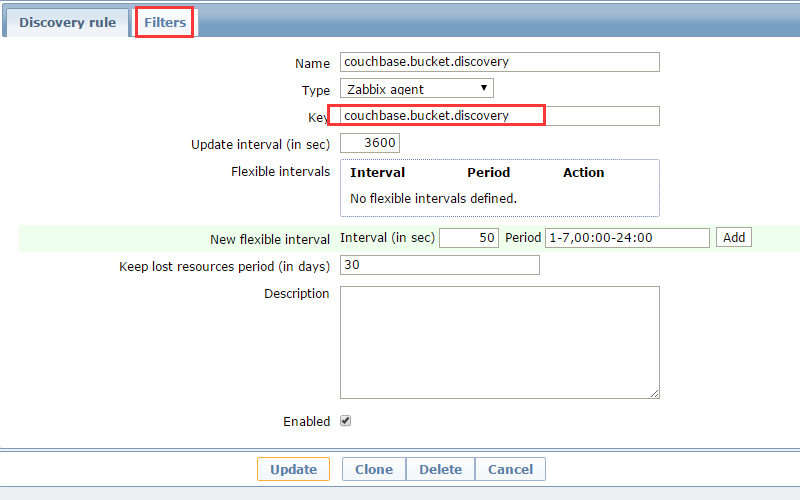
2)在模版中,选择“Discovery rules”,新增一个规则名:“couchbase.bucket.discovery”,重点是:
a. 在“key”中填写上一节在 zabbix-agent 中定义的名称:“couchbase.bucket.discovery”
b. 在“Filters”这一节增加一个 Macro 为:{#BUCKETNAME}(这个名称是在上一节的脚本中定义的,可以自定义)
3)下一步的重点是,增加几个“Item prototypes”,和普通的 Item 的区别在于:在 Key 中引用了上一步定义的 Macro,示例:
Name:	couchbase bucket [{#BUCKETNAME}] - quotaPercentUsed
Key:    couchbase.bucket.get[{#BUCKETNAME},quotaPercentUsed]
注:lld执行后,将获取到的每个 {#BUCKETNAME} 对应的值 ,自动生成对应的 Item,可以理解为一个循环操作。
4)接下来就是创建对应的 “Trigger prototypes”,在此处略过不提;
5)当然了,也可以在这个模版中增加几个普通的 items,triggers,graphs,在此略过不提;
6)请参考附图的示例。

F-01

F-02

F-03

F-04

F-05

F-06

F-07

F-08
演示 zabbix LLD(Low-Level Discovery) 如何使用
