首页 > 代码库 > Maven+nexus+svn部署打包过程
Maven+nexus+svn部署打包过程
1.软件版本
| 编号 | 软件 | 版本号 | |
| 1 | 系统版本 | Centos7 x64 | |
| 2 | Jdk版本 | 1.8.0_111 | |
| 3 | Jenkins版本 | 2.20 | |
| 4 | Svn版本 | 1.7.14 | |
| 5 | Maven | 3.3.9 | |
| 6 | Nexus | 2.14 | |
| 7 | Jenkins及svn服务器IP | 192.168.1.30 |
2.jdk安装(省略)
3.svn安装(省略)
4.nexus安装(如果已有nexus私服,此处步骤可省略)
官网下载最新的nexus安装包:
https://sonatype-download.global.ssl.fastly.net/nexus/oss/nexus-2.12.0-01-bundle.tar.gz
. 解压到相应的目录
解压包, 我这边放在/usr/local目录下。
tar -zxvf nexus-2.12.0-01-bundle.tar.gz -C /usr/local/
cd /usr/local
mv nexus-2.12.0-01 nexus
3. 设置为系统服务
这里需要使用root权限,具体请看http://books.sonatype.com/nexus-book/reference/install-sect-service.html
简单如下:
# cd /etc/init.d
# cp /usr/local/nexus/bin/nexus ./nexus
# chmod 755 nexus
# chkconfig --add nexus
# chkconfig --levels 345 nexus on
4. 编辑/etc/init.d/nexus的文本
4.1. 添加以下变量
RUN_AS_USER=root
NEXUS_HOME= /usr/local/nexus/
5. 启动服务
# service nexus start
具体可以看看附件中的详细的日志!

6. 启动之后,可以登录首页查看nexus的界面
http://192.168.1.30:8081/nexus/index.html
默认管理员用户名/密码: admin/admin123

5.maven安装
官网下载:
cd /usr/local
http://mirrors.cnnic.cn/apache/maven/maven-3/3.3.9/binaries/apache-maven-3.3.9-bin.tar.gz
tar -zxvf apache-maven-3.3.9-bin.tar.gz
mv apache-maven-3.3.9 maven
配置环境变量:
vim /etc/profile
export PATH=$PATH:/usr/local/zookeeper/bin:/usr/local/maven/bin
source /etc/profile
6.Jenkins安装
安装步骤省略,以下讲配置步骤。
Jenkins插件
菜单路径:系统管理—管理Jenkins—管理插件。
安装以下插件:
1) Maven Project Plugin
2) Subversion Plugin
3) Checkstyle Plugin
4) Findbugs Plugin
5) PMD Plugin
6) Warnings Plugin
Maven工程配置
Jenkins支持两种工程:FreeStyle工程和Maven工程。如果代码是用Maven构造的,可以直接建立Maven工程。
新建一个Maven工程后,需要设置以下条目:
1)设置svn代码的下载路径
2)设置自动构造的日期
3)设置pom文件的路径
4)设置mvn命令的参数
5)设置post-build的动作
配置JDK参数和maven参数:
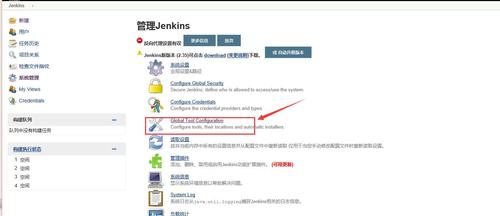
回到“系统管理”,点击“Global Tool Configuration”:

配置JDK路径:

配置MAVEN:

配置完成,点击“save”保存完成添加jdk和maven的环境变量配置
7.配置构建一个项目工程
说明,通过使用maven的setting.xml配置文件做为默认程序文件,在setting.xml加入远程私服地址,可以调用远程nexus私服的jar包setting.xml需要加入的配置如下:
<profiles>
<profile>
<id>nexus</id>
<repositories>
<repository>
<id>nexus_private</id>
<name>local private
nexus</name>
<url>http://192.168.1.30:8081/nexus/content/groups/public/</url>
<releases>
<enabled>true</enabled>
</releases>
<snapshots>
<enabled>true</enabled>
</snapshots>
</repository>
</repositories>
<pluginRepositories>
<pluginRepository>
<id>nexus_private</id>
<name>local private nexus</name>
<url>http://192.168.1.30:8081/nexus/content/groups/public/</url>
<releases>
<enabled>true</enabled>
</releases>
<snapshots>
<enabled>true</enabled>
</snapshots>
</pluginRepository>
</pluginRepositories>
</profile>
</profiles>
在jenkins上的配置为回到“系统管理”,点击“Global Tool Configuration”:
在“Maven Configuration” ->> “Default settings provider”选择“Setting file in filesystem”,
然后在“File path”中输入setting.xml的路径:/usr/local/maven/conf/setting.xml

构建生成的包类型是jar或者war包则由pom.xml文件配置指定
创建一个项目(创建一个自由风格的软件项目):
1)点击“新建”:

2)输入项目名称,选择“构建一个自由风格的软件项目”

点击OK,生成一个构建项目,并转入配置页面
3)配置项目:
配置自定义目录,如果不想将项目构建到默认的目录下(系统用户创建jenkins时会自动在用户下面创建一个目录workspace用于存放构建的项目,如果使用yum安装,那么会在/var/lib/Jenkins/wokspace下),可以自定义指定自己创建好的目录下:

在源码管理中选择Subversion:
Repository URL 表示项目工程在svn上的地址,即pom.xml所在路径。svn://192.168.1.30/java/bms
在“构建”中选择“Invoke top-level Maven targets”

选择上面配置的maven环境变量
填入svn地址同级目录下的pom.xml文件,在 “Goals”上输入maven需要执行的命令“clean package spring-boot:repackage”(此打包命令根据开发人员需求配置,可以询问开发人员),然后点击“高级”,出现隐藏的配置:

如果需要在构建完成后进行其他操作,。比如执行shell命令,可以在“构建”选项中选择“executec shell”,


添加完成,点击“save”保存,即可开始构建,点击“立即构建”,即可构建:

点击构建编号,进入构建页面:

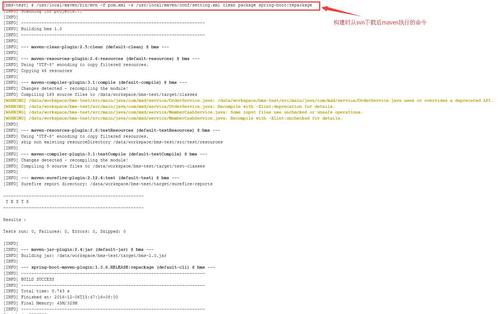
如果需要查看构建日志,可点击“Console Output”即可。

构建一个maven项目:
构建maven项目的操作方法与构建自由风格项目不一样的地方有:

配置“构建”时,pom.xml默认出来了,而且构建的工作目录是在此指定。

其他与构建自由风格项目操作一致
8.配置构建一个项目工程(直接使用pom.xml文件构建,私服在远程,此方法不推荐)
需要配置pom.xml文件,添加以下代码:
<repositories>
<repository>
<id>nexus_private</id>
<name>local private
nexus</name>
<url>http://192.168.1.30:8081/nexus/content/groups/public/</url>
<releases>
<enabled>true</enabled>
</releases>
<snapshots>
<enabled>true</enabled>
</snapshots>
</repository>
</repositories>
<pluginRepositories>
<pluginRepository>
<id>nexus_private</id>
<name>local private nexus</name>
<url>http://192.168.1.30:8081/nexus/content/groups/public/</url>
<releases>
<enabled>true</enabled>
</releases>
<snapshots>
<enabled>true</enabled>
</snapshots>
</pluginRepository>
</pluginRepositories>
1)点击“新建”:

2)输入项目名称,选择“构建一个自由风格的软件项目”

点击OK,生成一个构建项目,并转入配置页面
3)配置项目:
配置自定义目录,如果不想将项目构建到默认的目录下(系统用户创建jenkins时会自动在用户下面创建一个目录workspace用于存放构建的项目,如果使用yum安装,那么会在/var/lib/Jenkins/wokspace下),可以自定义指定自己创建好的目录下:

在源码管理中选择Subversion:
Repository URL 表示项目工程在svn上的地址,即pom.xml所在路径。svn://192.168.1.30/java/bms
在“构建”中选择“Invoke top-level Maven targets”

选择上面配置的maven环境变量
填入svn地址同级目录下的pom.xml文件,在 “Goals”上输入maven需要执行的命令“clean package spring-boot:repackage”

如果需要在构建完成后进行其他操作,。比如执行shell命令,可以在“构建”选项中选择“executec shell”:


Maven+nexus+svn部署打包过程
