首页 > 代码库 > linux学习笔记11
linux学习笔记11
apache 日志类型
1.普通日志格式(common logformat,CLF) common 大多数日志分析软件都支持这种格式
2.参考日志格式(referer logformat) referer 记录客户访问站点的用户身份
3.代理日志格式(agent log format) agent 记录请求的用户代理
4.综合日志格式(combined log format) combined 结合以上三种日志信息
1.虚拟主机的加密
在未制作之前

制作https://news.westos.com 发布页面
vim /etc/httpd/conf.d/music.conf
<Virtualhost *:443>
Servername music.westos.com
Documentroot /var/www/virtual/music.westos.com/html
Customlog "logs/music-443.log" combined
SSLEngine on
SSLCertificateFile /etc/pki/tls/certs/www.westos.com.crt
SSLCertificateKeyFile /etc/pki/tls/private/www.westos.com.key
</Virtualhost>

证书信息可在/etc/httpd/conf.d/ssl.conf中查看
注意:在vim中打开两个文件 :sp ssl.conf
crtl+ w 上 切换到上一个文件
crtl+ w 下 切换到下一个文件
检测

注意
在浏览器,访问 https://music.westos.com ,ssl.conf如果下配置
默认显示可以访问的一个存在的https界面,访问的是music的https,而不是https的defualt,
是因为/etc/httpd/conf.d/default.conf,并没有设置https的访问,并且/etc/httpd/conf.d/ssl.conf 没有生效/var/www/html
vim /etc/httpd/conf.d/ssl.conf
56 <VirtualHost _default_:443>
57
58 # General setup for the virtual host,inherited from global configuration
59 #DocumentRoot"/var/www/html"
60 #ServerName www.example.com:443
如果
vim /etc/httpd/conf.d/default.conf
<Virtualhost *:443>
Documentroot /var/www/html
Customlog "logs/default-443.log" combined
SSLEngine on
SSLCertificateFile /etc/pki/tls/certs/www.westos.com.crt
SSLCertificateKeyFile /etc/pki/tls/private/www.westos.com.key
</Virtualhost>
并且
vim /etc/httpd/conf.d/ssl.conf
56 <VirtualHost _default_:443>
57
58 # General setup for the virtual host, inheritedfrom global configuration
59 DocumentRoot"/var/www/html"
60 #ServerName www.example.com:443
在浏览器中访问 https://music.westos.com/,得到的结果页面就是default的https(443)。
2.网页重写
访问http://news.westos.com 自动跳转到https://news.westos.com
百度就是这样的哦~
vim /etc/httpd/conf.d/news.conf
<Virtualhost *:80>
Servername news.westos.com
RewriteEngine on
RewriteRule ^(/.*)$https://%{HTTP_HOST}$1 [redirect=301]
</Virtualhost>
<Directory "/var/www/virtual/news.westos.com/html">
Require all granted
</Directory>
<Virtualhost *:443>
Servername news.westos.com
Documentroot /var/www/virtual/news.westos.com/html
Customlog "logs/news-443.log" combined
SSLEngine on
SSLCertificateFile/etc/pki/tls/certs/www.westos.com.crt
SSLCertificateKeyFile /etc/pki/tls/private/www.westos.com.key
</Virtualhost>
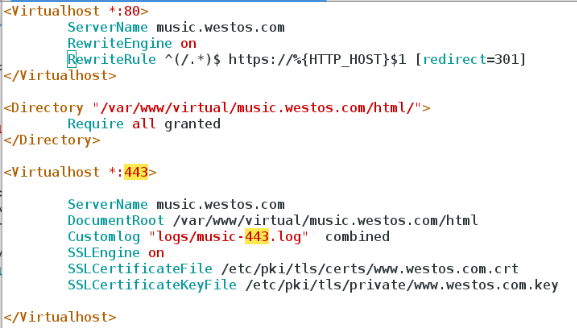
检测


http下可执行脚本
1.php
yum install php -y
vim /var/www/html/index.php
<?php
phpinfo ();
?>
vim /etc/httpd/conf/httpd.conf
166 <IfModule dir_module>
167 DirectoryIndex index.phpindex.html
168 </IfModule>

检测

2.cgi
cd /var/www/html/
mkdir cgi
1)vim/var/www/html/cgi/index.cgi 编写cji脚本主页
#!/usr/bin/perl
print "Content-type:text/html\n\n";
print `date`;
查看apache帮助手册~

chmod +xindex.cgi 给脚本加可执行权限
未加执行权限显示此页面

加了以后,成功显示~~~
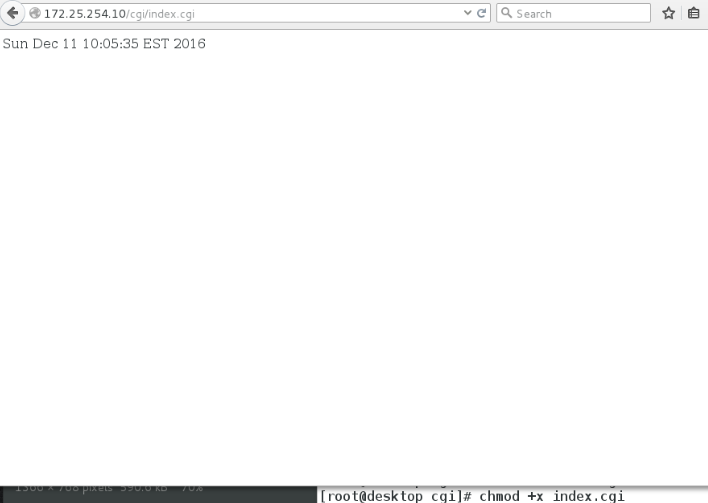
2)vim/etc/httpd/conf.d/default.conf使/var/www/html/cgi目录下的cgi文件可执行
<Directory"/var/www/html/cgi">
Options +ExecCGI
AddHandler cgi-script .cgi
</Directory>
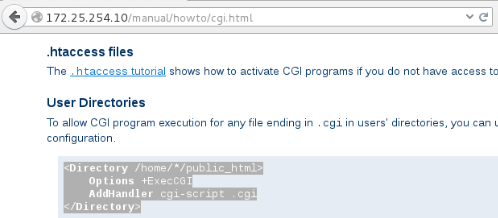
perl index.cgi 用perl执行cji脚本

检测
a)setenforce 0
http://172.25.254.230/cgi/index.cgi
成功显示~~~~
b)setenforce1
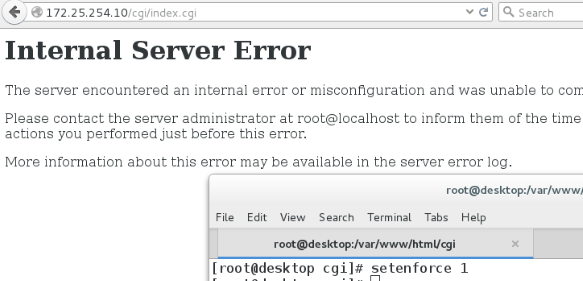
[root@web www]# ll -dZ cgi-bin/
drwxr-xr-x. root rootsystem_u:object_r:httpd_sys_script_exec_t:s0cgi-bin/
cgi-bin的上下文标签
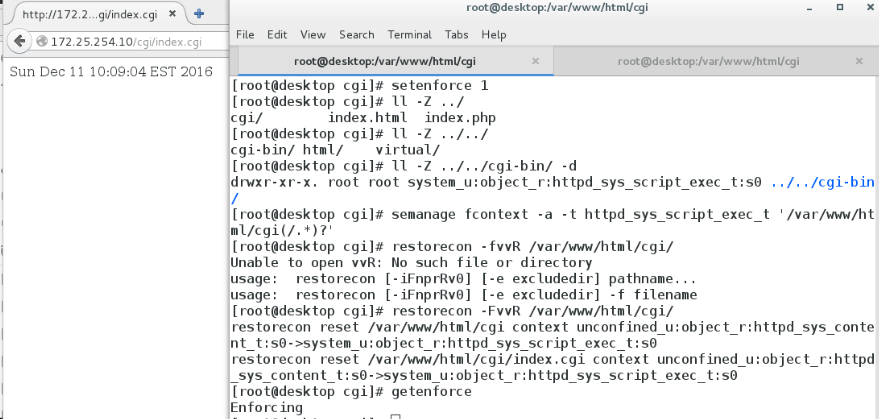
改变/var/www/html/cgi上下文标签为httpd_sys_script_exec_t(http可执行脚本)
semanage fcontext -a -thttpd_sys_script_exec_t ‘/var/www/html/cgi(/.*)?‘
restorecon -FvvR /var/www/html/cgi/
正向代理
服务器
yum install squid -y
56 http_access allow all
62 cache_dir ufs /var/spool/squid 10016 256
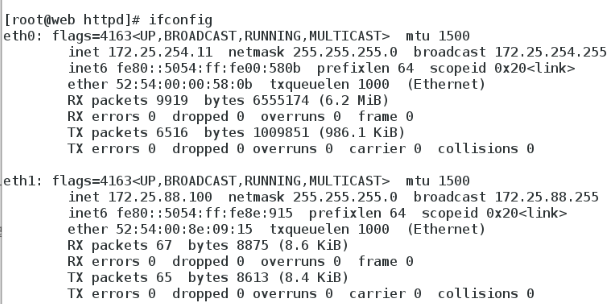
安装双网卡
添加网卡技能,GET~

eth0: inet 172.25.254.11
eth1: inet 172.25.88.100
真机 172.25.88.250
systemctl start httpd
systemctl stop firewalld
检测
客户端:172.25.88.10
在配置之前,客户端是不能访问真机的主页的。
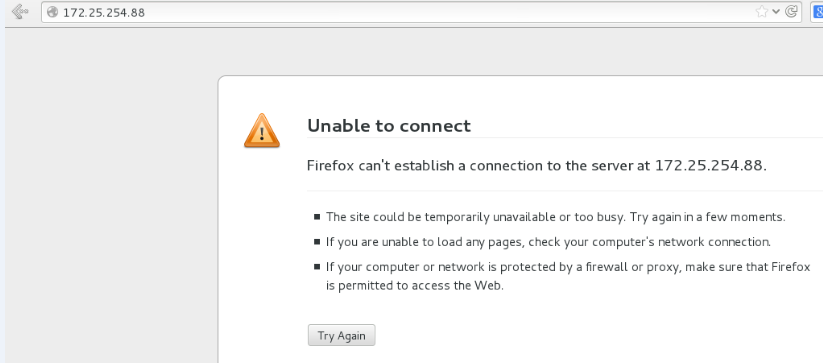
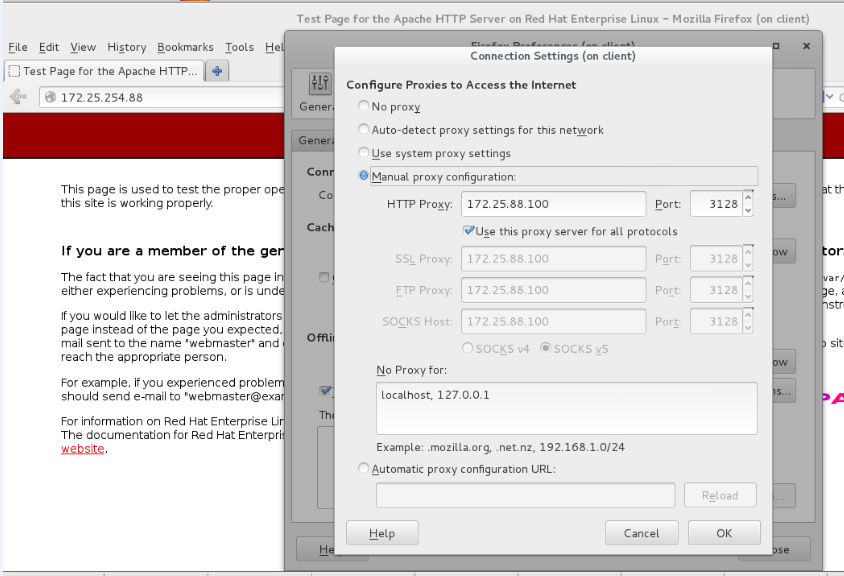
配置之后,在浏览器,通过代理访问172.25.254.88(别忘记写端口号~3128),但还是ping不通

正向代理和反向代理区别
正向代理:不需要知道,要访问哪个网站,客户端需要作配置
反向代理,明确的告诉上级要去拿什么,客户端不需要配置代理
交叉存储...
CDN加速
真机apache 172.25.88.250
服务器 172.25.88.100
56 http_access allow all
59 http_port 80 vhost vport
60 cache_peer 172.25.254.88 parent 80 0no-query
63 cache_dir ufs /var/spool/squid 100 16 256
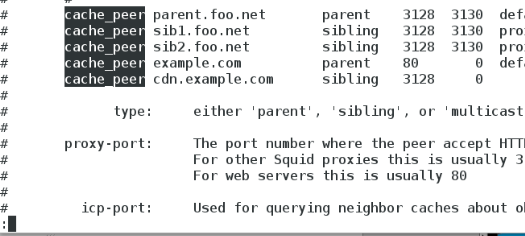
客户端 172.25.88.10
检测
在客户端,使用浏览器访问服务器(172.25.88.100),自动跳转到真机的apache主页(172.25.88.250)

轮询
真机 172.25.254.88
cat /var/www/html/index.html
lalalalala,i am 88.250
zhenji

虚拟机 172.25.88.251
cat /var/www/html/index.html
lalalalala,i am 88.251 xuniji

服务器
vim /etc/squid/squid.conf
56 http_access allow all
59 http_port 80 vhost vport
60 cache_peer 172.25.254.88 parent 80 0no-query originserver round-robin name=web1
61 cache_peer 172.25.88.251 parent 80 0no-query originserver round-robin name=web2
62 cache_peer_domain web1 web2www.miximixi.com
65 cache_dir ufs /var/spool/squid 100 16 256
客户端 172.25.88.100
vim /etc/hosts
172.25.88.100 www.miximixi.com
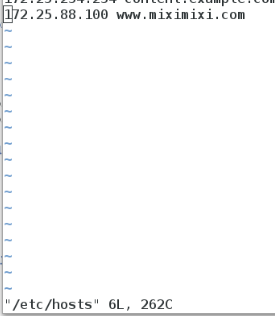
检验
在客户端浏览器中访问www.miximixi.com


SHELL
1.基础知识
1)运行一个脚本,就是开启一个新的shell,拥有一个新的环境。
vim /mnt/1.sh
#!/usr/bin/env tcsh
watch -n 1 date
chond +x /mnt/1.sh给脚本加执行权限
/mnt/1.sh 使用绝对路径执程序,才能看到效果
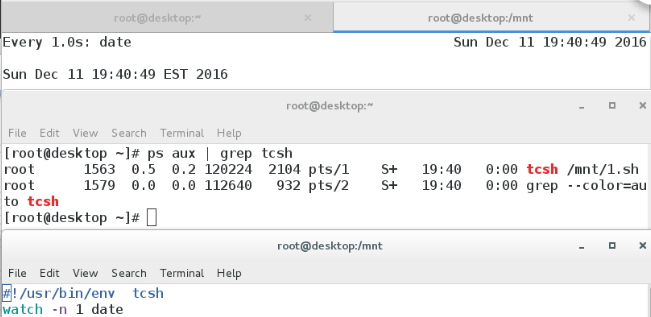
因为绝对路径执行shell,使用的是脚本文件中第一行#!指定的shell来执行命令(#!/usr/bin/env tcsh)
而 sh 1.sh 则是使用sh默认的bash执行脚本,所以使用过滤命令,没有效果~
2)引用 (就近匹配规则)
弱引号: "" 不能引用! \ $ `date`
强引号: ‘ ‘
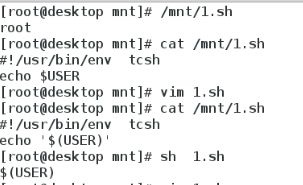
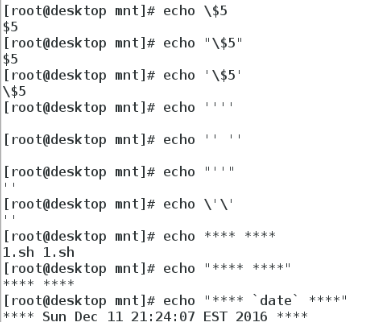


export 环境级变量,退出当前shell,变量就消失

~.bash_profile 和/etc/profile :
当~.bash_profile中内容存在时,先读~.bash_profile,否则读取/etc/bash_profile

3)$ PATH
echo $PATH
/bin – 用于用户的私有程序
/usr/local/bin – 本地开发、系统上的其他人使用的脚本
/usr/local/sbin - 本地开发、由root使用的脚本
执行ls命令的时候,系统会依照PATH的配置去每个PATH定义的目录下搜寻档名为ls的可运行档,如果在PATH定义的目录中含有多个档名为ls的可运行档,那么先搜寻到的同名命令先被运行!
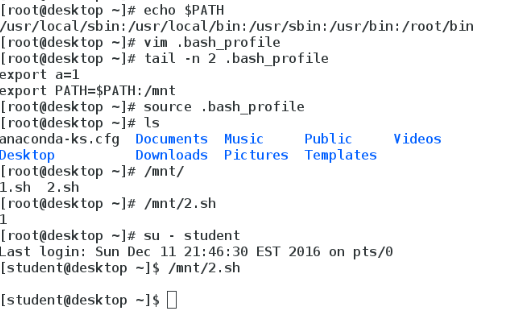
情景1:将ls由/bin/ls移动成为/root/ls
那么不管在哪个目录下输入任何与ls相关的命令,都无法执行ls
因为/root这个目录并不在PATH指定的目录中,所以,即使在/root目录下,也不能执行ls!
只能过绝对目录或相对目录来执行
解决方法:将/root加入PATH变量,就可以在"任何目录下"执行ls 了

注意:
1.本目录(.)最好不要放到PATH当中。
2.使用绝对路径或相对路径直接指定某个命令的档名来运行,会比搜寻PATH来的正确。
3.直接运行脚本和使用source命令运行脚本是不同的!
4)计算数值
I)echo $[1+2] echo $[2*2] echo$[2**3] echo $[2%3]
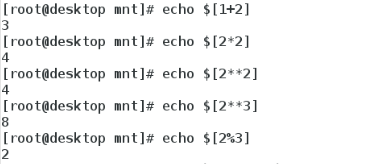
II)echo `expr 1 + 2`

III)let a=1+2 echo $a

IV)((a=3+2)) ((a++))
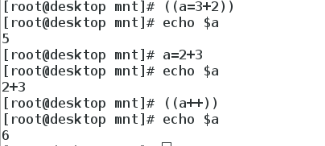
V)echo 2^3 |bc

5) $
$# 参数个数
$0 shellname
$1 the first argument
$* argument-list-part
$@ argument-list-whole
$$ shell‘s pid
$? shell exit stat (0:succeed,other:fail)

6)调试
脚本调试模式:
#!/bin/bash -x
# bash -x scripts
shel 脚本举例
一、数据的备份
1 for x in $(mysql -uroot -p1 -e"show databases;" -NE |grep -E "^\*|schema$" -v)
2 do
3 mysqldump -uroot -p1 $x >/mnt/database/$x.dump
4 done
5
6 echo ""
7 for DBDUMP in /mnt/database/*
8 do
9 SIZE=$(stat --printf "%s\n"$DBDUMP) 打印备份文件的大小
10 echo "$DBDUMP
11 $SIZE"
12 done
为了防止数据覆盖,可以在备份文件名中加`date`
mysql
-E --vertical Print the output of a query (rows)vertically.
-N --skip-column-names 跳过表头信息
二、ping 80-90 的主机,能ping通的显示up,不能的显示down
1)无参数的shell
I)方法一 for do done ,while do done
1 #!/bin/bash
2 for n in {80..90}
3 do
4 ping -c1 -w1 172.25.254.$n &>/dev/null #-c count –w wait ns
5 flag="$?"
6 while [ "$flag" -eq"0" ]
7 do
8 echo 172.25.254.$n is up
9 break
10 done
11
12 while [ "$flag" -ne"0" ]
13 do
14 echo 172.25.254.$n is down
15 break
16 done
17 done
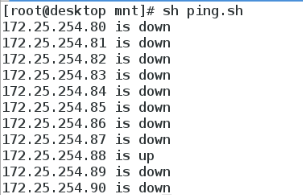
II)&&后,条件为真执行动作,||后,条件为假执行动作
1 #!/bin/bash
2 for n in {80..90}
3 do
4 ping -c1 -w1 172.25.254.$n &> /dev/null && echo172.25.254.$n is up || echo 172.25.254.$n is down
5
6 done
2)shell参数为指定ip
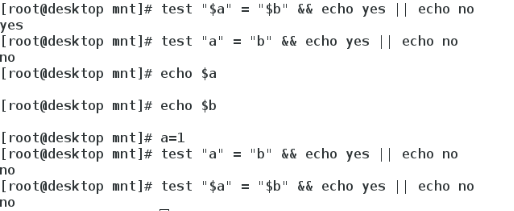
I)判断检测(test)
[ -z $a ] STRING zore
[ -n $a ] STRING nozore
[ -e $a ] file exist
[ file –ef file1 ] 比较两文件inode是否相等(是否互为硬链接)
[ file –ot file1 ] 比较file是否比file1 新
[ file –nt file1 ] 比较file是否比file1 老


1#!/bin/bash
2 [ -n "$*" ] && (
3 ping -c1 -w1 $* &>/dev/null&& echo $* is up || echo $* is down
4 )||(
5 echo please give me a ip addressfirst #错误提示
6 )
II)
三、倒计时
1.10s
1 #!/bin/bash
2 for ((SEC=10;SEC>=0;SEC--))
3 do
4 echo -n "After ${SEC}s is end "
5 echo -ne "\r"
6 sleep 1 使程序休眠1s,之后再执行
7 done
2.1m10s
1 #!/bin/bash
2 for ((MIN=5,SEC=10;SEC>=0;SEC--))
3 do
4
5 echo -n "After ${MIN}m ${SEC}s is end "
6 echo -ne "\r"
7 sleep 1
8
9 while [ "$MIN" -gt"0" -a "$SEC" -le "0" ]; 秒数减完,分钟数大于1时
10 do
11 ((MIN--))
12 SEC=60
13 done
14
15 done
3.1h1m5s
1#!/bin/bash
2 for ((HOUR=1,MIN=1,SEC=5;SEC>=0;SEC--))
3 do
4
5 echo -n "After ${HOUR}h ${MIN}m ${SEC}s is end"
6 echo -ne "\r"
7 sleep 1
8
9 while [ "$MIN" -gt"0" -a "$SEC" -le "0" ];
10 do
11 ((MIN--))
12 SEC=60
13 done
14
15 while [ "$MIN" -le"0" -a "$SEC" -le "0" -a "$HOUR"-gt "0" ];
16 do
17 ((HOUR--))
18 MIN=59
19 SEC=60
20 done
21
22 done
注意:
I)echo 默认会在结尾输出一个换行符
echo -n: do not output the trailing newline 不输出结尾的换行符
II)echo 默认开启 -E,默认不识别,转移字符(反斜杠)
echo -E disable interpretation ofbackslash escapes (default)
echo -e enable interpretation ofbackslash escapes 启用反斜杠转义的解释
III) echo -e "\其他参数"
\r 光标移至行首,但不换行(常作覆盖输出)
\f 换行但光标仍旧停留在原来的位置
\n 换行且光标移至行首
\a 滴滴~
\b 删除前一个字符 backspace

IV)为什么要用,两个\r???
五、判断一个数是不是在0~10
1#!/bin/bash
2 read -p "Please input a num: " NUM 外部传参
3 [ "$NUM" -ge "0" -a"$NUM" -le "10" ] && echo $NUM is in the range ||
4 (echo $NUM is out of the range)
六、检测文件类型 []
1 #!/bin/bash
2 if [ -e "$1" ]
3 then
4 [ -b "$1" ] && echoblockfile
5 [ -c "$1" ] && echoc block
6 [ -d "$1" ] && echodirectory
7 [ -f"$1" -a ! -L "$1" ] && echo regular-file
8 [ -L "$1" ] && echolink-file
9 else echo please input filename
10 fi
七、 useradd password username
request 1.no file
2.filelines diff
3.userexist
编写shell时,注意首先编写的是脚本主体,错误检测在最后写
1#!/bin/bash
2 if [ -n "$1" -a -n "$2" ] #判断参数是否为空
3 then
4 if [ -e $1 -a -e$2 ] #判断文件是否存在
5 then
6
7 USERLINE=`cat $1 | wc -l`
8 PASSLINE=`cat $2 | wc -l`
9
10 [ $USERLINE -eq $PASSLINE ] &&
#判断两个文件行数是否相等
11 (
12
13 for i in `seq $USERLINE`
14 do
15
16 #提取第i行的用户名# USERNAME=`sed -n ${i}p$1`
17 #提取第i行的密码# PASSWORD=`sed -n ${i}p$2`
18#检测用户是否存在,不用id,因为id看不到隐藏用户
CKUSER=`getent passwd$USERNAME`
19#如果用户不存在,才创建# [ -z "$CKUSER"] &&
20 (
21 useradd $USERNAME
22 echo $PASSWORD |passwd --stdin $USERNAME
23 )||echo "$USERNAME isexist"
24 done
25 )||echo "$1 and $2 have different lines"
26 elif [ ! -e $1 ]
27 then
28 echo "ERORR: $1 is notexit"
29 else
30 echo "ERORR: $2 is notexit"
31 fi
32 else
33 echo "ERROR : Pleaseinput userfile and password file after command!!!"
34 fi
八、case
1 #!/bin/bash
2 case $1 in
3 apple) echo banana
4 ;;
5 banana) echo apple
6 ;;
7 *)
8 echo error!
9 ;;
10 esac
九、expect
yum install expect -y
which expect
/usr/bin/expect
1)简单小程序
1.普通版
vim ask.sh
1 #!/bin/bash
2 read -p "what is your name:" NAME
3 read -p "how old are you: "AGE
4 read -p "what is your class:" CLASS
5 read -p "are you happy : "FEEL
6 echo $NAME is $AGE\‘s old $NAME is$CLASS student and $FEEL
vim anser.exp
1 #!/usr/bin/expect
2 spawn /mnt/shell/ask.sh监控文件的执行
3 expect "name"
4 send "cd\r"
5 expect "old"
6 send "80\r"
7 expect "class"
8 send "biansha\r"
9 expect "happy"
10 send "unhappy\r"
11 expect eof
12

2.进阶版(在命令行中输入回答)
1 #!/usr/bin/expect
2 set name [ lindex $argv 0 ]
3 set age [ lindex $argv 1 ]
4 set class [ lindex $argv 2 ]
5 set feel [ lindex $argv 3 ]
6
7
8
9 spawn /mnt/shell/ask.sh
10 expect "name"
11 send "$name\r"
12 expect "old"
13 send "$age\r"
14 expect "class"
15 send "$class\r"
16 expect "happy"
17 send "$feel\r"
18 expect eof
\r return 回车

2)ssh
1 #!/usr/bin/expect
2 set IP [ lindex $argv 0 ]
3 set PASS [ lindex $argv 1 ]
4 spawn ssh root@$IP
5 expect {
6 "yes/no"
7 { send "yes\r";exp_continue}
8 "password"
9 { send "$PASS\r"}
10 }
11 interact #停留在ssh的环境
十)检测1-10,是否开机,如果开机,显示主机名
作业
检测全班有多少台主机是开机的,在开机的主机上建立一个用户,更改用户的密码。
本文出自 “12049878” 博客,谢绝转载!
linux学习笔记11
