首页 > 代码库 > puppet集中配置管理系统
puppet集中配置管理系统
一、系统环境:rhel6.5 selinux and iptables disabled
物理主机:172.25.44.250
server:172.25.44.1 server1.example.com
client: 172.25.44.2 server2.example.com
client: 172.25.44.3 server3.example.com
注意:server和client之间要相互进行解析,时间同步,不然会验证失败。
二、安装配置以及证书获取:
安装的软件包:
server端:puppet-server-3.8.1-1.el6.noarch.rpm
puppet-3.8.1-1.el6.noarch.rpm
facter-2.4.4-1.el6.x86_64.rpm
hiera-1.3.4-1.el6.noarch.rpm
ruby-augeas-0.4.1-3.el6.x86_64.rpm
ruby-shadow-2.2.0-2.el6.x86_64.rpm
rubygem-json-1.5.5-3.el6.x86_64.rpm
rubygems-1.3.7-5.el6.noarch.rpm
client端: puppet-3.8.1-1.el6.noarch.rpm
hiera-1.3.4-1.el6.noarch.rpm
facter-2.4.4-1.el6.x86_64.rpm
rubygem-json-1.5.5-3.el6.x86_64.rpm
ruby-shadow-2.2.0-2.el6.x86_64.rpm
rubygems-1.3.7-5.el6.noarch.rpm
ruby-augeas-0.4.1-3.el6.x86_64.rpm
server端安装完启动服务:/etc/init.d/puppetmaster start
clientd端先不要开启服务。
获取证书:两种方法
/etc/puppet/配置目录:
组织结构如下:


puppet的第一个执行代码是在/etc/puppet/manifests/site.pp,因此这个文件必须存在,而其他的代码也要通过这个文件来调用。没有此文件puppet master无法启动,配置后面再定义。
第一种方法:server端手动生成签名
client先向服务端发送请求

server端进行手动签证

client端再次获取证书

第二种方法:server自动生成签名
修改server端的配置文件:
vim /etc/puppet/puppet.conf
第二行: autosign = true
vim /etc/puppet/autosign.conf
*.example.com
/etc/init.d/puppetmaster reload 修改配置文件后重启服务
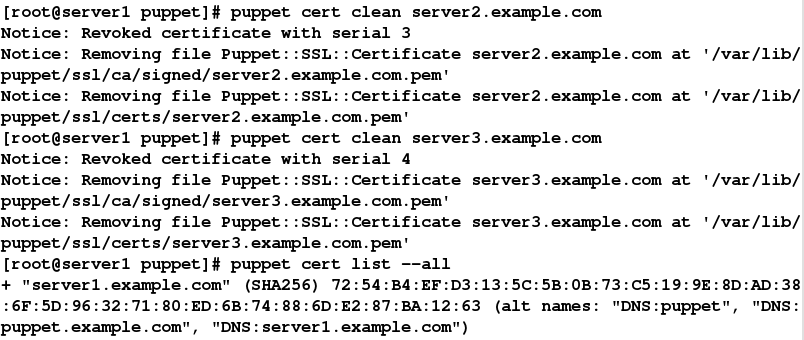
将server原有的签名删除

client端删掉原有证书的记录,再重新获取
rm -fr /var/lib/puppet/ssl/*
puppet agent --server server1.example.com --no-daemonize -vt
在实际中有时会修改client端的主机名,这样就需要重新生成证书。
三、puppet资源定义:
以下资源均定义在/etc/puppet/manifest/site.pp 文件中,在没有指定节点的情况下,对所有已经经过验证的 client 都生效。
1.创建文件:
server端:
vim /etc/puppet/site.pp
file {
"/tmp/li":
content => "www.xiaoze.org"
}
client端:
puppet agent --server server1.example.com --no-daemonize -vt
查看文件

当改变资源内容时,Hash码也会发生变化
server端:
passwd存储在/etc/puppet/files/目录下(自己创建)
vim /etc/puppet/fileserver.conf
[files]
path /etc/puppet/files
allow *
/etc/init.d/puppetmaster reload 重启服务
vim /etc/puppet/manifests/site.pp
file {
"/tmp/li":
source => "puppet:///files/passwd"
}
client端:
puppet agent --server server1.example.com --no-daemonize -vt
文件内容改变,Hash值也就跟着改变了
2.软件包定义:
server端:
vim /etc/puppet/manifests/site.pp
package {
"httpd":
ensure => present; 安装,卸载式absent
"vsftpd":
ensure => present
}
client端:
puppet agent --server server1.example.com --no-daemonize -vt
3.服务定义:
server端:
vim /etc/puppet/manifests/site.pp
service {
"httpd":
ensure => running; 开启服务
"vsftpd":
ensure => stopped 关闭服务
}
client端:
puppet agent --server server1.example.com --no-daemonize -vt
ps ax 可以查看所运行的进程
4.用户定义:
server端:
vim /etc/puppet/manifests/site.pp
user {
"lzk":
uid => 600,
home => "/home/lzk",
shell => "/bin/bash",
provider => useradd,
ensure => present,
password => westos
}
client端:
puppet agent --server server1.example.com --no-daemonize -vt
因为新建的用户"lzk",它的密码是明文的,这显然不符合安全的标准,如图:

需要利用配置文件进行改进,解决这个明文密码所带来的不安全性。
server端:
vim /etc/puppet/manifests/site.pp
在上面配置文件后面加上
exac {
"change passwd":
command => "echo redhat | passwd --stdin lzk",
path => "/bin:/usr/bin:/sbin:/usr/sbin",
onlyif => "id lzk"
}
client端:
puppet agent --server server1.example.com --no-daemonize -vt
可以看到明文密码变成hash加密过后的乱码,提高安全性

5.文件系统挂载:
server端:
vim /etc/puppet/manifests/site.pp
package {
"nfs-utils": 共享nfs文件系统需要安装
ensure => present
}
file {
"/public" :
ensure => directory
}
mount {
"/public":
device => "172.25.44.250:/mnt",
fstype => "nfs",
options => "defaults",
ensure => "mounted"
}
在物理主机上:
yum install -y vsftpd nfs-utils
vim /etc/exports
/mnt *(insecure,rw,async,no_root_squash)
exportfs -rv

如果端口号大于1024,则需要将 insecure 选项加入到配置文件(/etc/exports)相关选项中mount客户端才能正常工作。secure 选项要求mount客户端请求源端口小于1024(然而在使用 NAT 网络地址转换时端口一般总是大于1024的),默认情况下是开启这个选项的,如果要禁止这个选项,则使用 insecure 标识。
client端:
puppet agent --server server1.example.com --no-daemonize -vt


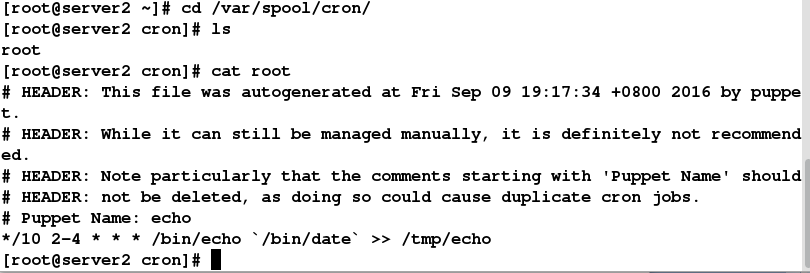
6.crontab任务
server端:
vim /etc/puppet/manifests/site.pp
cron {
echo:
command => "/bin/echo `/bin/date` >> /tmp/echo",
user => root,
hour => [‘2-4‘],
minute => ‘*/10‘
}
cilent端:
puppet agent --server server1.example.com --no-daemonize -vt
cd /var/spool/cron 任务生成在该目录下

四、编写模块
下面编写httpd模块:
server端:
cd /etc/puppet/manifests
mkdir node
vim /etc/puppet/manifests/site.pp
import ‘node/*.pp‘
cd node
vim server3.pp
node ‘server3.example.com‘
{
include httpd
}
mkdir /etc/puppet/modules/httpd/manifests -p
定义config.pp service.pp install.pp init.pp 这几个模块文件
vim insatll.pp

vim service.pp

vim config.pp

vim init.pp

mkdir /etc/puppet/modules/httpd/files -p
cp /etc/httpd/conf/httpd.conf /etc/puppet/modules/httpd/files/ 将配置文件放到模块定义的files目录中,不然执行会报错
client端:
puppet agent --server server1.example.com --no-daemonize -vt

注意:若出现如下报错,则是资源中文件的权限不够,最少为644
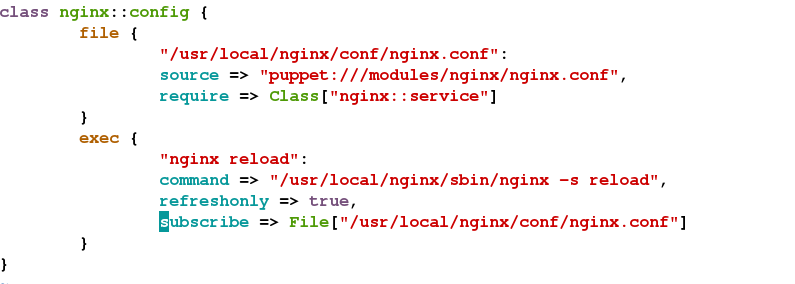
五、编写Nginx模块:
server端:
mkdir -p /etc/puppet/modules/nginx/manifests
mkdir -p /etc/puppet/modules/nginx/files
vim /etc/puppet/manifests/site.pp
import ‘node/*.pp‘
mkdir /etc/puppet/manifests/node
vim /etc/puppet/manifests/node/server3.pp
node ‘server3.example.com‘ {
include nginx
}

vim nginx.conf

vim nginx.sh

vim install.pp

vim service.pp

vim config.pp

vim init.pp

cilent端:
puppet agent --server server1.example.com --no-daemonize -vt

六、模板应用(添加虚拟主机)
文件放在templates目录中,以*.erb结尾
1. vim /etc/puppet/modules/httpd/manifests/init.pp

2. vim /etc/puppet/modules/httpd/templates/httpd_vhost.erb

3. vim /etc/puppet/manifests/node/server3.pp

4.修改配置文件 vim /etc/puppet/modules/httpd/files/httpd.conf
NameVirtualHost *:80
5.测试(记得添加虚拟主机的解析)
client端:
puppet agent --server server1.example.com --no-daemonize -vt
进行测试:


七、以Web的方式管理puppet
1.安装软件:
server端:
puppet-dashboard-1.2.23-1.el6.noarch.rpm
ruby-mysql-2.8.2-1.el6.x86_64.rpm
rubygem-rake-0.8.7-2.1.el6.noarch.rpm
2.创建数据库:
mysql> CREATE DATABASE dashboard_production CHARACTER SET utf8;
mysql> CREATE USER ‘dashboard‘@‘localhost‘ IDENTIFIED BY ‘westos‘;
mysql> GRANT ALL PRIVILEGES ON dashboard_production.* TO ‘dashboard‘@‘localhost‘;
3.修改配置服务:
vim /usr/share/puppet-dashboard/config/database.yml
—只留下生产环境配置—
production:
database: dashboard_production
username: dashboard
password: westos
encoding: utf8
adapter: mysq
rake RAILS_ENV=production db:migrate #建立 dashboard 所需的数据库和表
puppet-dashboard 默认时区不正确,需要修改:
# vi /usr/share/puppet-dashboard/config/settings.yml
time_zone: ‘Beijing‘
启动服务:
# service puppet-dashboard start
Starting Puppet Dashboard: => Booting WEBrick
=> Rails 2.3.14 application starting on http://0.0.0.0:3000
[ OK ]
# chmod 0666 /usr/share/puppet-dashboard/log/production.log
# service puppet-dashboard-workers start
实时报告汇总:
设置 server 端:
# vi /etc/puppet/puppet.conf
[main]
#添加以下两项
reports = http
reporturl = http://172.25.44.1:3000/reports
# service puppetmaster reload
设置 client 端:
# vi /etc/puppet/puppet.conf
[agent]
report = true
#添加以下行
# service puppet reload
在客户端安装完 puppet 后,并且认证完后,我们可以看到效果,那怎样让它自动与服务器同步
呢?默认多少分钟跟服务器同步呢?怎样修改同步的时间呢,这时候我们需要配置客户端:
(1) 配置 puppet 相关参数和同步时间:
# vi /etc/sysconfig/puppet
PUPPET_SERVER=server1.example.com #puppet master 的地址
PUPPET_PORT=8140
#puppet 监听端口
PUPPET_LOG=/var/log/puppet/puppet.log #puppet 本地日志
#PUPPET_EXTRA_OPTS=--waitforcert=500 【默认同步的时间,我这里不修改这行参数】
(2) 默认配置完毕后,客户端会半个小时跟服务器同步一次,我们可以修改这个时间。# vi /etc/puppet/puppet.conf
[agent]
runinterval = 60
#代表 60 秒跟服务器同步一次
# service puppet reload
点击server3.example.com -> Recent reports -> log 可看到日志

八、nginx+passenger:
puppet默认使用基于ruby的WEBRickHTTP来处理HTTPS请求,单个服务器使用Apache/Nginx+Passenger替换掉 WEBRickHTTP,Passenger 是用于将 Ruby 程序进行嵌入执行的Apache 模块,实现对 puppet 的负载均衡。

yum install -y gcc gcc-c++ curl-devel zlib-devel openssl-devel ruby-devel
gem install rack passenger
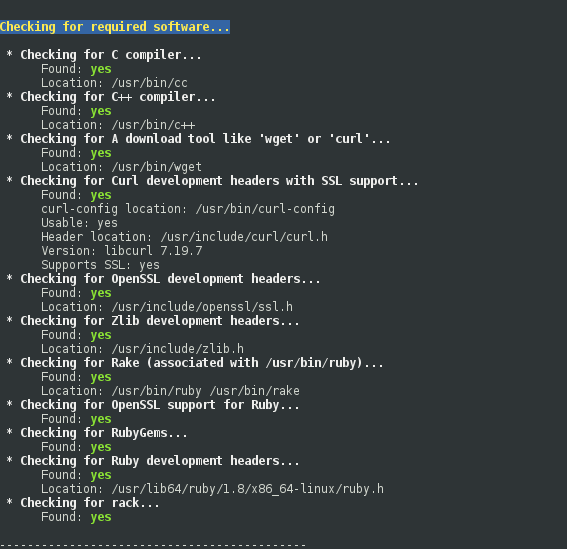
 passenger-install-nginx-module

确保所有的都是yes,为no的则退出,安装相应软件

脚本会自动安装 nginx 支持,按提示操作,基本就是一路回车,除了上图所示
vim /opt/nginx/conf/nginx.conf

..................
 mkdir /etc/puppet/rack/{public,tmp} -p
cp /usr/share/puppet/ext/rack/config.ru /etc/puppet/rack/
chown puppet.puppet /etc/puppet/rack/config.ru
/etc/init.d/puppetmaster stop
/opt/nginx/sbin/nginx -t
/opt/nginx/sbin/nginx
puppetmaster 不需要启动 , nginx 启动时会自动调用 puppet。

本文出自 “11721816” 博客,转载请与作者联系!
puppet集中配置管理系统
