首页 > 代码库 > LED驱动程序 S3C6410
LED驱动程序 S3C6410
这两天写了个LED驱动程序,网上也看了好多的帖子。
开始思路很清晰了,就是先看电路图,发现LED灯是接在GPM端口上的,
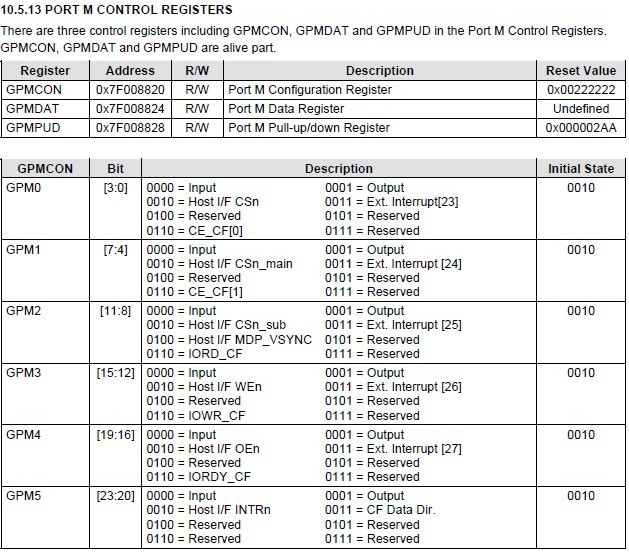
然后看S3C6410数据手册,先向GPMCON口写命令字,让GPM0-5设置为输出,再向GPMDAT口写数据字,在GPM0-5引脚拉低或拉高电平,
从而控制LED的亮灭。
1、电路图

很显然LED灯是接在GPM口引脚下面的
2、数据手册

3、LED驱动程序
- #include <linux/module.h>
- #include <linux/kernel.h>
- #include <linux/fs.h>
- #include <linux/uaccess.h> /*copy_to_user,copy_from_user*/
- #include <linux/io.h> /*inl(),outl()*/
- #include <linux/miscdevice.h>
- #include <linux/pci.h>
- static long S3C64XX_GPMCON=0xF4500820; /*这里是虚拟地址,物理地址可以再S3C6410数据手册上找到。也可以根据物理地址,ioremap()获得虚拟地址。*/
- static long S3C64XX_GPMDAT=0xF4500824;
- #define LED_MAJOR 240 /*主设备号*/
- int led_open(struct inode *inode,struct file *file)
- {
- unsigned tmp;
- tmp=inl(S3C64XX_GPMCON);
- printk("the pre GPMCON is %x",tmp);
- tmp=inl(S3C64XX_GPMDAT);
- printk("the pre GPMDAT is %x",tmp);
- outl(0x00111111,S3C64XX_GPMCON); /*向GPMCON命令端口写命令字,设置GPM0-5为output口*/
- printk("#############open#############");
- return 0;
- }
- static ssize_t led_read(struct file *file,char __user *buf,size_t count,loff_t * f_pos)
- {
- unsigned tmp=inl(S3C64XX_GPMDAT);
- int num=copy_to_user(buf,&tmp,count);
- if(num==0)
- printk("copy successfully");
- else printk("sorry copy failly");
- printk("the GPMDAT is %x.",tmp);
- return count;
- }
- static ssize_t led_write(struct file * file,const char __user * buf,size_t count,loff_t * f_pos)/*我是通过write()来控制LED灯的,也可以通过ioctl()来控制*/
- {
- char kbuf[10];
- printk("###########write###########");
- int num=copy_from_user(kbuf,buf,count);
- if(num==0)
- printk("copy successfully");
- else printk("sorry copy failly");
- printk("##the kbuf is %c",kbuf[0]);
- switch(kbuf[0])
- {
- case 0://off
- outl(0xff,S3C64XX_GPMDAT); /*拉高GPMDAT[0:5]的引脚,使LED灯灭,因为LED是低电平有电流通过*/
- break;
- case 1://on
- outl(0x00,S3C64XX_GPMDAT); /*拉低GPMDAT[0:5]的引脚,使LED灯亮*/
- break;
- default:
- break;
- }
- return count;
- }
- int led_release(struct inode *inode,struct file *file)
- {
- printk("#######release##########");
- return 0;
- }
- struct file_operations led_fops={
- .owner = THIS_MODULE,
- .open = led_open,
- .read = led_read,
- .write = led_write,
- .release = led_release,
- };
- int __init led_init(void)
- {
- int rc;
- printk("Test led dev\n");
- rc=register_chrdev(LED_MAJOR,"led",&led_fops);
- if(rc<0)
- {
- printk("register %s char dev error\n","led");
- return -1;
- }
- printk("OK!\n");
- return 0;
- }
- void __exit led_exit(void)
- {
- unregister_chrdev(LED_MAJOR,"led");
- printk("module exit\n");
- }
- module_init(led_init);
- module_exit(led_exit);
写好源码后,写Makefile
- obj-m:=led_driver.o
- KDIR:=/home/tmp/linux2.6.28
- all:
- make -C $(KDIR) M=$(shell pwd) modules CROSS_COMPILE=/usr/local/arm/4.4.1/bin/arm-linux-
/*之前make,出现一些问题,比如说缺少什么头文件啦之类,原来是没有建立内核树,到内核源码目录里面make一下就好了*/
写好驱动源代码和Makefile文件后就在本目录下make
之后生成了led_driver.ko文件,下载到开发板上
4、测试驱动程序
- #include <stdio.h>
- #include <sys/types.h>
- #include <sys/stat.h>
- #include <fcntl.h>
- /*#include <unistd.h>*/
- int main()
- {
- printf("hello led device .");
- char buf[10]={0,1,0,1};
- int fd=open("/dev/led",2,0777);
- if(fd<0){
- printf("can‘t open led device");
- return -1;
- }
- printf("open the led device successfully.");
- while(1)
- {
- int num=write(fd,&buf[0],1);
- if(num<0)
- printf("we set the led failly.");
- else printf("we set the led off");
- sleep(1);
- write(fd,&buf[1],1);
- printf("we set the led on");
- sleep(1);
- }
- close(fd);
- printf("bye led device .");
- return 0;
- }
arm-linux-gcc -o led_test.o led_test.c
编译好后,把led_test.o文件下载到开发板上
5、具体操作步骤
本人的OK6410开发板之前已装好linux-2.6.18内核的Linux系统,然后输shell命令
insmod led_driver.ko //加载led_driver.ko驱动到内核
mknod /dev/led c 240 0 //把led设备文件挂载到/dev/led上,c 代表字符设备 ,240 是主设备号 , 0 是次设备号
./led_test.o //启动测试程序,点亮LED灯
注意:
在PC机上写ARM开发板的驱动程序,需要在PC(俗称上位机)上配置交叉编译工具链 arm-linux-
开始想不通过驱动程序,通过iopl(3);提升权限,直接操作硬件的,发现在ARM开发板上不能这么做。
原来以为只能写驱动程序的方式控制寄存器的,后来发现,mmap()那个“/dev/mem”文件系统也可以的。
开始在开发板上调试,cat /var/log/messages 查看printk的输出,发现什么也没有,原来需要输入shell命令 klogd 来开启日志功能。
祝大家在开发板上玩的愉快。
