首页 > 代码库 > Google Authenticator SSH双重验证技术
Google Authenticator SSH双重验证技术
Technology - Site OPS
Google Authenticator
SSH双重验证技术
管理手册
目 录
第1章引言... 1
1.1 目的... 1
1.2 说明... 1
第2章 SSH 双重验证实现... 2
2.1 基础工作... 2
2.2 配置工作... 2
第3章手机客户端配置... 4
第4章 SSH 登录验证... 6
4.1XSHELL 登录验证... 6
4.2 跳板机登录... 7
4.3 总结... 8
第1章 引言
1.1 目的
SSH 安全隐患,在这我不多阐述,基于安全考虑,Linux系统服务器采用Googleauthenticator 身份验证,实现SSH双重验证技术,保证业务正常运行
1.2 说明
谷歌验证(GoogleAuthenticator)通过两个验证步骤,在登录时为用户的谷歌帐号提供一层额外的安全保护。使用谷歌验证可以直接在用户的设备上生成动态密码,无需网络连接。特点:自动生成QR码;支持多帐户;支持通过time-based和counter-based生成
当用户在Google帐号中启用“两步验证”功能后,就可以使用Google Authenticator来防止陌生人通过盗取的密码访问用户的帐户。通过两步验证流程登录时,用户需要同时使用密码和通过手机产生的动态密码来验证用户的身份。也就是说,即使可能的入侵者窃取或猜出了用户的密码,也会因不能使用用户的手机而无法登录帐户
验证登录必须保证SSH 服务器时间与手机终端时间同步
第2章 SSH双重验证实现
默认情况下,SSH已经在远程机器之间使用安全的数据通信;但是如果你想为自己的SSH连接添加另外某种安全层,可以添加谷歌身份验证器(Google Authenticator)双因子验证模块,该模块让你可以在连接到SSH服务器时,输入一个随机的一次性密码(TOTP)验证码。你在连接时,就得从智能手机或个人电脑输入这个验证码。
谷歌身份验证器是一种开源模块,实施了由谷歌开发的一次性通行码(TOTP)验证令牌。除了PAM(可插入验证模块)外,它还支持几种移动平台。这些一次性通行码是使用OATH(开放验证组织)制定的开放标准生成的。
2.1 基础工作
1) 安装相关依赖包
a) yum install pam-devel makegcc-c++ wget
2) 安装Google PAM
a) wget https://google-authenticator.googlecode.com/files/libpam-google-authenticator-1.0-source.tar.bz2
b) tar -xvflibpam-google-authenticator-1.0-source.tar.bz2
c) cdlibpam-google-authenticator-1.0
d) make;make install
2.2 配置工作
编译安装完成之后将会生成‘google-authenticator’工具,该工具用于生成key和code
1)执行Google-authenticator命令
[root@GoogleAuthenticator9 ~]# google-authenticator
Do you want authentication tokens to be time-based (y/n) y
https://www.google.com/chart?chs=200x200&chld=M|0&cht=qr&chl=otpauth://totp/root@GoogleAuthenticator9.abs.com.cn%3Fsecret%3DFEEJORGN5BMHRUN3
Your new secret key is: FEEJORGN5BMHRUN3
Your verification code is 357438
Your emergency scratch codes are:
47557618
80178077
46913492
98551493
84544589
Do you want me to update your"/root/.google_authenticator" file (y/n) y
Do you want to disallow multiple uses of the same authentication
token? This restricts you to one login about every 30s, but itincreases
your chances to notice or even prevent man-in-the-middle attacks(y/n) y
By default, tokens are good for 30 seconds and in order tocompensate for
possible time-skew between the client and the server, we allow anextra
token before and after the current time. If you experience problemswith poor
time synchronization, you can increase the window from its default
size of 1:30min to about 4min. Do you want to do so (y/n) y
If the computer that you are logging into isn‘t hardened againstbrute-force
login attempts, you can enable rate-limiting for the authenticationmodule.
By default, this limits attackers to no more than 3 login attemptsevery 30s.
Do you want to enable rate-limiting(y/n) y
2)SSH 配置工作
a) ChallengeResponseAuthenticationyes
b) UsePAM yes
c) PubkeyAuthentication no
3)添加认证
a) /etc/pam.d/sshd
auth required pam_google_authenticator.sosecret=${HOME}/.google_authenticator
4)重启服务
a) Service sshd restart
第3章 手机客户端配置
1)手机安装Google authenticator
a) iPhone 安装
i. http://itunes.apple.com/app/google-authenticator/id388497605?mt=8
b) Android 安装
i. https://play.google.com/store/apps/details?id=com.google.android.apps.authenticator
2)添加账号
a) URL 扫描
i. 通过浏览器,打开URL,利用Google authenticator 扫描工具扫描,立即获取账号验证
b) 手动添加账号
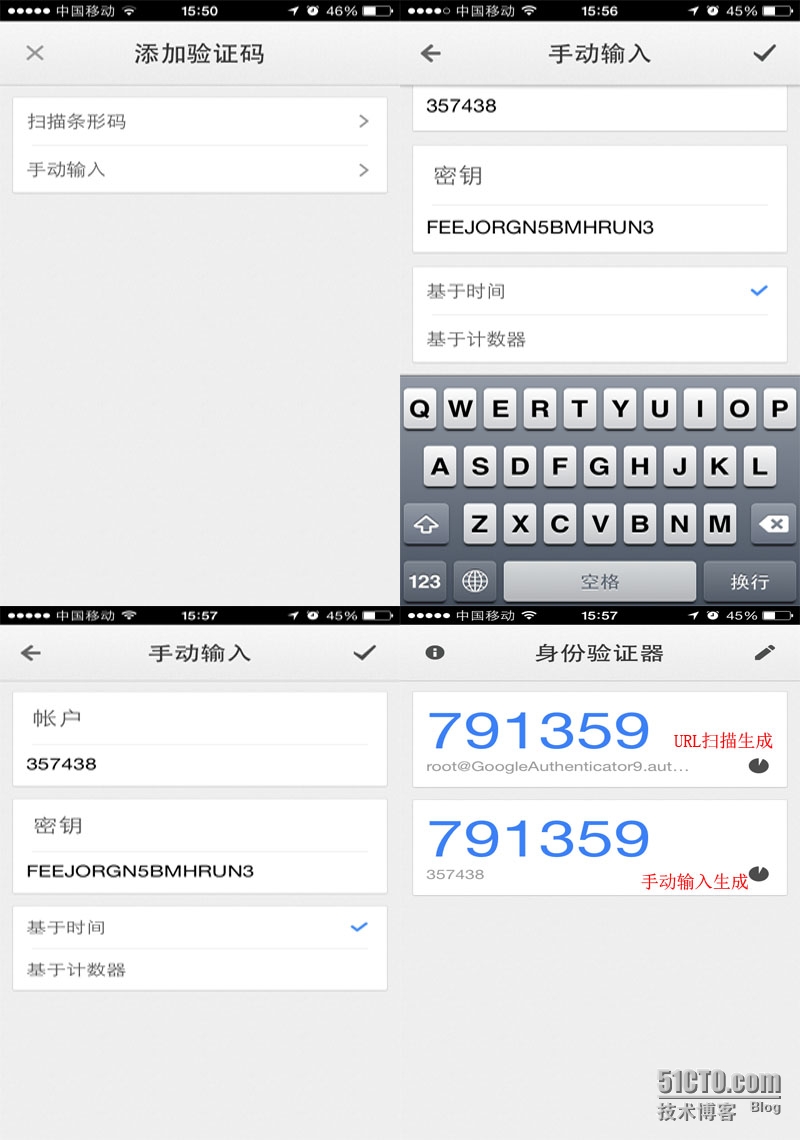
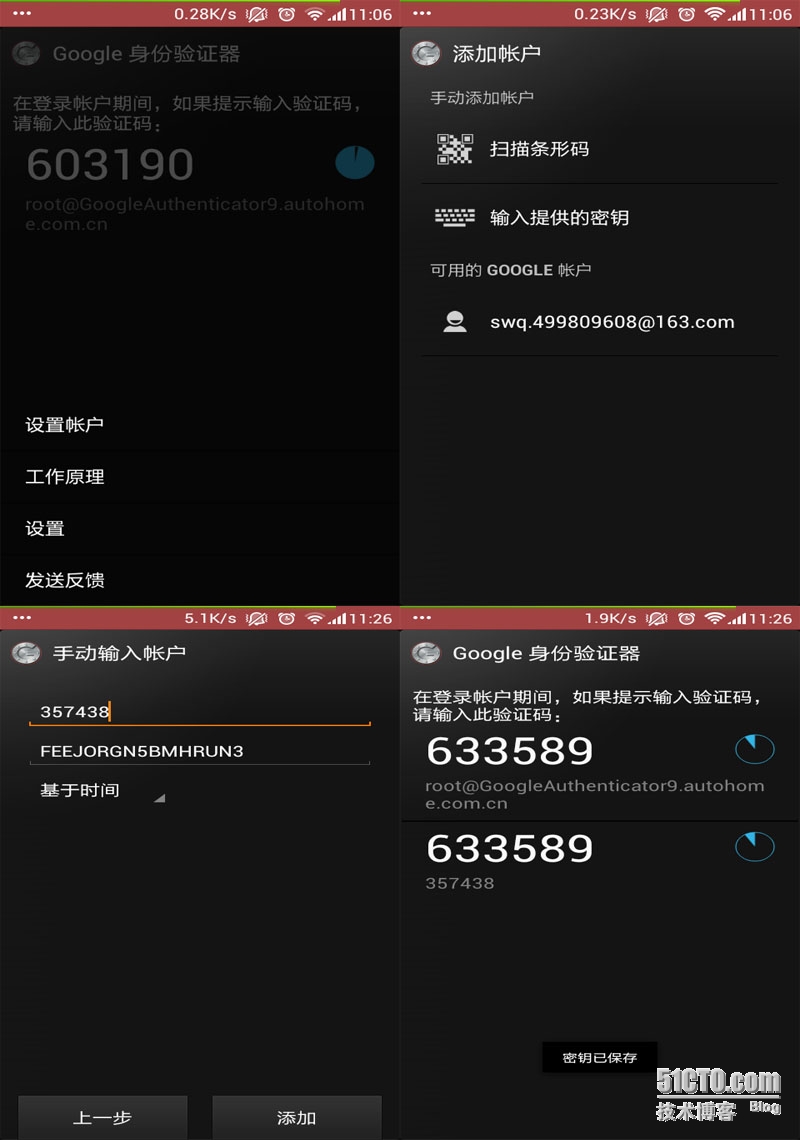
i. 手动输入code 和 key
ii. Your new secret key is: FEEJORGN5BMHRUN3
iii. Your verification code is 357438
3)iPhone Google authenticator图解
4)Android Google 身份验证图解
第4章 SSH 登录验证
4.1 XSHELL 登录验证
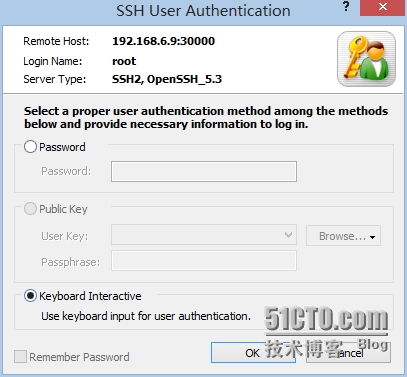
a) 打开XSHELL,登录服务器,选择keyboard Interactive
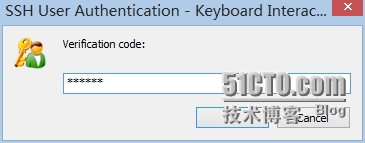
b) 输入框中输入code
c) 输入框中输入服务器密码
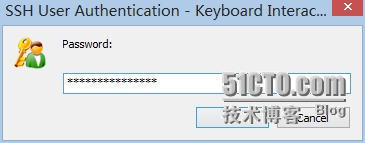
d) 进入服务器
e) 查看ssh登录日志信息

4.2 跳板机登录
1) Ssh connection 192.168.6.9
[root@AthController53 ~]# ssh 192.168.6.9 -p10000
The authenticity of host ‘[192.168.6.9]:10000([192.168.6.9]:10000)‘ can‘t be established.
RSA key fingerprint is51:b0:98:85:05:6e:4d:b5:8b:b4:a2:7e:d1:d2:a2:b5.
Are you sure you want to continue connecting (yes/no)? yes
2) 根据提示输入code
Warning: Permanently added ‘[192.168.6.9]:10000‘ (RSA)to the list of known hosts.
Address 192.168.6.9 maps to localhost, but this doesnot map back to the address –
POSSIBLE BREAK-IN ATTEMPT!
Verification code:
3) 输入密码
Password:
Last login: Thu Sep 11 13:16:41 2014 from 192.168.8.88
[root@GoogleAuthenticator9~]# ifconfig eth0
eth0 Link encap:Ethernet HWaddr FA:16:3E:FD:22:2A
inet addr:192.168.6.9 Bcast:192.168.15.255 Mask:255.255.240.0
UP BROADCAST RUNNING MULTICAST MTU:1500 Metric:1
RX packets:71714432 errors:0dropped:0 overruns:0 frame:0
TX packets:149214 errors:0 dropped:0overruns:0 carrier:0
collisions:0 txqueuelen:1000
RX bytes:5170948024 (4.8 GiB) TX bytes:10248495 (9.7 MiB)
[root@GoogleAuthenticator9 ~]#
4) 登录成功
4.3 总结
支持多key 集群,允许多台机器统一key管理,根据权限划分,不同的部门所生产不同的key,对应的用户所登录的key,规范用户登录权限管理
注意/root/google_authenticator文件权限,400 权限
本文出自 “欢迎评论,欢迎点赞” 博客,转载请与作者联系!
Google Authenticator SSH双重验证技术
