首页 > 代码库 > haproxy负载均衡的配置,以及haproxy+keeplived
haproxy负载均衡的配置,以及haproxy+keeplived
####Haproxy##########(http代理)###
准备三台虚拟机
yum install haproxy -y
cd /etc/haproxy/
vim haproxy.cfg
/etc/init.d/haproxy start
vim haproxy.cfg
将前端和后端的注释
#---------------------------------------------------------------------
# main frontend which proxys to the backends
#---------------------------------------------------------------------
#frontend main *:5000
# acl url_static path_beg -i /static /images /javascript /stylesheets
# acl url_static path_end -i .jpg .gif .png .css .js
# use_backend static if url_static
# default_backend app
#---------------------------------------------------------------------
# static backend for serving up images, stylesheets and such
#---------------------------------------------------------------------
#backend static
# balance roundrobin
# server static 127.0.0.1:4331 check
#---------------------------------------------------------------------
# round robin balancing between the various backends
#---------------------------------------------------------------------
#backend app
# balance roundrobin
# server app1 127.0.0.1:5001 check
# server app2 127.0.0.1:5002 check
# server app3 127.0.0.1:5003 check
# server app4 127.0.0.1:5004 check
listen lyitx *:80
balance roundrobin
server web1 172.25.50.30:80 check
server web2 172.25.50.40:80 check
/etc/init.d/haproxy start
netstat -anplt##可以看到80端口在haproxy上
开启sever4,server3 的httpd服务,写个测试页面
在真机上curl测试
[root@real Desktop]# curl 172.25.50.10
<h1>server3.example.com</h1>
[root@real Desktop]# curl 172.25.50.10
Server4.example.com
[root@real Desktop]# curl 172.25.50.10
<h1>server3.example.com</h1>
[root@real Desktop]# curl 172.25.50.10
Server4.example.com
##############监控页面添加认证####################
listen admin *:8080
stats enable
stats uri /status
stats auth admin:lyitx##admin是登陆的用户名lyitx是密码
stats refresh 5s
listen lyitx *:80
balance roundrobin
server web1 172.25.50.30:80 check
server web2 172.25.50.40:80 check
/etc/init.d/haproxy reload
再在浏览器上;
172.25.50.10:8080/status


/////////////设置前后端//////////////
listen admin *:8080
stats enable
stats uri /status
stats auth admin:lyitx
stats refresh 5s
frontend lyitx *:80
default_backend app
backend static
balance roundrobin
server web1 172.25.50.30:80 check
backend app
balance roundrobin
server web1 172.25.50.40:80 check
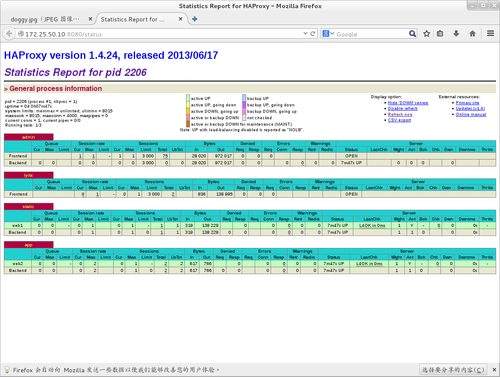
再在浏览器上;
172.25.50.10:8080/status

//////////////////////动静分离///////////////////////////////
vim haproxy.cfg
listen admin *:8080
stats enable
stats uri /status
stats auth admin:lyitx
stats refresh 5s
frontend lyitx *:80
acl url_static path_beg -i /images
acl url_static path_end -i .jpg .gif .png
use_backend static if url_static
default_backend app
backend static
balance roundrobin
server web1 172.25.50.30:80 check
backend app
balance roundrobin
server web2 172.25.50.40:80 check
[root@server3 html]# mkdir images
[root@server3 html]# ls
images index.html
[root@server3 html]# cd images/
[root@server3 images]# ls
OSI.gif doggyt.jpg
在浏览器中:172.25.50.10/images/doggy.jpg

###########ACL+地址转发+重定向################
listen admin *:8080
stats enable
stats uri /status
stats auth admin:lyitx
stats refresh 5s
frontend lyitx *:80
acl url_static path_beg -i /images
acl url_static path_end -i .jpg .gif .png
acl badhost src 172.25.50.250#设置禁止访问的ip。可以是个网段的
block if badhost
errorloc 403 http://172.25.50.10:8000#错误代码403的话,将地址转发到10主机上(在这之前将10主机的httpd打开,并将端口转换为8000(配置文件的136行))
redirect location http://172.25.50.10:8000 if badhost#badhost重定向
use_backend static if url_static
default_backend app
backend static
balance roundrobin
server web1 172.25.50.30:80 check
测试:172.25.50.10
////////////////////读写分离/////////////////////////
server2和server3都安装php
yum install php -y
在调度器server1上;
编辑配置文件:
vim haproxy.cfg
listen admin *:8080
stats enable
stats uri /status
stats auth admin:lyitx
stats refresh 5s
frontend lyitx *:80
acl url_static path_beg -i /images
acl url_static path_end -i .jpg .gif .png
acl lyitx.com hdr_beg(host) -i lyitx.com
acl badhost src 172.25.50.250
acl read method GET
acl read method HEAD
acl write method PUT
acl write method POST
# block if badhost
# errorloc 403 http://172.25.50.10:8000
# redirect location http://172.25.12.10:8000 if badhost
redirect code 301 location http://www.lyitx.com if lyitx.com
use_backend app if write
default_backend static
backend static
balance roundrobin
server web1 172.25.50.30:80 check
backend app
balance roundrobin
server web2 172.25.50.40:80 check
/etc/init.d/haproxy reload
真机上发送upload
[root@real Desktop]# scp -r upload/ 172.25.50.30:/var/www/html/
[root@real Desktop]# scp -r upload/ 172.25.50.40:/var/www/html/
在server3和server4上都进行如下操作
[root@server3 html]# ls
index.html upload
[root@server3 html]# cd upload/
[root@server3 upload]# ls
index.php upload_file.php
[root@server3 upload]# mv * ..
[root@server3 upload]# ls
[root@server3 upload]# cd ..
[root@server3 html]# ls
index.html index.php upload upload_file.php
[root@server3 html]# chmod 777 upload
[root@server3 html]# ll
total 16
-rw-r--r-- 1 root root 33 Feb 19 23:57 index.html
-rw-r--r-- 1 root root 257 Mar 18 03:36 index.php
drwxrwxrwx 2 root root 4096 Mar 18 03:44 upload
-rw-r--r-- 1 root root 927 Mar 18 03:36 upload_file.php
[root@server3 html]# vim upload_file.php
&& ($_FILES["file"]["size"] < 2000000))
[root@server3 html]# /etc/init.d/httpd restart
Stopping httpd: [ OK ]
Starting httpd: [ OK ]
[root@server3 html]# ls
index.html index.php upload upload_file.php
Server4和3重新启动httpd
在真机添加上解析后,在浏览器上www.lyitx.com


Keepalived+haproxy
编辑主从调度器的keepalived配置文件
把haproxy配置文件进行如下配置:
Vim /etc/haproxy/haproxy.cfg

在主调度器上:
[root@server1 ~]# cat /etc/keepalived/keepalived.conf
! Configuration File for keepalived
vrrp_script check_haproxy {
script "/opt/check_haproxy.sh"
interval 2
weight 2
}
global_defs {
notification_email {
root@localhost
}
notification_email_from Alexandre.Cassen@firewall.loc
smtp_server 192.168.200.1
smtp_connect_timeout 30
router_id LVS_DEVEL
}
vrrp_instance VI_1 {
state MASTER
interface eth0
virtual_router_id 51
priority 100
advert_int 1
authentication {
auth_type PASS
auth_pass 1111
}
virtual_ipaddress {
172.25.50.100
}
track_script {
check_haproxy
}
}
[root@server2 ~]# cat /etc/keepalived/keepalived.conf
! Configuration File for keepalived
vrrp_script check_haproxy {
script "/opt/check_haproxy.sh"
interval 2
weight 2
}
global_defs {
notification_email {
root@localhost
}
notification_email_from Alexandre.Cassen@firewall.loc
smtp_server 192.168.200.1
smtp_connect_timeout 30
router_id LVS_DEVEL
}
vrrp_instance VI_1 {
state BACKUP
interface eth0
virtual_router_id 51
priority 50
advert_int 1
authentication {
auth_type PASS
auth_pass 1111
}
virtual_ipaddress {
172.25.50.100
}
track_script {
check_haproxy
}
}
编写配置脚本文件,主从调度器都需要进行如下配置
[root@server2 ~]# cat /opt/check_haproxy.sh
#!/bin/bash
/etc/init.d/haproxy status &> /dev/null || /etc/init.d/haproxy restart &> /dev/null
if [ $? -ne 0 ];then
/etc/init.d/keepalived stop &> /dev/null
fi
[root@server2 ~]# chmod 755 /opt/check_haproxy.sh 给定权限755
配置完成后。
在真机上测试:
[root@real50 Desktop]# curl 172.25.50.100
<h2>server4.example.com</h2>
[root@real50 Desktop]# curl 172.25.50.100
<h1>server3.example.com</h1>
[root@real50 Desktop]# curl 172.25.50.100
<h2>server4.example.com</h2>
[root@real50 Desktop]# curl 172.25.50.100
<h1>server3.example.com</h1>
Vip 是在server1上的
[root@server1 ~]# ip addr show
1: lo: <LOOPBACK,UP,LOWER_UP> mtu 16436 qdisc noqueue state UNKNOWN
link/loopback 00:00:00:00:00:00 brd 00:00:00:00:00:00
inet 127.0.0.1/8 scope host lo
inet6 ::1/128 scope host
valid_lft forever preferred_lft forever
2: eth0: <BROADCAST,MULTICAST,UP,LOWER_UP> mtu 1500 qdisc pfifo_fast state UP qlen 1000
link/ether 52:54:00:06:13:fa brd ff:ff:ff:ff:ff:ff
inet 172.25.50.10/24 brd 172.25.50.255 scope global eth0
inet 172.25.50.100/32 scope global eth0
inet6 fe80::5054:ff:fe06:13fa/64 scope link
测试:将server1的网卡接口关闭,
[root@server1 ~]# ip link set down eth0
负载均衡调度依然正常,此时vip出现在server2主机上
[root@real50 Desktop]# curl 172.25.50.100
<h2>server4.example.com</h2>
[root@real50 Desktop]# curl 172.25.50.100
<h1>server3.example.com</h1>
[root@real50 Desktop]# curl 172.25.50.100
<h2>server4.example.com</h2>
[root@real50 Desktop]# curl 172.25.50.100
<h1>server3.example.com</h1>
[root@server2 ~]# ip addr show
1: lo: <LOOPBACK,UP,LOWER_UP> mtu 16436 qdisc noqueue state UNKNOWN
link/loopback 00:00:00:00:00:00 brd 00:00:00:00:00:00
inet 127.0.0.1/8 scope host lo
inet6 ::1/128 scope host
valid_lft forever preferred_lft forever
2: eth0: <BROADCAST,MULTICAST,UP,LOWER_UP> mtu 1500 qdisc pfifo_fast state UP qlen 1000
link/ether 52:54:00:07:bb:e5 brd ff:ff:ff:ff:ff:ff
inet 172.25.50.20/24 brd 172.25.50.255 scope global eth0
inet 172.25.50.100/32 scope global eth0
inet6 fe80::5054:ff:fe07:bbe5/64 scope link
valid_lft forever preferred_lft forever
把网卡端口打开后,serevr1继续接管vip,server2上的vip调转。

Realsever

测试成功!!!!!
haproxy负载均衡的配置,以及haproxy+keeplived
