首页 > 代码库 > 试用SpringBoot创建WEB应用
试用SpringBoot创建WEB应用
最近试用了一下Spring Boot,发现用它创建WEB应用简直好爽啊,记录一下。
首先用Eclipse建一个maven工程,创建时选中“Create a simple proejct (skip archetype selection)”,建个简单工程就好了。
然后编辑pom.xml,引入相关的包,完整文件如下:
<project xmlns="http://maven.apache.org/POM/4.0.0" xmlns:xsi="http://www.w3.org/2001/XMLSchema-instance"
xsi:schemaLocation="http://maven.apache.org/POM/4.0.0 http://maven.apache.org/xsd/maven-4.0.0.xsd">
  <modelVersion>4.0.0</modelVersion>
  <groupId>org.test</groupId>
  <artifactId>appboot</artifactId>
  <version>0.0.1</version>
  <name>appboot</name>
  <dependencies>
    <!-- 引入WEB开发支持 -->
    <dependency>
      <groupId>org.springframework.boot</groupId>
      <artifactId>spring-boot-starter-web</artifactId>
      <version>1.4.1.RELEASE</version>
    </dependency>
    <!-- 引入FreeMarker支持 -->
    <dependency>
      <groupId>org.springframework.boot</groupId>
      <artifactId>spring-boot-starter-freemarker</artifactId>
      <version>1.4.1.RELEASE</version>
    </dependency>
    <!-- 引入重编译自动加载支持,这样在Eclipse中调试时有变更会自动重新加载 -->
    <dependency>
      <groupId>org.springframework.boot</groupId>
      <artifactId>spring-boot-devtools</artifactId>
      <version>1.4.1.RELEASE</version>
      <optional>true</optional>
    </dependency>
    <!-- 引入fastjson,用于替换默认的json包 -->
    <dependency>
      <groupId>com.alibaba</groupId>
      <artifactId>fastjson</artifactId>
      <version>1.2.17</version>
    </dependency>
  </dependencies>
  <build>
    <finalName>appboot</finalName>
    <plugins>
      <!-- 引入maven打包支持 -->
      <plugin>
        <groupId>org.springframework.boot</groupId>
        <artifactId>spring-boot-maven-plugin</artifactId>
        <version>1.4.1.RELEASE</version>
        <executions>
          <execution>
            <goals>
              <goal>repackage</goal>
            </goals>
          </execution>
        </executions>
      </plugin>
    </plugins>
  </build>
</project>
添加应用程序入口文件Application.java,如下:
package org.me;

import org.springframework.boot.SpringApplication;
import org.springframework.boot.autoconfigure.SpringBootApplication;
import org.springframework.boot.autoconfigure.web.HttpMessageConverters;
import org.springframework.context.annotation.Bean;
import org.springframework.http.converter.HttpMessageConverter;

import com.alibaba.fastjson.serializer.SerializerFeature;
import com.alibaba.fastjson.support.config.FastJsonConfig;
import com.alibaba.fastjson.support.spring.FastJsonHttpMessageConverter;

@SpringBootApplication
public class Application {
    /**
     * 用fastjson作为默认的json编码器
     * @return
     */
    @Bean
    public HttpMessageConverters fastJsonHttpMessageConverters() {
        FastJsonHttpMessageConverter fastConverter = new FastJsonHttpMessageConverter();
        FastJsonConfig fastJsonConfig = new FastJsonConfig();
        fastJsonConfig.setSerializerFeatures(SerializerFeature.WriteDateUseDateFormat, SerializerFeature.WriteMapNullValue);
        fastConverter.setFastJsonConfig(fastJsonConfig);
        HttpMessageConverter<?> converter = fastConverter;

        return new HttpMessageConverters(converter);
    }

    /**
    * 应用程序入口
    * @param args
    */
    public static void main(String[] args) {
        //用SpringApplication启动
        SpringApplication.run(Application.class, args);
    }
}
如果只用默认的json编码器,那么只有main方法就够了。然后来写一个控制器,比如叫HomeController:
package org.me;

import java.util.Date;
import java.util.Map;

import org.springframework.stereotype.Controller;
import org.springframework.web.bind.annotation.RequestBody;
import org.springframework.web.bind.annotation.RequestMapping;
import org.springframework.web.bind.annotation.RequestMethod;
import org.springframework.web.bind.annotation.ResponseBody;

/**
 * 定义一个控制器
 */
@Controller
public class HomeController {
    /**
    * 定义一个login方法,映射到/login上,返回视图为home/login.ftl
    */
    @RequestMapping("/login")
    public String login(Map<String, Object> model) {
        model.put("time", new Date());
        model.put("message", "Hello, Spring Boot");

        return "home/login";
    }

    /**
    * 定义一个Json的调用
    */
    @RequestMapping(value = "/checkLogin", method = RequestMethod.POST)
    @ResponseBody
    public JsonResult checkLogin(@RequestBody LoginRequest request) {
        JsonResult result = new JsonResult();
        result.error = 2020;
        result.data = String.format("%s : %s", request.user, request.pass);

       return result;
    }
}
和用SpringMVC时没有什么不同。SpringBoot一般不推荐JSP视图引擎,所以这里使用了freemarker作为视图引擎。login方法里指定了视图为home/login,因此在src/main/resources/templates/home下创建视图login.ftl:
<!DOCTYPE html>
<html>
<head>
  <title>Login</title>
  <meta http-equiv="Content-Type" content="text/html; charset=UTF-8" />
  <link rel="stylesheet" href="http://www.mamicode.com/css/core.css" />
  <script src="http://www.mamicode.com/js/jquery-3.1.1.min.js"></script>
  <script>
  $(function(){
      $("#login").click(function(){
        $.ajax({
          url: "checkLogin",
        type: "POST",
        contentType: "application/json",
        dataType: "json",
        data: JSON.stringify({user:"admin", pass:"123"}),
        success: function(data) {
            $("#out").text(JSON.stringify(data));
        }
      });
    });
  });
  </script>
</head>
<body>
  DateTime: ${time?time}<br>
  Message: ${message}<br/><br/>
  <button id="login">登录</button><br/><br/>
  <div id="out"></div>
</body>
</html>
这个页面从控制器接收了time和message两个参数,用${}的形式显示在页面上。此外还包括了一个ajax调用,向后台请求checkLogin,并传入参数,显示返回值。
最后加个SpringBoot的配置文件,application.properties,放到src/main/resources下:
# APPLICATION SETTINGS (SpringApplication)
spring.main.web-environment=true
spring.main.show-banner=false

# EMBEDDED SERVER CONFIGURATION (ServerProperties)
server.port=8080

# FREEMARKER (FreeMarkerAutoConfiguration)
spring.freemarker.cache=false
spring.freemarker.templateEncoding=UTF-8
spring.freemarker.suffix=.ftl
其实主要是server.port参数,我们的工程内置了tomcat,这个参数指定了tomcat的绑定端口。
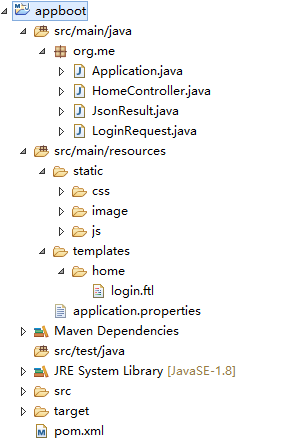
完整的项目结构如下:

默认情况下,视图放到resources/templates下,静态资源放到resources/static下。一切准备就绪,Ctrl+F11把工程跑起来吧,用浏览器访问 http://localhost:8080/login 就可以打开页面了。一但在Eclipse里修改了java文件,SpringBoot会自动重新加载,在开发调试时会很方便。
打包的时候,可以把整个项目的相关资源打成一个jar,这样用命令行就可以运行了。
mvn clean package
会在target下得到一个appboot.jar,这个jar里包含了用户代码的class文件、依赖的jar文件、视图文件、静态资源,会比较大,直接用命令行运行:
java -jar appboot.jar
一个完整的web应用就跑起来了,目标环境只要有JRE就够了,完全不用安装tomcat。虽然jar文件比较大,但是部署到远程环境的话可就方便多了。
本文出自 “兔子窝” 博客,请务必保留此出处http://boytnt.blog.51cto.com/966121/1866267
试用SpringBoot创建WEB应用
