首页 > 代码库 > Install Exchange 2016 CU3 on Windows server 2016
Install Exchange 2016 CU3 on Windows server 2016
1.Download Ex2016 cu3:
Exchange 2016 CU3:
Notable fixes and improvements are:
Added: Support for Windows Server 2016.
KB3154387: The DFS health set is listed as “Unhealthy” in an Exchange Server 2016 environment.
KB316916: Data loss may occur during public folder migration to Exchange 2013, Exchange 2016, or Exchange Online.
KB3190887: Upgrading Exchange Server causes the server to go offline unexpectedly
Download: Cumulative Update 3 for Exchange Server 2016 (KB3152589)
Download: Exchange Server 2016 CU3 UM Language Packs
View: Description of Cumulative Update 3 for Exchange Server 2016
View: Blog post of the Exchange Team about CU3 for Exchange Server 2016
2.Install Windows Feature:
Install-WindowsFeature NET-Framework-45-Features, RPC-over-HTTP-proxy, RSAT-Clustering,RSAT-Clustering-CmdInterface, RSAT-Clustering-Mgmt, RSAT-Clustering-PowerShell,Web-Mgmt-Console, WAS-Process-Model, Web-Asp-Net45, Web-Basic-Auth,Web-Client-Auth, Web-Digest-Auth, Web-Dir-Browsing, Web-Dyn-Compression,Web-Http-Errors, Web-Http-Logging, Web-Http-Redirect, Web-Http-Tracing,Web-ISAPI-Ext, Web-ISAPI-Filter, Web-Lgcy-Mgmt-Console, Web-Metabase,Web-Mgmt-Console, Web-Mgmt-Service, Web-Net-Ext45, Web-Request-Monitor,Web-Server, Web-Stat-Compression, Web-Static-Content, Web-Windows-Auth,Web-WMI, Windows-Identity-Foundation,RSAT-ADDS

3.Install Unified Communications Managed API 4.0 Runtime (UcmaRuntimeSetup.exe):http://www.microsoft.com/en-us/download/details.aspx?id=34992
Start-BitsTransfer -Source http://download.microsoft.com/download/2/C/4/2C47A5C1-A1F3-4843-B9FE-84C0032C61EC/UcmaRuntimeSetup.exe -Destination c:\temp\UcmaRuntimeSetup.exe

c:\temp\UcmaRuntimeSetup.exe /q
![]()
Install Exchange server 2016 CU3:
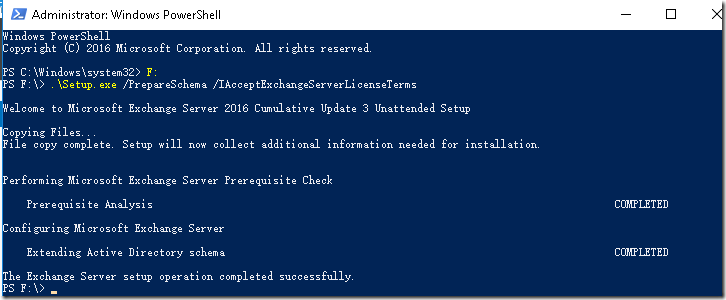
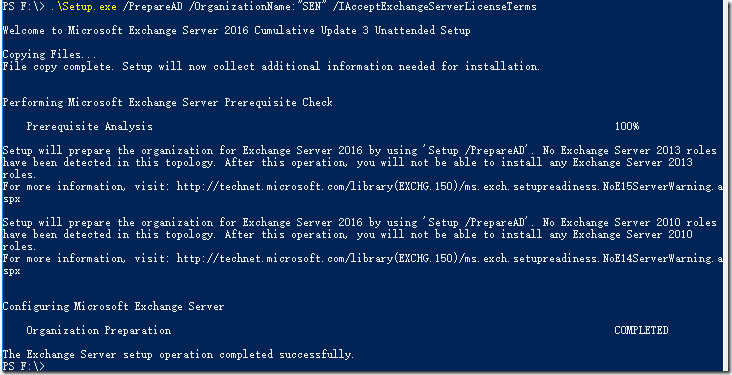
1)Prepare AD
.\Setup.exe /PrepareSchema /IAcceptExchangeServerLicenseTerms

.\Setup.exe /PrepareAD /OrganizationName:"SEN" /IAcceptExchangeServerLicenseTerms

.\Setup.exe /PrepareAllDomains /IAcceptExchangeServerLicenseTerms

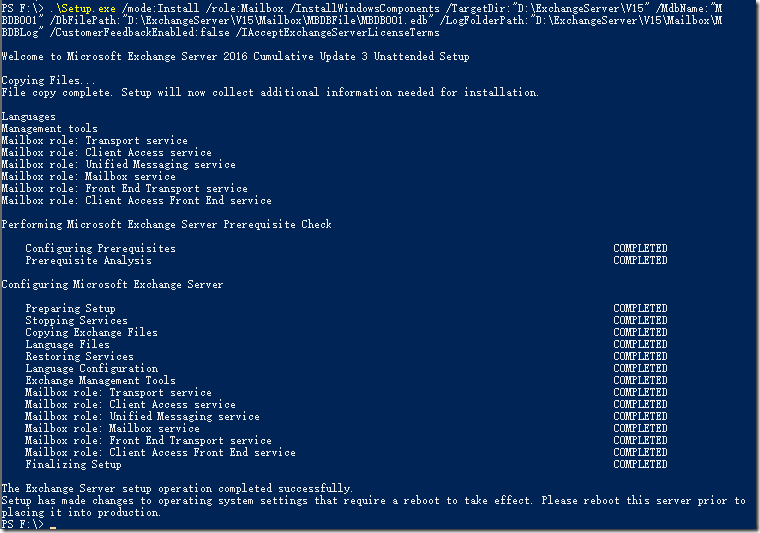
2)Install Ex2016 CU3:
.\Setup.exe /mode:Install /role:Mailbox /InstallWindowsComponents /TargetDir:"D:\ExchangeServer\V15" /MdbName:"MBDB001" /DbFilePath:"D:\ExchangeServer\V15\Mailbox\MBDBFile\MBDB001.edb" /LogFolderPath:"D:\ExchangeServer\V15\Mailbox\MBDBLog" /CustomerFeedbackEnabled:false /IAcceptExchangeServerLicenseTerms

. Post-Installation Tasks:
Set-ExchangeServer –Identity SEN-Ex01 -ProductKey *
1) Creating accepted domains
New-AcceptedDomain -Name Aplusnb -DomainName aplusnb.cn -DomainType Authoritative
2)Enable User Mailbox:
get-user -OrganizationalUnit "sen.hi.cn/SEN" | where-object {$_.RecipientType –eq “User”} | Enable-Mailbox | get-mailbox | select name,windowsemailaddress,database
3) Creating an email address policy
New-EmailAddressPolicy -Name Aplusnb -IncludedRecipients AllRecipients -ConditionalCompany "Aplusnb" -EnabledEmailAddressTemplates "SMTP:@aplusnb.cn"
Update-EmailAddressPolicy -Identity Aplusnb
get-mailbox | select name,windowsemailaddress,EmailAddresses,database
4)Configuring connectors
1. Send Connector:
New-SendConnector -Name "Send To Internet" -Internet -AddressSpaces "*" -DNSRoutingEnabled:$TRUE -SourceTransportServers "SEN-Ex01"
2.Configure ReceiveConnector:
Get-ReceiveConnector –Server SEN-Ex01
Get-ReceiveConnector “Default SEN-Ex01” | select Identity,PermissionGroups
Get-ReceiveConnector “Default SEN-Ex01” | Set-ReceiveConnector -PermissionGroups AnonymousUsers, ExchangeUsers, ExchangeServers, ExchangeLegacyServers
Get-ReceiveConnector
5) Configuring SSL certificates
$Data = http://www.mamicode.com/New-ExchangeCertificate -FriendlyName"SEN-Ex01_Certificate" -GenerateRequest -SubjectName "c=CN, o=NOS, cn=mail.sen.hi.cn" -DomainName mail.sen.hi.cn,autodiscover.sen.hi.cn,mail.aplusnb.cn,autodiscover.aplusnb.cn,sen-ex01.sen.hi.cn,sen-ex01,localhost -PrivateKeyExportable $true
Set-Content -path "\\Sen-Ex01\C$\SEN-Ex01CertRequest.req.txt" -Value $Data
You can use the contents of the Exch01CertRequest.req.tx file to request an SSL certificate from a certificate authority (CA),open web:
http://SEN-DC01/Certsrv To Request an SSL Certificate and save to \\SEN-Ex01\C$\SEN-Ex01certnew.cer
Import-ExchangeCertificate –Server Exch01 -FileData ([Byte[]]$(Get-Content -Path "\\SEN-Ex01\C$\SEN-Ex01certnew.cer" -Encoding byte -ReadCount 0)) | Enable-ExchangeCertificate –Server SEN-Ex01 -Services "IIS,POP,IMAP,SMTP"
6)Configuring Outlook Anywhere
Get-OutlookAnywhere –Server SEN-Ex01 | Set-OutlookAnywhere -ExternalHostname mail.sen.hi.cn -ExternalClientsRequireSsl:$true -ExternalClientAuthenticationMethod:Basic –InternalHostName SEN-Ex01.sen.hi.cn -InternalClientsRequireSsl:$true -InternalClientAuthenticationMethod:Basic
7)Enabling MapiHttp
Set-OrganizationConfig -MapiHttpEnabled $true
8) Set Exchange web VirtualDirectory ExternalUrl:
Set-OwaVirtualDirectory -identity "owa (default web site)" -LogonFormat UserName -DefaultDomain "sen.hi.cn"
External same as Internal:
$DomainName = "sen.hi.cn"
$hostname = "mail." + $DomainName
$owa = "https://" + $hostname + "/owa"
$ecp = "https://" + $hostname + "/ecp"
$mapi = "https://" + $hostname + "/mapi"
$powershell = "https://" + $hostname + "/powershell"
$activesync = "https://" + $hostname + "/Microsoft-Server-ActiveSync"
$oab = "https://" + $hostname + "/OAB"
$ews = "https://" + $hostname + "/EWS/Exchange.asmx"
Get-OwaVirtualDirectory | Set-OwaVirtualDirectory –ExternalUrl $owa –InternalUrl $owa
Get-EcpVirtualDirectory | Set-EcpVirtualDirectory –ExternalUrl $ecp –InternalUrl $ecp
Get-MapiVirtualDirectory | Set-MapiVirtualDirectory –ExternalUrl $mapi –InternalUrl $mapi
Get-ActiveSyncVirtualDirectory | Set-ActiveSyncVirtualDirectory -ExternalUrl $activesync –InternalUrl $activesync
Get-OABVirtualDirectory | Set-OABVirtualDirectory -ExternalUrl $oab -InternalUrl $oab -RequireSSL:$true
Get-WebServicesVirtualDirectory | Set-WebServicesVirtualDirectory -ExternalUrl $ews -InternalUrl $ews -BasicAuthentication:$True -Force
Get-PowershellVirtualDirectory | Set-PowershellVirtualDirectory –ExternalUrl $powershell –InternalUrl $powershell -BasicAuthentication:$True
External not same as Internal:
$InDomainName = "sen.hi.cn"
$ExDomainName = "aplusnb.cn"
$InHostname = "SEN-Ex01." + $InDomainName
$ExHostname = "mail." + $ExDomainName
$InOwa = "https://" + $InHostname + "/owa"
$ExOwa = "https://" + $ExHostname + "/owa"
$InEcp = "https://" + $InHostname + "/ecp"
$ExEcp = "https://" + $ExHostname + "/ecp"
$InMapi = "https://" + $InHostname + "/mapi"
$ExMapi = "https://" + $ExHostname + "/mapi"
$InPowershell = "https://" + $InHostname + "/powershell"
$ExPowershell = "https://" + $ExHostname + "/powershell"
$InActivesync = "https://" + $InHostname + "/Microsoft-Server-ActiveSync"
$ExActivesync = "https://" + $ExHostname + "/Microsoft-Server-ActiveSync"
$InOab = "https://" + $InHostname + "/OAB"
$ExOab = "https://" + $ExHostname + "/OAB"
$InEws = "https://" + $InHostname + "/EWS/Exchange.asmx"
$ExEws = "https://" + $ExHostname + "/EWS/Exchange.asmx"
Get-OwaVirtualDirectory | Set-OwaVirtualDirectory –ExternalUrl $ExOwa –InternalUrl $InOwa -LogonFormat UserName -DefaultDomain $InDomainName
Get-EcpVirtualDirectory | Set-EcpVirtualDirectory –ExternalUrl $ExEcp –InternalUrl $InEcp
Get-MapiVirtualDirectory | Set-MapiVirtualDirectory –ExternalUrl $ExMapi –InternalUrl $InMapi
Get-ActiveSyncVirtualDirectory | Set-ActiveSyncVirtualDirectory -ExternalUrl $ExActivesync –InternalUrl $InActivesync
Get-OABVirtualDirectory | Set-OABVirtualDirectory -ExternalUrl $ExOab -InternalUrl $InOab -RequireSSL:$true
Get-WebServicesVirtualDirectory | Set-WebServicesVirtualDirectory -ExternalUrl $ExEws -InternalUrl $InEws -BasicAuthentication:$True -Force
Get-PowershellVirtualDirectory | Set-PowershellVirtualDirectory –ExternalUrl $ExPowershell –InternalUrl $InPowershell -BasicAuthentication:$True
9)Enable Mailbox Replication Service (MRS)MRSProxy:
Get-WebServicesVirtualDirectory | fl server,mrs*
Get-WebServicesVirtualDirectory -ADPropertiesOnly | Where {$_.MRSProxyEnabled -ne $true} | Set-WebServicesVirtualDirectory -MRSProxyEnabled $true
Set-WebServicesVirtualDirectory -Identity Exch01\EWS(Default Web Site) -ExternalUrl https://mail.sen.hi.cn/EWS/exchange.asmx -BasicAuthentication $true -InternalUrl https://SEN-ex01.sen.hi.cn/EWS/Exchange.asmx
10)Publishing Exchange:
with a solid firewall solution where only the following ports are opened:
Port 25 for SMTP
Port 80 for HTTP
Port 443 for HTTPS
Port 587 for SMTP submission
Ports 110 and 143 for POP3 and IMAP4
Ports 993 and 995 for Secure POP3 and Secure IMAP4.
本文出自 “blog” 博客,请务必保留此出处http://ganzy.blog.51cto.com/91848/1856701
Install Exchange 2016 CU3 on Windows server 2016
