首页 > 代码库 > 在Windows server 2016 RTM下用PoweShell无人值守安装配置Exchange 2016 CU3
在Windows server 2016 RTM下用PoweShell无人值守安装配置Exchange 2016 CU3
最新的Exchange 2016 CU3 新增支持最新的Windows Server 2016 RTM,接下我们就来通过,用纯命令(PowerShell)安装和配置Exchange 的基体功能。
1.下载 Ex2016 cu3:
Exchange 2016 CU3:ExchangeServer2016-x64-cu3.iso
Fixes and improvements are:
Added: Support for Windows Server 2016.
KB3154387: The DFS health set is listed as “Unhealthy” in an Exchange Server 2016 environment.
KB316916: Data loss may occur during public folder migration to Exchange 2013, Exchange 2016, or Exchange Online.
KB3190887: Upgrading Exchange Server causes the server to go offline unexpectedly
Download: Cumulative Update 3 for Exchange Server 2016 (KB3152589)
Download: Exchange Server 2016 CU3 UM Language Packs
View: Description of Cumulative Update 3 for Exchange Server 2016
View: Blog post of the Exchange Team about CU3 for Exchange Server 2016
2.安装 Windows Feature:
Install-WindowsFeature NET-Framework-45-Features, RPC-over-HTTP-proxy, RSAT-Clustering,RSAT-Clustering-CmdInterface, RSAT-Clustering-Mgmt, RSAT-Clustering-PowerShell,Web-Mgmt-Console, WAS-Process-Model, Web-Asp-Net45, Web-Basic-Auth,Web-Client-Auth, Web-Digest-Auth, Web-Dir-Browsing, Web-Dyn-Compression,Web-Http-Errors, Web-Http-Logging, Web-Http-Redirect, Web-Http-Tracing,Web-ISAPI-Ext, Web-ISAPI-Filter, Web-Lgcy-Mgmt-Console, Web-Metabase,Web-Mgmt-Console, Web-Mgmt-Service, Web-Net-Ext45, Web-Request-Monitor,Web-Server, Web-Stat-Compression, Web-Static-Content, Web-Windows-Auth,Web-WMI, Windows-Identity-Foundation,RSAT-ADDS

3.下载并安装 Unified Communications Managed API 4.0 Runtime
Start-BitsTransfer -Source http://download.microsoft.com/download/2/C/4/2C47A5C1-A1F3-4843-B9FE-84C0032C61EC/UcmaRuntimeSetup.exe -Destination c:\temp\UcmaRuntimeSetup.exe

c:\temp\UcmaRuntimeSetup.exe /q
![]()
安装 Exchange server 2016 CU3:
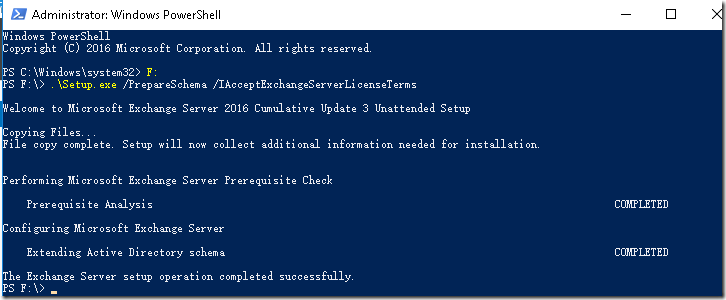
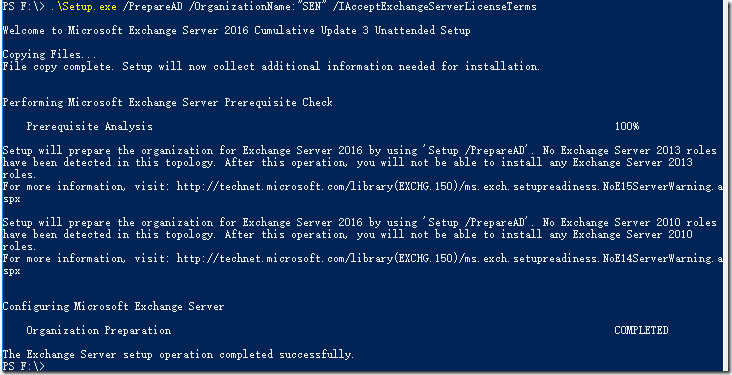
1)扩展 AD
.\Setup.exe /PrepareSchema /IAcceptExchangeServerLicenseTerms

.\Setup.exe /PrepareAD /OrganizationName:"SEN" /IAcceptExchangeServerLicenseTerms

.\Setup.exe /PrepareAllDomains /IAcceptExchangeServerLicenseTerms

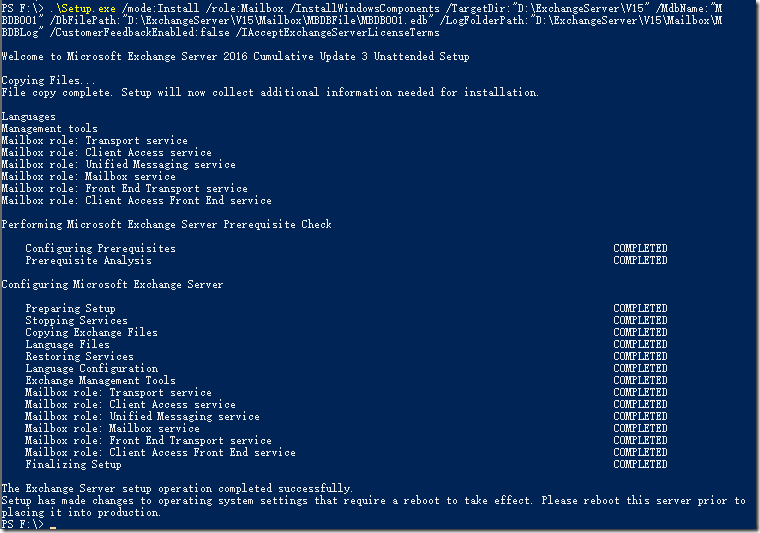
2)安装 Ex2016 CU3:
.\Setup.exe /mode:Install /role:Mailbox /InstallWindowsComponents /TargetDir:"D:\ExchangeServer\V15" /MdbName:"MBDB001" /DbFilePath:"D:\ExchangeServer\V15\Mailbox\MBDBFile\MBDB001.edb" /LogFolderPath:"D:\ExchangeServer\V15\Mailbox\MBDBLog" /CustomerFeedbackEnabled:false /IAcceptExchangeServerLicenseTerms

. Post-Installation Tasks:
Set-ExchangeServer –Identity SEN-Ex01 –ProductKey *******
1) 新增 accepted domains
New-AcceptedDomain -Name Aplusnb -DomainName aplusnb.cn -DomainType Authoritative

2)启用指定OU下 用户邮箱:
get-user -OrganizationalUnit "sen.hi.cn/SEN" | where-object {$_.RecipientType –eq “User”} | Enable-Mailbox | get-mailbox | select name,windowsemailaddress,database

3) 新建 Email address policy
New-EmailAddressPolicy -Name Aplusnb -IncludedRecipients AllRecipients -ConditionalCompany "Aplusnb" -EnabledEmailAddressTemplates "SMTP:@aplusnb.cn"

Update-EmailAddressPolicy -Identity Aplusnb
get-mailbox | select name,windowsemailaddress,EmailAddresses,database

4)配置 connectors
1. 发送连接: 可以使Exchange向外部Internet发送邮件。
New-SendConnector -Name "Send To Internet" -Internet -AddressSpaces "*" -DNSRoutingEnabled:$TRUE -SourceTransportServers "SEN-Ex01"

2.配置接收连接:使Exchange 可以接收外部Internet发过来的邮件。
Get-ReceiveConnector –Server SEN-Ex01
Get-ReceiveConnector “Default SEN-Ex01” | select Identity,PermissionGroups

Get-ReceiveConnector “Default SEN-Ex01” | Set-ReceiveConnector -PermissionGroups AnonymousUsers, ExchangeUsers, ExchangeServers, ExchangeLegacyServers
Get-ReceiveConnector

5) 配置Exchange 证书
申请证书:
$Data = http://www.mamicode.com/New-ExchangeCertificate -FriendlyName"SEN-Ex01_Certificate" -GenerateRequest -SubjectName "c=CN, o=NOS, cn=mail.sen.hi.cn" -DomainName mail.sen.hi.cn,autodiscover.sen.hi.cn,mail.aplusnb.cn,autodiscover.aplusnb.cn,sen-ex01.sen.hi.cn,sen-ex01,localhost -PrivateKeyExportable $true

Set-Content -path "\\Sen-Ex01\C$\SEN-Ex01CertRequest.req.txt" -Value $Data

打开Exch01CertRequest.req.txt 复制其内容到企业证书服务器:
http://SEN-DC01/Certsrv 申请证书并保存到\\SEN-Ex01\C$\SEN-Ex01certnew.cer下:


导入证书并启用服务:
Import-ExchangeCertificate –Server SEN-Ex01 -FileData ([Byte[]]$(Get-Content -Path "\\SEN-Ex01\C$\SEN-Ex01certnew.cer" -Encoding byte -ReadCount 0)) | Enable-ExchangeCertificate –Server SEN-Ex01 -Services "IIS,POP,IMAP,SMTP"

6)配置 Outlook Anywhere
Get-OutlookAnywhere –Server SEN-Ex01 | Set-OutlookAnywhere -ExternalHostname mail.sen.hi.cn -ExternalClientsRequireSsl:$true -ExternalClientAuthenticationMethod:Basic –InternalHostName SEN-Ex01.sen.hi.cn -InternalClientsRequireSsl:$true -InternalClientAuthenticationMethod:Basic

7)启用 MapiHttp
Set-OrganizationConfig -MapiHttpEnabled $true
8)设置Exchange web VirtualDirectory
Set-OwaVirtualDirectory -identity "owa (default web site)" -LogonFormat UserName -DefaultDomain "sen.hi.cn"
$InDomainName = "sen.hi.cn"
$ExDomainName = "aplusnb.cn"
$InHostname = "SEN-Ex01." + $InDomainName
$ExHostname = "mail." + $ExDomainName
$InOwa = "https://" + $InHostname + "/owa"
$ExOwa = "https://" + $ExHostname + "/owa"
$InEcp = "https://" + $InHostname + "/ecp"
$ExEcp = "https://" + $ExHostname + "/ecp"
$InMapi = "https://" + $InHostname + "/mapi"
$ExMapi = "https://" + $ExHostname + "/mapi"
$InPowershell = "https://" + $InHostname + "/powershell"
$ExPowershell = "https://" + $ExHostname + "/powershell"
$InActivesync = "https://" + $InHostname + "/Microsoft-Server-ActiveSync"
$ExActivesync = "https://" + $ExHostname + "/Microsoft-Server-ActiveSync"
$InOab = "https://" + $InHostname + "/OAB"
$ExOab = "https://" + $ExHostname + "/OAB"
$InEws = "https://" + $InHostname + "/EWS/Exchange.asmx"
$ExEws = "https://" + $ExHostname + "/EWS/Exchange.asmx"

Get-OwaVirtualDirectory | Set-OwaVirtualDirectory –ExternalUrl $ExOwa –InternalUrl $InOwa -LogonFormat UserName -DefaultDomain $InDomainName
Get-EcpVirtualDirectory | Set-EcpVirtualDirectory –ExternalUrl $ExEcp –InternalUrl $InEcp
Get-MapiVirtualDirectory | Set-MapiVirtualDirectory –ExternalUrl $ExMapi –InternalUrl $InMapi
Get-ActiveSyncVirtualDirectory | Set-ActiveSyncVirtualDirectory -ExternalUrl $ExActivesync –InternalUrl $InActivesync
Get-OABVirtualDirectory | Set-OABVirtualDirectory -ExternalUrl $ExOab -InternalUrl $InOab -RequireSSL:$true
Get-WebServicesVirtualDirectory | Set-WebServicesVirtualDirectory -ExternalUrl $ExEws -InternalUrl $InEws -BasicAuthentication:$True -Force -MRSProxyEnabled $true
Get-PowershellVirtualDirectory | Set-PowershellVirtualDirectory –ExternalUrl $ExPowershell –InternalUrl $InPowershell -BasicAuthentication:$True


9)Enable Mailbox Replication Service (MRS)MRSProxy:
Get-WebServicesVirtualDirectory | fl server,mrs*
Get-WebServicesVirtualDirectory -ADPropertiesOnly | Where {$_.MRSProxyEnabled -ne $true} | Set-WebServicesVirtualDirectory -MRSProxyEnabled $true
Set-WebServicesVirtualDirectory -Identity Exch01\EWS(Default Web Site) -ExternalUrl https://mail.sen.hi.cn/EWS/exchange.asmx -BasicAuthentication $true -InternalUrl https://SEN-ex01.sen.hi.cn/EWS/Exchange.asmx

10)发布 Exchange:
在企业防火墙上开启以下端口:
Port 25 for SMTP
Port 80 for HTTP
Port 443 for HTTPS
Port 587 for SMTP submission
Ports 110 and 143 for POP3 and IMAP4
Ports 993 and 995 for Secure POP3 and Secure IMAP4.
总结:
到此为止,一个具有基本功能的Exchange 服务器就安装配置好了,安装Exchange服务器是一个比较费时间的事,通过命令的方式,可以做无人值守,从而节省时间。
一个全新的安装可以按以下命令(PowerShell)安装和配置好一台Exchange:
1.安装WindowsFeature和UcmaRuntimeSetup.exe:
Install-WindowsFeature NET-Framework-45-Features, RPC-over-HTTP-proxy, RSAT-Clustering,RSAT-Clustering-CmdInterface, RSAT-Clustering-Mgmt, RSAT-Clustering-PowerShell,Web-Mgmt-Console, WAS-Process-Model, Web-Asp-Net45, Web-Basic-Auth,Web-Client-Auth, Web-Digest-Auth, Web-Dir-Browsing, Web-Dyn-Compression,Web-Http-Errors, Web-Http-Logging, Web-Http-Redirect, Web-Http-Tracing,Web-ISAPI-Ext, Web-ISAPI-Filter, Web-Lgcy-Mgmt-Console, Web-Metabase,Web-Mgmt-Console, Web-Mgmt-Service, Web-Net-Ext45, Web-Request-Monitor,Web-Server, Web-Stat-Compression, Web-Static-Content, Web-Windows-Auth,Web-WMI, Windows-Identity-Foundation,RSAT-ADDS
Start-BitsTransfer -Source http://download.microsoft.com/download/2/C/4/2C47A5C1-A1F3-4843-B9FE-84C0032C61EC/UcmaRuntimeSetup.exe -Destination c:\UcmaRuntimeSetup.exe
c:\UcmaRuntimeSetup.exe /q
2.扩展AD和安装 Exchange:
先切换到Exchange光盘所在位置:(如:F:\ )其中红色部分请替换成自己的信息:
.\Setup.exe /PrepareSchema /IAcceptExchangeServerLicenseTerms
.\Setup.exe /PrepareAD /OrganizationName:"SEN" /IAcceptExchangeServerLicenseTerms
.\Setup.exe /PrepareAllDomains /IAcceptExchangeServerLicenseTerms
.\Setup.exe /mode:Install /role:Mailbox /InstallWindowsComponents /TargetDir:"D:\ExchangeServer\V15" /MdbName:"MBDB001" /DbFilePath:"D:\ExchangeServer\V15\Mailbox\MBDBFile\MBDB001.edb" /LogFolderPath:"D:\ExchangeServer\V15\Mailbox\MBDBLog" /CustomerFeedbackEnabled:false /IAcceptExchangeServerLicenseTerms
3.安装完成后打开Exchange Management Shell配置Exchange:
Set-ExchangeServer –Identity SEN-Ex01 -ProductKey QXYKC-7H87P-YKC2Q-XRVQ7-GTJP2
New-AcceptedDomain -Name Aplusnb -DomainName aplusnb.cn -DomainType Authoritative
get-user -OrganizationalUnit "sen.hi.cn/SEN" | where-object {$_.RecipientType –eq “User”} | Enable-Mailbox | get-mailbox | select name,windowsemailaddress,database
New-EmailAddressPolicy -Name Aplusnb -IncludedRecipients AllRecipients -ConditionalCompany "Aplusnb" -EnabledEmailAddressTemplates "SMTP:@aplusnb.cn"
Update-EmailAddressPolicy -Identity Aplusnb
get-mailbox | select name,windowsemailaddress,EmailAddresses,database
New-SendConnector -Name "Send To Internet" -Internet -AddressSpaces "*" -DNSRoutingEnabled:$TRUE –SourceTransportServers "SEN-Ex01"
Get-ReceiveConnector “Default SEN-Ex01” | Set-ReceiveConnector -PermissionGroups AnonymousUsers, ExchangeUsers, ExchangeServers, ExchangeLegacyServers
配置证书:
$Data = http://www.mamicode.com/New-ExchangeCertificate -FriendlyName"SEN-Ex01_Certificate" -GenerateRequest -SubjectName "c=CN, o=NOS, cn=mail.sen.hi.cn" -DomainName mail.sen.hi.cn,autodiscover.sen.hi.cn,mail.aplusnb.cn,autodiscover.aplusnb.cn,sen-ex01.sen.hi.cn,sen-ex01,localhost -PrivateKeyExportable $true
Import-ExchangeCertificate –Server SEN-Ex01 -FileData ([Byte[]]$(Get-Content -Path "\\SEN-Ex01\C$\SEN-Ex01certnew.cer" -Encoding byte -ReadCount 0)) | Enable-ExchangeCertificate –Server SEN-Ex01 -Services "IIS,POP,IMAP,SMTP"
配置outlook Anywhere:
Get-OutlookAnywhere –Server SEN-Ex01 | Set-OutlookAnywhere -ExternalHostname mail.sen.hi.cn -ExternalClientsRequireSsl:$true -ExternalClientAuthenticationMethod:Basic –InternalHostName SEN-Ex01.sen.hi.cn -InternalClientsRequireSsl:$true -InternalClientAuthenticationMethod:Basic
Set-OrganizationConfig -MapiHttpEnabled $true
配置Web VirtualDirectory:
$InDomainName = "sen.hi.cn"
$ExDomainName = "aplusnb.cn"
$InHostname = "SEN-Ex01." + $InDomainName
$ExHostname = "mail." + $ExDomainName
$InOwa = "https://" + $InHostname + "/owa"
$ExOwa = "https://" + $ExHostname + "/owa"
$InEcp = "https://" + $InHostname + "/ecp"
$ExEcp = "https://" + $ExHostname + "/ecp"
$InMapi = "https://" + $InHostname + "/mapi"
$ExMapi = "https://" + $ExHostname + "/mapi"
$InPowershell = "https://" + $InHostname + "/powershell"
$ExPowershell = "https://" + $ExHostname + "/powershell"
$InActivesync = "https://" + $InHostname + "/Microsoft-Server-ActiveSync"
$ExActivesync = "https://" + $ExHostname + "/Microsoft-Server-ActiveSync"
$InOab = "https://" + $InHostname + "/OAB"
$ExOab = "https://" + $ExHostname + "/OAB"
$InEws = "https://" + $InHostname + "/EWS/Exchange.asmx"
$ExEws = "https://" + $ExHostname + "/EWS/Exchange.asmx"
Get-OwaVirtualDirectory | Set-OwaVirtualDirectory –ExternalUrl $ExOwa –InternalUrl $InOwa -LogonFormat UserName -DefaultDomain $InDomainName
Get-EcpVirtualDirectory | Set-EcpVirtualDirectory –ExternalUrl $ExEcp –InternalUrl $InEcp
Get-MapiVirtualDirectory | Set-MapiVirtualDirectory –ExternalUrl $ExMapi –InternalUrl $InMapi
Get-ActiveSyncVirtualDirectory | Set-ActiveSyncVirtualDirectory -ExternalUrl $ExActivesync –InternalUrl $InActivesync
Get-OABVirtualDirectory | Set-OABVirtualDirectory -ExternalUrl $ExOab -InternalUrl $InOab -RequireSSL:$true
Get-WebServicesVirtualDirectory | Set-WebServicesVirtualDirectory -ExternalUrl $ExEws -InternalUrl $InEws -BasicAuthentication:$True -Force -MRSProxyEnabled $true
Get-PowershellVirtualDirectory | Set-PowershellVirtualDirectory –ExternalUrl $ExPowershell –InternalUrl $InPowershell -BasicAuthentication:$True
在Windows server 2016 RTM下用PoweShell无人值守安装配置Exchange 2016 CU3
