首页 > 代码库 > ansible应用总结
ansible应用总结
1、常用的自动化运维工具
CFengineChefPuppet基于Ruby开发,采用C/S架构,扩展性强,基于SSL认证SaltStack基于Python开发,采用C/S架构,相对于puppet更轻量级,配置语法采用YMAL,使得配置脚本更为简单Ansible基于Pyton开发,分布式,无需客户端,轻量级,配置语言采用YAML
2、为何选择ansible
相对于puppet和saltstack,ansible无需客户端,更轻量级ansible甚至都不用启动服务,仅仅只是一个工具,可以很轻松的实现分布式扩展更强的远程命令执行操作不输于puppet和saltstack的其他功能
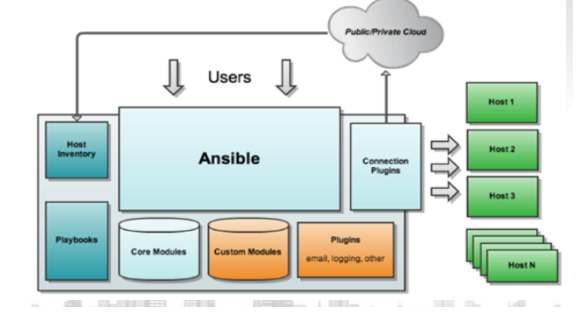
3、ansible基本架构

4、ansible基本组成
核心:ansible核心模块(Core Modules):这些都是ansible自带的模块 扩展模块(Custom Modules):如果核心模块不足以完成某种功能,可以添加扩展模块插件(Plugins):完成模块功能的补充剧本(Playbooks):ansible的任务配置文件,将多个任务定义在剧本中,由ansible自动执行连接插件(Connectior Plugins):ansible基于连接插件连接到各个主机上,虽然ansible是使用ssh连接到各个主机的,但是它还支持其他的连接方法,所以需要有连接插件主机群(Host Inventory):定义ansible管理的主机
5、ansible安装
配置epel源(略过) yum install ansible -y
6、ansible常用模块
file:用于配置文件属性yum:用于安装软件包cron:配置计划任务copy:复制文件到远程主机command:在远程主机上执行命令raw:类似于command模块,支持管道user:配置用户group:配置用户组service:用于管理服务ping:用于检测远程主机是否存活setup:查看远程主机的基本信息mount:配置挂载点
7、ansible简单配置
[root@martin-1 ansible]# cd /etc/ansible/
[root@martin-1 ansible]# ls
ansible.cfg hosts roles
[root@martin-1 ansible]# vim hosts
[web] #组的名称
172.16.6.236 # 这里是被ansible管理的主机
172.16.6.246
172.16.6.183
8、建立免秘钥登陆
[root@martin-1 ~]# ssh-keygen -t rsa
[root@martin-1 ~]# ssh-copy-id -i /root/.ssh/id_rsa.pub 172.16.6.236
[root@martin-1 ~]# ssh-copy-id -i /root/.ssh/id_rsa.pub 172.16.6.246
[root@martin-1 ~]# ssh-copy-id -i /root/.ssh/id_rsa.pub 172.16.6.183
实例介绍
Command模块

9、palybook简介
playbook是由一个或多个“play”组成的列表。play的主要功能在于将事先归并为一组的主机装扮成事先通过ansible中的task定义好的角色。从根本上来讲,所谓task无非是调用ansible的一个module。将多个play组织在一个playbook中,即可以让它们联合起来按事先编排的机制完成某一任务
tasks 任务,即调用模块完成的某操作
variables 变量
templates 模板
handles 处理器,由某事件触发执行的操作
roles 角色
简单示例
[root@ansible scripts]# cat 2.yml
- hosts: web
remote_user: root
tasks:
- name: install apache
yum: name=httpd state=latest
- name: install configuration file for apache
copy: src=http://www.mamicode.com/root/httpd.conf dest=/etc/httpd/conf/httpd.conf
notify:
- restart httpd
- name: start httpd service
service: enabled=true name=httpd state=started
handlers:
- name: restart httpd
service: name=httpd state=restarted
安装haproxy+keepalived
[root@martin-1 ansible]# tree
.
├── hosts
├── roles
│ ├── haproxy
│ │ ├── defaults
│ │ ├── files
│ │ │ ├── haproxy-1.5.14-3.el7.x86_64.rpm
│ │ │ └── install_haproxy.sh
│ │ ├── handlers
│ │ │ └── main.yml
│ │ ├── meta
│ │ ├── tasks
│ │ │ └── main.yml
│ │ ├── templates
│ │ │ └── haproxy.cfg.j2
│ │ └── vars
│ ├── keepalived-master
│ │ ├── defaults
│ │ ├── files
│ │ │ ├── install_keepalived_master.sh
│ │ │ └── keepalived-1.2.13-7.el7.x86_64.rpm
│ │ ├── handlers
│ │ │ └── main.yml
│ │ ├── meta
│ │ ├── tasks
│ │ │ └── main.yml
│ │ ├── templates
│ │ │ └── keepalived.conf.j2
│ │ └── vars
│ ├── keepalived-slave
│ │ ├── defaults
│ │ ├── files
│ │ │ ├── install_keepalived_slave.sh
│ │ │ └── keepalived-1.2.13-7.el7.x86_64.rpm
│ │ ├── handlers
│ │ │ └── main.yml
│ │ ├── meta
│ │ ├── tasks
│ │ │ └── main.yml
│ │ ├── templates
│ │ │ └── keepalived.conf.j2
│ │ └── vars


10、Zabbix-agent 安装详细说明
在/目录下面建立 ansible文件夹
[root@martin-1 ansible]# pwd
/ansible
目录结构如下
[root@martin-1 ansible]# tree
.
├── hosts
├── roles
│ └── zabbix-agent
│ ├── defaults
│ ├── files
│ │ ├── zabbix-agent-3.2.0-1.el7.x86_64.rpm
│ │ └── zabbix_agent_install.sh
│ ├── handlers
│ │ └── main.yml
│ ├── meta
│ ├── tasks
│ │ └── main.yml
│ ├── templates
│ │ └── zabbix_agentd.conf.j2
│ └── vars
│ └── main.yml
└── site.yml
9 directories, 8 files
目录名称是固定的,没有用到的可以不创建如defaults目录
[root@martin-1 ansible]# cat hosts
[zabbix-agent]
172.16.6.67 定义需要安装zabbix-agent的服务器ip
172.16.6.65
172.16.6.76
172.16.6.77
[root@martin-1 ansible]# cat site.yml 入口文件
- name: install zabbix agent
hosts: zabbix-agent
remote_user: root
roles:
- zabbix-agent
[root@martin-1 ansible]# cat roles/zabbix-agent/tasks/main.yml
---
- name: cp zabbix-agent-3.2.0-1.el7.x86_64.rpm to all client
copy: src=http://www.mamicode.com/zabbix-agent-3.2.0-1.el7.x86_64.rpm dest=/tmp/
- name: cp zabbix_agent_install.sh to all client
copy: src=http://www.mamicode.com/zabbix_agent_install.sh dest=/tmp/ mode=0755
- name: execute scripts to install zabbix agent
shell: /bin/bash /tmp/zabbix_agent_install.sh
- name: configure zabbix agent conf
template: src=http://www.mamicode.com/zabbix_agentd.conf.j2 dest=/etc/zabbix/zabbix_agentd.conf
notify: restart zabbix agent
- name: Start zabbix agent
service: name=zabbix-agent state=started enabled=yes
这里是自定义的任务列表,第一行表示任务名称,第二行表示使用相应的模块执行任务,所以这里需要对ansible的基本模块及常用参数有个基本了解,常用模块在上面已经说明过了,这里就不再详细说明
http://docs.ansible.com/ansible/modules_by_category.html 官方各大模块说明
[root@martin-1 ansible]# cat roles/zabbix-agent/files/zabbix_agent_install.sh
#!/bin/bash
cd /tmp
if [ ! -f zabbix-agent-3.2.0-1.el7.x86_64.rpm ];then
exit 0
fi
rpm -ivh zabbix-agent-3.2.0-1.el7.x86_64.rpm
if [ $? -eq 0 ];then
echo "zabbix-agent install succefull"
else
echo "zabbix-agent install failed"
fi
/usr/bin/cp /etc/zabbix/zabbix_agentd.conf /etc/zabbix/zabbix_agentd.conf.$(date +%F).ori
安装脚本
该任务的总体意思就是将安装包和安装脚本拷贝到远程客户端服务器上面,然后执行该安装脚本,并修改配置文件,启动zabbix-agent客户端,从这个列子可以看到ansible只是其中一个环节,假如是apigw任务(使用haproxy+keepalived来实现),需要对如下知识点比较熟悉才能较好的完成这个任务的编写
1、 ansible基本模块和参数的使用
2、 ansible-playbook yaml 任务格式的写法
3、 负载均衡软件haproxy的需要熟悉
4、 高可用软件keepalived的需要熟悉
由此:使用ansible编写任务是一个综合性的过程,并不仅仅局限于ansible本身
在安装前检查客户端是否安装了zabbix-agent

可以看到都没有安装,接下来运行palybook任务
[root@martin-1 ansible]# pwd
/ansible
[root@martin-1 ansible]# ansible-playbook -i hosts site.yml


检查zabbix-agent在客户端的安装和启动情况


可以看到zabbix-agent已经安装和启动完成
更多内容请参考官方网站 http://docs.ansible.com/ansible/
本文出自 “厚德载物” 博客,谢绝转载!
ansible应用总结
