首页 > 代码库 > HAProxy+Varnish+LNMP实现高可用负载均衡动静分离集群部署
HAProxy+Varnish+LNMP实现高可用负载均衡动静分离集群部署
HAProxy高可用负载均衡集群部署

基本信息:
系统平台:VMware WorkStation
系统版本: CentOS Linux release 7.2.1511 (Core)
内核版本: 3.10.0-327.el7.x86_64
集群架构:
前端:HAProxy
1、虚拟FQDN:www.simpletime.net
2、VIP:192.168.39.1;DIP:172.16.39.50
3、调度服务器:Varnish1、Varnish2
4、调度算法:URL_Hash_Consistent
5、集群统计页:172.16.39.50:9091/simpletime?admin
缓存服务器:Varnish
1、VarnishServer1:172.16.39.14:9527
2、VarnishServer2:172.16.39.15:9527
3、开启健康状态探测,提供高可用
4、负载均衡后端Web服务器组
5、动静分离后端服务器,并动静都提供负载均衡效果
后端服务器:
StaticServer1:172.16.39.14:80
StaticServer2:172.16.39.15:80
DynamicServer1:172.16.39.151
DynamicServer2:172.16.39.152
Mysql服务器:
MysqlServer:172.16.39.150
思考:
1、负载均衡动静分离后,会话如何保持?
2、负载均衡动静分离后,存储如何解决?
3、该方案适用于什么样的场景?
4、该方案缺陷有哪些?
5、如何改进?
一、部署HAProxy
1 2 3 4 5 6 7 8 9 10 11 12 13 14 15 16 17 18 19 20 21 22 23 24 25 26 27 28 29 30 31 32 33 34 35 | 1、安装HAProxy~]# yum install HAProxy2、配置HAProxy#---------------------------------------------------------------------# main frontend which proxys to the backends#---------------------------------------------------------------------frontend web *:80 #acl url_static path_beg -i /static /images /javascript /stylesheets #acl url_static path_end -i .jpg .gif .png .css .js .html .txt .htm #acl url_dynamic path_begin -i .php .jsp #default_backend static_srv if url_static #use_backend dynamic_srv if url_dynamic use_backend varnish_srv#---------------------------------------------------------------------# round robin balancing between the various backends#---------------------------------------------------------------------backend varnish_srv balance uri #使用基于URL的一致性哈希调度算法 hash-type consistent server varnish1 172.16.39.14:9527 check server varnish2 172.16.39.15:9527 checklisten stats #开启HAProxy图形化Web管理功能 bind :9091 stats enable stats uri /simpletime?admin stats hide-version stats auth admin:abc.123 stats admin if TRUE3、启动服务~]# systemctl start haproxy ~]# systemctl status haproxy #查看状态~]# ss -tnlp #查看80和9091端口是否启用~]# systemctl enable haproxy #设置开机启动 |
二、部署Varnish,两台配置一致(172.16.39.14|15)
1 2 3 4 5 6 7 8 9 10 11 12 13 14 15 16 17 18 19 20 21 22 23 24 25 26 27 28 29 30 31 32 33 34 35 36 37 38 39 40 41 42 43 44 45 46 47 48 49 50 51 52 53 54 55 56 57 58 59 60 61 62 63 64 65 66 67 68 69 70 71 72 73 74 75 76 77 78 79 80 81 82 83 84 85 86 87 88 89 90 91 92 93 94 95 96 97 98 99 100 101 102 103 104 105 106 107 108 109 110 111 112 113 114 115 116 117 118 119 120 121 122 123 124 125 126 127 128 129 130 131 132 133 134 135 136 137 138 139 140 141 142 143 144 145 146 147 148 149 150 151 152 153 154 155 156 157 158 159 160 161 162 163 164 165 166 167 168 169 170 171 172 173 174 175 176 177 178 179 180 181 182 183 184 185 186 187 188 | 1、安装及配置~]# yum install varnish -y~]# vim /etc/varnish/varnish.params VARNISH_LISTEN_PORT=9527 #更改默认端口~]# systemctl start varnish ~]# systemctl enable varnish ~]# vim /etc/varnish/default.vclvcl 4.0;##############启用负载均衡模块###############import directors;################定义Purge-ACL控制#######################acl purgers { "127.0.0.1"; "172.16.39.0"/16;}# Default backend definition. Set this to point to your content server.##############配置健康状态探测##############probe HE { #静态检测 .url = "/health.html"; #指定检测URL .timeout = 2s; #探测超时时长 .window = 5; #探测次数 .threshold = 2; #探测次数成功多少次才算健康 .initial = 2; #Varnish启动探测后端主机2次健康后加入主机 .interval = 2s; #探测间隔时长 .expected_response = 200; #期望状态响应码}probe HC { #动态监测 .url = "/health.php"; .timeout = 2s; .window = 5; .threshold = 2; .initial = 2; .interval = 2s; .expected_response = 200; }#############添加后端主机################backend web1 { .host = "172.16.39.151:80"; .port = "80"; .probe = HC;}backend web2 { .host = "172.16.39.152:80"; .port = "80"; .probe = HC;}backend app1 { .host = "172.16.39.14:80"; .port = "80"; .probe = HE;}backend app2 { .host = "172.16.39.15:80"; .port = "80"; .probe = HE;}#############定义负载均衡及算法###############sub vcl_init { new webcluster = directors.round_robin(); webcluster.add_backend(web1); webcluster.add_backend(web2); new appcluster = directors.round_robin(); appcluster.add_backend(app1); appcluster.add_backend(app2);}################定义vcl_recv函数段######################sub vcl_recv {#####ACL未授权,不允许PURGE,并返回405##### if (req.method == "PURGE") { if(!client.ip ~ purgers){ return(synth(405,"Purging not allowed for" + client.ip)); } return (purge); }#####添加首部信息,使后端服务记录访问者的真实IP# if (req.restarts == 0) {# set req.http.X-Forwarded-For = req.http.X-Forwarded-For + ", " + client.ip;# } else {# set req.http.X-Forwarded-For = client.ip;# }# set req.backend_hint = webcluster.backend();# set req.backend_hint = appcluster.backend();#注:因为Varnish不是一级代理,配置forward只能取到上级代理IP,而上级代理IP,本身就包含在HAProxy发送过来的Forward里,所以没必要配置,而后端服务器只要日志格式有启用记录Forward信息,并且上级代理没有做限制,那么,就能获取到客户端真实IP;#####动静分离##### if (req.url ~ "(?i)\.(php|asp|aspx|jsp|do|ashx|shtml)($|\?)") { set req.backend_hint = appcluster.backend(); }#####不正常的请求不缓存##### if (req.method != "GET" && req.method != "HEAD" && req.method != "PUT" && req.method != "POST" && req.method != "TRACE" && req.method != "OPTIONS" && req.method != "PATCH" && req.method != "DELETE") { return (pipe); }#####如果请求不是GET或者HEAD,不缓存##### if (req.method != "GET" && req.method != "HEAD") { return (pass); }#####如果请求包含Authorization授权或Cookie认证,不缓存##### if (req.http.Authorization || req.http.Cookie) { return (pass); }#####启用压缩,但排除一些流文件压缩##### if (req.http.Accept-Encoding) { if (req.url ~ "\.(bmp|png|gif|jpg|jpeg|ico|gz|tgz|bz2|tbz|zip|rar|mp3|mp4|ogg|swf|flv)$") { unset req.http.Accept-Encoding; } elseif (req.http.Accept-Encoding ~ "gzip") { set req.http.Accept-Encoding = "gzip"; } elseif (req.http.Accept-Encoding ~ "deflate") { set req.http.Accept-Encoding = "deflate"; } else { unset req.http.Accept-Encoding; } } return (hash);}####################定义vcl_pipe函数段#################sub vcl_pipe { return (pipe);}sub vcl_miss { return (fetch);}####################定义vcl_hash函数段#################sub vcl_hash { hash_data(req.url); if (req.http.host) { hash_data(req.http.host); } else { hash_data(server.ip); } if (req.http.Accept-Encoding ~ "gzip") { hash_data ("gzip"); } elseif (req.http.Accept-Encoding ~ "deflate") { hash_data ("deflate"); }}##############设置资源缓存时长#################sub vcl_backend_response { if (beresp.http.cache-control !~ "s-maxage") { if (bereq.url ~ "(?i)\.(jpg|jpeg|png|gif|css|js|html|htm)$") { unset beresp.http.Set-Cookie; set beresp.ttl = 3600s; } }}################启用Purge#####################sub vcl_purge { return(synth(200,"Purged"));}###############记录缓存命中状态##############sub vcl_deliver { if (obj.hits > 0) { set resp.http.X-Cache = "HIT from " + req.http.host; set resp.http.X-Cache-Hits = obj.hits; } else { set resp.http.X-Cache = "MISS from " + req.http.host; } unset resp.http.X-Powered-By; unset resp.http.Server; unset resp.http.Via; unset resp.http.X-Varnish; unset resp.http.Age;}2、加载配置,因为还没有配置后端应用服务器,可以看到后端主机健康检测全部处于Sick状态~]# varnishadm -S /etc/varnish/secret -T 127.0.0.1:6082varnish> vcl.load conf1 default.vcl 200 VCL compiled.varnish> vcl.use conf1200 VCL ‘conf1‘ now activevarnish> backend.list 200 Backend name Refs Admin Probeweb1(172.16.39.151,,80) 15 probe Sick 0/5web2(172.16.39.152,,80) 15 probe Sick 0/5app1(172.16.39.14,,80) 15 probe Sick 0/5app2(172.16.39.15,,80) 15 probe Sick 0/5 |
三、部署Mysql(172.16.39.150)
1 2 3 4 5 6 7 8 9 10 11 | ~]# yum install mariadb.server~]# rpm -qe mariadb-servermariadb-server-5.5.44-2.el7.centos.x86_64~]# vim /etc/my.cnf #数据库基本优化[mysqld]innodb_file_per_table = ONskip_name_resolve = ON~]# mysql #创建wordpress数据库并授权该数据库用户> create database wwwdb; > grant all on wwwdb.* to www@‘172.16.39.%‘ identified by "abc.123"; > exit |
四、部署NFS文件系统
1 2 3 4 5 6 7 8 9 10 11 12 13 14 15 16 17 18 19 20 | 1、后端所有主机安装服务~]# yum install nfs-utils2、动态资源主机172.16.39.152设为动态web数据共享服务器DynamicServer2 ~]# vim /etc/exports /data/web/ 172.16.39.151/16(rw,sync) #rw=可读写,sync=内存及硬盘同步写入数据3、静态主机172.16.39.15设为静态web数据共享服务器StaticServer2 ~]# vim /etc/exports/data/web/ 172.16.39.14/16(rw,sync) #rw=可读写,sync=内存及硬盘同步写入数据~]# systemctl start nfs-server #启动服务DynamicServer2 ~]# exportfs -avr #重载配置exporting 172.16.39.151/16:/data/webStaticServer2 ~]# exportfs -avr #重载配置exporting 172.16.39.14/16:/data/web4、两台服务端设为开机启动~]# systemctl enable nfs-server5、客户端同步,动态主机挂载动态服务器共享,静态主机挂载静态服务器共享~]# showmount -e 172.16.39.152Export list for 172.16.39.152:/data/web 172.16.39.151/16~]# mount -t nfs 172.16.39.15:/data/web /data/web |
五、部署后端主机(注意:已经部署了NFS文件系统)
1 2 3 4 5 6 7 8 9 10 11 12 13 14 15 16 17 18 19 20 21 22 23 24 25 26 27 28 29 30 31 32 33 34 35 36 37 38 39 40 41 42 43 44 45 46 47 48 49 50 | 1、安装及配置(DynamicServer2:172.16.39.152)~]# yum install nginx php-fpm php-mysql -y~]# mkdir /data/web/www -pv~]# vim /etc/nginx/conf.d/www.simple.com.confserver { listen 80; root /data/web/www; server_name www.simple.com; index index.html index.htm index.php; location ~ [^/]\.php(/|$) { try_files $uri = 404; fastcgi_pass 127.0.0.1:9000; fastcgi_index index.php; include fastcgi.conf; #access_log_bypass_if ($uri = ‘/health.php‘); }}备注:access_log_bypass_if 需添加日志过滤模块,本文主要实现过滤健康状态检测信息;~]# systemctl start nginx php-fpm2、部署wordpress应用~]# unzip wordpress-4.3.1-zh_CN.zip ~]# mv wordpress/* /data/web/www/www]# cp wp-config{-sample,}.phpwww]# vim wp-config.phpdefine(‘DB_NAME‘, ‘wwwdb‘);define(‘DB_USER‘, ‘www‘);define(‘DB_PASSWORD‘, ‘abc.123‘);define(‘DB_HOST‘, ‘172.16.39.150‘);3、设置facl权限~]# id apache~]# setfacl -m u:apache:rwx /data/web/www 4、拷贝web数据至StaticServer2,另两台后端主机挂载的是两台NFS服务端的数据文件,web数据数完成~]# tar -jcvf web.tar.gz /data/web/www~]# scp web.tar.gz 172.16.39.15:~]# setfacl -m u:apache:rwx /data/web/wwwStaticServer2 ~]# tar -xf web.tar.gz -C /data/web5、创建动静资源主机组Varnish健康状态探测页面DynamicServer2~]# echo "<h1>DynamicServer is Health.</h1> > /data/web/www/health.php StaticServer2~]# echo "<h1>StaticServer is Health.</h1>" > /data/web/www/health.html 6、在Varnish主机上查看健康状态(172.16.39.14|15,也就是StaticServer主机)StaticServer2~]# varnishadm -S /etc/varnish/secret -T 127.0.0.1:6082varnish> backend.list #后端Web主机正常200 Backend name Refs Admin Probeweb1(172.16.39.151,,80) 15 probe Healthy 5/5web2(172.16.39.152,,80) 15 probe Healthy 5/5app1(172.16.39.14,,80) 15 probe Healthy 5/5app2(172.16.39.15,,80) 15 probe Healthy 5/5 |
7、web访问172.16.39.50完成wordpress配置


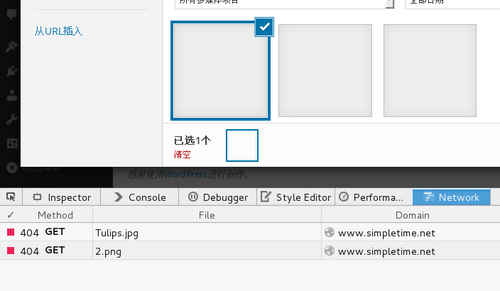
8、创建图文测试,发现动静分离下,图片上传后无法显示

9、分析原因,动静分离后,用户可以上传图片至动态资源主机上,但静态资源却没有该图片,初步解决方案:使用文件同步软件,实时同步图片等流格式资源。

六、部署Rsync+inodify,实现静态资源主机同步上传资源图片目录,解决图片不能显示问题
1 2 3 4 5 6 7 8 9 10 11 12 13 14 15 16 17 18 19 20 21 22 23 24 25 26 27 28 29 30 31 32 33 34 35 36 37 38 39 40 41 42 43 44 45 46 47 48 49 50 51 52 53 54 | 1、将StaticServer2配置为备份端,同步动态资源资源DynamicServer2下的web图片上传目录文件~]# rpm -qa rsync~]# vim /etc/rsyncd.conf #尾行追加uid = root #指定执行备份的用户及组权限为root用户gid = rootuser chroot = no #关闭chrootmax connections = 200 #最大连接数timeout = 600 pid file = /var/run/rsyncd.pidlock file = /var/run/rsyncd.locklog file = /var/log/rsyncd.log[web]path=/data/web/www/wp-content/uploadsignore errorsread only = nolist = nohosts allow = 172.16.39.0/255.255.0.0 #只允许39网段进行同步auth users = rsync #认证的用户名secrets file = /etc/rsyncd.password #指定密码文件2、创建rsync同步用户密码文件~]# echo “rsync:abc.123” > /etc/rsyncd.password ~]# chmod 600 /etc/rsyncd.password3、启动服务~]# systemctl start rsyncd ~]# ss -tnlp |grep rsync #查看是否开启873端口~]# systemctl enable rsyncd #设置rsync开机启动4、部署Rsync同步端DynamicServer2,实时同步本机web图片数据至StaticServer2,并保持以DynamicServer2为主两台服务器web图片资源一致性。~]# yum install rsync inodify-tools inodify-tools-devel如果yum源没有找到inodify,就直接下载源码包进行编译~]# tar -xf inodify-tools-3.13.tar.gz~]# ./configure --prefix=/usr/local/inotify ~]# ]# make -j 2 && make install~]# ln -sv /usr/local/inotify/bin/inotifywait /usr/bin/~]# echo “abc.123” > /etc/rsyncd.password~]# chmod 600 /etc/rsyncd.password#创建实时同步脚本~]# vim /etc/rsync.sh#!/bin/bashhost=172.16.39.15 #数据备份主机src=http://www.mamicode.com//data/web/www/wp-content/uploads/ #想要备份的目录des=webuser=rsync/usr/bin/rsync -vzrtopg --delete --progress --password-file=/etc/rsyncd.password $src $user@$host::$des/usr/bin/inotifywait -mrq --timefmt ‘%d/%m/%y %H:%M‘ --format ‘%T %w%f%e‘ -e modify,delete,create,attrib $src \ | while read filesdo/usr/bin/rsync -vzrtopg --delete --progress --password-file=/etc/rsyncd.password $src $user@$host::$desecho "${files} was rsynced" >>/tmp/rsync.log 2>&1done5、添加开机自动运行脚本~]# chmod 764 /etc/rsync.sh~]# echo "/usr/bin/bash /etc/rsync.sh &" >> /etc/rc.local #开机后台自动运行该脚本~]# chmod 750 /etc/rc.d/rc.local #Centos7,rc.local没有执行权限,要给予权限才能执行~]# sh /etc/rsync.sh & #执行同步脚本 |
七、测试
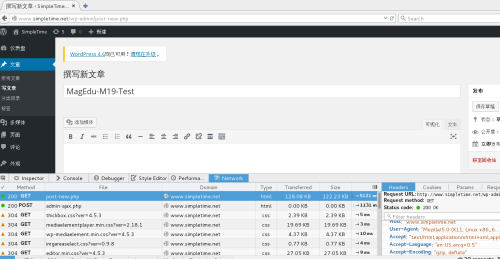
1、图文博客发布

1 2 3 4 5 6 7 8 9 10 11 12 13 14 15 16 17 18 19 20 21 22 23 24 25 26 27 28 29 30 31 32 33 34 35 36 37 38 39 40 | 2、PURGE清空Varnish缓存测试~]# curl -X PURGE www.simpletime.net/ <!DOCTYPE html><html> <head> <title>200 Purged</title> </head> <body> <h1>Error 200 Purged</h1> <p>Purged</p> <h3>Guru Meditation:</h3> <p>XID: 100925448</p> <hr> <p>Varnish cache server</p> </body></html>3、压力测试 #存在缓存服务器,单机测试只做参考~]# ab -c 20000 -n 20000 -r www.simpletime.net/Requests per second: 670.86 [#/sec] (mean)Time per request: 29812.421 [ms] (mean)Time per request: 1.491 [ms] (mean, across all concurrent requests)~]# ab -c 20000 -n 20000 -r www.simpletime.net/Requests per second: 521.78 [#/sec] (mean)Time per request: 38330.212 [ms] (mean)Time per request: 1.917 [ms] (mean, across all concurrent requests)~]# ab -c 20000 -n 20000 -r www.simpletime.net/Requests per second: 521.78 [#/sec] (mean)Time per request: 38330.212 [ms] (mean)Time per request: 1.917 [ms] (mean, across all concurrent requests)4、HAProxy调度器挂了,整个架构崩溃...5、Varnish挂一台,没事,有冗余,高可用实现,另一台Varnish压力增大,尽快修复故障机器即可。6、后端主机,理论上动静态群集组能冗余各组一台服务器故障,可因为NFS文件系统懒人配置,NFS客户端挂了没事,NFS服务端挂了,GameOver...7、文件服务器NFS服务端挂了,(NFS服务器没有做冗余)GameOver...8、Rsync+Inodify文件实时同步系统挂了,服务器还能访问,只是图片等流格式文件不显示了...9、MysqlServer挂了,无冗余,(GameOver)...10、后端应用服务器Nginx日志示例:~]# tail /var/log/nginx/access.log172.16.39.15(VarnishIP) - - [26/Aug/2016:17:09:56 +0800] "POST /wp-admin/admin-ajax.php HTTP/1.1" 200 32 "http://172.16.39.50/wp-admin/post-new.php" "Mozilla/5.0 (Windows NT 6.1; WOW64) AppleWebKit/537.36 (KHTML, like Gecko) Chrome/49.0.2623.110 Safari/537.36" "172.16.39.5(客户端IP), 172.16.39.50(HAProxyIP)" |
八、总结
1、架构优点:
(1)HAProxy为Varnish缓存服务器提供了高可用的负载均衡,其使用的算法,也为Varnish提升了缓存命中率;
(2)HAProxy提供Web图形化管理界面,节约了学习成本;
(3)Varnish的高效缓存机制极大的提升了Web应用的性能,降低了Web服务器的压力;
(4)Varnish给后端Web服务器提供了高可用负载均衡,并使用了动态分离技术,保障了后端主机的冗余,显著提升了其性能;
(5)NFS+Rsync+inodify基本解决了该架构存储的问题,该架构文件存储因服务器有限,并没有设计好,储存服务器因有单独的网络存储服务器来提供;
2、冗余不足:
(1)Nginx负载均衡调度器,没有冗余能力,易出现单点故障。
解决方案:增加服务器,使用Keepalive做高可用。
(2)MysqlServer,没有冗余能力。
解决方案:增加服务器,使用Keepalive做高可用。
(3)NFS文件服务,没有冗余能力。
解决方案:可以增加服务器,使用rsync+inodify实现数据实时同步,再用keepalive做高可用。
3、性能瓶颈:
(1)NFS文件系统,因网络IO能力与磁盘本身性能,多台主机同时挂载执行读取读写操作,势必带来性能下降,根据木桶原理,此短板已成为该群集方案性能瓶颈。
(2)在大量的读写访问下,数据库的压力会非常大,从而影响性能。
解决方案:a、主从复制,主要提供高可用冗余能力,对性能有所提升,对数据压力不算太大的企业可选方案;
b、高可用负载均衡,扩展性强,同时提供高可用及负载均衡,性能有极大提升;
4、会话保持
(1)会话保持机制因添加memcache服务器,使用其sesion功能;
友情链接:
1、Nginx日志过滤模块官网下载链接
https://github.com/cfsego/ngx_log_if/
2、Varnish4.0官方帮助指南
http://www.varnish-cache.org/docs/4.0/users-guide/
以上均为个人观点,本架构还有许多不足之处,仅作学习交流之用;
HAProxy+Varnish+LNMP实现高可用负载均衡动静分离集群部署
