首页 > 代码库 > nginx
nginx
###################nginx######################
1.nginx安装
下载nginx-1.12.0.tar.gz安装包
tar zxf nginx-1.12.0.tar.gz
[root@server3 nginx-1.12.0]# useradd -M -d /usr/local/lnmp/nginx -s /sbin/nologin -u 800 ##创建nginx用户
[root@server3 nginx-1.12.0]# id nginx ##查看用户是否存在
uid=800(nginx) gid=800(nginx) groups=800(nginx)
[root@server3 nginx-1.12.0]# yum install -y gcc
[root@server3 nginx-1.12.0]# ./configure --prefix=/usr/local/lnmp/nginx --user=nginx --group=nginx --with-threads --with-file-aio --with-http_ssl_module --with-http_stub_status_module ##添加模块
根据添加模块时的报错安装相关软件
yum install pcre-devel -y
yum install opensll-devel -y
make && make install ##编译并进行安装
[root@server3 ~]# netstat -antlp
Active Internet connections (servers and established)
Proto Recv-Q Send-Q Local Address Foreign Address State PID/Program name
tcp 0 0 0.0.0.0:80 0.0.0.0:* LISTEN 12618/nginx
tcp 0 0 0.0.0.0:22 0.0.0.0:* LISTEN 922/sshd
tcp 0 0 127.0.0.1:25 0.0.0.0:* LISTEN 998/master
tcp 0 0 172.25.6.3:22 172.25.6.250:37374 ESTABLISHED 1052/sshd
tcp 0 0 :::22 :::* LISTEN 922/sshd
tcp 0 0 ::1:25 :::* LISTEN 998/master
2.nginx虚拟主机
[root@server3 conf]# vim nginx.conf
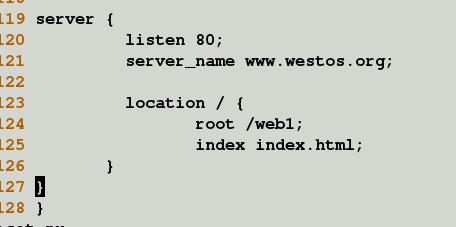
[root@server3 /]# mkdir web1
mkdir: cannot create directory `web1‘: File exists
[root@server3 /]# cd web1/
[root@server3 web1]# ls
[root@server3 web1]# vim index.html
<h1>server</h1>
测试:

3. https
[root@server3 certs]# make cert.pem
umask 77 ; \
PEM1=`/bin/mktemp /tmp/openssl.XXXXXX` ; \
PEM2=`/bin/mktemp /tmp/openssl.XXXXXX` ; \
/usr/bin/openssl req -utf8 -newkey rsa:2048 -keyout $PEM1 -nodes -x509 -days 365 -out $PEM2 -set_serial 0 ; \
cat $PEM1 > cert.pem ; \
echo "" >> cert.pem ; \
cat $PEM2 >> cert.pem ; \
rm -f $PEM1 $PEM2
Generating a 2048 bit RSA private key
......................................+++
..........................+++
writing new private key to ‘/tmp/openssl.Qcb8J6‘
-----
You are about to be asked to enter information that will be incorporated
into your certificate request.
What you are about to enter is what is called a Distinguished Name or a DN.
There are quite a few fields but you can leave some blank
For some fields there will be a default value,
If you enter ‘.‘, the field will be left blank.
-----
Country Name (2 letter code) [XX]:cn
State or Province Name (full name) []:shaanxi
Locality Name (eg, city) [Default City]:xi‘an
Organization Name (eg, company) [Default Company Ltd]:westos
Organizational Unit Name (eg, section) []:linux
Common Name (eg, your name or your server‘s hostname) []:server3
Email Address []:westos@qq.com
[root@server3 certs]# ls
ca-bundle.crt cert.pem Makefile
ca-bundle.trust.crt make-dummy-cert renew-dummy-cert
[root@server3 certs]# mv cert.pem /usr/local/lnmp/nginx/conf/
[root@server3 certs]# nginx -s reload
测试:

4.nginx访问控制
[root@server3 certs]# cd /usr/local/lnmp/nginx/conf/
[root@server3 conf]# vim nginx.conf
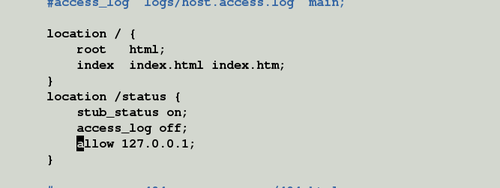
[root@server3 conf]# nginx -s reload
测试:

5.网页重写
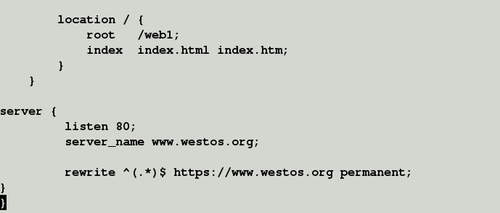
[root@server3 admin]# nginx -s reload
测试:

6.负载均衡(一)
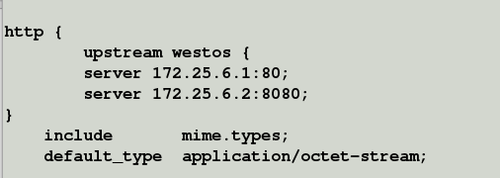

修改6.1和6.2主机的httpd的配置文件,将6.1的端口改为80,将6.2的端口改为8080,并重启httpd使生效,如果火墙开启,则关闭
测试:
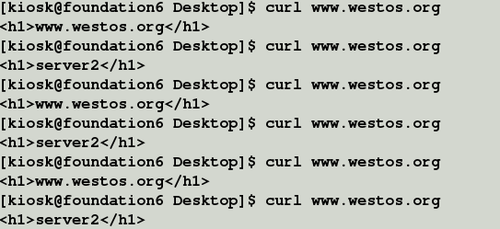
7.负载均衡(二)

[root@server3 html]# nginx -t
nginx: the configuration file /usr/local/lnmp/nginx/conf/nginx.conf syntax is ok
nginx: configuration file /usr/local/lnmp/nginx/conf/nginx.conf test is successful
[root@server3 html]# nginx -s reload
打开6.3的httpd,修改端口为8000
如果6.1和6.2httpd正常

如果两者挂掉

8.负载均衡(三)

[root@server3 html]# nginx -s reload
如果6.1和6.2正常

如果6.1挂掉

nginx
