首页 > 代码库 > SVN学习笔记二——客户端使用
SVN学习笔记二——客户端使用
SVN部署完成并成功配置完成后,就是使用的事情了,对于SVN,使用最多的往往是开发人员而不是运维人员,所以可能一些开发人员在这方面都比运维人员更熟悉,在我的工作经历中就曾有一个开发自行搭建SVN并且给开发和运维做培训的,强!
好了,上面主要是说其实对于SVN使用反而是开发比较在行,所以这里就简单的记录一下SVN客户端的使用吧。
Windows客户端的使用(TortoiseSVN)
1、安装TortoiseSVN,注意软件区分32位和64位,下载的时候请下载对应版本,然后安装只需下一步到完成即可。安装完成后,可能右键菜单中没有svn的命令,重启一下计算机就有了。
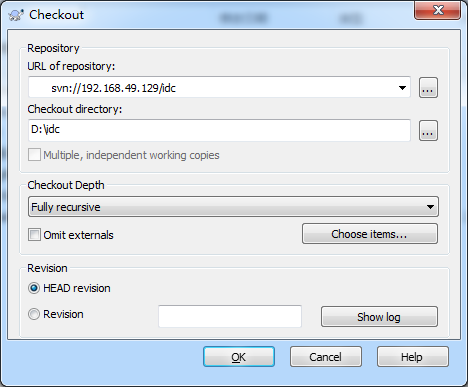
2、安装完成后,到windows中的任意路径下,新建一个文件夹,然后右键选择“SVN checkout”,然后在弹出的窗口中输入SVN server的相关信息,最后确定。
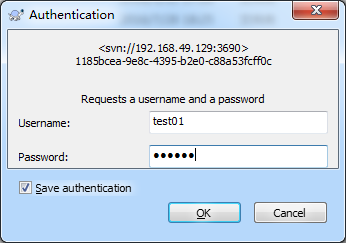
3、服务器要求输入用户凭据,这里输入之前创建的用户名密码,确认,如果防止后续重复要求输入用户凭据,可以选择记住凭据。
4、成功checkout后,出现以下窗口,返回到windows的对应路径下,可以看到文件夹上有一个绿色的对勾,这就表示已经成功从SVN server上checkout了文件,并且和SVN server保持一致状态。


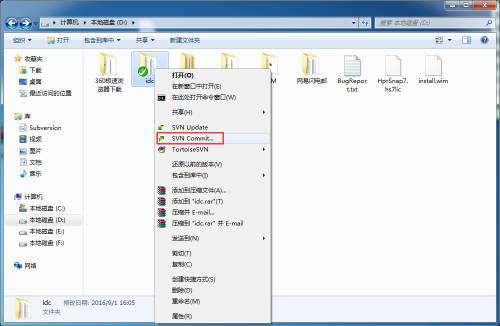
5、好的,在idc文件夹下创建两个文件,文件创建之后,会有一个蓝色的问号标志。然后右键文件夹,选择“SVN commit”。

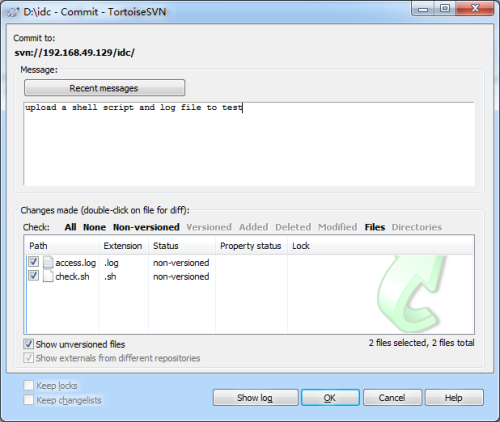
6、输入对上传内容的评论,以便其他人能对该代码有所了解,也方便自己过后查找,然后选择新增的文件,最后确认提交。
7、成功提交之后,可以看到以下窗口,版本从0变为1,SVN对每一次的增删修改等操作都会生成一个新的版本,以保证修改不会丢失,且可回溯。再回到windows资源管理器,此时文件都是绿色的对勾,表示所有文件都已提交到SVN。


Linux客户端的使用(主要是命令行)
估计svn在Linux上很少用到客户端,也就是运维人员可能用到,比如部署服务可以从SVN上取相关的配置或者shell脚本等,下面主要介绍一些命令:
[root@mylinux hooks]# svn --help
usage: svn <subcommand> [options] [args]
Subversion command-line client, version 1.6.11.
Type ‘svn help <subcommand>‘ for help on a specific subcommand.
Type ‘svn --version‘ to see the program version and RA modules
or ‘svn --version --quiet‘ to see just the version number.
Most subcommands take file and/or directory arguments, recursing
on the directories. If no arguments are supplied to such a
command, it recurses on the current directory (inclusive) by default.
Available subcommands:
add
blame (praise, annotate, ann)
cat
changelist (cl)
checkout (co)
cleanup
commit (ci)
copy (cp)
delete (del, remove, rm)
diff (di)
export
help (?, h)
import
info
list (ls)
lock
log
merge
mergeinfo
mkdir
move (mv, rename, ren)
propdel (pdel, pd)
propedit (pedit, pe)
propget (pget, pg)
proplist (plist, pl)
propset (pset, ps)
resolve
resolved
revert
status (stat, st)
switch (sw)
unlock
update (up)
Subversion is a tool for version control.
For additional information, see http://subversion.tigris.org/
这是svn的所有命令,如果查看更详细的命令可以svn command --help来查看,当然也可以到官网上查看帮助信息。
1)checkout命令
mkdir -p /opt/data/www
svn co svn://192.168.49.129/idc /opt/data/www/ --username=test01 --password=123456
#创建一个目录,并且svn库checkout到本地
2)查看文件命令
 svn ls svn://192.168.49.129/idc/ --username=test01 --password=123456
# 列出svn版本库中的文件
 svn list svn://192.168.49.129/idc/ --username=test01 --password=123456
# 与上一条命令等同
svn cat svn://192.168.49.129/idc/testf.txt --username=test01 --password=123456
# 查看svn版本库中某一文件内容
3)上传文件命令
svn add /opt/data/www/hello.txt  --username=test01 --password=123456
# 上传文件到svn中,注意:上传并非提交,这里只是添加到checkout本地的目录中,svn库中并没有
[root@mylinux hooks]# svn ls svn://192.168.49.129/idc/ --username=test01 --password=123456
a.txt
access.log
b.txt
c.txt
check.sh
testf.txt
testfile.txt
xm01.txt
新建文本文档.txt
4)提交命令
svn ci -m "add hello world" /opt/data/www/
# 因为之前往本地目录中添加了hello.txt文件,但是并未提交到svn,所以执行该命令后,就将hello.txt提交到svn库中
[root@mylinux hooks]# svn ls svn://192.168.49.129/idc/ --username=test01 --password=123456
a.txt
access.log
b.txt
c.txt
check.sh
hello.txt
testf.txt
testfile.txt
xm01.txt
新建文本文档.txt
[root@mylinux hooks]# svn cat svn://192.168.49.129/idc/hello.txt --username=test01 --password=123456
Hello,World.
5)拷贝svn库命令
svn copy svn://192.168.49.129/idc svn://192.168.49.129/idc/branch -m "add a branch" --username=test01 --password=123456
# 拷贝svn的idc库到idc下的分支,相当于给idc库创建一个分支
6)删除命令
svn delete svn://192.168.49.129/idc/c.txt -m "test for delete" --username=test01 --password=123456
# 删除idc库中的c.txt文件,注意这里的删除是直接提交更改的,即本地目录中也将同步该操作
[root@mylinux hooks]# ls /opt/data/www/
access.log b.txt hello.txt testf.txt 新建文本文档.txt
a.txt check.sh testfile.txt xm01.txt
好了,Linux客户端的操作基本上就是这些了,最后补上一张图,是对客户端操作的一个总结吧。
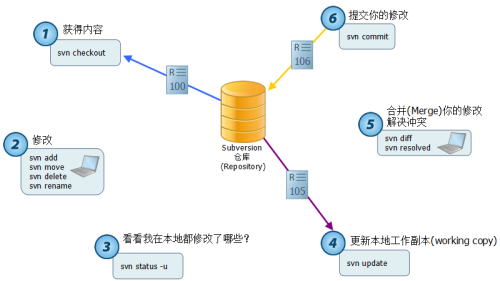
图片来源为:http://blog.chinaunix.net/uid-27004869-id-4112057.html
本文出自 “IT小二郎” 博客,请务必保留此出处http://jerry12356.blog.51cto.com/4308715/1845542
SVN学习笔记二——客户端使用
