首页 > 代码库 > Keepalived 高可用ipvs和nginx服务
Keepalived 高可用ipvs和nginx服务
Keepalived 高可用ipvs和nginx服务
============================================================================
概述:
============================================================================
回顾:

Virtual Server(虚拟服务器):
1.配置参数:
★虚拟服务器的配置格式:
virtual_server IP port | virtual_server fwmark int { ... real_server { ... } ... }★常用参数
keepalived高可用的ipvs-dr集群
前面讲到用LVS的DR模式来实现Web应用的负载均衡。为了防止LVS服务器自身的单点故障导致整个Web应用无法提供服务,因此还得利用Keepalived实现lvs的高可用性。
1.实验原理:
即客户端访问VIP(域名解析到VIP),LVS接收情况后根据负载均衡调度算法,转发请求到真实服务器,真实服务器接收到客户端请求后,将处理结果直接返回给客户端。
实验原理图如下:(借用别人的)

2.实验环境准备
准备四台虚拟主机,两台作为real_server,两台作为keepalived+lvs-dr模型的调度器;
在两个RS上修改内核参数,来限制arp响应和通告的级别;
配置两台keepalived+lvs-dr调度器的virtual_server
3.ip地址规划:
keepalived+lvs-dr模型的调度器
node1:10.1.252.161
node2:10.1.249.203
要转移的ip地址:
10.1.252.73,把其80端口定义为集群服务
Real_server
RS 1:10.1.252.37
RS 2:10.1.252.153
其80端口分别向外提供web服务
4.实验环境搭建:
1)首先为两台RS准备httpd服务,并提供测试页面如下:
RS 1

RS 2为一台CentOS 6主机

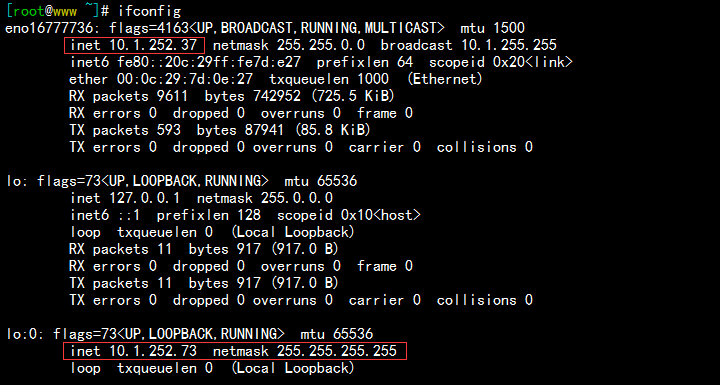
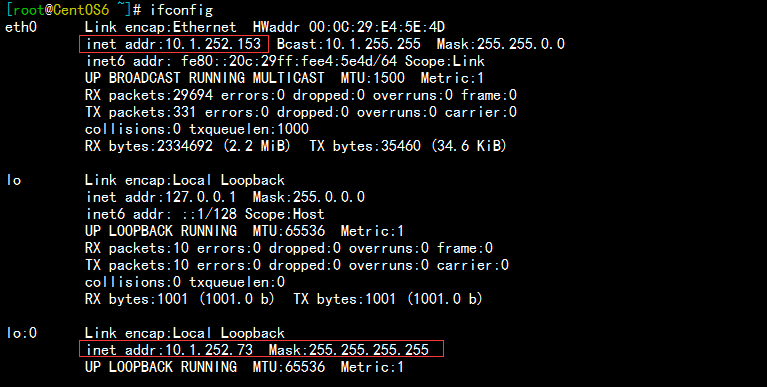
2)接下来我们要修改两台RS的内核参数arp_ignore和arp_announce,然后配置其本地lo网卡的网卡别名作为VIP(配置可参考先前的文档脚本),如下:
RS 1 vip如下:

RS 2 vip如下:

5.配置调度器node1,和node2,的keepalived服务,手动测试看能否调度到后端RS,过程如下:
1)node1配置如下:
[root@node1 ~]# cat  /etc/keepalived/keepalived.conf
! Configuration File for keepalived

global_defs {
   notification_email {
       root@localhost
   }
   notification_email_from keepalived@localhost
   smtp_server 127.0.0.1
   smtp_connect_timeout 30
   router_id node1
   vrrp_mcast_group4 224.0.100.19
}

vrrp_instance VI_1 {
    state MASTER
    interface eno16777736
    virtual_router_id 17
    priority 100
    advert_int 1
    authentication {
        auth_type PASS
        auth_pass f7111b2e
    }
    virtual_ipaddress {
        10.1.252.73/16 dev eno16777736
    }
    notify_master "/etc/keepalived/notify.sh master"
    notify_backup "/etc/keepalived/notify.sh backup"
    notify_fault "/etc/keepalived/notify.sh fault"
}
2)node2,配置如下;
[root@node2 ~]# cat /etc/keepalived/keepalived.conf
! Configuration File for keepalived

global_defs {
   notification_email {
       root@localhost
   }
   notification_email_from keepalived@localhost
   smtp_server 127.0.0.1
   smtp_connect_timeout 30
   router_id node1
   vrrp_mcast_group4 224.0.100.19
}

vrrp_instance VI_1 {
    state BACKUP
    interface eno16777736
    virtual_router_id 17
    priority 98
    advert_int 1
    authentication {
        auth_type PASS
        auth_pass f7111b2e
    }
    virtual_ipaddress {
        10.1.252.73/16 dev eno16777736
    }
     notify_master "/etc/keepalived/notify.sh master"
     notify_backup "/etc/keepalived/notify.sh backup"
     notify_fault "/etc/keepalived/notify.sh fault"
}
3)在node1上对转移ip:10.1.252.73的80端口定义集群服务,如下:

4)启动node1节点上的keepalived服务,然后在node2上做测试,如下:
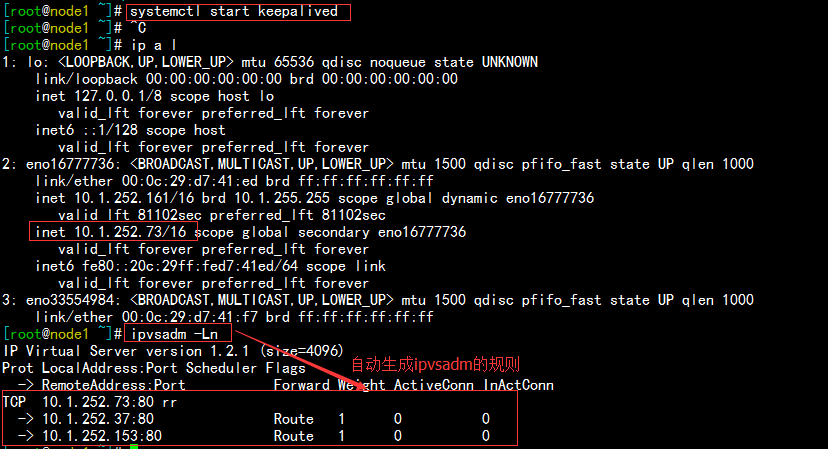
启动node1,之后查看ip,因为此时node1为主节点,所以转移ip在node1上,如下:

在node2上做测试,可以看到是以轮询的方式响应,如下:

5)关闭node1上的keepalived服务,使10.1.252.73的地址转移到node2,以同样的方法在node2上定义转移ip的集群服务,在node1上测试发现,同样可以以轮询的方式正常调度到后端的RS服务器。

6.如上,两个节点手动测试都没有问题,清空两个调度器上的定义的集群服务;接下来我们要通过定义keepalived的配置文件来自动生成ipvsadm定义的规则。
1)首先编辑node1的配置文件,定义virtual server(虚拟主机服务),如下:
[root@node1 keepalived]# cat keepalived.conf
! Configuration File for keepalived

global_defs {
   notification_email {
       root@localhost
   }
   notification_email_from keepalived@localhost
   smtp_server 127.0.0.1
   smtp_connect_timeout 30
   router_id node1
   vrrp_mcast_group4 224.0.100.19
}

vrrp_instance VI_1 {
    state MASTER
    interface eno16777736
    virtual_router_id 17
    priority 100
    advert_int 1
    authentication {
        auth_type PASS
        auth_pass f7111b2e
    }
    virtual_ipaddress {
        10.1.252.73/16 dev eno16777736
    }
    notify_master "/etc/keepalived/notify.sh master"
    notify_backup "/etc/keepalived/notify.sh backup"
    notify_fault "/etc/keepalived/notify.sh fault"
}

virtual_server 10.1.252.73 80 {       # 定义转移ip端口80的集群服务
    delay_loop 3
    lb_algo rr
    lb_kind DR
    protocol TCP

    real_server 10.1.252.37 80 {      # 定义集群服务包含的RS 1
         weight 1                     # 权重为1
	 HTTP_GET {                   # 定义RS1的健康状态检测
	     url {
	       path /
	       status_code 200
	     }
	     connect_timeout 1
	     nb_get_retry 3
	     delay_before_retry 1
	  }
    }
    real_server 10.1.252.153 80 {      # 定义集群服务包含的RS 1
         weight 1                      # 权重为1
	 HTTP_GET {                    # 定义RS1的健康状态检测
	     url {
	       path /
	       status_code 200
	     }
	     connect_timeout 1
	     nb_get_retry 3
	     delay_before_retry 1
	  }
    }
}
同理,在node2的节点上也添加定义virtual server,如下:
[root@node2 keepalived]# cat  keepalived.conf
! Configuration File for keepalived

global_defs {
   notification_email {
       root@localhost
   }
   notification_email_from keepalived@localhost
   smtp_server 127.0.0.1
   smtp_connect_timeout 30
   router_id node1
   vrrp_mcast_group4 224.0.100.19
}

vrrp_instance VI_1 {
    state BACKUP
    interface eno16777736
    virtual_router_id 17
    priority 98
    advert_int 1
    authentication {
        auth_type PASS
        auth_pass f7111b2e
    }
    virtual_ipaddress {
        10.1.252.73/16 dev eno16777736
    }
    notify_master "/etc/keepalived/notify.sh master"
    notify_backup "/etc/keepalived/notify.sh backup"
    notify_fault "/etc/keepalived/notify.sh fault"
}

virtual_server 10.1.252.73 80 {
    delay_loop 3
    lb_algo rr
    lb_kind DR
    protocol TCP

    real_server 10.1.252.37 80 {
         weight 1
	 HTTP_GET {
	     url {
	       path /
	       status_code 200
	     }
	     connect_timeout 1
	     nb_get_retry 3
	     delay_before_retry 1
	  }
    }
    real_server 10.1.252.153 80 {
         weight 1
	 HTTP_GET {
	     url {
	       path /
	       status_code 200
	     }
	     connect_timeout 1
	     nb_get_retry 3
	     delay_before_retry 1
	  }
    }
}
7.如上,两个节点node1和node2都已经定义好虚拟主机的集群服务,现在我们开始测试。
1)启动node1和node2上的keepalived服务,因为node1为主节点,所以首先连接转移ip的集群服务,如下:

使用curl测试访问发现,以轮询的方式响应,如下:

现在我停止后端主机RS1,再次在node1上使用ipvsadm查看,RS1已经不存在了,使用curl请求,这是只有RS2响应,如下:
[root@node1 ~]# ipvsadm -Ln
IP Virtual Server version 1.2.1 (size=4096)
Prot LocalAddress:Port Scheduler Flags
  -> RemoteAddress:Port           Forward Weight ActiveConn InActConn
TCP  10.1.252.73:80 rr
  -> 10.1.252.153:80              Route   1      0          0
You have new mail in /var/spool/mail/root
[root@node2 ~]# for i in {0..9};do curl http://10.1.252.73 ;done
<h1>RS 2 CentOS 6.8</h1>
<h1>RS 2 CentOS 6.8</h1>
<h1>RS 2 CentOS 6.8</h1>
<h1>RS 2 CentOS 6.8</h1>
<h1>RS 2 CentOS 6.8</h1>
<h1>RS 2 CentOS 6.8</h1>
<h1>RS 2 CentOS 6.8</h1>
<h1>RS 2 CentOS 6.8</h1>
<h1>RS 2 CentOS 6.8</h1>
<h1>RS 2 CentOS 6.8</h1>
把RS1启动,3s之后ipvsadm规则就又检测到了,使用curl请求,后端主机又是以轮询的方式响应:
[root@node1 ~]# ipvsadm -Ln
IP Virtual Server version 1.2.1 (size=4096)
Prot LocalAddress:Port Scheduler Flags
  -> RemoteAddress:Port           Forward Weight ActiveConn InActConn
TCP  10.1.252.73:80 rr
  -> 10.1.252.37:80               Route   1      0          0
  -> 10.1.252.153:80              Route   1      0          0
[root@node2 ~]# for i in {0..9};do curl http://10.1.252.73 ;done
<h1>RS 1</h1>
<h1>RS 2 CentOS 6.8</h1>
<h1>RS 1</h1>
<h1>RS 2 CentOS 6.8</h1>
<h1>RS 1</h1>
<h1>RS 2 CentOS 6.8</h1>
<h1>RS 1</h1>
<h1>RS 2 CentOS 6.8</h1>
<h1>RS 1</h1>
<h1>RS 2 CentOS 6.8</h1>
如果我们把后端的两台RS都停止服务,发现再使用ipvsadm就检测不到了,使用curl访问,提示拒绝访问,如下:
[root@node2 ~]# for i in {0..9};do curl http://10.1.252.73 ;done
curl: (7) Failed connect to 10.1.252.73:80; Connection refused
curl: (7) Failed connect to 10.1.252.73:80; Connection refused
curl: (7) Failed connect to 10.1.252.73:80; Connection refused
curl: (7) Failed connect to 10.1.252.73:80; Connection refused
curl: (7) Failed connect to 10.1.252.73:80; Connection refused
curl: (7) Failed connect to 10.1.252.73:80; Connection refused
curl: (7) Failed connect to 10.1.252.73:80; Connection refused
curl: (7) Failed connect to 10.1.252.73:80; Connection refused
curl: (7) Failed connect to 10.1.252.73:80; Connection refused
curl: (7) Failed connect to 10.1.252.73:80; Connection refused
8.现在我们就需要定义一个sorry_server,可以用来提醒用户,集群服务出现故障。这里要使用调度器本身的httpd服务来做更合适;并且,要保证两台调度器的web服务都启动起来。
注意:调度器的web服务在这是没有用的,因为80端口直接在INPUT链上已经被劫走,当做集群服务了,所以调度器上的web服务只能当做sorry_server。
1)在node1和node2上定义sorry_server如下:(以node1为例)
[root@node1 keepalived]# cat  keepalived.conf
! Configuration File for keepalived

global_defs {
   notification_email {
       root@localhost
   }
   notification_email_from keepalived@localhost
   smtp_server 127.0.0.1
   smtp_connect_timeout 30
   router_id node1
   vrrp_mcast_group4 224.0.100.19
}

vrrp_instance VI_1 {
    state MASTER
    interface eno16777736
    virtual_router_id 17
    priority 100
    advert_int 1
    authentication {
        auth_type PASS
        auth_pass f7111b2e
    }
    virtual_ipaddress {
        10.1.252.73/16 dev eno16777736
    }
    notify_master "/etc/keepalived/notify.sh master"
    notify_backup "/etc/keepalived/notify.sh backup"
    notify_fault "/etc/keepalived/notify.sh fault"
}

virtual_server 10.1.252.73 80 {
    delay_loop 3
    lb_algo rr
    lb_kind DR
    protocol TCP

    sorry_server 127.0.0.1 80   # 定义的 sorry_server为本机的80端口

    real_server 10.1.252.37 80 {
         weight 1
	 HTTP_GET {
	     url {
	       path /
	       status_code 200
	     }
	     connect_timeout 1
	     nb_get_retry 3
	     delay_before_retry 1
	  }
    }
    real_server 10.1.252.153 80 {
         weight 1
	 HTTP_GET {
	     url {
	       path /
	       status_code 200
	     }
	     connect_timeout 1
	     nb_get_retry 3
	     delay_before_retry 1
	  }
    }
}
2)然后我们编辑本机httpd服务的映射根目录,添加提醒用户的测试页面,如下:
[root@node1 html]# echo "<h1>LB Cluster Fault,this is Sorry Server 1</h1>" > /var/www/html/index.html
[root@node1 html]# cat /var/www/html/index.html
<h1>LB Cluster Fault,this is Sorry Server 1</h1>
3)在后端两台RS停止服务的情况下,使用ipvsadm查看,可以看到有本机的定义的sorry_server,使用curl访问如下:
[root@node1 ~]# ipvsadm -Ln
IP Virtual Server version 1.2.1 (size=4096)
Prot LocalAddress:Port Scheduler Flags
  -> RemoteAddress:Port           Forward Weight ActiveConn InActConn
TCP  10.1.252.73:80 rr
  -> 127.0.0.1:80                 Route   1      0          0
[root@node2 ~]# for i in {0..9};do curl http://10.1.252.73 ;done
<h1>LB Cluster Fault,this is Sorry Server 1</h1>
<h1>LB Cluster Fault,this is Sorry Server 1</h1>
<h1>LB Cluster Fault,this is Sorry Server 1</h1>
<h1>LB Cluster Fault,this is Sorry Server 1</h1>
<h1>LB Cluster Fault,this is Sorry Server 1</h1>
<h1>LB Cluster Fault,this is Sorry Server 1</h1>
<h1>LB Cluster Fault,this is Sorry Server 1</h1>
<h1>LB Cluster Fault,this is Sorry Server 1</h1>
<h1>LB Cluster Fault,this is Sorry Server 1</h1>
<h1>LB Cluster Fault,this is Sorry Server 1</h1>
4)后端主机只要有一个RS启动,3s之后sorry_server就会下线了,由后端主机提供服务。
如上,整个过程就是利用keepalived高可用lvs-dr负载均衡的web集群。。。
=============================================================================
keepalived高可用nginx服务
Keepalived 高可用ipvs和nginx服务


