首页 > 代码库 > 深入Nginx优化
深入Nginx优化
1、优化nginx的必要性
学习 nginx 有必然要了解下如何进一步压榨 nginx 的性能。要是你要搭建自己的服务器,那么你肯定会想方设法地优化 nginx(就算你的服务器目前压力不是很大),既然这样,那我们就必须进一步了解 nginx。
2、nginx可以从哪里优化
对于 nginx 本身,最重要的也就是它的配置文件了,在这个配置文件中,可以配置 nginx 的各种属性。既然我们需要对 nginx 进行优化,那么首先想到的肯定就是这个配置文件,这个文件名为 nginx.conf,它保存有 nginx 不同模块的全部设置。
3、具体模块配置
当我们打开 nginx 的配置文件,可以看出它分为四大模块。顶层模块就是最前面、暴露在最外面的。下面依次是events 模块、http 模块,mail 模块(被注释掉了)。这就是 nginx 总体的配置文件结构。
3.1、顶层配置

1和3行的user和pid这两项对我们的目的完全没有影响,所以我们没必要修改。
第 2 行的worker_processes(这里的原始值是 1),可以通过这样一个命令来查看:

(因为是虚拟机,所以这里的逻辑cpu个数是0)
这里定义了 nginx 在为你的网站提供服务时,worker 进程的数量。据参考,这个优化值受到包括 CPU 内核数、存储数据的磁盘数、负载值在内的许多因素的影响。如果不确定的话,将其设置为可用的 CPU内核的数量是一个不错的选择(设置为“auto”,将会尝试自动检测可用的值)。
3.2、event模块
这个模块包括了 nginx 中处理链接的全部设置:

worker_connections 设置了一个 worker 进程可以同时打开的链接数。这个值原本受 events 里面的 worker_rlimit_nofile 参数所限制,但是现在这里没有这一项参数,那么调整的幅度就不要太大。虽然没有既定值,但是你只要知道这个值的含义,往后如果有需求,完全可以回头调整。
multi_accept 的作用是告诉 nginx 在收到新链接的请求通知时,尽可能接受链接。当然,得让他开着。
3.3、http模块
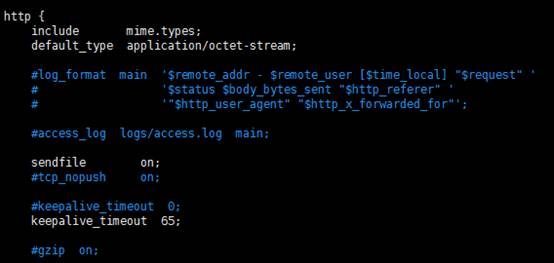
当外部有 http 请求时, nginx 的 http 模块才是处理这个请求的核心。我们只要简单的了解一下就能优化不少参数。

在 http 的配置文件中我们可以看到 每一个小模块 都是被独立标注出来的,很好区分,这里我们就尽量一个一个查看:
(1)、sendfile 指向 sendfile()函数。sendfile() 在磁盘和 TCP 端口(或者任意两个文件描述符)之间复制数据。不要在意这些细节,说了这么多,只是想说,开着就好。
(2)、tcp_nopush 配置 nginx 在一个包中发送全部的头文件,而不是一个一个发送。
(3)、tcp_nodelay 配置 nginx 不要缓存数据,应该快速的发送小数据——这仅仅应该用于频繁发送小的碎片信息而无需立刻获取响应的、需要实时传递数据的应用中。
(4)、keepalive_timeout 指定了与客户端的 keep-alive 链接的超时时间。服务器会在这个时间后关闭链接。我们可以降低这个值,以避免让 worker 过长时间的忙碌。(可以改的低点,比如15)
(5)、access_log 确定了 nginx 是否保存访问日志。将这个设置为关闭可以降低磁盘 IO 而提升速度。
4、完整配置展示:
user www-data;
worker_processes8;
pid /run/nginx.pid;
events {
worker_connections 1024;
multi_accept on;
}
http {
##
# Basic Settings
##
sendfile on;
tcp_nopush on;
tcp_nodelay on;
keepalive_timeout 15;
types_hash_max_size 2048;
# server_tokens off;
# server_names_hash_bucket_size 64;
#server_name_in_redirect off;
include /etc/nginx/mime.types;
default_type application/octet-stream;
##
# Logging Settings
access_log off;
error_log /var/log/nginx/error.log;
# Gzip Settings
gzip on;
gzip_disable "msie6";
gzip_vary on;
gzip_proxied any;
gzip_comp_level 9;
gzip_buffers 16 8k;
gzip_http_version 1.1;
gzip_types text/plain text/css application/json application/x-javascripttext/xml application/xml application/xml+rss text/javascript;
##
# nginx-naxsi config
##
# Uncomment it if you installed nginx-naxsi
##
#include /etc/nginx/naxsi_core.rules;
##
# nginx-passenger config
##
# Uncomment it if you installednginx-passenger
##
#passenger_root /usr;
#passenger_ruby /usr/bin/ruby;
##
# Virtual Host Configs
##
include /etc/nginx/conf.d/*.conf;
include /etc/nginx/sites-enabled/*;
}
# mail {
# # See sample authentication script at:
# #http://wiki.nginx.org/ImapAuthenticateWithApachePhpScript
# # auth_http localhost/auth.php;
# # pop3_capabilities "TOP""USER";
# # imap_capabilities "IMAP4rev1""UIDPLUS";
# server {
# listen localhost:110;
# protocol pop3;
# proxy on;
# }
# server {
# listen localhost:143;
# protocol imap;
# proxy on;
# }
#}
本文出自 “Linux” 博客,请务必保留此出处http://syklinux.blog.51cto.com/9631548/1873385
深入Nginx优化
