首页 > 代码库 > 用户、组管理,源码包安装
用户、组管理,源码包安装
先讲解后试验,最后有截图文件
一、用户账户管理
1. 用户账户:
超级用户root(0)
程序用户(1~499)
普通用户(500~60000)
组账户:
基本组(私有组)
附加组(公共组)
2. /etc/passwd 保存用户账户的基本信息
# grep ^root /etc/passwd
root:x:0:0:root:/root:/bin/bash
字段1:帐号名root
字段2:密码占位符x
字段3:UID
字段4:GID
字段5:用户全名
字段6:宿主目录
字段7:登录Shell /sbin/nologin 不允许登录shell
3. /etc/shadow 保存密码字串/有效期等信息
# grep student /etc/shadow
student:$1$po/zD0XK$4HSh/Aeae/eJ6dNj1k7Oz1:14495:0:99999:7:::
字段1:帐号名称
字段2:加密的密码
字段3:从1970/1/1到上次修改密码的天数
字段4:多少天之内不能修改密码,默认值为0
字段5:密码的最长有效天数,默认值为99999
字段6:密码过期之前警告天数,默认值为7
字段7:密码过期之后账户宽限时间 3+5
字段8:帐号失效时间,默认值为空
字段9:保留字段(未使用)
密码过期:一旦超过密码过期日期,用户成功登陆,Linux会强迫用户设置一个新密码,设置完成后才开启Shell程序
账户过期:若超过账户过期日期,Linux会禁止用户登陆系统,即使输入正确密码,也无法登陆
4. useradd 添加账户
-u:指定 UID 标记号
-d:指定宿主目录,缺省为 /home/用户名
-e:指定帐号失效时间
-g:指定所属的基本组(组名或GID)
-G:指定所属的附加组(组名或GID)
-M:不为用户建立并初始化宿主目录
-s:指定用户的登录Shell
5. passwd 设置密码
-d 清空密码
-l 锁定用户账户
-S 查看用户账户的状态
-u 解锁用户账户
--stdin 从标准输入取密码
6. 与账户相关的文件和目录
/etc/default/useradd
/etc/login.defs
/etc/skel/
主要文件
~/.bash_profile 每次登录时执行
~/.bashrc 每次进入新的Bash环境时执行
~./bash_logout 每次退出登录时执行
全局
/etc/bashrc
/etc/profile
7. usermod 修改用户账户的属性
-l 更改用户账户登录名称
-L 锁定
-U 解锁
-u、-d、-e、-g、-G、-s与useradd相同
8. chage
-l 列出密码有效期
-d 3
-m 指定密码最小天数 4
-M 指定密码最大天数 5
-W 6
-I 指定密码失效后多少天锁定账户 7
-E 指定账户过期时间 YYYY-MM-DD 8
9. userdel 删除账户
-r 连同主目录一起删除
10. id 查看用户ID标识
-u 输出用户数字标识
-g 输出用户所在基本组的数字标识
-G 输出用户所在附加组的数字标识
-n 现实对应项的名称
二、组账户管理
1. /etc/group 组账号文件
# grep student /etc/group
字段1:组账户名称
字段2:密码占位符x
字段3:组账户GID号
字段4:本组的成员用户列表
2. /etc/gshadow 组账号管理信息
# grep student /etc/gshadow
字段1:组账户名称
字段2:加密后的密码字符串
字段3:本组的管理员列表
字段4:本组的成员用户列表
3. groupadd 添加组账户
-g 指定gid
4. gpasswd 设置组密码和组管理
-A 定义组管理员列表
-a 添加组成员
-d 删除组成员
-M 定义组成员列表,可设置多个
-r 移除密码
5. newgrp 切换所属基本组
6. groupdel 删除组
7. groups 查看用户组信息
三、源码包的编译安装
1. 准备开发环境gcc、g++、make
2. 源码安装基本过程
tar 解包/usr/src
./configure 配置
make 编译
make install 安装
一、用户账号管理
1. 创建账户
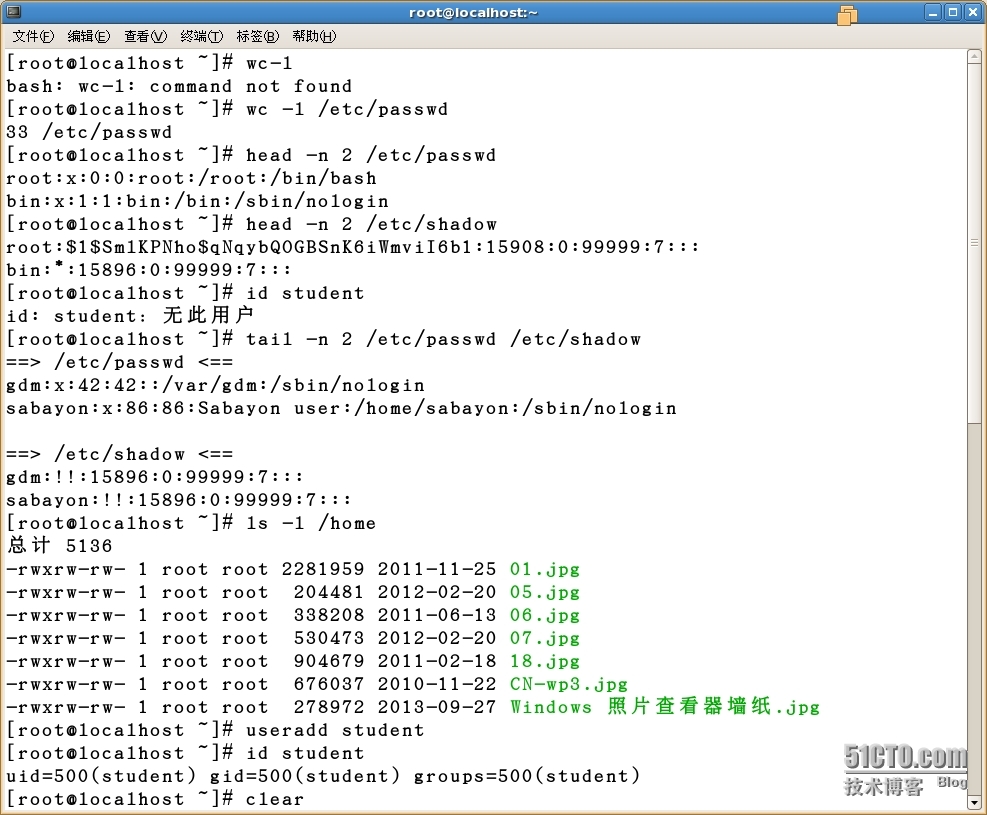
[root@localhost ~]# wc -l /etc/passwd /etc/shadow //统计有多少用户
[root@localhost ~]# head -n 2 /etc/passwd //显示头两行
[root@localhost ~]# head -n 2 /etc/shadow //显示头两行
[root@localhost ~]# id student //查看student用户id标示
[root@localhost ~]# tail -n 2 /etc/passwd /etc/shadow //显示尾两行
[root@localhost ~]# ls -l /home/ //列出/home/的内容
[root@localhost ~]# useradd student //新建用户student
[root@localhost ~]# id student //查看student用户id标示
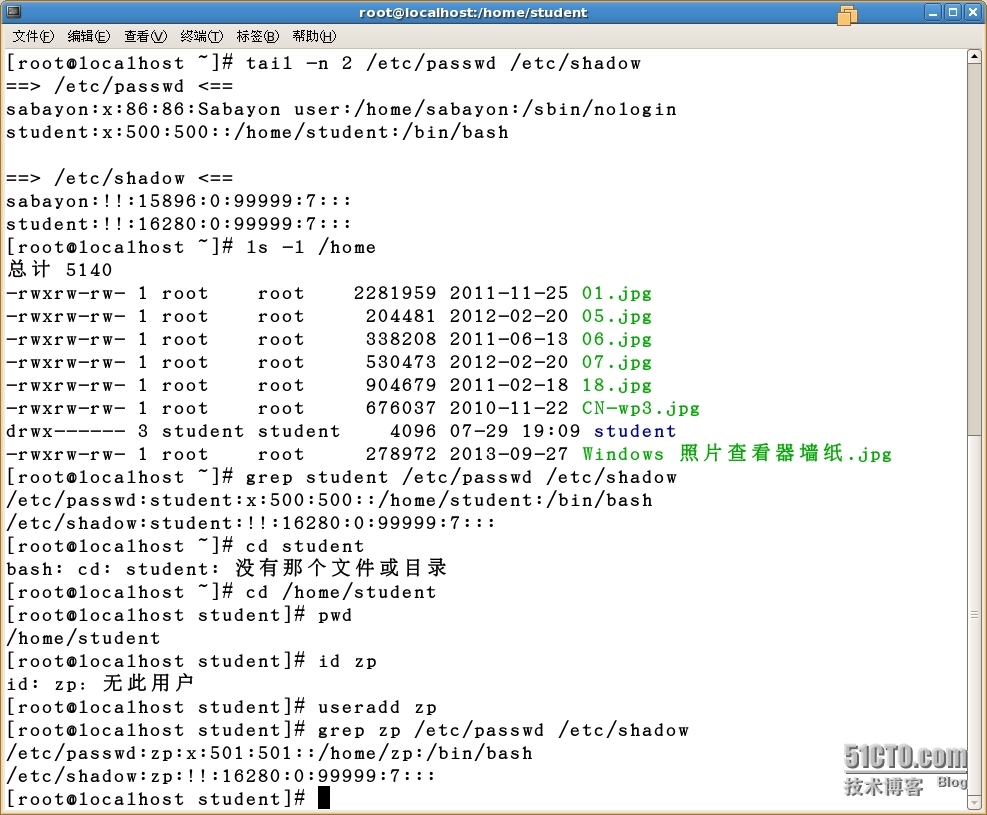
[root@localhost ~]# tail -n 2 /etc/passwd /etc/shadow //查看/etc/passwd和/etc/shadow的尾两行
[root@localhost ~]# ls -l /home/ //列出/home/的内容
[root@localhost ~]# grep student /etc/passwd //检索/etc/passwd种含有student的信息
[root@localhost ~]# grep student /etc/shadow //检索/etc/shadow种含有student的信息
[root@localhost ~]# cd ~student //切换到student的家目录
[root@localhost student]# pwd //查看当前目录
[root@localhost ~]# id zengye //查看zengye用户的id标示
[root@localhost ~]# useradd zengye //新建用户zengye
[root@localhost ~]# grep zengye /etc/passwd /etc/shadow //检索/etc/passwd种含有zengye的信息
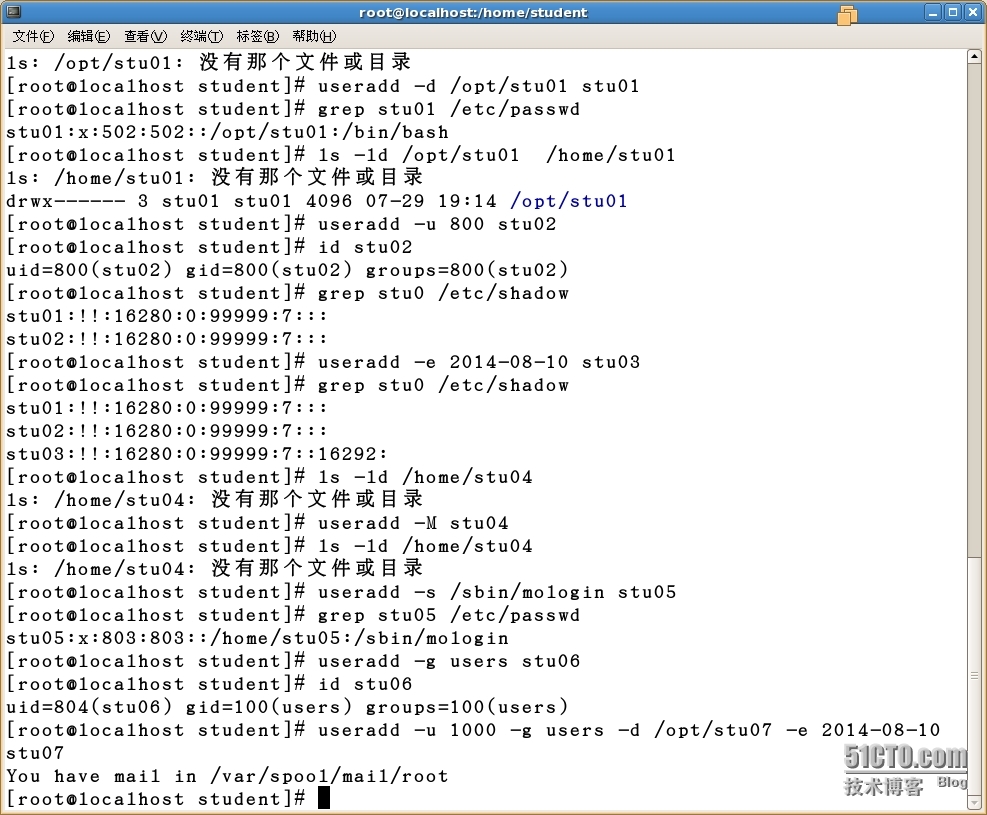
[root@localhost ~]# ls -ld /opt/stu01 //列出/opt/stu01/的内容
[root@localhost ~]# useradd -d /opt/stu01 stu01 //新建stu01用户家目录为/opt/stu01
[root@localhost ~]# grep stu01 /etc/passwd //检索/etc/passwd种含有stu01的信息
[root@localhost ~]# ls -ld /opt/stu01 //列出/opt/stu01/的内容
[root@localhost ~]# ls -ld /home/stu01 //列出/home/stu01/的内容
[root@localhost ~]# useradd -u 800 stu02 //新建用户stu02id标示为800
[root@localhost ~]# id stu02 //查看stu02用户的id标示
[root@localhost ~]# grep stu0 /etc/shadow //检索/etc/shadow种含有stu0的信息
[root@localhost ~]# useradd -e 2014-08-10 stu03 //新建用户stu03用户到期时间为2014-08-10
[root@localhost ~]# grep stu0 /etc/shadow //检索/etc/shadow种含有stu0的信息
[root@localhost ~]# ls -ld /home/stu04 //列出/home/stu04/的内容
[root@localhost ~]# useradd -M stu04 //新建用户stu04不建立家目录
[root@localhost ~]# ls -ld /home/stu04 //列出/home/stu04/的内容
[root@localhost ~]# useradd -s /sbin/nologin stu05 //新建用户stu05指定用户登陆的shell目录为/sbin/nologin(不能登录)
[root@localhost ~]# grep stu05 /etc/passwd //检索/etc/passwd种含有stu05的信息
[root@localhost ~]# useradd -g users stu06 //新建用户stu06默认属于users组
[root@localhost ~]# id stu06 //查看用户stu06的id标示
[root@localhost ~]# useradd -u 1000 -g users -d /opt/stu07 -e 2014-08-10 stu07 //新建用户stu07id标示为1000默认属于users组家目录为/opt/stu07账户到期时间为2004-8-10
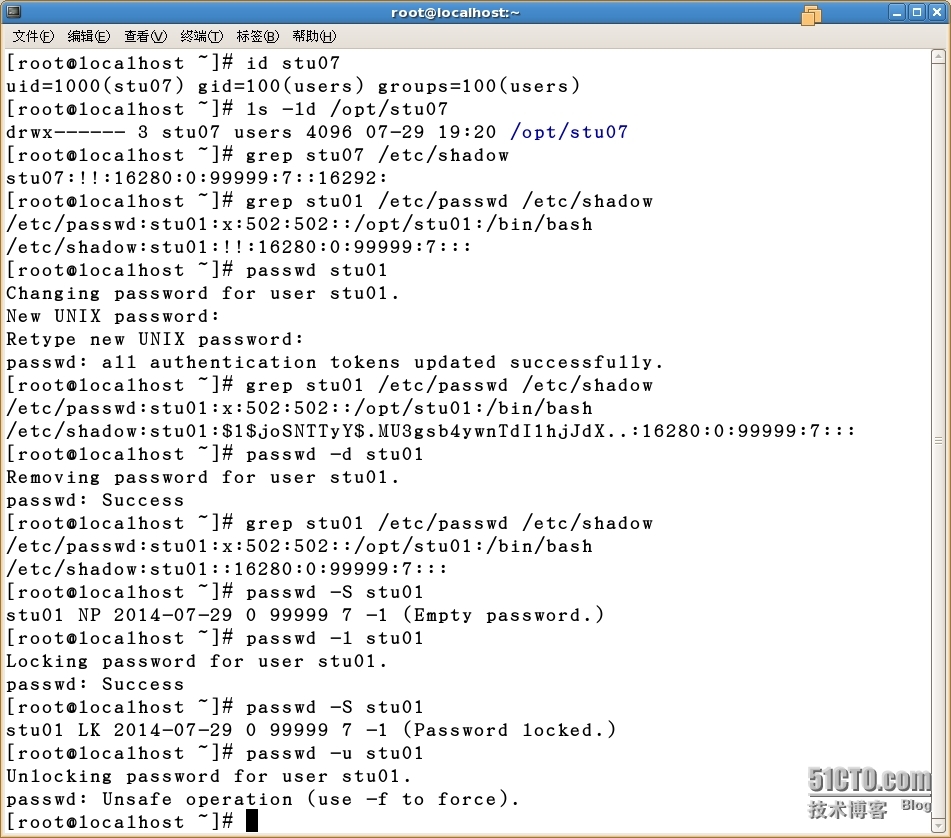
[root@localhost ~]# id stu07 //查看stu07的id标示
[root@localhost ~]# ls -ld /opt/stu07/ //列出/opt/stu07/的内容
[root@localhost ~]# grep stu07 /etc/shadow //检索/etc/shadow种含有stu07的信息
2. 设置密码
[root@localhost ~]# grep stu01 /etc/passwd /etc/shadow //检索/etc/shadow和/etc/passwd中含有stu01的信息
[root@localhost ~]# passwd stu01 //为stu01用户设置密码
[root@localhost ~]# grep stu01 /etc/passwd /etc/shadow //检索/etc/shadow和/etc/passwd中含有stu01的信息
[root@localhost ~]# passwd -d stu01 //清空stu01的密码
[root@localhost ~]# grep stu01 /etc/passwd /etc/shadow //检索/etc/shadow和/etc/passwd中含有stu01的信息
[root@localhost ~]# passwd stu01 //为stu01用户设置密码
[root@localhost ~]# passwd -S stu01 //stu01用户的状态
[root@localhost ~]# passwd -l stu01 //锁定stu01用户
[root@localhost ~]# passwd -S stu01 //stu01用户的状态
[root@localhost ~]# passwd -u stu01 //解锁stu01用户
[root@localhost ~]# passwd -S stu01 //stu01用户的状态
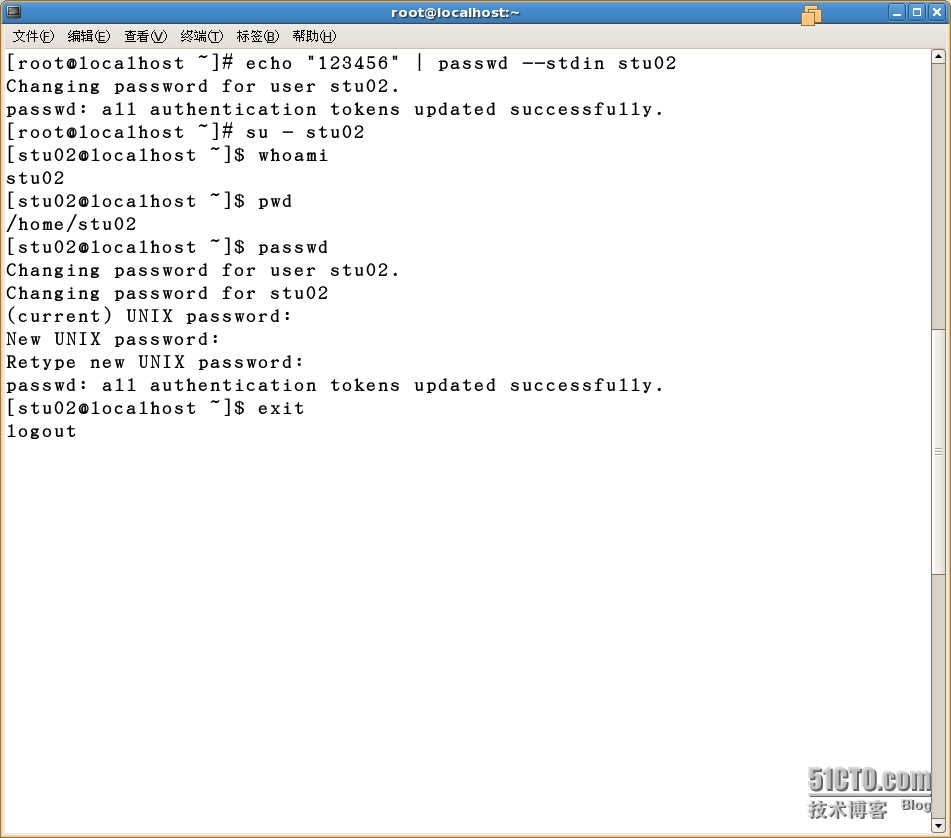
[root@localhost ~]# echo "redhat" | passwd --stdin stu02 //通过管道给stu02用户设置密码“redhat”
[root@localhost ~]# su - stu02 //切换到stu02用户
[stu02@localhost ~]$ whoami //查询当前用户是谁
[stu02@localhost ~]$ pwd //显示当前目录
[stu02@localhost ~]$ passwd //为当前用户更改密码
3. 与账户新建相关的文件
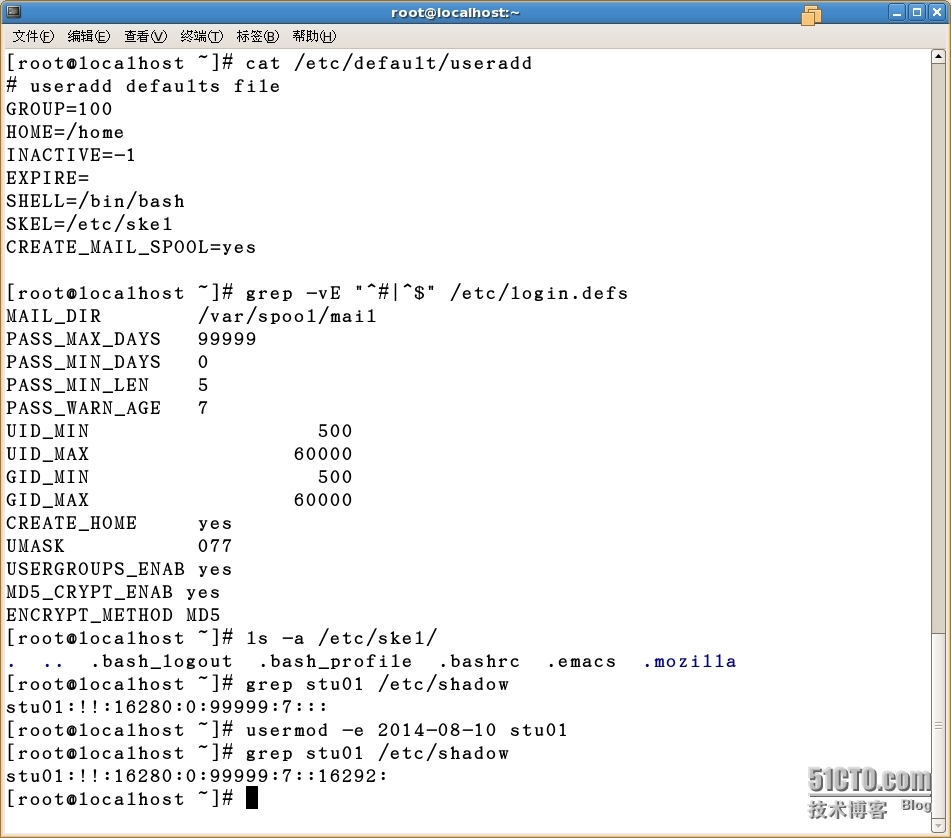
[root@localhost ~]# cat /etc/default/useradd //用户添加的默认配置文档
[root@localhost ~]# grep -vE "^#|^$" /etc/login.defs //密码有效控制期默认配置文档
[root@localhost ~]# ls -a /etc/skel/ //用户的初始配置文件来源
4. 修改账户信息
[root@localhost ~]# grep stu01 /etc/shadow //检索/etc/shadow中含有stu01的信息
[root@localhost ~]# usermod -e 2014-08-20 stu01 //修改stu01的账户到期时间为2014-08-20
[root@localhost ~]# grep stu01 /etc/shadow //检索/etc/shadow中含有stu01的信息
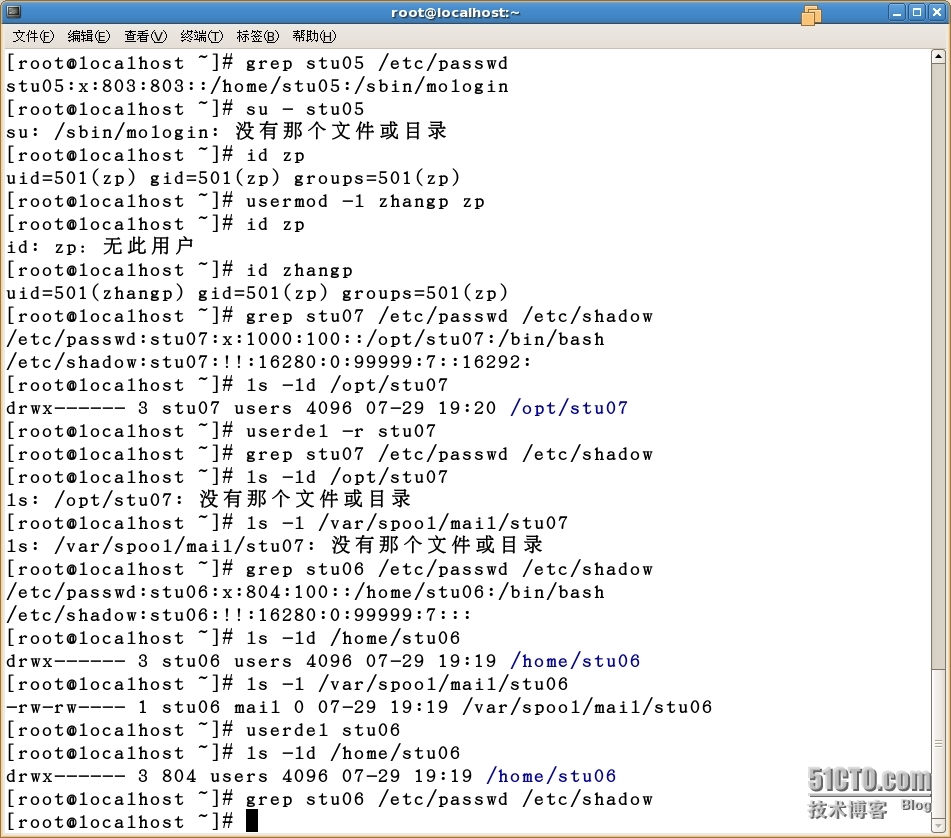
[root@localhost ~]# grep stu05 /etc/passwd //检索/etc/passwd中含有stu05的信息
[root@localhost ~]# su - stu05 //切换到stu05用户
[root@localhost ~]# usermod -s /bin/bash stu05 //更改stu05用户的登录shell位置
[root@localhost ~]# grep stu05 /etc/passwd //检索/etc/passwd中含有stu05的信息
[root@localhost ~]# su - stu05 //切换到stu05用户
[root@localhost ~]# id zengye //查看zenye用户的id标示
[root@localhost ~]# usermod -l feige zengye //更改zengye用户名为feige
[root@localhost ~]# id zengye //查看zenye用户的id标示
[root@localhost ~]# id feige //查看feige用户的id标示
4、删除账户
[root@localhost ~]# grep stu07 /etc/passwd /etc/shadow //检索/etc/shadow和/etc/passwd中含有stu07的信息
[root@localhost ~]# ls -ld /opt/stu07/ //列出/opt/stu07/的内容
[root@localhost ~]# ls -l /var/spool/mail/stu07 //列出/var/spool/mial/stu07用户的内容
[root@localhost ~]# userdel -r stu07 //删除用户stu07并删除用户的宿主目录和用户邮件
[root@localhost ~]# grep stu07 /etc/passwd /etc/shadow //检索/etc/shadow和/etc/passwd中含有stu07的信息
[root@localhost ~]# ls -ld /opt/stu07/ //列出/opt/stu07/的内容
[root@localhost ~]# ls -l /var/spool/mail/stu07 //列出/var/spool/mial/stu07用户的内容
[root@localhost ~]# grep stu06 /etc/passwd /etc/shadow //检索/etc/shadow和/etc/passwd中含有stu06的信息
[root@localhost ~]# ls -ld /home/stu06/ //列出/opt/stu06/的内容
[root@localhost ~]# ls -l /var/spool/mail/stu06 //列出/var/spool/mial/stu06用户的内容
[root@localhost ~]# userdel stu06 //删除stu06用户
[root@localhost ~]# grep stu06 /etc/passwd /etc/shadow //检索/etc/shadow和/etc/passwd中含有stu06的信息
[root@localhost ~]# ls -ld /home/stu06/ //列出/opt/stu06/的内容
[root@localhost ~]# ls -l /var/spool/mail/stu06 //列出/var/spool/mial/stu06用户的内容
将系统中创建的普通账户全部删除 -r
5. 与账户新建相关的文件
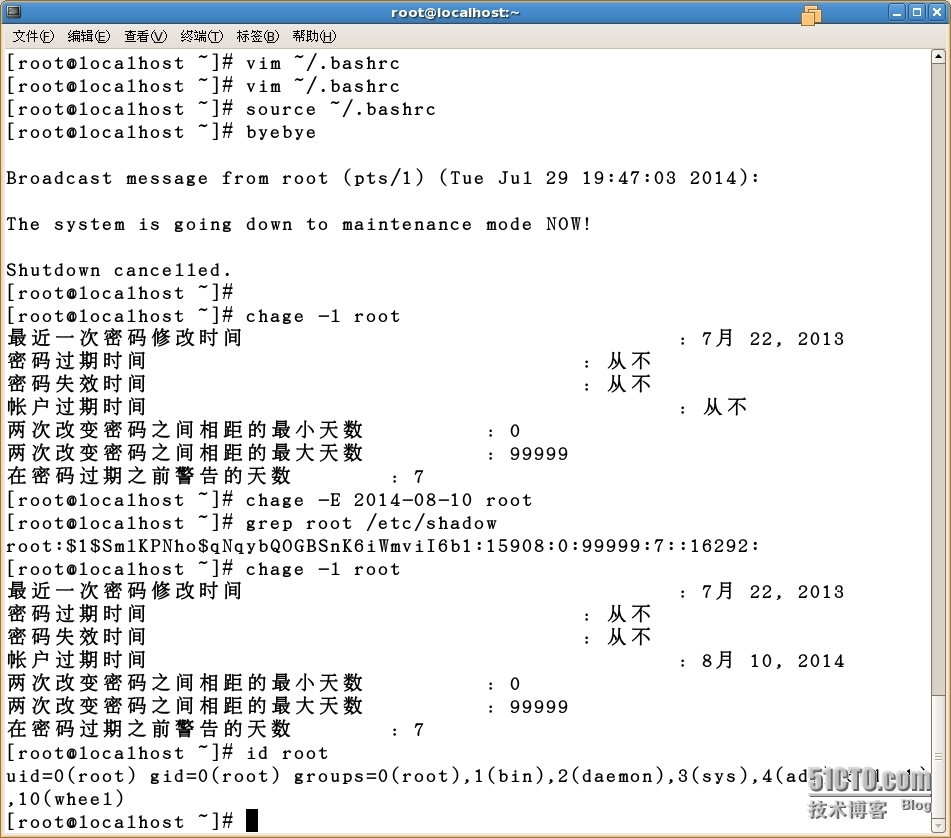
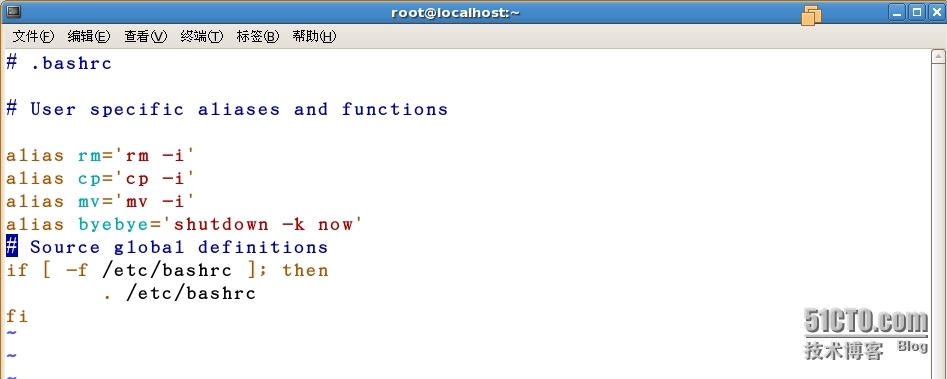
[root@localhost ~]# grep byebye ~/.bashrc //设置别名永久生效
alias byebye=‘shutdown -k now‘
[root@localhost ~]# source ~/.bashrc //强制更新~/.bashrc 文件
[root@localhost ~]# byebye
6. chage
[root@localhost ~]# chage -l root //列出root用户的有效期信息
[root@localhost ~]# chage -E 2014-08-30 root //指定root用户的账号过期时间为2014-08-20
[root@localhost ~]# grep root /etc/shadow //检索/etc/shadow中与root有关的信息
[root@localhost ~]# chage -l root //列出root用户的有效期信息
[root@localhost ~]# id root //查看root用户的id标示
二、组账号管理
1. 查看组相关配置文件
[root@localhost ~]# head -n 1 /etc/group //查看头两行
[root@localhost ~]# head -n 1 /etc/gshadow //查看头两行
2. 创建组
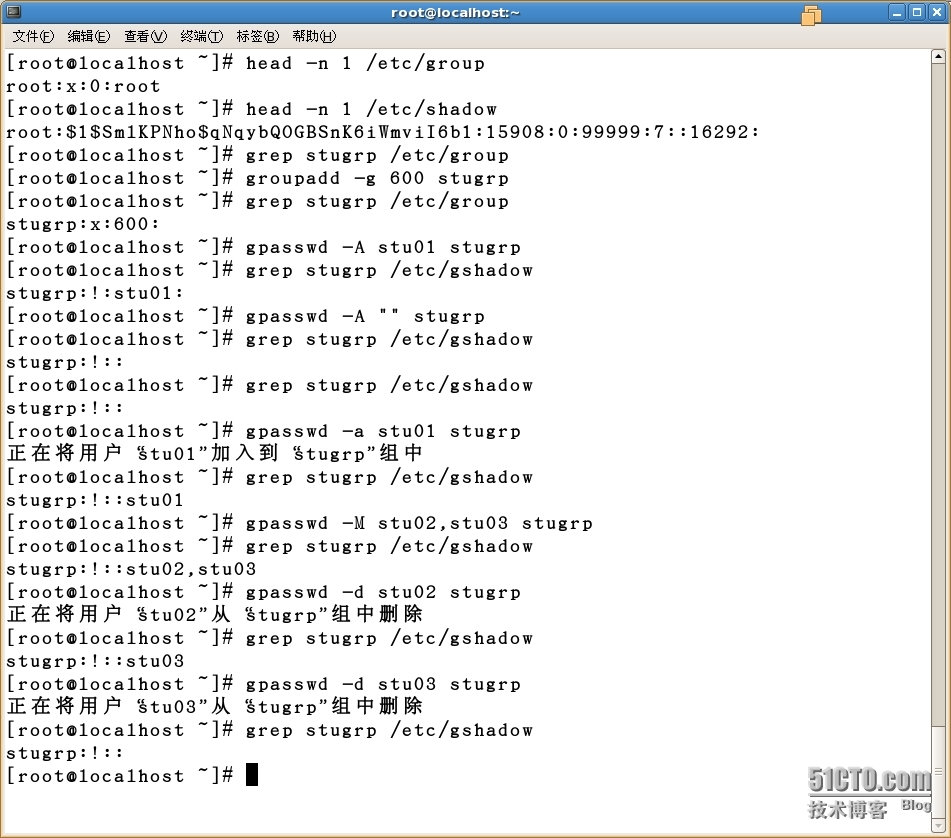
[root@localhost ~]# grep stugrp /etc/group //检索/etc/group中与stugrp组有关的信息
[root@localhost ~]# groupadd -g 800 stugrp //新建组指定id为800
[root@localhost ~]# grep stugrp /etc/group //检索/etc/group中与stugrp组有关的信息
3. 设置组管理员
[root@localhost ~]# useradd stu01 //新建用户stu01
[root@localhost ~]# useradd stu02 //新建用户stu02
[root@localhost ~]# useradd stu03 //新建用户stu03
[root@localhost ~]# gpasswd -A stu01 stugrp //设置stugrp组的管理员
[root@localhost ~]# grep stugrp /etc/gshadow //检索/etc/gshadow中与stugrp组有关的信息
[root@localhost ~]# gpasswd -A "" stugrp //取消管理员
4. 添加单个用户到组中
[root@localhost ~]# grep stugrp /etc/gshadow //检索/etc/group中与stugrp组有关的信息
[root@localhost ~]# gpasswd -a stu01 stugrp //将用户stu01加入stugrp组
[root@localhost ~]# grep stugrp /etc/gshadow //检索/etc/group中与stugrp组有关的信息
5. 添加多个用户到组中
[root@localhost ~]# grep stugrp /etc/gshadow //检索/etc/gshadow中与stugrp组有关的信息
[root@localhost ~]# gpasswd -M stu02,stu03 stugrp //将stu02,stu03用户加入组stugrp
[root@localhost ~]# grep stugrp /etc/gshadow //检索/etc/gshadow中与stugrp组有关的信息
6. 将组里面账户删除
[root@localhost ~]# grep stugrp /etc/gshadow //检索/etc/gshadow中与stugrp组有关的信息
[root@localhost ~]# gpasswd -d stu02 stugrp //将stu02删除出组stugrp
[root@localhost ~]# grep stugrp /etc/gshadow //检索/etc/gshadow中与stugrp组有关的信息
[root@localhost ~]# gpasswd -d stu03 stugrp //将stu03删除出组stugrp
[root@localhost ~]# grep stugrp /etc/gshadow //检索/etc/gshadow中与stugrp组有关的信息
7. 设置组密码
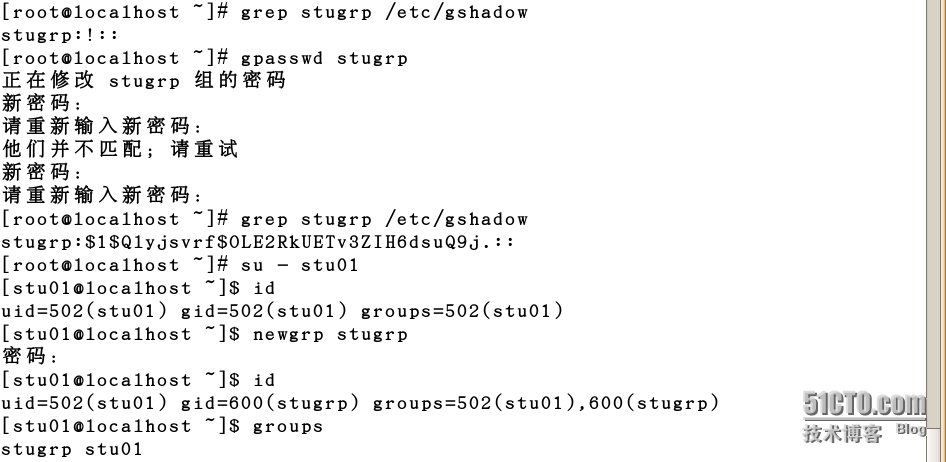
[root@localhost ~]# grep stugrp /etc/gshadow //检索/etc/gshadow中与stugrp组有关的信息
[root@localhost ~]# gpasswd stugrp //为stugrp组设置密码
[root@localhost ~]# grep stugrp /etc/gshadow //检索/etc/gshadow中与stugrp组有关的信息
[root@localhost ~]# su - stu01 //切换到stu01用户
[stu01@localhost ~]$ id //查看stu01的用户id
[stu01@localhost ~]$ newgrp stugrp //将stu01用户临时加入组stugrp
[stu01@localhost ~]$ id //查看stu01的用户id
[stu01@localhost ~]$ groups //查看当前用户属于哪个组
8. 删除组
[root@localhost ~]# groupdel stugrp //删除组stugrp
[root@localhost ~]# grep stugrp /etc/group /etc/gshadow //检索/etc/gshadow和/etc/group中与stugrp组有关的信息
[root@localhost ~]# groupadd gr01 //创建组gr01
[root@localhost ~]# useradd -g gr01 test01 //新建用户test01默认属于gr01组
[root@localhost ~]# groups test01 //查看test01输入哪个组
test01 : gr01
[root@localhost ~]# groupdel gr01 //删除组gr01
groupdel:不能删除用户的主组。
[root@localhost ~]# usermod -g users test01 //将test01的默认组更改为users
[root@localhost ~]# groups test01 //查看test01属于哪个组
test01 : users
[root@localhost ~]# groupdel gr01 //删除gr01组
三、源码包的安装
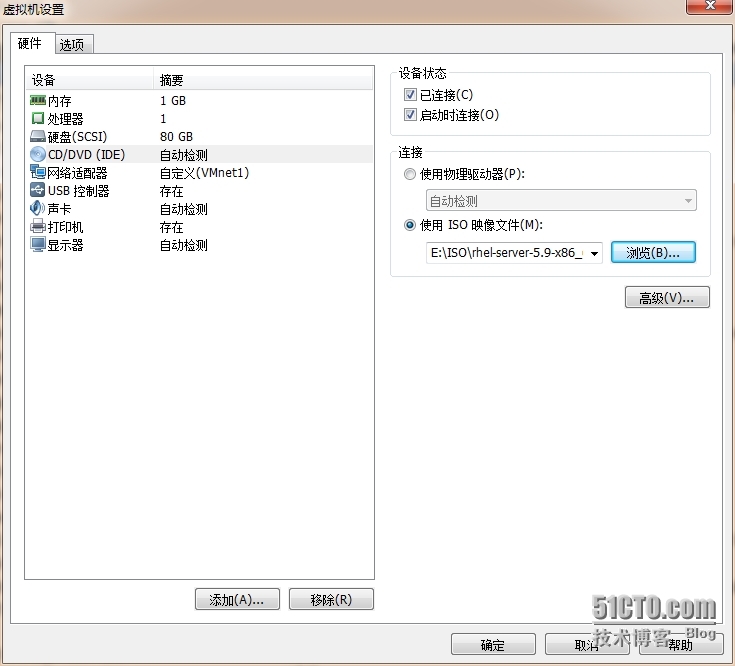
①配置YUM仓库
放入rhel5.9 iso,确保电源OK
[root@localhost ~]# cat /etc/yum.repos.d/server.repo //在整个目录新建*.repo的文档
[rhel-Server]
name=Red Hat Enterprise Linux Server
baseurl=file:///misc/cd/Server/
enabled=1
gpgcheck=1
gpgkey=file:///etc/pki/rpm-gpg/RPM-GPG-KEY-redhat-release
②安装gcc环境
[root@localhost ~]# yum -y install gcc* //安装gcc*相关的软件
③解压httpd到/usr/src
[root@localhost ~]# cd /root/Desktop/ //切换到桌面
[root@localhost Desktop]# ls //列出桌面内容
httpd-2.2.25.tar.gz
[root@localhost Desktop]# tar -zxvf httpd-2.2.25.tar.gz -C /usr/src/ //解压到/usr/src
④安装httpd
[root@localhost Desktop]# cd /usr/src/httpd-2.2.25/ //切换目录到解压位置
[root@localhost httpd-2.2.25]# ./configure --prefix=/usr/local/apache2
[root@localhost httpd-2.2.25]# echo $?
0
[root@localhost httpd-2.2.25]# make
[root@localhost httpd-2.2.25]# echo $?
0
[root@localhost httpd-2.2.25]# make install
[root@localhost httpd-2.2.25]# echo $?
0
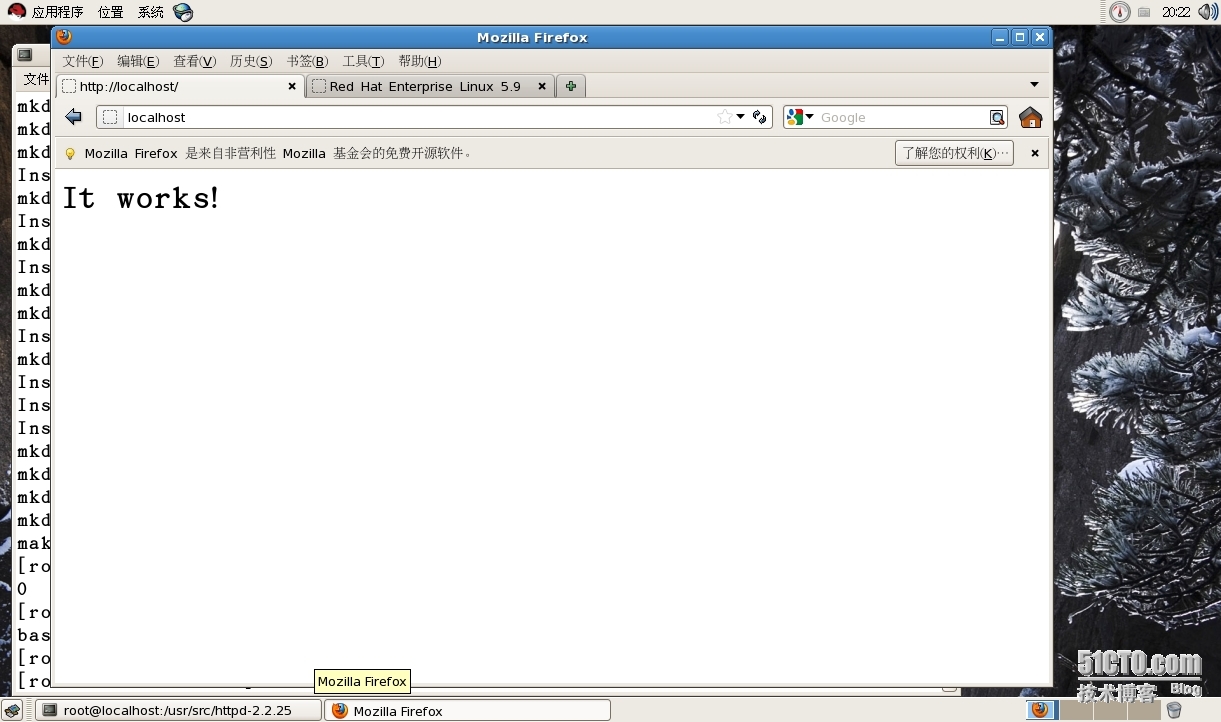
[root@localhost httpd-2.2.25]# /usr/local/apache2/bin/apachectl start
⑤测试
http://localhost
