首页 > 代码库 > Java基础系列19:使用JXL或者POI生成和解析Excel文件
Java基础系列19:使用JXL或者POI生成和解析Excel文件
一 简介
如题所示,当我们需要在Java中解析Excel文件时,可以考虑使用JXL或POI的API来解析。
二者的区别如下:
jxl现在基本上没被维护了,最近一次更新时间还是几年前。相反,poi属于Apache开源项目的一部分,更新维护得比较好,最新稳定版 POI 3.15 是今年(2016年)9月更新的,同时poi可以支持更高版本的excel,而jxl只能支持excel2003以及之前的版本
小文件使用jxl解析效率比较高,但是因为支持的excel版本的限制,导致不能导出65535以上量级的数据
总之,我建议使用POI来生成解析excel文件。关于生成和解析excel文件的流程实际上跟Java生成和解析xml文件(PS:关于这部分的内容可以参考我的这篇文章:https://www.zifangsky.cn/596.html)是差不多的,因此我下面就直接贴示例代码了。当然,代码里面有详细的注释供大家参考
二 使用JXL生成和解析Excel文件
jxl-2.6.12.jar下载地址:http://maven.outofmemory.cn/net.sourceforge.jexcelapi/jxl/2.6/
package cn.zifangsky.excel;

import java.io.File;

import jxl.Cell;
import jxl.Sheet;
import jxl.Workbook;
import jxl.write.Label;
import jxl.write.WritableSheet;
import jxl.write.WritableWorkbook;

public class JXLDemo {

	/**
	 * JXL创建Excel文件
	 *
	 * @param fileUrl
	 *            文件路径
	 * @return null
	 */
	public static void createExcel(String fileUrl) {
		String[] title = { "title1", "title2", "title3" };
		// 创建Excel文件
		File firstExcelFile = new File(fileUrl);

		try {
			// 创建工作簿
			WritableWorkbook workbook = Workbook.createWorkbook(firstExcelFile);
			// 创建sheet
			WritableSheet sheet = workbook.createSheet("demo", 0);
			Label label = null; // 单元格
			// 设置第一行的标题
			for (int i = 0; i < title.length; i++) {
				label = new Label(i, 0, title[i]);
				sheet.addCell(label);
			}

			// 添加几行数据
			for (int i = 0; i < title.length; i++) {
				for (int j = 1; j < 11; j++) {
					label = new Label(i, j, String.valueOf(i + j));
					sheet.addCell(label);
				}
			}
			workbook.write();
			workbook.close();
		} catch (Exception e) {
			e.printStackTrace();
		}
	}

	/**
	 * JXL解析Excel文件
	 *
	 * @param fileUrl
	 *            文件路径
	 * @return null
	 */
	public static void resolveExcel(String fileUrl) {
		try {
			Workbook workbook = Workbook.getWorkbook(new File(fileUrl));
			// 获取工作表中的第一个sheet
			Sheet sheet = workbook.getSheet(0);
			for (int i = 0; i < sheet.getRows(); i++) {
				for (int j = 0; j < sheet.getColumns(); j++) {
					Cell cell = sheet.getCell(j, i);
					System.out.print(cell.getContents() + " ");
				}
				System.out.println();
			}
		} catch (Exception e) {
			e.printStackTrace();
		}

	}

	public static void main(String[] args) {
		JXLDemo.createExcel("C:/Users/Administrator/Desktop/jxlExcel.xls");
		JXLDemo.resolveExcel("C:/Users/Administrator/Desktop/jxlExcel.xls");
	}

}
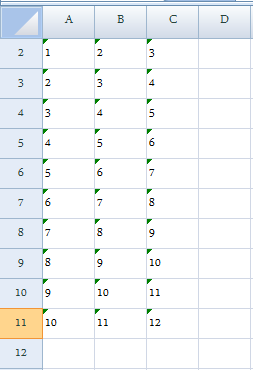
生成的excel文件如下所示:

最后输出如下:
title1 title2 title3
1 2 3
2 3 4
3 4 5
4 5 6
5 6 7
6 7 8
7 8 9
8 9 10
9 10 11
10 11 12
三 使用POI生成和解析Excel文件
jar包下载地址:http://poi.apache.org/download.html
(1)生成和解析低版本的Excel文件:
package cn.zifangsky.excel;

import java.io.File;
import java.io.FileInputStream;
import java.io.FileOutputStream;
import java.io.IOException;
import java.io.InputStream;
import java.io.OutputStream;

import org.apache.poi.hssf.usermodel.HSSFCell;
import org.apache.poi.hssf.usermodel.HSSFRow;
import org.apache.poi.hssf.usermodel.HSSFSheet;
import org.apache.poi.hssf.usermodel.HSSFWorkbook;

public class POIDemo {

	/**
	 * POI创建Excel文件
	 *
	 * @param fileUrl
	 *            文件路径
	 * @return null
	 */
	public static void createExcel(String fileUrl) {
		String[] title = { "title1", "title2", "title3" };

		// 创建工作簿
		HSSFWorkbook workbook = new HSSFWorkbook();
		// 创建sheet
		HSSFSheet sheet = workbook.createSheet("demo");

		// 设置第一行的标题
		HSSFRow firstRow = sheet.createRow(0);
		HSSFCell cell = null;
		for (int i = 0; i < title.length; i++) {
			cell = firstRow.createCell(i);
			cell.setCellValue(title[i]);
		}

		// 添加几行数据
		for (int i = 0; i < 10; i++) {
			HSSFRow nextRow = sheet.createRow(i + 1);
			for (int j = 0; j < title.length; j++) {
				cell = nextRow.createCell(j);
				cell.setCellValue(i * j);
			}
		}

		// 创建Excel文件
		File POIExcelFile = new File(fileUrl);
		try {
			POIExcelFile.createNewFile();
			OutputStream outputStream = new FileOutputStream(POIExcelFile);
			workbook.write(outputStream);

			outputStream.close();
			workbook.close();
		} catch (IOException e) {

			e.printStackTrace();
		}
	}

	/**
	 * POI解析Excel文件
	 *
	 * @param fileUrl
	 *            文件路径
	 * @return null
	 */
	public static void resolveExcel(String fileUrl) {
		File POIExcelFile = new File(fileUrl);
		try {
			InputStream inputStream = new FileInputStream(POIExcelFile);
			// 创建工作簿
			HSSFWorkbook workbook = new HSSFWorkbook(inputStream);
			// 创建sheet
			// HSSFSheet sheet = workbook.getSheetAt(0);
			HSSFSheet sheet = workbook.getSheet("demo");

			int firstRowNum = sheet.getFirstRowNum(); // 第一行的行号
			int lastRowNum = sheet.getLastRowNum(); // 最后一行的行号
			// 循环遍历每一个单元格
			for (int row = firstRowNum; row <= lastRowNum; row++) {
				HSSFRow eachRow = sheet.getRow(row); // 每一行
				int firstCellNum = eachRow.getFirstCellNum(); // 第一列的列号
				int lastCellNum = eachRow.getLastCellNum(); // 最后一列的列号
				for (int column = firstCellNum; column < lastCellNum; column++) {
					HSSFCell cell = eachRow.getCell(column);
					if (row == 0)
						System.out.print(cell.getStringCellValue() + " ");
					else
						System.out.print(cell.getNumericCellValue() + " ");
				}
				System.out.println();
			}
			workbook.close();
		} catch (IOException e) {
			e.printStackTrace();
		}
	}

	public static void main(String[] args) {
		POIDemo.createExcel("C:/Users/Administrator/Desktop/poiExcel.xls");
		POIDemo.resolveExcel("C:/Users/Administrator/Desktop/poiExcel.xls");
	}

}
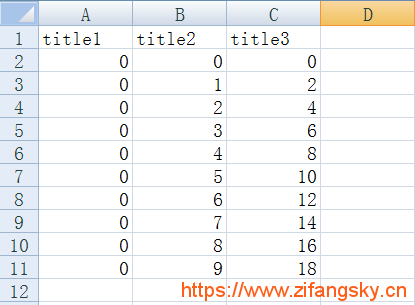
生成的excel文件如下:

控制台输出如下:
title1 title2 title3
0.0 0.0 0.0
0.0 1.0 2.0
0.0 2.0 4.0
0.0 3.0 6.0
0.0 4.0 8.0
0.0 5.0 10.0
0.0 6.0 12.0
0.0 7.0 14.0
0.0 8.0 16.0
0.0 9.0 18.0
(2)生成和解析高版本的Excel文件:
其实使用POI生成高版本的excel文件,只需要将HSSFWorkbook、HSSFSheet、HSSFRow、HSSFCell等类分别替换成:XSSFWorkbook、XSSFSheet、XSSFRow、XSSFCell等类即可,也就是将每个类最前面的“H”换成“X”即可
示例代码如下:
package cn.zifangsky.excel;

import java.io.File;
import java.io.FileInputStream;
import java.io.FileOutputStream;
import java.io.IOException;
import java.io.InputStream;
import java.io.OutputStream;

import org.apache.poi.xssf.usermodel.XSSFCell;
import org.apache.poi.xssf.usermodel.XSSFRow;
import org.apache.poi.xssf.usermodel.XSSFSheet;
import org.apache.poi.xssf.usermodel.XSSFWorkbook;

public class POIDemo2 {

	/**
	 * POI创建高版本Excel文件
	 *
	 * @param fileUrl
	 *            文件路径
	 * @return null
	 */
	public static void createExcel(String fileUrl) {
		String[] title = { "title1", "title2", "title3" };

		// 创建工作簿
		XSSFWorkbook workbook = new XSSFWorkbook();
		// 创建sheet
		XSSFSheet sheet = workbook.createSheet("demo");

		// 设置第一行的标题
		XSSFRow firstRow = sheet.createRow(0);
		XSSFCell cell = null;
		for (int i = 0; i < title.length; i++) {
			cell = firstRow.createCell(i);
			cell.setCellValue(title[i]);
		}

		// 添加几行数据
		for (int i = 0; i < 10; i++) {
			XSSFRow nextRow = sheet.createRow(i + 1);
			for (int j = 0; j < title.length; j++) {
				cell = nextRow.createCell(j);
				cell.setCellValue(i * j);
			}
		}

		// 创建Excel文件
		File POIExcelFile = new File(fileUrl);
		try {
			POIExcelFile.createNewFile();
			OutputStream outputStream = new FileOutputStream(POIExcelFile);
			workbook.write(outputStream);

			outputStream.close();
			workbook.close();
		} catch (IOException e) {

			e.printStackTrace();
		}
	}

	/**
	 * POI解析高版本Excel文件
	 *
	 * @param fileUrl
	 *            文件路径
	 * @return null
	 */
	public static void resolveExcel(String fileUrl) {
		File POIExcelFile = new File(fileUrl);
		try {
			InputStream inputStream = new FileInputStream(POIExcelFile);
			// 创建工作簿
			XSSFWorkbook workbook = new XSSFWorkbook(inputStream);
			// 创建sheet
			// HSSFSheet sheet = workbook.getSheetAt(0);
			XSSFSheet sheet = workbook.getSheet("demo");

			int firstRowNum = sheet.getFirstRowNum(); // 第一行的行号
			int lastRowNum = sheet.getLastRowNum(); // 最后一行的行号
			// 循环遍历每一个单元格
			for (int row = firstRowNum; row <= lastRowNum; row++) {
				XSSFRow eachRow = sheet.getRow(row); // 每一行
				int firstCellNum = eachRow.getFirstCellNum(); // 第一列的列号
				int lastCellNum = eachRow.getLastCellNum(); // 最后一列的列号
				for (int column = firstCellNum; column < lastCellNum; column++) {
					XSSFCell cell = eachRow.getCell(column);
					if (row == 0)
						System.out.print(cell.getStringCellValue() + " ");
					else
						System.out.print(cell.getNumericCellValue() + " ");
				}
				System.out.println();
			}
			workbook.close();
		} catch (IOException e) {
			e.printStackTrace();
		}
	}

	public static void main(String[] args) {
		POIDemo2.createExcel("C:/Users/Administrator/Desktop/poiExcel2.xlsx");
		POIDemo2.resolveExcel("C:/Users/Administrator/Desktop/poiExcel2.xlsx");
	}

}
生成的excel文件如下:

最后输出如下:
title1 title2 title3
0.0 0.0 0.0
0.0 1.0 2.0
0.0 2.0 4.0
0.0 3.0 6.0
0.0 4.0 8.0
0.0 5.0 10.0
0.0 6.0 12.0
0.0 7.0 14.0
0.0 8.0 16.0
0.0 9.0 18.0
(3)结合Java解析xml创建excel导出模板:
如果我们需要定期将数据库中的部分数据导出到excel中,那么我们可以预先创建一个excel导出时的模板,以后每次导出数据时就可以根据这个模板导出格式统一的报表了。关于这个模板的格式我们可以定义在一个xml文件中,然后用Java解析这个xml文件读取样式即可
i)模板格式的xml文件student.xml:
<?xml version="1.0" encoding="UTF-8"?>
<excel id="student" code="student" name="学生信息导入">
    <colgroup>
        <col index="A" width=‘17em‘></col>
        <col index="B" width=‘17em‘></col>
        <col index="C" width=‘17em‘></col>
        <col index="D" width=‘17em‘></col>
        <col index="E" width=‘17em‘></col>
        <col index="F" width=‘17em‘></col>
    </colgroup>
    <title>
        <tr height="16px" rowspan="2">
            <td colspan="6" value="http://www.mamicode.com/学生信息导入" />
        </tr>
        <tr height="14px" rowspan="1">
            <td colspan="3" value="http://www.mamicode.com/基础信息" />
            <td colspan="3" value="http://www.mamicode.com/扩展信息" />
        </tr>
    </title>
    <thead>
        <tr height="12px">
        	<th value="http://www.mamicode.com/编号" />
            <th value="http://www.mamicode.com/姓名" />
            <th value="http://www.mamicode.com/性别" />
            <th value="http://www.mamicode.com/年龄" />
            <th value="http://www.mamicode.com/出生日期" />
            <th value="http://www.mamicode.com/ 爱好" />
        </tr>
    </thead>
</excel>
(2)模板创建示例:
package cn.zifangsky.excel;

import java.io.File;
import java.io.FileOutputStream;
import java.io.OutputStream;
import java.util.List;

import org.apache.commons.lang.StringUtils;
import org.apache.poi.ss.usermodel.HorizontalAlignment;
import org.apache.poi.ss.util.CellRangeAddress;
import org.apache.poi.xssf.usermodel.XSSFCell;
import org.apache.poi.xssf.usermodel.XSSFCellStyle;
import org.apache.poi.xssf.usermodel.XSSFFont;
import org.apache.poi.xssf.usermodel.XSSFRow;
import org.apache.poi.xssf.usermodel.XSSFSheet;
import org.apache.poi.xssf.usermodel.XSSFWorkbook;
import org.dom4j.Attribute;
import org.dom4j.Document;
import org.dom4j.Element;
import org.dom4j.io.SAXReader;

public class CreateTemplate {

	public static void main(String[] args) {
		SAXReader reader = new SAXReader();
		try {
			Document document = reader.read(new File("src/cn/zifangsky/excel/student.xml"));
			Element rootElement = document.getRootElement();
			// 创建工作簿
			XSSFWorkbook workbook = new XSSFWorkbook();
			// 创建sheet
			XSSFSheet sheet = workbook.createSheet("Sheet0");
			// 获取模板名称
			String templateName = rootElement.attributeValue("name");

			int rowNum = 0; // 初始行号
			// 设置列宽
			Element colGroup = rootElement.element("colgroup");
			setColumnWidth(sheet, colGroup);

			// 设置标题
			Element title = rootElement.element("title");
			rowNum = setTitle(workbook, sheet, title, rowNum);

			// 设置表头
			Element thead = rootElement.element("thead");
			rowNum = setHead(workbook, sheet, thead, rowNum);

			// 创建Excel文件
			File POIExcelFile = new File("C:/Users/Administrator/Desktop/template.xlsx");
			POIExcelFile.createNewFile();
			OutputStream outputStream = new FileOutputStream(POIExcelFile);
			workbook.write(outputStream);

			outputStream.close();
			workbook.close();
		} catch (Exception e) {
			e.printStackTrace();
		}
	}

	/**
	 * 单位转换
	 */
	public static int convert(String value) {
		// 得到宽度单位
		String unit = value.replaceAll("\\d", "");
		// 去除非数字字符
		String num = value.replaceAll("\\D", "");

		int v = 0;
		if (StringUtils.isNotBlank(unit) && StringUtils.isNotBlank(num))
			if (unit.equals("em")) {
				v = Math.round(Float.valueOf(num) * 267.5F);
			} else if (unit.equals("px")) {
				v = Math.round(Float.valueOf(num) * 20F);
			}
		return v;
	}

	/**
	 * 设置列宽
	 */
	private static void setColumnWidth(XSSFSheet sheet, Element colGroup) {
		List<Element> cols = colGroup.elements();
		for (int i = 0; i < cols.size(); i++) {
			Element col = cols.get(i);

			Attribute widthAttribute = col.attribute("width");

			// 设置宽度
			sheet.setColumnWidth(i, convert(widthAttribute.getValue()));
		}
	}

	/**
	 * 设置标题相关内容
	 */
	private static int setTitle(XSSFWorkbook workbook, XSSFSheet sheet, Element title, int rowNum) {
		List<Element> trs = title.elements("tr");

		int rspan = 0; // 横跨多少行
		int cspan = 0; // 横跨多少列
		// 遍历多行标题
		for (int i = 0; i < trs.size(); i++, rowNum += rspan) {
			Element tr = trs.get(i);
			Attribute rowSpan = tr.attribute("rowspan");
			Attribute height = tr.attribute("height");
			rspan = Integer.valueOf(rowSpan.getValue());

			List<Element> tds = tr.elements("td");
			XSSFRow row = sheet.createRow(rowNum);

			// 遍历标题中的多列子标题
			for (int j = 0, colNum = 0; j < tds.size(); j++, colNum += cspan) {
				// 表格样式
				XSSFCellStyle cellStyle = workbook.createCellStyle();
				cellStyle.setAlignment(HorizontalAlignment.CENTER); // 居中

				Element td = tds.get(j);
				XSSFCell cell = row.createCell(colNum);

				Attribute colSpan = td.attribute("colspan");
				Attribute value = td.attribute("value");
				cspan = Integer.valueOf(colSpan.getValue());
				if (value != null) {
					cell.setCellValue(value.getValue());

					// 设置字体
					XSSFFont font = workbook.createFont();
					font.setFontName("宋体");
					font.setBold(true);
					font.setFontHeight((short) convert(height.getValue()));
					cellStyle.setFont(font);
					cell.setCellStyle(cellStyle);

					// 合并单元格
					sheet.addMergedRegion(new CellRangeAddress(rowNum, rowNum + rspan - 1, colNum, colNum + cspan - 1));
				}
			}
		}
		return rowNum;
	}

	/**
	 * 设置表头相关内容
	 */
	private static int setHead(XSSFWorkbook workbook, XSSFSheet sheet, Element thead, int rowNum) {
		List<Element> trs = thead.elements("tr");
		for (int i = 0; i < trs.size(); i++, rowNum++) {
			Element tr = trs.get(i);
			XSSFRow row = sheet.createRow(rowNum);
			Attribute height = tr.attribute("height");

			List<Element> ths = tr.elements("th");
			for (int j = 0; j < ths.size(); j++) {
				// 表格样式
				XSSFCellStyle cellStyle = workbook.createCellStyle();
				cellStyle.setAlignment(HorizontalAlignment.CENTER); // 居中

				Element th = ths.get(j);
				Attribute value = th.attribute("value");
				XSSFCell cell = row.createCell(j);
				if (value != null) {
					cell.setCellValue(value.getValue());

					// 设置字体
					XSSFFont font = workbook.createFont();
					font.setFontName("宋体");
					font.setFontHeight((short) convert(height.getValue()));
					cellStyle.setFont(font);
					cell.setCellStyle(cellStyle);
				}
			}
		}
		return rowNum;
	}
}
最后生成的模板文件如下:
 注:我这里仅仅只是写了一个生成模板文件的测试代码,因此涉及到JDBC方面的操作就省略掉了
PS:上面图片中的水印是我个人博客的域名,因此还请管理员手下留情不要给我标为“转载文章”,谢谢!!!
本文出自 “zifangsky的个人博客” 博客,请务必保留此出处http://983836259.blog.51cto.com/7311475/1880293
Java基础系列19:使用JXL或者POI生成和解析Excel文件
