首页 > 代码库 > MongoDB集群解决方案-分片技术
MongoDB集群解决方案-分片技术
MongoDB,NoSQL技术的实现,基于分布式文件存储的数据库,由C++语言编写。主要是解决海量数据的访问效率问题,为web应用提供可扩展的高性能数据库存储解决方案
MongoDB集群的实现方式:
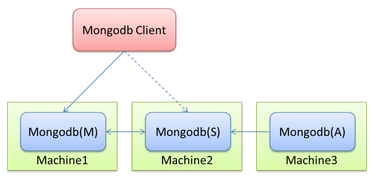
1、Replica Set:也叫作副本集,简单来说就是集群中的服务器包含了多分数据,保证主节点挂掉了。备节点能够继续的提供服务,但是提供的前提就是数据必须要和主节点的一致,如下图:

MongoDB(M)表示主节点,MongoDB(S)表示从节点,MongoDB(A)表示仲裁节点;
M节点存储数据并提供所有的增擅长服务,S节点默认不提供服务,但是可以通过设置使备节点提供查询服务,这样可以减少主节点的压力。A节点是一个特殊的节点,不提供任何服务,只是起一个选举的作用,当有主节点宕机时,可通过A节点来选取出那个S节点来提升为主节点。
2、Master-Slave:类似于MySQL的主从模式,配置很简单,这里我就不多说了
3、Sharding:和Replica Set类似,也需要一个仲裁节点,但是Sharding还需要配置服务器和路由节点,如下图:

MongoDB(R)为路由节点(mongos),数据库集群请求的入口,所有的请求都通过mongos进行协调,它就是一个请求分发器,他负责把对应的数据请求转发到对应的shard服务器上。
MongoDB(C1)为配置服务器,存储了集群的元信息,元信息保存了集群的状态和组织结构,元信息包含每个分片保存的数据块信息以及每个数据块的范围,mongos会缓存这个信息用来做读写的路由分发!
本文主要是实现第三种Sharding方式,架构部署图如下
部署环境:
| 主机名 | IP |
| node1 | 192.168.1.109 |
| node2 | 192.168.1.107 |
| node3 | 192.168.1.110 |
一、规划每个服务对应的端口
config server:11000
路由:10000
shard:10001
shard:10002
shard:10003
二、在node1、node2、node3上创建相应的目录(以下操作均在mongodb用户下执行)
[root@node1 ~]# cat /etc/passwd | grep mongodb
mongodb:x:10001:10001::/data/mongodb:/bin/bash
[root@node1 ~]# su - mongodb
[mongodb@node1 ~]$ pwd
/data/mongodb
[mongodb@node1 ~]$ mkdir -p config/{data,log}   ##config server的数据、日志路径
[mongodb@node1 ~]$ mkdir -p mongos/log          ##路由的日志路径
[mongodb@node1 ~]$ mkdir -p shard1/{data,log}   ##副本集1的数据、日志路径
[mongodb@node1 ~]$ mkdir -p shard2/{data,log}
[mongodb@node1 ~]$ mkdir -p shard3/{data,log}
[mongodb@node1 ~]$ tar -xf mongodb-linux-x86_64-rhel62-3.2.7.tgz   ##这里用的是3.2.7的版本,目前官网最新是3.2.9
[mongodb@node1 ~]$ ll
drwxr-xr-x 4 mongodb dev     4096 Sep 30 20:50 config
drwxr-xr-x 3 mongodb dev     4096 Sep 30 20:55 mongodb-linux-x86_64-rhel62-3.2.7
-rw-r--r-- 1 mongodb dev 74938432 Sep 30 20:40 mongodb-linux-x86_64-rhel62-3.2.7.tgz
drwxr-xr-x 3 mongodb dev     4096 Sep 30 20:50 mongos
drwxr-xr-x 4 mongodb dev     4096 Sep 30 20:50 shard1
drwxr-xr-x 4 mongodb dev     4096 Sep 30 20:51 shard2
drwxr-xr-x 4 mongodb dev     4096 Sep 30 20:51 shard3
###node2、node3亦是如此
三、启动node1、node2、node3的配置服务器
[mongodb@node1 bin]$ pwd
/data/mongodb/mongodb-linux-x86_64-rhel62-3.2.7/bin
[mongodb@node1 bin]$ ./mongod --configsvr --port 11000 --dbpath /data/mongodb/config/data/ --logpath /data/mongodb/config/log/config.log --fork   ##"--fork"在后台运行,在node1上执行
[mongodb@node2 bin]$ ./mongod --configsvr --port 11000 --dbpath /data/mongodb/config/data/ --logpath /data/mongodb/config/log/config.log --fork   ##在node2上执行
[mongodb@node3 bin]$ ./mongod --configsvr --port 11000 --dbpath /data/mongodb/config/data/ --logpath /data/mongodb/config/log/config.log --fork   ##在node3上执行
四、启动node1、node2、node3的路由
[mongodb@node1 bin]$ ./mongos --configdb 192.168.1.109:11000,192.168.1.107:11000,192.168.1.110:11000 --port 10000 --logpath /data/mongodb/mongos/log/mongos.log --fork   ##node1启动路由
[mongodb@node2 bin]$ ./mongos --configdb 192.168.1.109:11000,192.168.1.107:11000,192.168.1.110:11000 --port 10000 --logpath /data/mongodb/mongos/log/mongos.log --fork   ##node2启动路由
[mongodb@node3 bin]$ ./mongos --configdb 192.168.1.109:11000,192.168.1.107:11000,192.168.1.110:11000 --port 10000 --logpath /data/mongodb/mongos/log/mongos.log --fork   ##node3启动路由
五、在node1、node2、node3上设置shard并启动
./mongod --shardsvr --replSet shard1 --port 11001 --dbpath /data/mongodb/shard1/data --logpath /data/mongodb/shard1/log/shard1.log --fork  --oplogSize 10240 --logappend   ##设置shard1
./mongod --shardsvr --replSet shard2 --port 11002 --dbpath /data/mongodb/shard2/data --logpath /data/mongodb/shard2/log/shard2.log --fork  --oplogSize 10240 --logappend   ##设置shard2
./mongod --shardsvr --replSet shard3 --port 11003 --dbpath /data/mongodb/shard3/data --logpath /data/mongodb/shard3/log/shard3.log --fork  --oplogSize 10240 --logappend   ##设置shard3
###node2、node3操作亦是如此
六、登录任意一台机器,在相应的端口对shard进行配置
1、对shard1进行配置
[mongodb@node1 bin]$ ./mongo --port 11001   ##连接至副本集shard1
> use admin
> config  = {_id:"shard1",members:[{_id:0,host:"192.168.1.109:11001"},{_id:1,host:"192.168.1.107:11001"},{_id:2,host:"192.168.1.110:11001",arbiterOnly:true}]}    ##"arbiterOnly"设定谁为仲裁节点
> rs.initiate(config);   ##对shard1进行初始化
2、对shard2进行配置
[mongodb@node1 bin]$ ./mongo --port 11002   ##连接至副本集shard2
> use admin
> config2 = {_id:"shard2",members:[{_id:0,host:"192.168.1.109:11002"},{_id:1,host:"192.168.1.107:11002",arbiterOnly:true},{_id:2,host:"192.168.1.110:11002"}]}
> rs.initiate(config2);   ##对shard2进行初始化
3、对shard3进行配置
[mongodb@node2 bin]$ ./mongo --port 11003   ##连接至副本集shard3
> use admin
> config3 = {_id:"shard3",members:[{_id:0,host:"192.168.1.109:11003",arbiterOnly:true},{_id:1,host:"192.168.1.107:11003"},{_id:2,host:"192.168.1.110:11003"}]}
> rs.initiate(config3);   ##对shard3进行初始化

###注意:本机配置shard时,不能把本机设置为"arbiter",否则会报错,必须要去其他节点设置。
###在配置shard1、shard2时都是在node1上配置的,因为仲裁节点分别是node3、node2。当node1为仲裁节点时,必须
要去node2或者是node3上去配置
七、配置好副本集后,还需要将路由与副本集串联起来,因为所有的请求都是经过路由,随后再到配置服务器的
[mongodb@node1 bin]$ ./mongo --port 10000   ##连接至mongos
mongos> use admin
mongos> db.runCommand({addshard:"shard1/192.168.1.109:11001,192.168.1.107:11001,192.168.1.110:11001"});   ##将路由和副本集shard1串联起来
{ "shardAdded" : "shard1", "ok" : 1 }
mongos> db.runCommand({addshard:"shard2/192.168.1.109:11002,192.168.1.107:11002,192.168.1.110:11002"});   ##将路由和副本集shard2串联起来
{ "shardAdded" : "shard2", "ok" : 1 }
mongos> db.runCommand({addshard:"shard3/192.168.1.109:11003,192.168.1.107:11003,192.168.1.110:11003"});   ##将路由和副本集shard1串联起来
{ "shardAdded" : "shard3", "ok" : 1 }
八、检测配置是否成
1、连接至mongos查看sh
[mongodb@node1 bin]$ ./mongo --port 10000
mongos> use amdin
mongos> sh.status()
    shards:
    {  "_id" : "shard1",  "host" : "shard1/192.168.1.107:11001,192.168.1.109:11001" }
    {  "_id" : "shard2",  "host" : "shard2/192.168.1.109:11002,192.168.1.110:11002" }
    {  "_id" : "shard3",  "host" : "shard3/192.168.1.107:11003,192.168.1.110:11003" }
2、连接至各个shard的端口查看rs
[mongodb@node1 bin]$ ./mongo --port 11001
shard1:PRIMARY> rs.status()
    "name" : "192.168.1.109:11001",
            "health" : 1,
            "state" : 1,
            "stateStr" : "PRIMARY",
    "name" : "192.168.1.107:11001",
            "health" : 1,
            "state" : 2,
            "stateStr" : "SECONDARY",
    "name" : "192.168.1.110:11001",
            "health" : 1,
            "state" : 7,
            "stateStr" : "ARBITER",

##其他节点查看方式相同
九、插入数据,测试数据能否进行自动分片
[mongodb@node1 bin]$ ./mongo --port 10000
mongos> use admin
mongos> db.runCommand( { enablesharding :"testdb"});  ##创建数据库,指定数据库"testdb"进行分片生效
{ "ok" : 1 }
mongos> db.runCommand({shardcollection:"testdb.table1",key:{apId:1,_id:1}})  ##MongoDB具有很多片键,此处创建ID片键,指定"testdb"数据库中的"table1"表中的数据通过ID片键进行分片
{ "collectionsharded" : "testdb.table1", "ok" : 1 }
mongos> use testdb;
switched to db testdb
mongos> for(var i=1;i<100000;i++)db.table1.save({id:i,"test1":"testval1"});   ##在"testdb"中的表"table1"中插入10w个id

[mongodb@node2 bin]$ ./mongo --port 11003   ##node2上连接至shard3
shard3:PRIMARY> use testdb
switched to db testdb
shard3:PRIMARY> db.table1.find()
{ "_id" : ObjectId("57ef6d2e4eec2b8ef67ad1ce"), "id" : 1, "test1" : "testval1" }
{ "_id" : ObjectId("57ef6d2e4eec2b8ef67ad1cf"), "id" : 2, "test1" : "testval1" }
{ "_id" : ObjectId("57ef6d2e4eec2b8ef67ad1d1"), "id" : 4, "test1" : "testval1" }
{ "_id" : ObjectId("57ef6d2e4eec2b8ef67ad1d2"), "id" : 5, "test1" : "testval1" }
{ "_id" : ObjectId("57ef6d2e4eec2b8ef67ad1d6"), "id" : 9, "test1" : "testval1" }
{ "_id" : ObjectId("57ef6d2e4eec2b8ef67ad1d9"), "id" : 12, "test1" : "testval1" }
{ "_id" : ObjectId("57ef6d2e4eec2b8ef67ad1db"), "id" : 14, "test1" : "testval1" }
{ "_id" : ObjectId("57ef6d2e4eec2b8ef67ad1dd"), "id" : 16, "test1" : "testval1" }
{ "_id" : ObjectId("57ef6d2e4eec2b8ef67ad1de"), "id" : 17, "test1" : "testval1" }
{ "_id" : ObjectId("57ef6d2e4eec2b8ef67ad1e0"), "id" : 19, "test1" : "testval1" }
{ "_id" : ObjectId("57ef6d2e4eec2b8ef67ad1e3"), "id" : 22, "test1" : "testval1" }
{ "_id" : ObjectId("57ef6d2e4eec2b8ef67ad1e4"), "id" : 23, "test1" : "testval1" }
{ "_id" : ObjectId("57ef6d2f4eec2b8ef67ad1e5"), "id" : 24, "test1" : "testval1" }
{ "_id" : ObjectId("57ef6d2f4eec2b8ef67ad1e8"), "id" : 27, "test1" : "testval1" }
{ "_id" : ObjectId("57ef6d2f4eec2b8ef67ad1ea"), "id" : 29, "test1" : "testval1" }
{ "_id" : ObjectId("57ef6d2f4eec2b8ef67ad1eb"), "id" : 30, "test1" : "testval1" }
{ "_id" : ObjectId("57ef6d2f4eec2b8ef67ad1ee"), "id" : 33, "test1" : "testval1" }
{ "_id" : ObjectId("57ef6d2f4eec2b8ef67ad1ef"), "id" : 34, "test1" : "testval1" }
{ "_id" : ObjectId("57ef6d2f4eec2b8ef67ad1f2"), "id" : 37, "test1" : "testval1" }
{ "_id" : ObjectId("57ef6d2f4eec2b8ef67ad1f4"), "id" : 39, "test1" : "testval1" }

[mongodb@node3 bin]$ ./mongo --port 11002    ##node3上连接至shard2
shard2:PRIMARY> use testdb
switched to db testdb
shard2:PRIMARY> db.table1.find()
{ "_id" : ObjectId("57ef6d2e4eec2b8ef67ad1d4"), "id" : 7, "test1" : "testval1" }
{ "_id" : ObjectId("57ef6d2e4eec2b8ef67ad1d8"), "id" : 11, "test1" : "testval1" }
{ "_id" : ObjectId("57ef6d2e4eec2b8ef67ad1da"), "id" : 13, "test1" : "testval1" }
{ "_id" : ObjectId("57ef6d2e4eec2b8ef67ad1df"), "id" : 18, "test1" : "testval1" }
{ "_id" : ObjectId("57ef6d2e4eec2b8ef67ad1e2"), "id" : 21, "test1" : "testval1" }
{ "_id" : ObjectId("57ef6d2f4eec2b8ef67ad1e9"), "id" : 28, "test1" : "testval1" }
{ "_id" : ObjectId("57ef6d2f4eec2b8ef67ad1f0"), "id" : 35, "test1" : "testval1" }
{ "_id" : ObjectId("57ef6d2f4eec2b8ef67ad1fa"), "id" : 45, "test1" : "testval1" }
{ "_id" : ObjectId("57ef6d2f4eec2b8ef67ad1fc"), "id" : 47, "test1" : "testval1" }
{ "_id" : ObjectId("57ef6d2f4eec2b8ef67ad1fe"), "id" : 49, "test1" : "testval1" }
{ "_id" : ObjectId("57ef6d2f4eec2b8ef67ad200"), "id" : 51, "test1" : "testval1" }
{ "_id" : ObjectId("57ef6d2f4eec2b8ef67ad202"), "id" : 53, "test1" : "testval1" }
{ "_id" : ObjectId("57ef6d2f4eec2b8ef67ad203"), "id" : 54, "test1" : "testval1" }
{ "_id" : ObjectId("57ef6d2f4eec2b8ef67ad206"), "id" : 57, "test1" : "testval1" }
{ "_id" : ObjectId("57ef6d2f4eec2b8ef67ad208"), "id" : 59, "test1" : "testval1" }
{ "_id" : ObjectId("57ef6d2f4eec2b8ef67ad204"), "id" : 55, "test1" : "testval1" }
{ "_id" : ObjectId("57ef6d2f4eec2b8ef67ad209"), "id" : 60, "test1" : "testval1" }
{ "_id" : ObjectId("57ef6d2f4eec2b8ef67ad20c"), "id" : 63, "test1" : "testval1" }
{ "_id" : ObjectId("57ef6d2f4eec2b8ef67ad20f"), "id" : 66, "test1" : "testval1" }
{ "_id" : ObjectId("57ef6d2f4eec2b8ef67ad210"), "id" : 67, "test1" : "testval1" }

###node1上查看方式亦是如此
###注意:查看数据,只能在主节点上进行
问题小结:
1、集群中的每台服务器时间必须要保持一致,否则启动mongos会出现"Error Number 5"
2、在配置Replica Set时,只能指明三个节点,官网明确指出。
3、在部署集群时,如果不想设置"arbitrate“,可以通过设定副本集中的优先级"priority"来定义主备备4、
本文出自 “wtc” 博客,请务必保留此出处http://wangtianci.blog.51cto.com/11265133/1858287
MongoDB集群解决方案-分片技术
