首页 > 代码库 > haproxy+varnish实现discuz论坛的动静分离以及静态缓存
haproxy+varnish实现discuz论坛的动静分离以及静态缓存
一、目的:
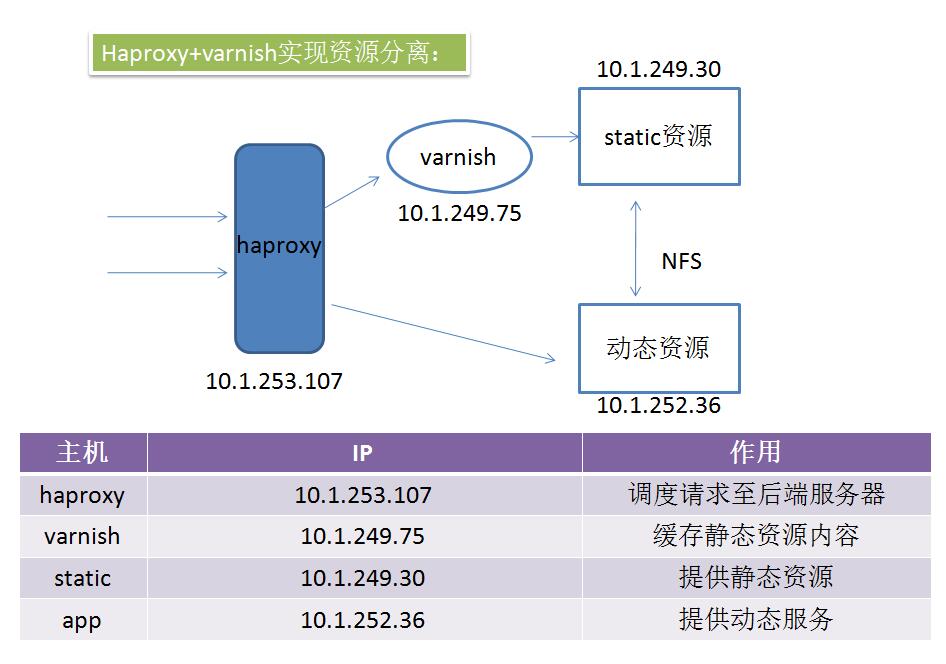
(1) 动静分离discuzx,静态资源通过NFS挂载至动态服务器中;
(2) varnish缓存静态资源;
二、拓扑规划

三、步骤:
1、先部署discuz的动静分离
(1)在app动态服务器快速搭建LAMP环境:
yum install -y httpd mysql-server php php-mysql
(2)创建discuz论坛的mysql用户:
MySQL [(none)]> GRANT ALL ON *.* TO ‘nihao‘@‘localhost‘ IDENTIFIED BY ‘123456‘;
MySQL [(none)]> FLUSH PRIVILEGES;
(3)部署discuz论坛程序:
[root@localhost html]# unzip Discuz_X3.2_SC_UTF8.zip
(4)要实现discuz的动静分离,首先要了解discuz的动静资源的存放目录位置,在discuz的根目录upload目录中,data和static存放的是静态资源:
[root@localhost upload]# tree -L 1
.
├── admin.php
├── api
├── api.php
├── archiver
├── config
├── connect.php
├── cp.php
├── crossdomain.xml
├── data  #静态资源
├── favicon.ico
├── forum.php
├── group.php
├── home.php
├── index.php
├── install
├── member.php
├── misc.php
├── plugin.php
├── portal.php
├── robots.txt
├── search.php
├── source
├── static  #静态资源
├── template
├── uc_client
├── uc_server
└── userapp.php
10 directories, 17 files
(5)知道了静态资源的位置,接下来就可以搭建static静态资源的静态服务器了,首先,快速搭建LAMP环境,这里就不演示了,搭建完成后启动NFS和配置NFS:
[root@php ~]# yum install -y rpcbind nfs-utils
[root@php ~]# vim /etc/exports  #编辑NFS共享目录
[root@php ~]# cat !$
cat /etc/exports
/var/www/html/upload/data 10.1.0.0/16(rw)
/var/www/html/upload/static 10.1.0.0/16(rw)
[root@php ~]# service rpcbind start
[root@php ~]# service ntf start
[root@php ~]# showmount -e 10.1.249.30
Export list for 10.1.249.30:
/var/www/html/upload/static 10.1.0.0/16
/var/www/html/upload/data   10.1.0.0/16
(6)回过头来,先把动态服务的初始化静态内容复制到静态服务器上,再动态服务器上将静态资源的两个目录挂上去:
[root@localhost ~]# scp /var/www/html/upload/static/* 10.1.249.30:/var/www/html/upload/static/*  #拷贝文件时路径要一致
[root@localhost ~]# scp /var/www/html/upload/data/* 10.1.249.30:/var/www/html/upload/data/*
[root@localhost ~]# mount.nfs 10.1.249.30:/var/www/html/upload/static/ /var/www/html/upload/static/ #挂载NFS
[root@localhost ~]# mount.nfs 10.1.249.30:/var/www/html/upload/data/ /var/www/html/upload/data/
(7)OK,接下来可以安装haproxy来进行设置acl调度了:
[root@localhost ~]# yum install -y haproxy
[root@localhost ~]# cat /etc/haproxy/haproxy.cfg
#---------------------------------------------------------------------
# Example configuration for a possible web application.  See the
# full configuration options online.
#
#   http://haproxy.1wt.eu/download/1.4/doc/configuration.txt
#
#---------------------------------------------------------------------
#---------------------------------------------------------------------
# Global settings
#---------------------------------------------------------------------
global
    # to have these messages end up in /var/log/haproxy.log you will
    # need to:
    #
    # 1) configure syslog to accept network log events.  This is done
    #    by adding the ‘-r‘ option to the SYSLOGD_OPTIONS in
    #    /etc/sysconfig/syslog
    #
    # 2) configure local2 events to go to the /var/log/haproxy.log
    #   file. A line like the following can be added to
    #   /etc/sysconfig/syslog
    #
    #    local2.*                       /var/log/haproxy.log
    #
    log         127.0.0.1 local2
    chroot      /var/lib/haproxy
    pidfile     /var/run/haproxy.pid
    maxconn     4000
    user        haproxy
    group       haproxy
    daemon
    # turn on stats unix socket
    stats socket /var/lib/haproxy/stats
#---------------------------------------------------------------------
# common defaults that all the ‘listen‘ and ‘backend‘ sections will
# use if not designated in their block
#---------------------------------------------------------------------
defaults
    mode                    http
    log                     global
    option                  httplog
    option                  dontlognull
    option http-server-close
    option forwardfor       except 127.0.0.0/8
    option                  redispatch
    retries                 3
    timeout http-request    10s
    timeout queue           1m
    timeout connect         10s
    timeout client          1m
    timeout server          1m
    timeout http-keep-alive 10s
    timeout check           10s
    maxconn                 3000
#---------------------------------------------------------------------
# main frontend which proxys to the backends
#---------------------------------------------------------------------
listen stats
    mode http
    bind *:1080
    stats enable
    stats hide-version
    stats uri     /admin
    stats realm   Haproxy\ Statistics
    stats auth    admin:admin
    stats admin if TRUE
frontend  main
    bind *:80
    acl url_static       path_beg       -i /static /images /javascript /stylesheets
    acl url_static       path_end       -i .jpg .gif .png .css .js .html .ico
    use_backend static          if url_static
    default_backend             app
#---------------------------------------------------------------------
# static backend for serving up images, stylesheets and such
#---------------------------------------------------------------------
backend static
    balance     roundrobin
    server      static 10.1.249.30:80 check
    rspadd X-Via:static #启用响应报文首部标志,以便观察是静态服务器反馈的
#---------------------------------------------------------------------
# round robin balancing between the various backends
#---------------------------------------------------------------------
backend app
    balance     roundrobin
    server app 10.1.252.36:80 check
    rspadd X-Via:app #启用响应报文首部标志,以便观察是动态服务器反馈的
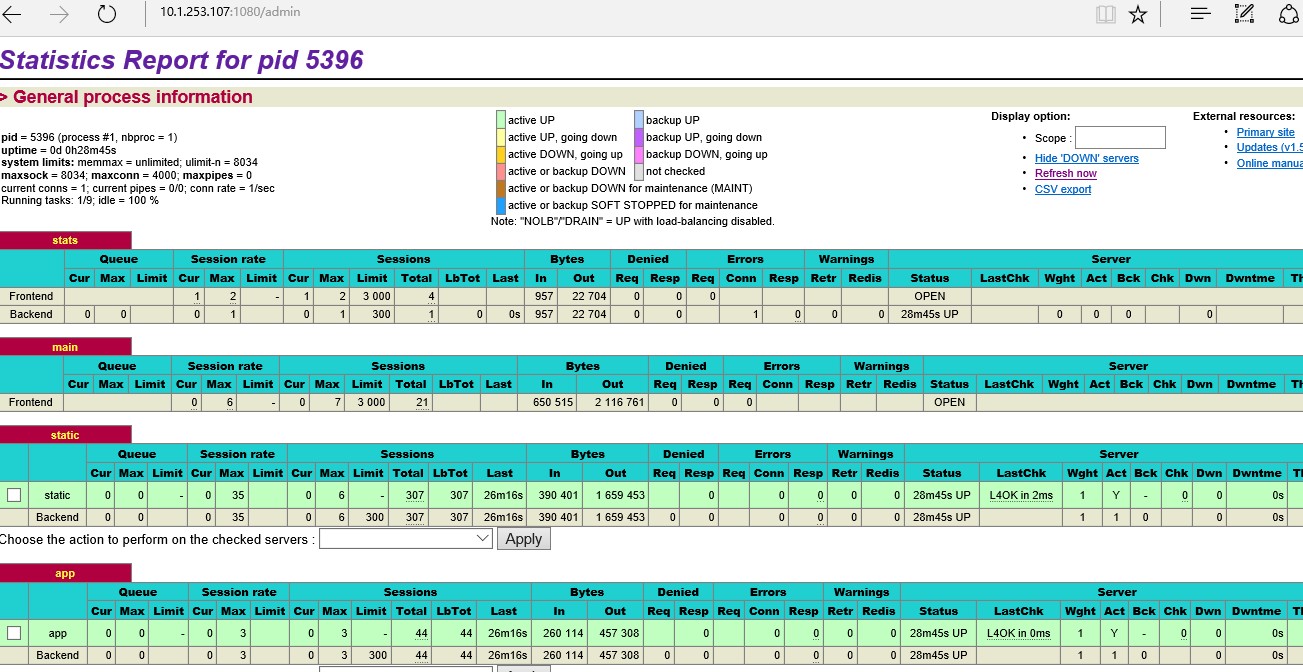
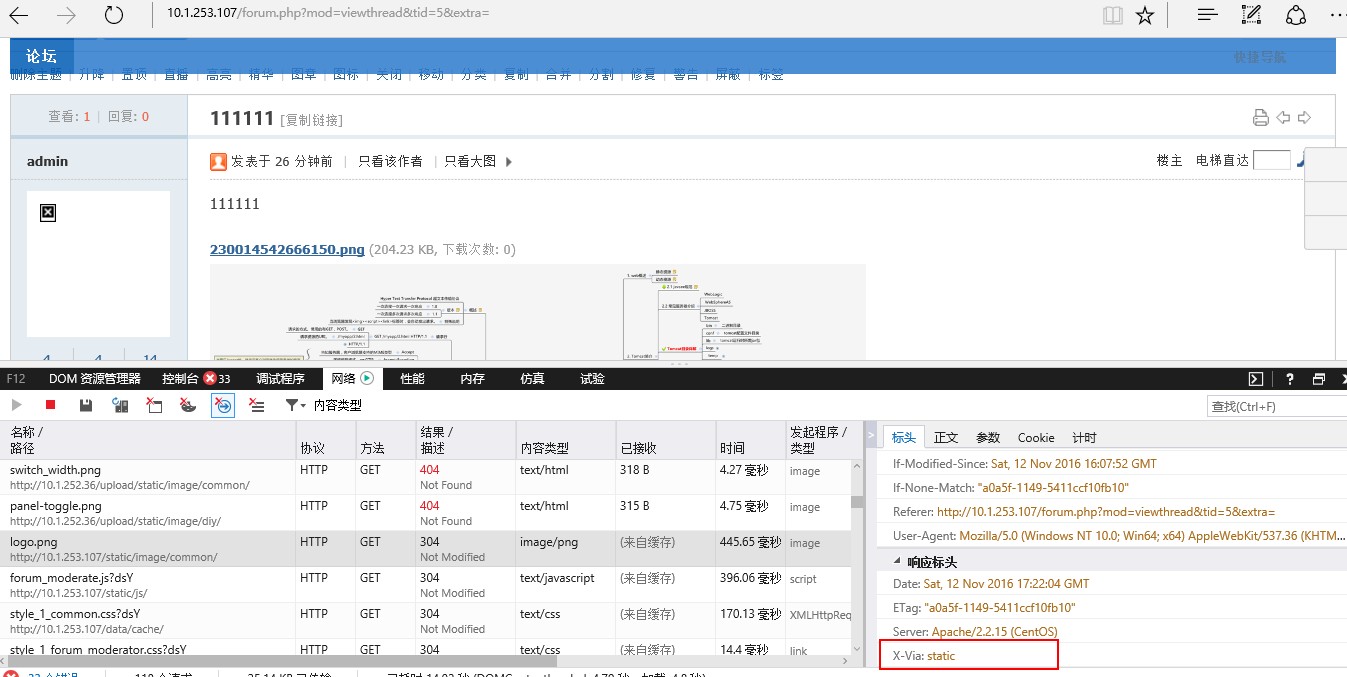
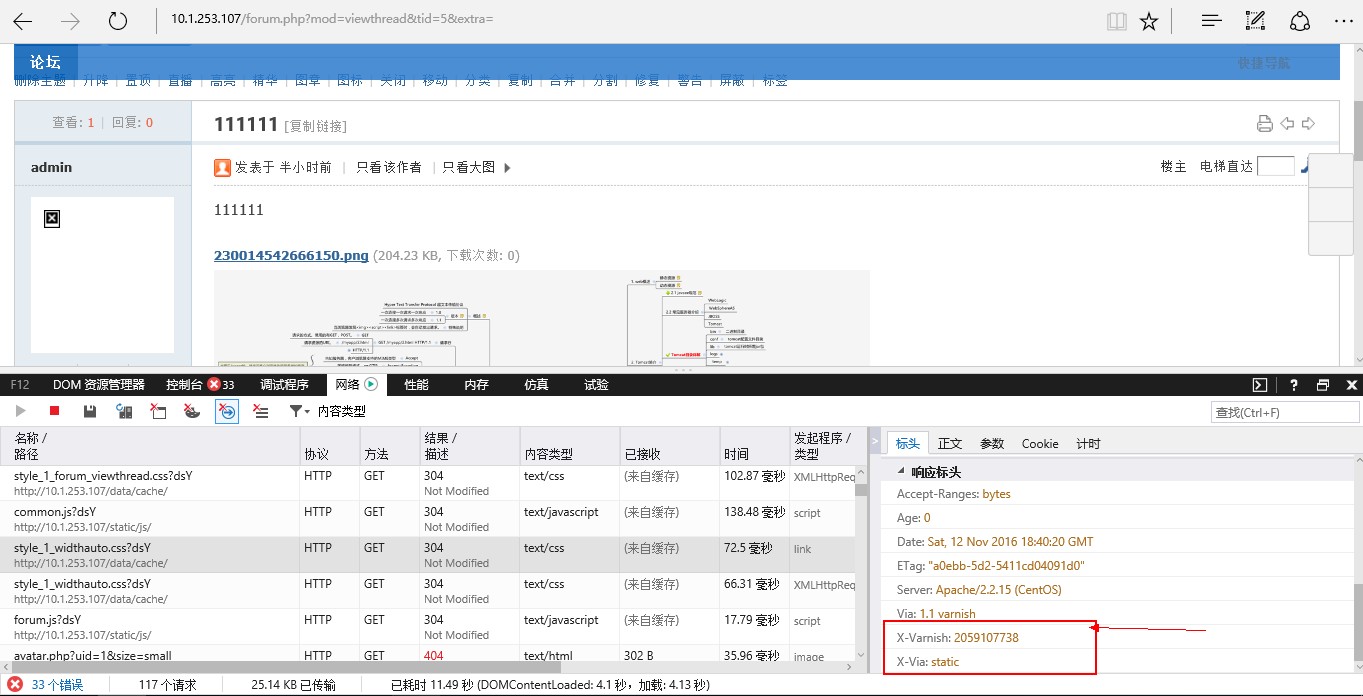
(8)OK,haproxy已经搭建完成,我们来测试一下:
haproxy状态页:

动态服务器响应:

静态服务器响应:

2、动静分离已经实现,接下来在静态资源添加varnish来缓存静态资源:
(9)安装配置varnish,由于前端haproxy已经进行了资源的分离,所以,varnish的配置基本用默认的配置就可以了
[root@localhost ~]# yum install -y varnish-3.0.7-1.el7.centos.x86_64.rpm
[root@localhost ~]# vim /etc/varnish/default.vcl
backend default {
  .host = "10.1.249.30";
  .port = "80";
}
(10)修改HAproxy的配置文件,把静态资源的调度IP改为varnish:
[root@localhost ~]# cat  /etc/haproxy/haproxy.cfg
#---------------------------------------------------------------------
# Example configuration for a possible web application.  See the
# full configuration options online.
#
#   http://haproxy.1wt.eu/download/1.4/doc/configuration.txt
#
#---------------------------------------------------------------------
#---------------------------------------------------------------------
# Global settings
#---------------------------------------------------------------------
global
    # to have these messages end up in /var/log/haproxy.log you will
    # need to:
    #
    # 1) configure syslog to accept network log events.  This is done
    #    by adding the ‘-r‘ option to the SYSLOGD_OPTIONS in
    #    /etc/sysconfig/syslog
    #
    # 2) configure local2 events to go to the /var/log/haproxy.log
    #   file. A line like the following can be added to
    #   /etc/sysconfig/syslog
    #
    #    local2.*                       /var/log/haproxy.log
    #
    log         127.0.0.1 local2
    chroot      /var/lib/haproxy
    pidfile     /var/run/haproxy.pid
    maxconn     4000
    user        haproxy
    group       haproxy
    daemon
    # turn on stats unix socket
    stats socket /var/lib/haproxy/stats
#---------------------------------------------------------------------
# common defaults that all the ‘listen‘ and ‘backend‘ sections will
# use if not designated in their block
#---------------------------------------------------------------------
defaults
    mode                    http
    log                     global
    option                  httplog
    option                  dontlognull
    option http-server-close
    option forwardfor       except 127.0.0.0/8
    option                  redispatch
    retries                 3
    timeout http-request    10s
    timeout queue           1m
    timeout connect         10s
    timeout client          1m
    timeout server          1m
    timeout http-keep-alive 10s
    timeout check           10s
    maxconn                 3000
#---------------------------------------------------------------------
# main frontend which proxys to the backends
#---------------------------------------------------------------------
listen stats
    mode http
    bind *:1080
    stats enable
    stats hide-version
    stats uri     /admin
    stats realm   Haproxy\ Statistics
    stats auth    admin:admin
    stats admin if TRUE
frontend  main
    bind *:80
    acl url_static       path_beg       -i /static /images /javascript /stylesheets
    acl url_static       path_end       -i .jpg .gif .png .css .js .html .ico
    use_backend static          if url_static
    default_backend             app
#---------------------------------------------------------------------
# static backend for serving up images, stylesheets and such
#---------------------------------------------------------------------
backend static
    balance     roundrobin
    server      static 10.1.249.75:6081 check
    rspadd X-Via:static
#---------------------------------------------------------------------
# round robin balancing between the various backends
#---------------------------------------------------------------------
backend app
    balance     roundrobin
    server app 10.1.252.36:80 check
    rspadd X-Via:app
 OK,haproxy+varnish实现动静资源分离和静态资源的缓存到此暂告一段落,更多内容请关注我的博客。
本文出自 “6638225” 博客,转载请与作者联系!
haproxy+varnish实现discuz论坛的动静分离以及静态缓存
