首页 > 代码库 > CentOS 7 corosync高可用集群的实现
CentOS 7 corosync高可用集群的实现
CentOS 7 corosync高可用集群的实现
===============================================================================
概述:
===============================================================================
在CentOS 7上实现高可用集群案例
1.corosync安装配置
★CentOS 7:
corosync v2 (quorum system) + pacemaker (standalone daemon) + crmsh/pcs
★安装配置:
☉前提:
时间同步、主机名解析、多播地址;
☉安装:
各节点安装相关的程序包,corosync/pacemaker
★corosync的程序环境:
配置文件:/etc/corosync/corosync.conf
密钥文件:/etc/corosync/authkey
Unit File:corosync.service
★corosync配置文件格式:
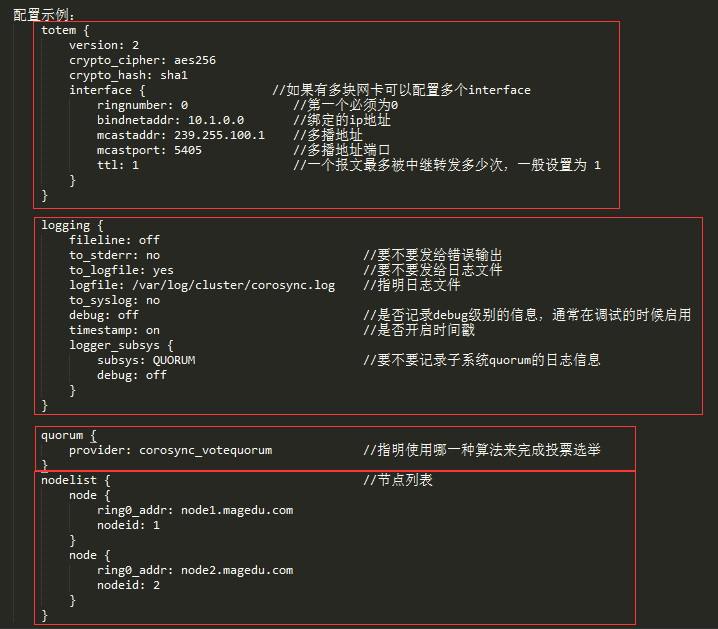
totem协议:节点间的通信协议,主要定义通信方式、通信协议版本、加密算法等
interface{}:定义集群心跳信息传递的接口,可以有多组;
ringnumber(环号):
bindnetaddr(绑定的网络地址)
mcastaddr(多播地址)
mcastport(实现多播地址的端口)
ttl(一个报文最多被中继转发多少次,一般设置为 1)
version(配置文件版本):目前取值仅有2一项可用
crypto_hash:哈希加密算法 md5, sha1, sha256, sha384 and sha512.
crypto_cipher:对称加密算法 aes256, aes192, aes128 and 3des
配置示例:
★生成authkey:
corosync-keygen
★启动服务:
systemctl start corosync.service
★验正服务启动:
(1)查看日志;
(2)corosync-cmapctl| grep members
(3)corosync-cfgtool:管理工具;
-s:显示当前节点各ring相关的信息;
-R:控制所有节点重载配置;
===============================================================================
实验:CentOS 7高可用Web集群服务
==============================================================================
实验环境描述:
两台CentOS 7.2 X86_64 的虚拟主机,模拟两节点集群;
ip部署:node1:10.1.252.153 ;node2:10.1.252.161
安装前配置
1)主机名解析(/etc/hosts),解析的结果必须要和本地使用的主机名保持一致


2)时间同步:

安装配置过程如下:
1.各节点安装相关的程序包,corosync/pacemaker
# 只需安装pacemaker即可,因为会把依赖的corosync程序包一并安装上
[root@node1 ~]# yum install pacemaker -y

Dependencies Resolved # 以来的程序包如下:

=======================================================================================================================================================================
 Package                                           Arch                              Version                                    Repository                        Size
=======================================================================================================================================================================
Installing:
 pacemaker                                         x86_64                            1.1.13-10.el7                              CDROM                            462 k
Installing for dependencies:
 corosync                                          x86_64                            2.3.4-7.el7                                CDROM                            210 k
 corosynclib                                       x86_64                            2.3.4-7.el7                                CDROM                            124 k
 libqb                                             x86_64                            0.17.1-2.el7                               CDROM                             91 k
 pacemaker-cli                                     x86_64                            1.1.13-10.el7                              CDROM                            253 k
 pacemaker-cluster-libs                            x86_64                            1.1.13-10.el7                              CDROM                             92 k
 pacemaker-libs                                    x86_64                            1.1.13-10.el7                              CDROM                            519 k
 resource-agents                                   x86_64                            3.9.5-54.el7                               CDROM                            339 k

Transaction Summary
=======================================================================================================================================================================
Install  1 Package (+7 Dependent packages)
2.编辑corosync配置文件/etc/corosync/corosync.conf
[root@node1 ~]# cd /etc/corosync
[root@node1 corosync]# ls
corosync.conf.example  corosync.conf.example.udpu  corosync.xml.example  uidgid.d
[root@node1 corosync]# cp corosync.conf.example corosync.conf  # 把配置文件示例复制一下

totem {
      version: 2
      crypto_cipher: aes256
      crypto_hash: sha1
      interface {              # 如果有多块网卡可以配置多个interface
	  ringnumber: 0              #第一个必须为0
	  bindnetaddr: 10.1.252.153      #绑定的ip地址
	  mcastaddr: 239.255.100.1   #多播地址,必要使用默认的249
	  mcastport: 5405            #默认值即可
	  ttl: 1                     #必须为1
      }
}

logging {
      fileline: off
      to_stderr: no                            #要不要发给错误输出
      to_logfile: yes                          #要不要发给日志文件
      logfile: /var/log/cluster/corosync.log   #指明日志文件
      to_syslog: no
      debug: off                               #是否记录debug级别的信息,通常在调试的时候启用
      timestamp: on                            #是否开启时间戳
      logger_subsys {
	   subsys: QUORUM                      #要不要记录子系统quorum的日志信息
	   debug: off
      }
}

quorum {
      provider: corosync_votequorum            #指明使用哪一种算法来完成投票选举
}

nodelist {                                     #节点列表
      node {
	 ring0_addr: node1.magedu.com
	 nodeid: 1
      }
      node {
	 ring0_addr: node2.magedu.com
	 nodeid: 2
      }
}
3.生成生成authkey:
[root@node1 corosync]# corosync-keygen
Corosync Cluster Engine Authentication key generator.
Gathering 1024 bits for key from /dev/random.
Press keys on your keyboard to generate entropy.
Press keys on your keyboard to generate entropy (bits = 888).
Press keys on your keyboard to generate entropy (bits = 936).
Press keys on your keyboard to generate entropy (bits = 984).
Writing corosync key to /etc/corosync/authkey.

[root@node1 corosync]# ll
total 20
-r-------- 1 root root  128 Dec  7 16:07 authkey
-rw-r--r-- 1 root root 2881 Dec  7 15:30 corosync.conf
-rw-r--r-- 1 root root 2881 Nov 21  2015 corosync.conf.example
-rw-r--r-- 1 root root  767 Nov 21  2015 corosync.conf.example.udpu
-rw-r--r-- 1 root root 3278 Nov 21  2015 corosync.xml.example
drwxr-xr-x 2 root root    6 Nov 21  2015 uidgid.d
4.将node1的配置文件和认证authkey文件远程复制给节点node2主机一份:
[root@node1 corosync]# scp -p corosync.conf authkey node2:/etc/corosync/
corosync.conf                               100% 3031     3.0KB/s   00:00
authkey                                     100%  128     0.1KB/s   00:00

# 在node2节点上验证文件
[root@node2 ~]# cd /etc/corosync/
[root@node2 corosync]# ll
total 20
-r-------- 1 root root  128 Dec  7 16:07 authkey
-rw-r--r-- 1 root root 3031 Dec  7 16:41 corosync.conf
-rw-r--r-- 1 root root 2881 Nov 21  2015 corosync.conf.example
-rw-r--r-- 1 root root  767 Nov 21  2015 corosync.conf.example.udpu
-rw-r--r-- 1 root root 3278 Nov 21  2015 corosync.xml.example
drwxr-xr-x 2 root root    6 Nov 21  2015 uidgid.d
5.启动node1和node2两节点的corosync服务,查看监听的端口
[root@node1 corosync]# systemctl start corosync.service
[root@node1 corosync]# ss -tunl
Netid State      Recv-Q Send-Q   Local Address:Port                  Peer Address:Port
udp   UNCONN     0      0                    *:68                               *:*
udp   UNCONN     0      0         10.1.252.153:5404                             *:*
udp   UNCONN     0      0         10.1.252.153:5405                             *:*
udp   UNCONN     0      0        239.255.100.1:5405                             *:*
udp   UNCONN     0      0            127.0.0.1:323                              *:*
udp   UNCONN     0      0                    *:43497                            *:*
udp   UNCONN     0      0                    *:514                              *:*
udp   UNCONN     0      0                   :::30879                           :::*
查看node1 corosync的日志文件,正常启动,如下:
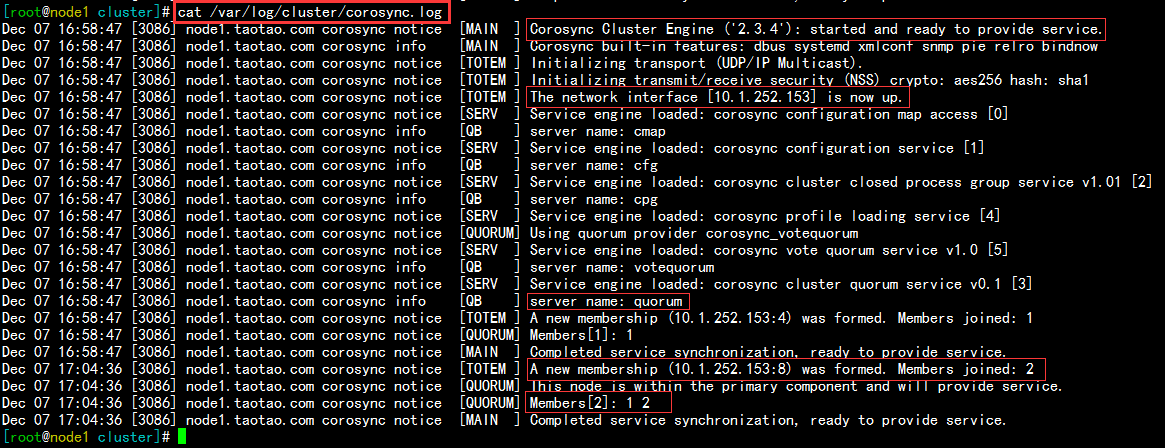
查看node2 corosync的日志文件,正常启动,如下:

6.检测集群工作是否正常
[root@node1 cluster]# corosync-cfgtool -s
Printing ring status.
Local node ID 1
RING ID 0
	id	= 10.1.252.153
	status	= ring 0 active with no faults   # 没有错误

[root@node2 corosync]# corosync-cfgtool -s
Printing ring status.
Local node ID 2
RING ID 0
	id	= 10.1.252.161
	status	= ring 0 active with no faults

[root@node1 cluster]# corosync-cmapctl |grep member
runtime.totem.pg.mrp.srp.members.1.config_version (u64) = 0
runtime.totem.pg.mrp.srp.members.1.ip (str) = r(0) ip(10.1.252.153)
runtime.totem.pg.mrp.srp.members.1.join_count (u32) = 1
runtime.totem.pg.mrp.srp.members.1.status (str) = joined
runtime.totem.pg.mrp.srp.members.2.config_version (u64) = 0
runtime.totem.pg.mrp.srp.members.2.ip (str) = r(0) ip(10.1.252.161)
runtime.totem.pg.mrp.srp.members.2.join_count (u32) = 1
runtime.totem.pg.mrp.srp.members.2.status (str) = joined
如上,就是corosync集群的配置过程,接下来我们启用pacemaker
1.在两个节点分别启动pacemaker,查看其状态
[root@node1 cluster]# systemctl start pacemaker.service  # 启动服务

[root@node1 cluster]# systemctl status pacemaker.service  # 查看其状态
● pacemaker.service - Pacemaker High Availability Cluster Manager
   Loaded: loaded (/usr/lib/systemd/system/pacemaker.service; disabled; vendor preset: disabled)
   Active: active (running) since Wed 2016-12-07 17:53:38 CST; 50s ago
 Main PID: 3311 (pacemakerd)
   CGroup: /system.slice/pacemaker.service   # 启动的相关服务
           ├─3311 /usr/sbin/pacemakerd -f
           ├─3312 /usr/libexec/pacemaker/cib
           ├─3313 /usr/libexec/pacemaker/stonithd
           ├─3314 /usr/libexec/pacemaker/lrmd
           ├─3315 /usr/libexec/pacemaker/attrd
           ├─3316 /usr/libexec/pacemaker/pengine
           └─3317 /usr/libexec/pacemaker/crmd
2.使用crm_mon命令监控查看服务是否正常,可以看到当前DC为node1,正常

3.配置crmsh接口
1)下载crmsh以及依赖的rpm包,然后安装
# 这是我下载的crmsh的rpm包,以及依赖到的程序文件
[root@node1 crmsh]# ll
total 668
-rw-r--r-- 1 root root 608836 Oct 16  2015 crmsh-2.1.4-1.1.x86_64.rpm
-rw-r--r-- 1 root root  27080 Oct 16  2015 pssh-2.3.1-4.2.x86_64.rpm
-rw-r--r-- 1 root root  42980 Oct 16  2015 python-pssh-2.3.1-4.2.x86_64.rpm

# 配置好yum仓库,直接在本地安装程序包即可
[root@node1 crmsh]# yum install -y ./*
2)运行crm命令,进入交互命令方式

3)在configure中关闭stonith
crm(live)# configure
crm(live)configure# help
crm(live)configure# property  # Tab键可补全
batch-limit=                   maintenance-mode=              placement-strategy=
cluster-delay=                 migration-limit=               remove-after-stop=
cluster-recheck-interval=      no-quorum-policy=              shutdown-escalation=
crmd-transition-delay=         node-action-limit=             start-failure-is-fatal=
dc-deadtime=                   node-health-green=             startup-fencing=
default-action-timeout=        node-health-red=               stonith-action=
default-resource-stickiness=   node-health-strategy=          stonith-enabled=
election-timeout=              node-health-yellow=            stonith-timeout=
enable-acl=                    notification-agent=            stonith-watchdog-timeout=
enable-startup-probes=         notification-recipient=        stop-all-resources=
have-watchdog=                 pe-error-series-max=           stop-orphan-actions=
is-managed-default=            pe-input-series-max=           stop-orphan-resources=
load-threshold=                pe-warn-series-max=            symmetric-cluster=
crm(live)configure# property stonith-enabled=
stonith-enabled (boolean, [true]):
    Failed nodes are STONITH‘d

crm(live)configure# property stonith-enabled=false  # 设置stonith为false
 crm(live)configure# show  # 再次查看发现多了一行 stonith-enabled=false
node 1: node1.taotao.com 	attributes standby=off
node 2: node2.taotao.com
property cib-bootstrap-options: 	have-watchdog=false 	dc-version=1.1.13-10.el7-44eb2dd 	cluster-infrastructure=corosync 	stonith-enabled=false
crm(live)configure# verify   # 校验没有报错
crm(live)configure# commit   # 确定没问题,提交
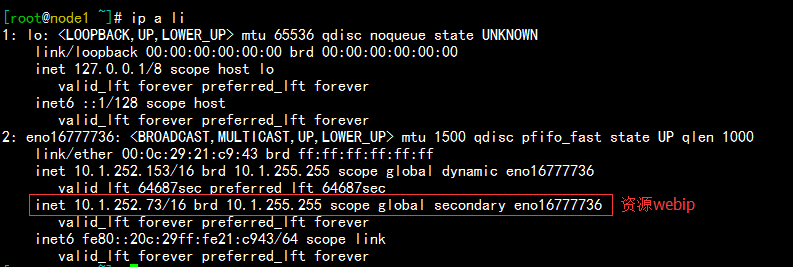
4.在configure中使用primitive定义一个webip的资源;

查看当前webip资源所在的节点,可以发现在节点node1上;

5.设置node1处于standby待机状态,发现资源webip转移到了节点node2上,如下:


6.现在在node1和node2两台主机上启动httpd服务,并提供测试页面,如下:
[root@node1 html]# echo "<h1>Node1</h1>" > index.html
[root@node1 html]# cat index.html
<h1>Node1</h1>

[root@node2 html]# echo "<h1>Node2</h1>" > index.html
[root@node2 html]# cat index.html
<h1>Node2</h1>

# 两节点启动服务,测试均可正常访问,如下:
[root@node2 html]# curl 10.1.252.153
<h1>Node1</h1>
[root@node2 html]# curl 10.1.252.161
<h1>Node2</h1>
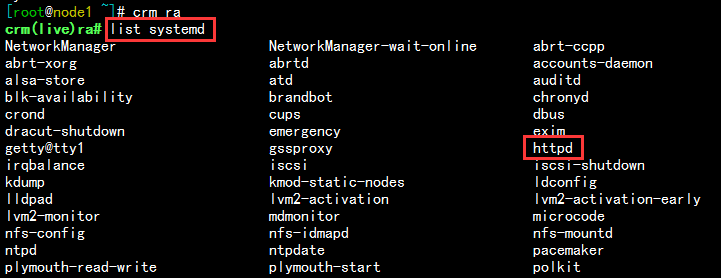
7.在集群中定义httpd的资源,在CentOS 7 中要想使httpd出现在systemd的资源列表中,就要设定开机自启enable
[root@node1 ~]# systemctl enable httpd.service
Created symlink from /etc/systemd/system/multi-user.target.wants/httpd.service to /usr/lib/systemd/system/httpd.service.

[root@node2 html]# systemctl enable httpd.service
Created symlink from /etc/systemd/system/multi-user.target.wants/httpd.service to /usr/lib/systemd/system/httpd.service.
1)在资源ra中查看systemd列表可以看到httpd资源,如下:
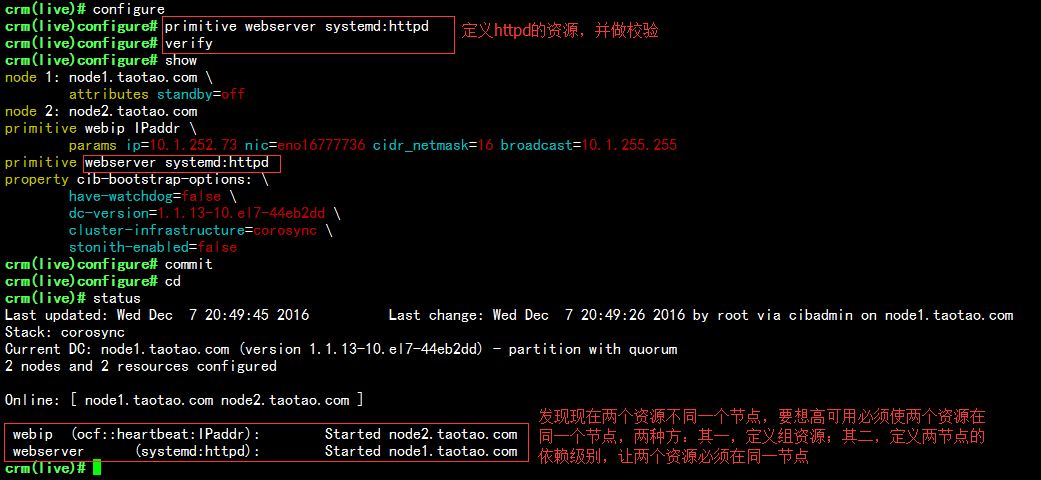
8.定义httpd的资源,并查看,发现两个资源并不在同一节点,但是高可用服务必须要求两个资源在同一个节点上,所以,我们要设定组资源或者资源约束;
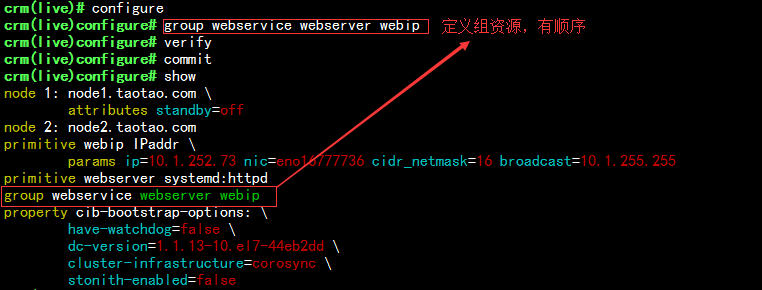
9.定义组资源webservice,使webserver和webip位于同一组中,如下:
10.查看其状态,可以发现现在资源组webservice位于节点node1上,在浏览器中访问资源ip,可以正常访问node1的web界面,如下:


11.设置node1处于standby待机状态,发现组资源webservice转移到了节点node2上,再次访问资源ip发现为node2节点的web页面


12.我们可以使用resource/migrate命令完成手动迁移资源到指定的节点上,现在我把node1上线,然后手动把资源迁移到node1,如下:


我们也可以使用resource下的stop,start,status命令控制服务的停止和启动,以及状态查看
crm(live)# resource
crm(live)resource# stop webservice
crm(live)resource# status
 Resource Group: webservice
     webserver	(systemd:httpd):	(target-role:Stopped) Stopped
     webip	(ocf::heartbeat:IPaddr):	(target-role:Stopped) Stopped
crm(live)resource# status webservice
resource webservice is NOT running
crm(live)resource# start webservice
crm(live)resource# status webservice
resource webservice is running on: node1.taotao.com
本文出自 “逐梦小涛” 博客,请务必保留此出处http://1992tao.blog.51cto.com/11606804/1880448
CentOS 7 corosync高可用集群的实现

